Microsoft Entra messaging
Microsoft Entra ID can send one-time passcodes (OTP) by SMS and voice call for multifactor authentication and self-service password reset.
Infobip Messaging for Microsoft Entra delivers this SMS and voice OTP traffic through the Infobip network. Microsoft calls this capability Choose Your Own Telephony Provider (CYOT). Microsoft Entra ID still generates and validates the passcode and runs the sign-in experience. Only the delivery of the SMS message or voice call moves to Infobip.
Microsoft is retiring Microsoft-provided SMS and voice delivery in Microsoft Entra ID. From February 1, 2027, it is retired for all users except Global Administrators and external users. For Global Administrators and external users, it is retired on July 1, 2027. To keep using SMS and voice authentication after these dates, you need a telephony provider. For details, see Passkeys by default and retirement of Microsoft-provided SMS and voice authentication(opens in new tab) in the Microsoft documentation.
This integration is available for Microsoft Entra ID workforce tenants in global Azure only. It does not support SMS sign-in as a primary authentication method, Microsoft Entra External ID, or Azure AD B2C.
Microsoft recommends passkeys instead of SMS or voice authentication. Use SMS and voice OTP for users who have a business, regulatory, or technical requirement for telephony-based authentication.
How it works [#how-it-works]
When a user needs an SMS or voice passcode, the request goes through the following steps:
Microsoft Entra ID starts the request
A user needs a passcode for multifactor authentication or self-service password reset.
The Azure Function receives the request
Microsoft Entra ID sends the request to the Azure Function that you deploy in your Azure subscription.
The Azure Function sends the request to Infobip
It authenticates with the app registration that you connect to your Infobip account.
Infobip delivers the passcode
Infobip sends the SMS message or makes the voice call to the user.
Microsoft Entra ID completes the sign-in
Microsoft Entra ID validates the passcode that the user enters.
Infobip uses the app registration to identify your Infobip account. When you connect the app registration, Infobip gives it permission to send messages only.
To set up the integration, complete these steps in order:
- Get the solution in Microsoft Security Store.
- Create your Infobip account.
- Deploy the integration in Azure.
- Connect the application to your Infobip account.
- Create an SMS or voice profile.
- Test the integration and roll it out.
Responsibilities [#responsibilities]
The following table shows who is responsible for each part of the integration.
| Owner | Responsibilities |
|---|---|
| Microsoft | Microsoft Entra authentication and the handoff to the Azure Function |
| Your organization | Deploying and running the Azure Function, managing your Infobip account, renewing the integration certificate, and configuring fraud controls |
| Infobip | SMS and voice delivery, and fraud controls |
Costs [#costs]
The integration has two separate costs:
- Infobip usage: The SMS and voice traffic you send. These charges appear on your Azure bill. To estimate messaging costs, use the Infobip pricing calculator(opens in new tab) and select SMS or Voice and the destination country.
- Azure hosting: The Azure Function and the supporting resources in your subscription, such as storage, Key Vault, and monitoring. Azure bills these resources based on your configuration and usage.

Prerequisites [#prerequisites]
Before you start, make sure that you have the following:
- A Microsoft Entra ID workforce tenant in global Azure
- An Azure subscription with a valid payment method, to buy the solution and to host the integration
- Azure Cloud Shell in PowerShell mode (recommended), or PowerShell 7.0 or later with Azure CLI 2.61 or later
- A test user with a phone number registered for SMS or voice authentication
- A new Infobip account, which you create during setup
- Accounts with the permissions in the following table
| Task | Required access |
|---|---|
| Create the app registration during deployment | Permission to register applications in your tenant. By default, all users can register applications. If your organization has turned off Users can register applications, you need at least the Application Developer role. |
| Deploy Azure resources | Owner, or Contributor and Role Based Access Control Administrator on the subscription |
| Grant directory access during deployment | Privileged Role Administrator |
| Configure SMS and voice profiles | Authentication Policy Administrator |
If you use Privileged Identity Management (PIM), activate the eligible roles before you run the setup script.
Check that your app management policies do not block the setup script from creating the app registration and its credentials. Policies that restrict credentials, multitenant apps, or custom Application ID URIs can make the script fail partway through.
Get the solution in Microsoft Security Store [#get-the-solution-in-microsoft-security-store]
To get the solution:
-
Log in to the Microsoft Entra admin center(opens in new tab) as an Authentication Policy Administrator.
-
Go to Entra ID > Authentication methods > Policies and select Add telecom profile. The Set up an SMS or voice provider page opens. It guides you through the subscription, the integration, and the profile.
-
Select Subscribe to an SMS or voice provider, and then select Infobip.
-
Select Get solution. The Infobip listing opens in Microsoft Security Store, on the Get solution page and the Purchase step.
You can also open the Infobip listing(opens in new tab) directly in Microsoft Security Store.
-
In Account details, set the following fields:
- Billing subscription: Select the Azure subscription to bill for the solution.
- Resource group: Select an existing resource group, or select Create new resource group.
- Resource name: Enter a name for the solution resource. Use 1 to 64 letters, numbers, hyphens, underscores, parentheses, or periods. The name cannot end with a period and must be unique within the selected subscription and resource group.
-
In Solution details, check the plan and billing:
- Plan: Infobip Communications Metered Bundle is selected. This is a metered plan for SMS and voice OTP traffic. It includes a US$100 credit line in your Infobip account. To increase your credit line, contact [email protected].
- Billing term: Select 1 year subscription.
- Auto-renewal: Leave on to renew the subscription automatically.
The price shows as a one-time payment of 0.00. You pay for the SMS and voice traffic you send.
-
(Optional) In Tags, select Add new tag to label the resource in Azure.
-
Select Next. The Deploy step shows Microsoft Entra as the required service and the subscription, resource group, and resource name you selected.
-
Select Next.
-
On the Review step, check the order details, and read the terms of use and privacy policy.
-
Select Place order. The Confirmation step shows Your order is in progress. This can take a few minutes.
-
When you see Your order is complete, select Configure account now. The Infobip sign-up page opens in a new tab.
Billing starts after you configure your account on the Infobip side. If you do not configure your account within 30 days of the order, Microsoft deletes the subscription automatically.
You can find the order later in Microsoft Security Store, in Management > My solutions.
Create your Infobip account [#create-your-infobip-account]
Configure account now opens the Infobip sign-up page for this solution. Create your Infobip account on this page. This is the only way to link your Infobip account to your Microsoft Security Store order, and you cannot use an existing Infobip account.
Complete the sign-up. When your account is ready, the Homepage of the Infobip web interface opens. Keep this tab open. You need it after you deploy the integration.
Deploy the integration in Azure [#deploy-the-integration-in-azure]
A setup script deploys the integration in your Azure subscription. You do not need to create the Azure resources or the app registration yourself. After you approve the deployment plan, the script does the following:
- Creates the app registration in your Microsoft Entra ID tenant, with the default name
EPP Application. You connect this app registration to your Infobip account in the next section. - Configures the app registration so that Infobip can use it. You do not need to add the Infobip tenant yourself.
- Deploys an Azure Function App with the
SendOtpfunction. It also deploys the supporting resources: a storage account, a Key Vault with the encryption certificate, a managed identity, Log Analytics, and Application Insights. - Secures the Function App so that only Microsoft Entra ID can call it.
To deploy the integration:
-
Go back to the Microsoft Entra admin center, to the Set up an SMS or voice provider page. Select Set up the provider integration.
-
Select the Azure subscription that will host the integration, and review the Infobip configuration in the pane.
-
Select View setup script on GitHub and review the setup instructions.
-
Log in to the Azure portal(opens in new tab) and select the Cloud Shell icon (
>_) in the toolbar. You can also go to shell.azure.com(opens in new tab). -
Select PowerShell. If Cloud Shell opens in Bash, select Switch to PowerShell.
-
The first time you use Cloud Shell, select No storage account required, select your subscription, and select Apply.
-
Download the setup script:
powershellInvoke-WebRequest -Uri 'https://raw.githubusercontent.com/Azure-Samples/ExternalPhoneProvider-AzureFunction-Sample/main/setup/Setup-Epp.ps1' -OutFile '.\Setup-Epp.ps1' -
Run the script:
powershell.\Setup-Epp.ps1 -
Follow the prompts. Use the configuration shown in the integration pane in the Microsoft Entra admin center.
- Azure tenant and Azure subscription: Select your tenant and the subscription that hosts the integration.
- Application: Keep the default, Create a new application. To use an app registration that you created earlier, search for it or enter its client ID.
- Azure region: Select the region closest to the Microsoft Entra region of your tenant.
- Provider: Enter
Infobip. This prompt has no default. - Service plan: Select a hosting plan. The default is Flex Consumption (FC1). For low latency, use Flex Consumption with one always-ready instance to avoid cold starts.
- Resource name prefix: Enter 2 to 8 lowercase characters, or keep the default,
epp.
The script uses JavaScript by default. To use C# or Python, run the script with the
-Languageparameter. -
Review the deployment plan. To deploy, enter
Yes. The default answer isNo, so if you press Enter without typing, the script cancels the setup. The script creates nothing until you approve the plan.The deployment usually takes a few minutes.
-
Save the deployment summary. It includes the tenant ID, the endpoint URL, and the Application (client) ID. You need these values to connect the application to your Infobip account and to create the profile. Save the resource name prefix too, in case you need to run the script again.
Copy the deployment summary before you leave Cloud Shell. Cloud Shell sessions are temporary and can end when you switch tabs, and Cloud Shell does not save the output.
Connect the application to your Infobip account [#connect-the-application-to-your-infobip-account]
To connect the application:
-
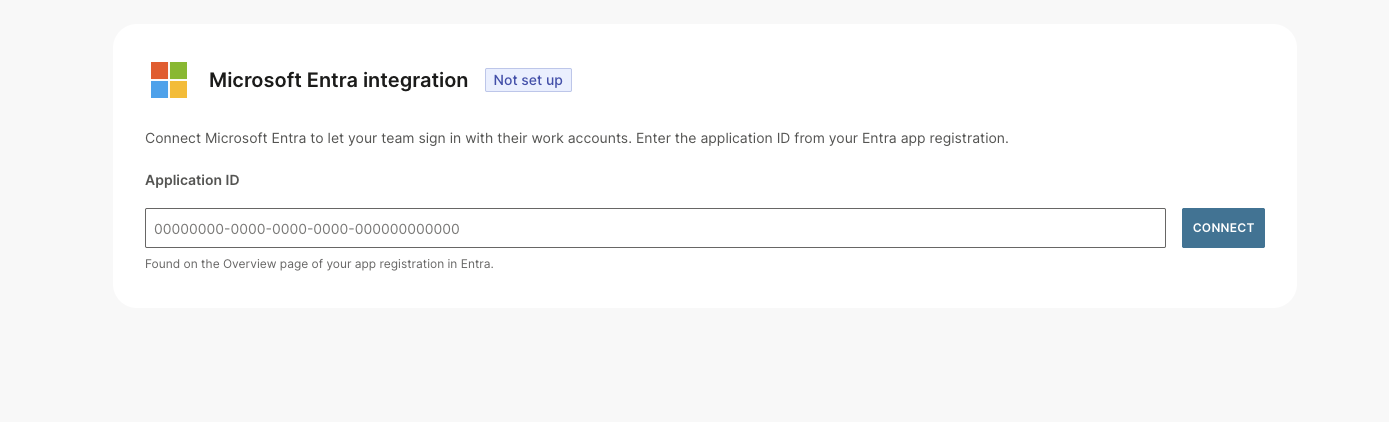
Find the Microsoft Entra integration card. The status shows Not set up.
-
In Application ID, paste the Application (client) ID from the deployment summary.
-
Select Connect.
When the connection succeeds, you see the message Microsoft Entra application connected and the status changes to Connected.
Use only the Application (client) ID from the deployment summary. Do not enter any other ID, such as the Object ID, your tenant ID, your subscription ID, or the ID of a different app registration.
To connect one more app registration, select Connect another application and repeat the steps. For example, you can connect separate deployments in different Azure regions, or separate deployments for testing and production.
After you connect the application:
- In Microsoft Security Store(opens in new tab), go to Management > My solutions and confirm that the Subscription status is Subscribed.
- In the Microsoft Entra admin center, return to Set up the provider integration. Select Verify to check the Infobip subscription.
Create an SMS or voice profile [#create-an-sms-or-voice-profile]
Create one profile for each channel that you want to deliver through Infobip. Start in Evaluation mode. In this mode, Microsoft keeps delivering the passcodes while the integration processes validation requests, so your users are not affected.
The profile shares its Target users with your existing SMS or voice policy. If you change them, you also change which users can use SMS or voice authentication. Keep the current selections during the rollout. To try different users or groups, use a test tenant.
To create the profile:
- On the Set up an SMS or voice provider page, select Create an SMS or voice profile.
- On Delivery channel, select SMS or Voice call, and then select Next.
- On Target users, review the targets carried over from your existing SMS or voice configuration. Keep the existing Include and Exclude selections, and then select Next.
- On Profile plan, select Evaluation. Review the Evaluation sampling percentage, and then select Next.
- On Function App, select the Function App that the setup script deployed. The wizard fills in the Function App URL and App ID. Compare them with the endpoint URL and the Application (client) ID in the deployment summary, and then select Next.
- On Review and finalize, check the delivery channel, the targets, the Evaluation plan, and the Function App. Select Create profile.
The profile appears on the Policies page, under External.
To deliver both SMS and voice through Infobip, repeat these steps for the other channel. You can also use Infobip for one channel and a different provider for the other.
Changes to the authentication method policy can take up to an hour to apply. Wait before you start testing.
Test the integration and roll it out [#test-the-integration-and-roll-it-out]
Use a test user with a phone number registered for SMS or voice authentication.
Test in evaluation mode [#test-in-evaluation-mode]
Evaluation mode tests only the connection between Microsoft Entra ID and the Azure Function. The Azure Function does not send the request to Infobip, so a successful evaluation does not confirm delivery. To test delivery through Infobip, move to production mode with a low traffic percentage.
To test in evaluation mode:
- In a private browser window, log in as the test user and complete an SMS or voice authentication.
- In the Azure portal, go to your Function App > Functions > SendOtp > Invocations. Open the most recent transaction. In Invocation details, confirm Evaluation request completed with HTTP
200. - In the Microsoft Entra admin center, go to Monitoring & health > Audit logs and filter by Service: Azure MFA. Open the most recent entry and confirm that DeliveryMethod is
CyotEvaluation.
Move to production mode [#move-to-production-mode]
To move the profile to production mode:
- In the Microsoft Entra admin center, go to Entra ID > Authentication methods > Policies.
- Open the SMS or voice profile and go to Profile plan.
- Select Production and set Traffic routed through provider percentage to a low starting value.
- Save the profile. Check the saved plan, percentage, endpoint, application ID, and targets.
Then test delivery through Infobip:
- In a new private browser window, log in as the test user. Confirm that the passcode arrives by SMS or voice call and that the authentication completes.
- In the Azure portal, go to your Function App > Functions > SendOtp > Invocations. Open the most recent transaction. In Invocation details, confirm that the request completed with HTTP
200. - In the Microsoft Entra admin center, go to Audit logs and filter by Service: Azure MFA. Open the most recent entry and confirm that DeliveryMethod is
Cyot. - In the Infobip web interface, go to Analyze > Logs and confirm that the message was delivered. For more information, see Message logs.
At a partial percentage, only some requests go through Infobip. Make a few attempts.
Increase traffic gradually [#increase-traffic-gradually]
To increase the traffic gradually:
- Increase Traffic routed through provider percentage in stages until you reach
100. - Keep the endpoint URL and the application ID unchanged.
- After each change, check that authentication works and that Infobip delivers the passcodes.
When each stage succeeds, continue to 100% without delay. If you see a problem, keep the current percentage while you investigate.
Maintain the integration [#maintain-the-integration]
After you roll out the integration, take care of the following:
- Certificate renewal: The certificate that the setup script creates is valid for 12 months and you must renew it manually. Key Vault sends an email notification 30 days before the certificate expires. Set up Key Vault certificate contacts and assign an owner for the renewal.
- Fraud controls: Work with Infobip to set up fraud protection, destination, usage, and spending controls for your traffic.
- Resiliency: If you need higher availability, you can deploy the integration in more than one Azure region.
Troubleshooting [#troubleshooting]
Use the following table to find who to contact.
| Issue | Contact |
|---|---|
| Microsoft Entra authentication, passcode validation, or the handoff to the Azure Function | Microsoft Support(opens in new tab) |
| The Azure Function or other Azure resources | Your Azure team |
| SMS or voice delivery, sender registration, destinations, fraud controls, or charges | Infobip Support |
For diagnostic steps and logs, see Troubleshoot SMS and voice with your own telephony provider(opens in new tab) in the Microsoft documentation.
Expand an issue to see how to fix it.
Was this page helpful?