Code in Code element
This section provides examples of how to use the Code element to perform various tasks.
Transfer end-user's location into latitude and longitude
When the end user sends the location and you want to determine exact latitude and longitude.

Define working hours
If the end user wants to talk to an agent, they can reach them during working hours. But outside of working hours, the end user won't be redirected to an agent.
With the coding element, you can define those working hours and configure the dialog accordingly.
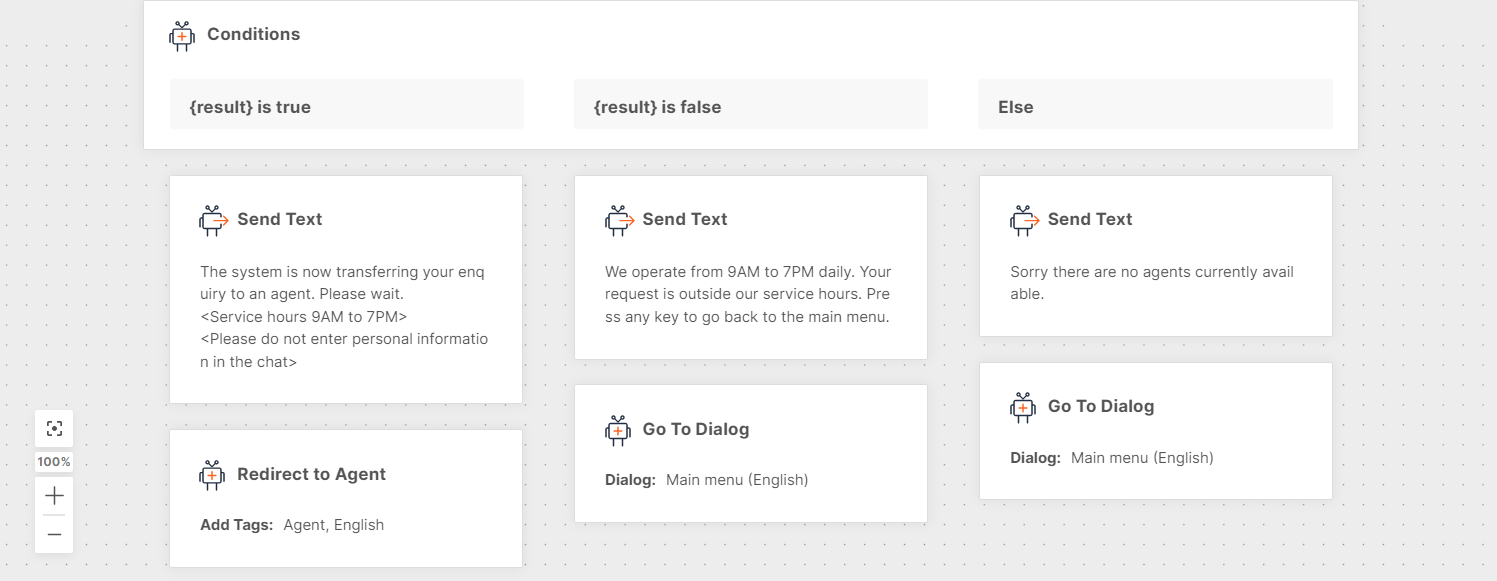
Take into account the different time zones.
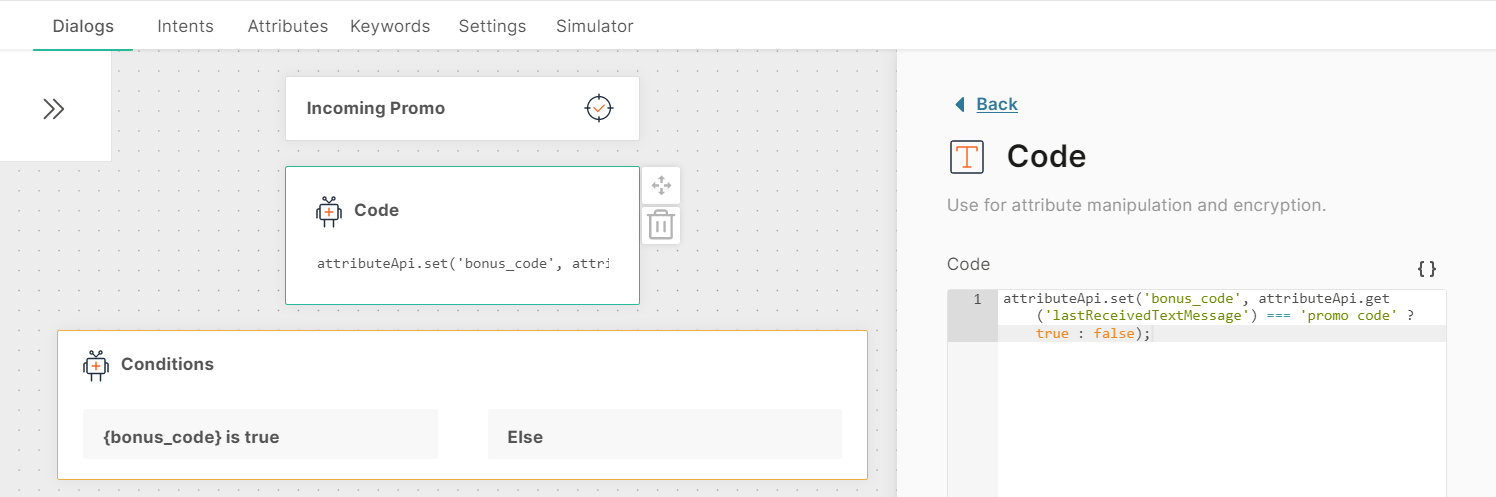
Branch dialogs according to incoming promo messages
Use lastreceivedtextmessage predefined attribute to check whether incoming messages contain a promo code.
Initialize parameters only once using Chatbot Attributes
In many instances when creating a chatbot, you need to make multiple API calls for various use cases that the bot supports. Instead of hardcoding the API details such as the base URL, username, password, encryption key (if applicable), etc., you can create chatbot attributes for each of these parameters and then initialize them using the coding element once the user enters the default dialog.
This is the code you can use for initializing values:
The initialized values are then accessible in all dialogs in the chatbot as attributes (without hard coding them everywhere you need to use them).
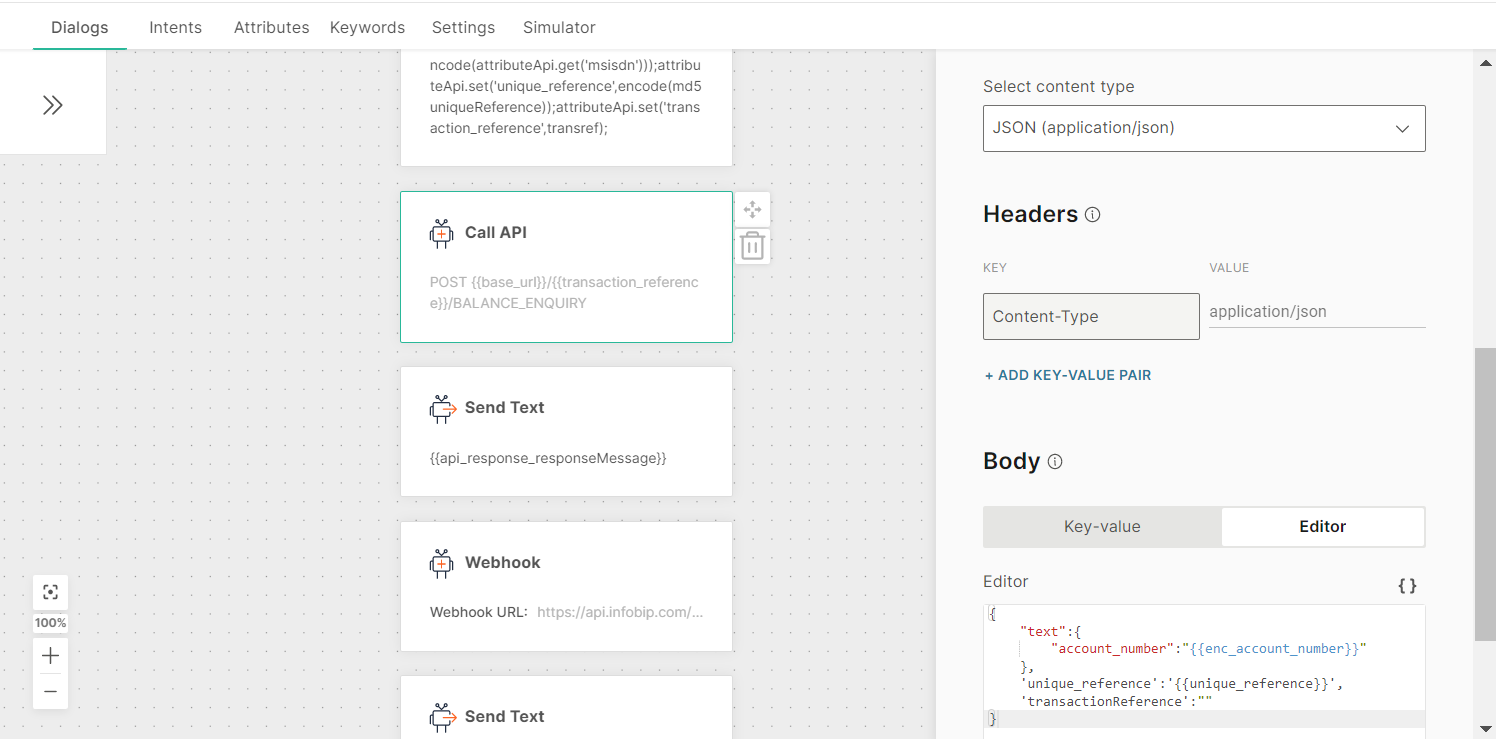
Should you need to change the bot environment from development to production, and the API URL and credentials change, you just need to change those details only once in the coding element.
Encrypt and decrypt sensitive data
Use encryptionUtils to protect sensitive customer information such as ID, personal data, or credentials. This process uses AES-128-ECB encryption with PKCS5 padding.
Use one of the following encryption options:
- Default key: Uses the library's built-in default key. Use this option for non-critical data.
- Custom secret: Uses a custom key that you provide. Use this option for sensitive data that need enhanced security.
Store the encryption key in session attributes so it can be reused across dialog elements.
Use the same key for both encryption and decryption. Data that is encrypted with one key cannot be decrypted with a different key.
Use default encryption key
The following example shows how to encrypt and decrypt the ID CustomerID12345 by using the default key.
Use custom secret
The following example shows how to encrypt and decrypt the ID QatariID12345 by using the custom key my-secure-password-2024.
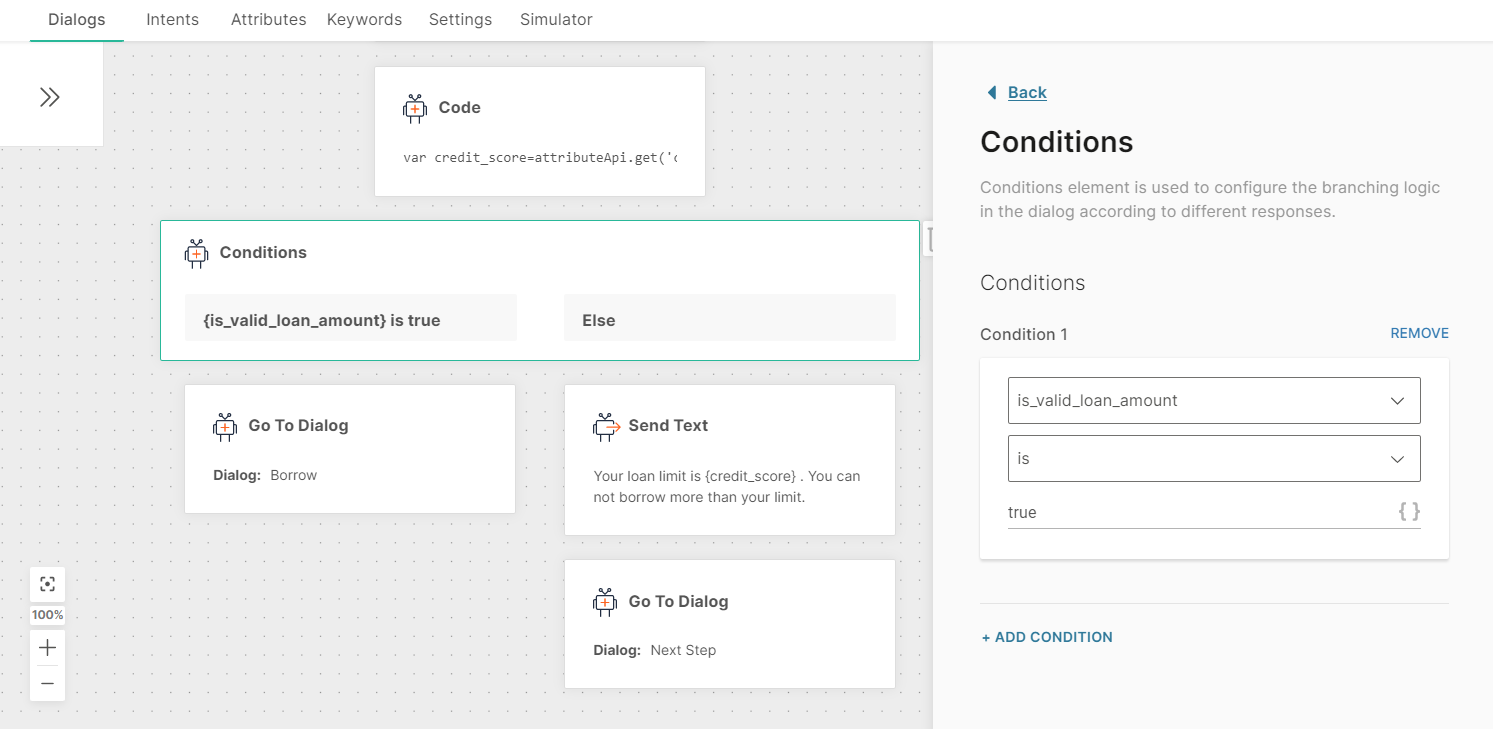
Compare numerical attribute values
For example, if you have customers applying for loans, and the customer should not be allowed to apply for a loan amount greater than their credit score (loan limit). This loan limit varies from customer to customer and cannot be hardcoded.
-
Create a Boolean attribute, is_valid_loan_amount, of scope Chatbot.
-
After the user enters loan amount to borrow (loan_amount), use the coding element to compare the loan amount Vs the loan limit (credit_score), setting the is_valid_loan_amount to true or false depending on the comparison results
javascript12 const creditScore = attributeApi.get('credit_score');3 const loanAmount = attributeApi.get('loan_amount');45 if (loanAmount <= creditScore) {6 attributeApi.set('is_valid_loan_amount', true);7 } else {8 attributeApi.set('is_valid_loan_amount', false);9 } -
Add a Conditions element, such that if is_valid_loan_amount is true, proceed with loan application, else notify the user to apply for a lesser amount.
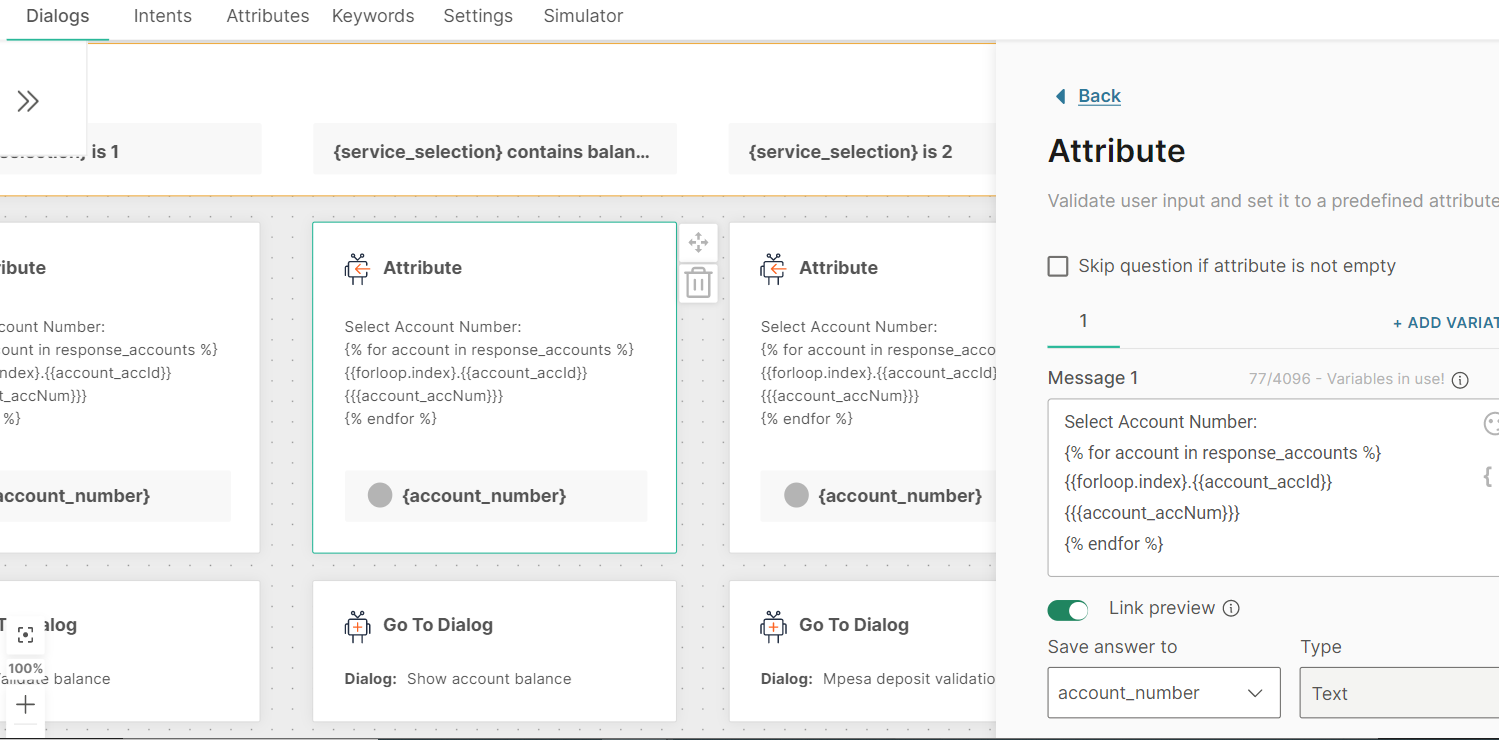
Select a valid option from dynamically generated API response
For example, if you have a banking chatbot, and the end user is presented with a list of account numbers to transact from, they should select one account number from the list. If the selected account number is not in the provided list then the bot should respond with an error message.
-
Create a list attribute response_accounts to store the list of user bank accounts from the API response. Define the account_number attribute which will hold the account number the user has typed in.
-
Display the dynamic list of accounts for the user to select from. The user input will be stored in the account_number attribute.
-
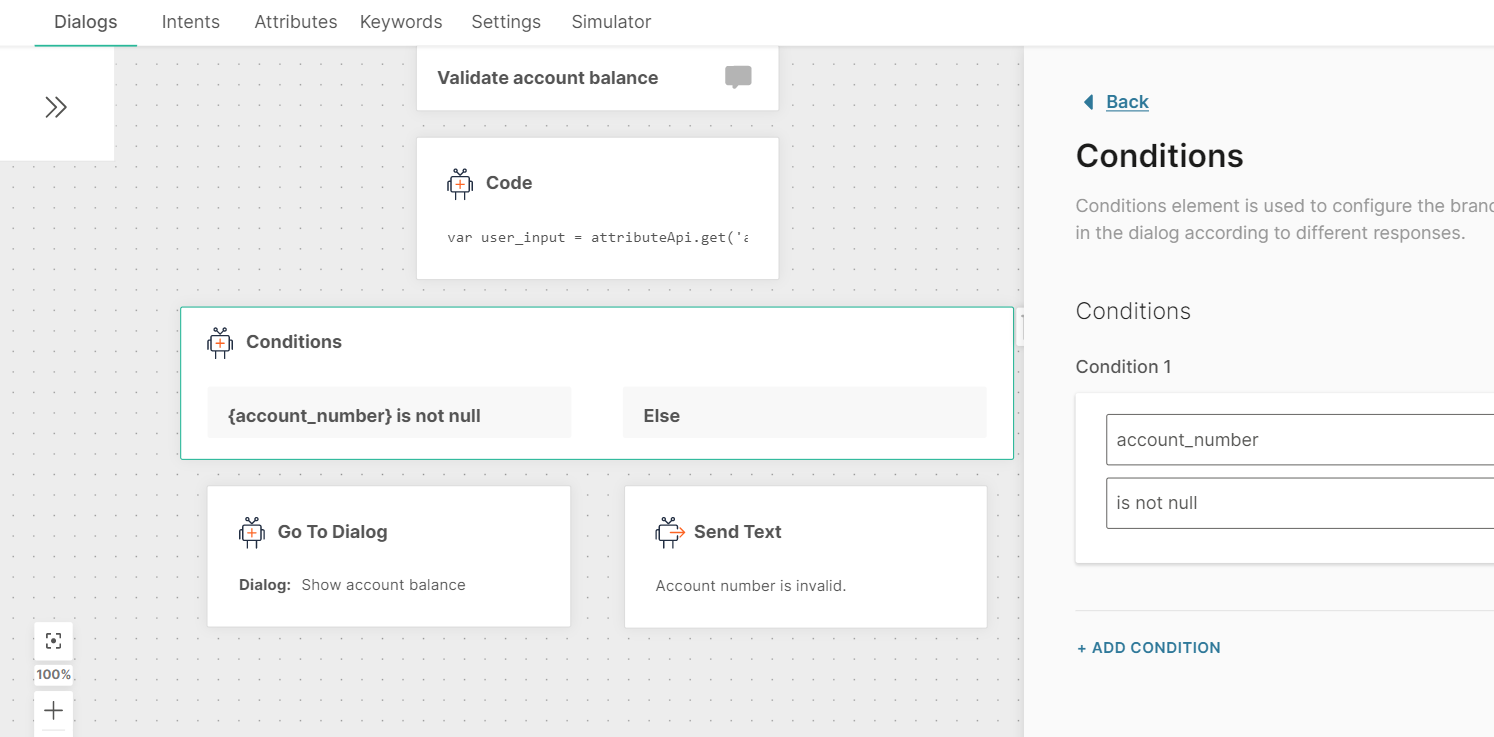
Using the coding element, validate whether the user input (account_number) is in the list of the valid account numbers:
javascript12 const validAccounts = attributeApi.get('valid_accounts');3 const userInput = attributeApi.get('account_number');45 let accountNumber = null;67 const isUserInputValidAccount = validAccounts.indexOf(userInput) > -1;8 if (isUserInputValidAccount) {9 accountNumber = userInput;10 } else {11 const indexInArray = userInput - 1;12 const isUserInputValidArrayIndex = validAccounts.length > indexInArray && validAccounts[indexInArray] !== 'undefined';13 if (isUserInputValidArrayIndex) {14 accountNumber = validAccounts[indexInArray];15 }16 }1718 attributeApi.set('account_number', accountNumber); -
In the above coding element, if the account_number is not valid (i.e. it’s not in the valid list), its set to null.
-
Using the conditions element, if the account_number attribute is null, display the invalid account number message, else continue conversing with the bot:
Allow multiple selection from a dynamically generated API response
When you have an onboarding chatbot, and want the end users to select their disability, it can be selected from a dynamically generated list (using API call). Each disability has an ID and a Name. To enable users to select multiple values, they can type in several numbers separated by space. Using a second API, the selected disability IDs (not the number options the user typed in) are passed as a single white-space delimited parameter.
-
Create the following attributes:
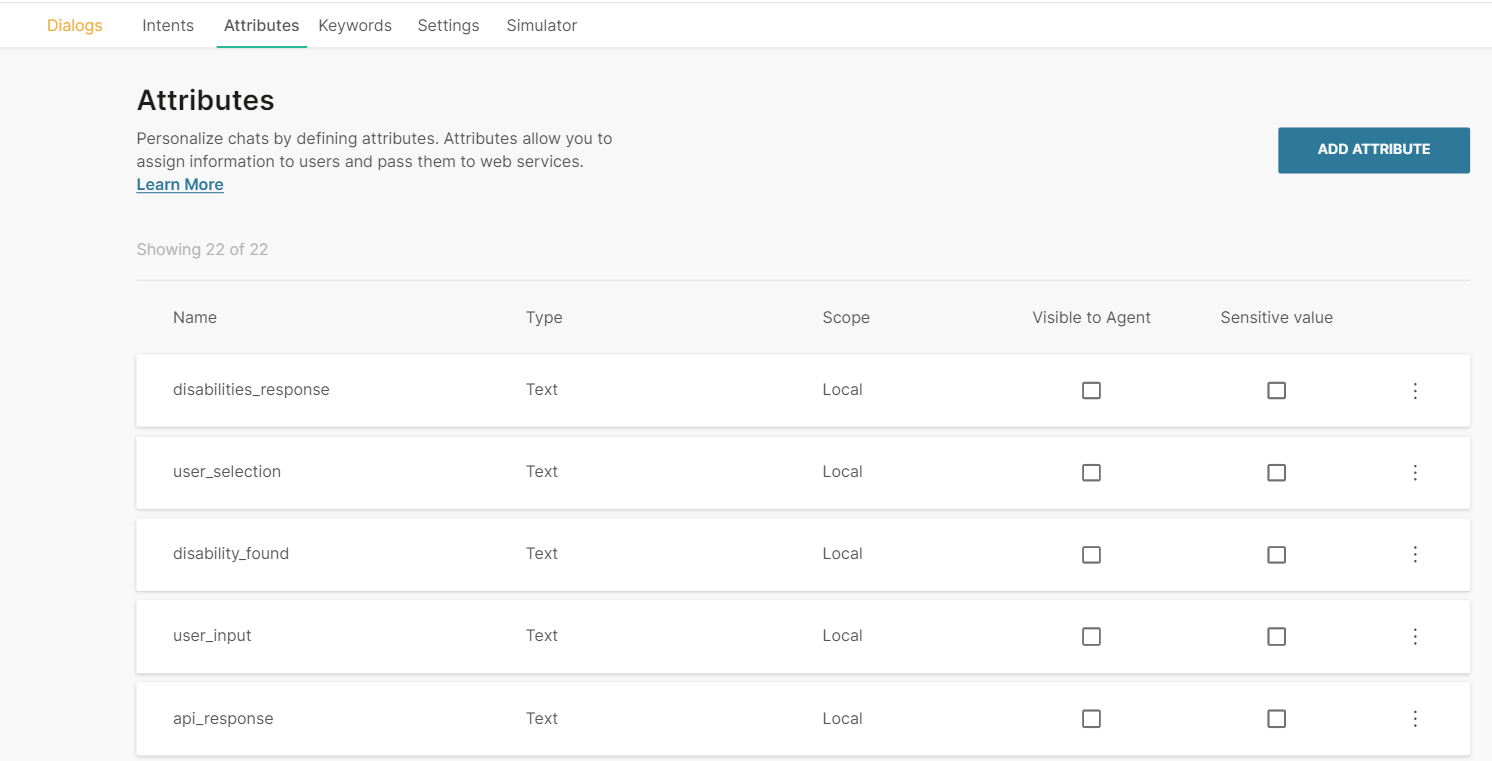
disabilities_response – will hold the list of disabilities to select from (returned by the first API)
user_selection – Will hold the list of disabilities the user has selected
disability_found –a Boolean attribute keeping track whether the user input is valid
user_input – will store the disabilities that the user types in
api_response – complete api response in the root json path($.)
invalid_input –the user input that doesn’t match expected responses
selected_ids – the disability IDs that the user selected
-
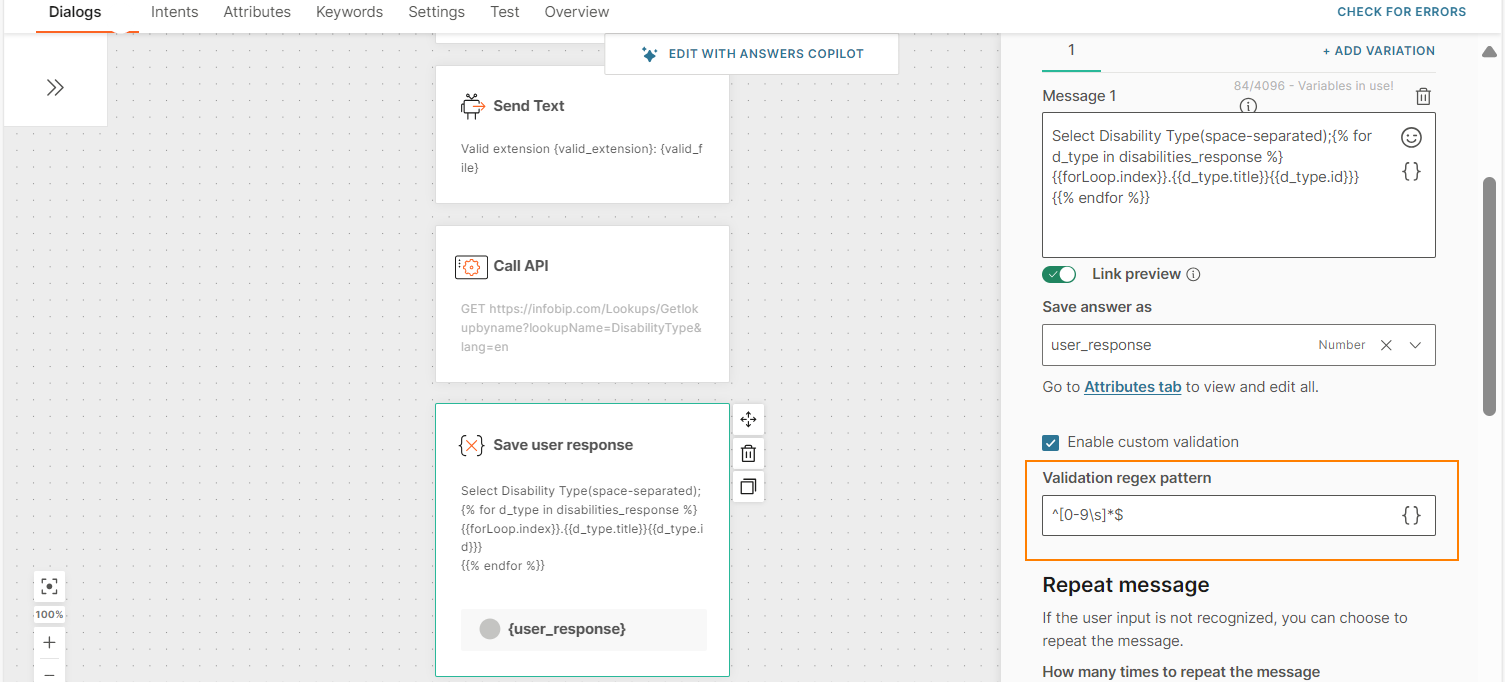
Display the dynamic list of disabilities for the user to select. The user input will be stored in the user_input attribute. This user input is validated using a regex expression that only allows numbers and spaces (^[0-9\s]*$)
-
Using the coding element:
a) Convert the space delimited user input into an array for easier processing
b) Loop through the elements in the array generated in the previous step. For each iteration, check if the current element (user input) is an index in the list of disabilities. If it is, store the corresponding disability in the user_selection list attribute defined in step 1. For good measure, you can separately push the matched disability ID to a separate list selected_ids (also defined in step 1).
c) Convert the selected_ids list into a space delimited string as expected by the second API call.
The final coding element should be like this:javascript12 /**3 * This validates disability type based on user input4 **/5 var user_input = attributeApi.get('user_input');6 var disabilities = attributeApi.get('disabilities_response');7 var inputs_array = user_input.split(" ");8 var selected_ids = [];910 attributeApi.set('inputs_array', inputs_array);1112 var user_selection = [];13 var disability_found = true;14 var i = 0;15 for(i=0; i<inputs_array.length; i++){16 var val = inputs_array[i];17 var index = parseInt(val)-1;18 attributeApi.set('invalid_input', val);1920 if(val == "") {//Means multiple white spaces between numbers21 //Pass22 }else if(typeof disabilities[index] == 'undefined') {23 disability_found = false;24 attributeApi.set('invalid_input', val);2526 } else { //Found27 user_selection.push(disabilities[index]);28 selected_ids.push(disabilities[index].Id);29 }30 }3132 attributeApi.set('disability_found', disability_found);33 attributeApi.set('user_selection', user_selection);34 attributeApi.set('selected_ids', selected_ids.join(" ")); -
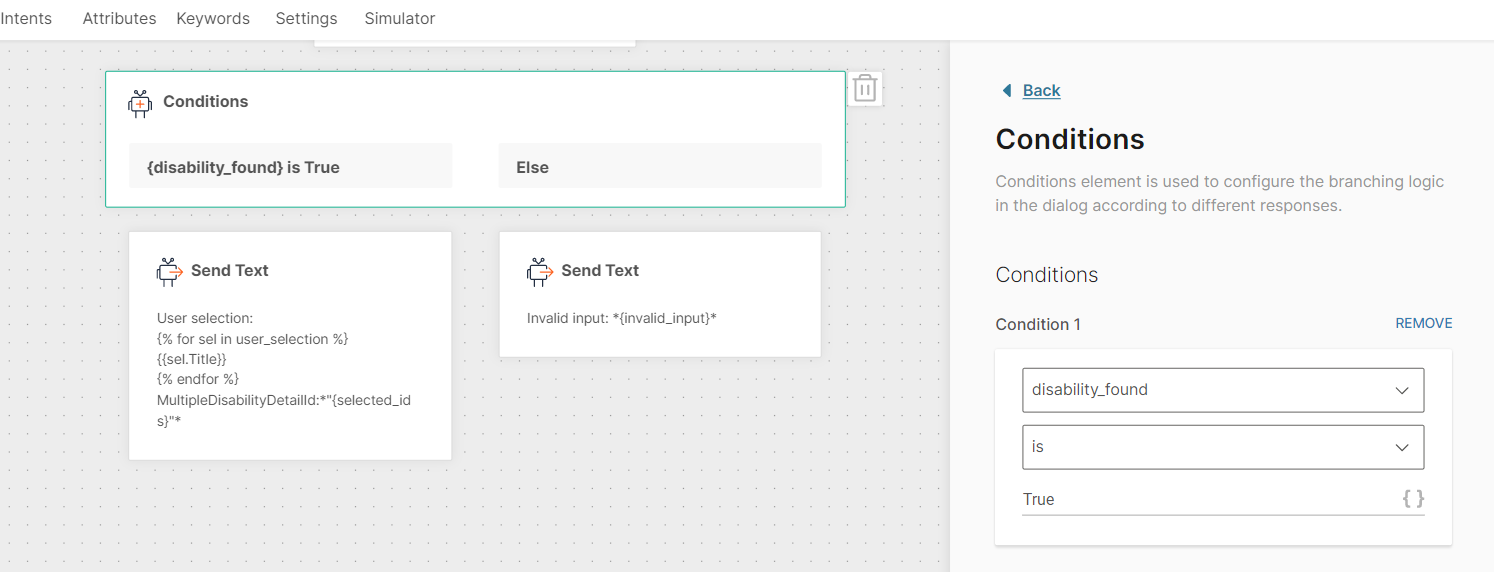
Using the conditions element, if disability_found attribute is True, proceed with chatbot conversation, otherwise display a validation error message.
Transfer time and date sent by the user into required time zone and date format
In the example below, the time zone to which the time and date received are reformatted in the Coding element is Asia/Kolkata:
Use Message Attribute Type to Receive Multiple File Types
This example shows how to use an attribute, which has the attribute type 'Message', to receive a file from the end user. The example uses the Code element to identify whether the file type is an image or a document.
Dialog [#dialog-use-message-attribute-type-to-receive-multiple-file-types]
Code [#code-use-message-attribute-type-to-receive-multiple-file-types]
where
- MOMessage is of attribute type Message
- message_type is of attribute type Text
Explanation of the Dialog and Code [#explanation-of-the-dialog-and-code-use-message-attribute-type-to-receive-multiple-file-types]
-
The MOMessage attribute stores the file sent by the end user.
-
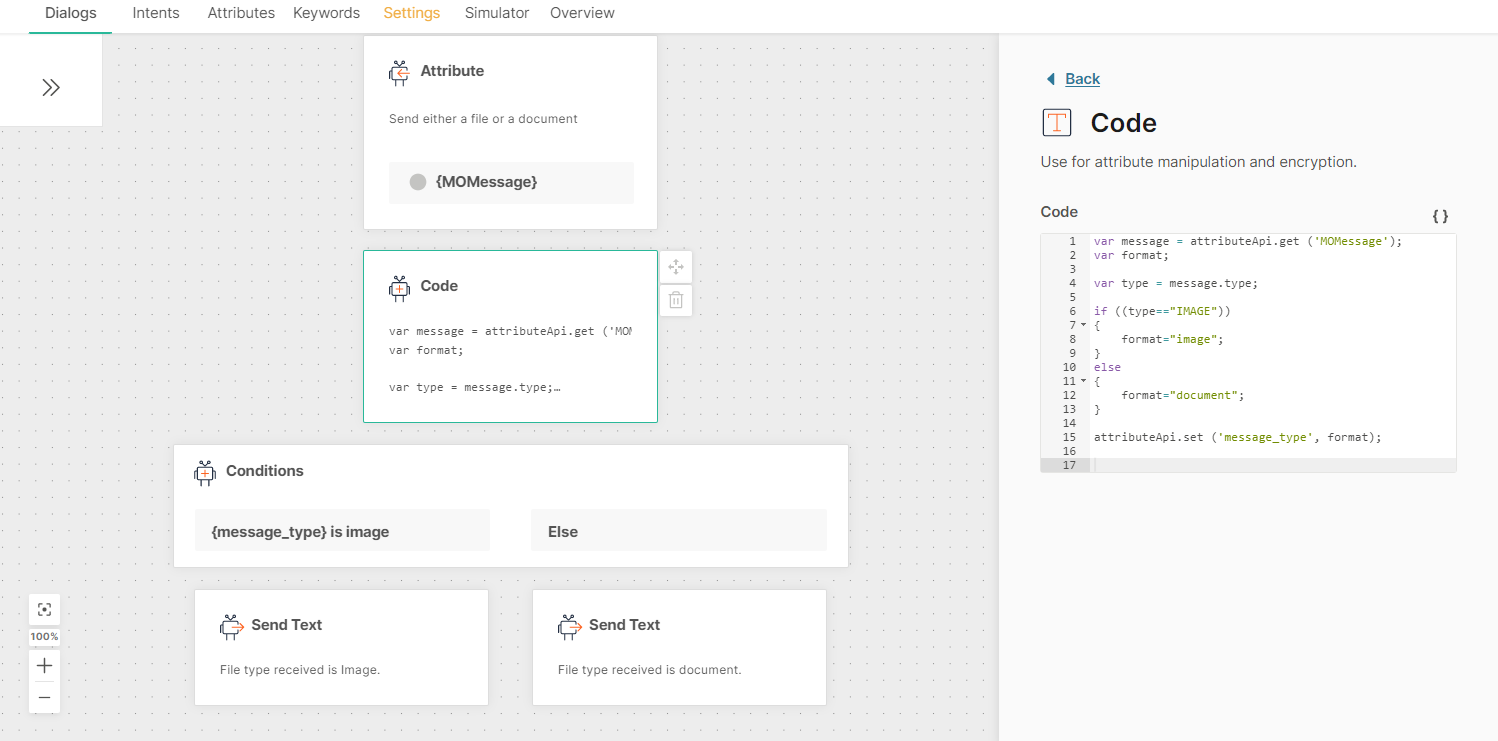
The Code element does the following:
- var message = attributeApi.get ('MOMessage');
Uses the 'attributeApi' object to get the value of the MOMessage attribute - var type = message.type
Uses the 'type' property to extract the file type, and assigns the value to the variable, type - Uses the if-else statement to identify whether the 'type' variable is 'image' or 'document'. If it is image, assigns the value 'image' to the variable, format. Else, assigns the value 'document' to the variable, format
- attributeApi.set ('message_type', format);
Uses the 'attributeApi' object to set the value of the 'format' variable to the attribute, message_type
- var message = attributeApi.get ('MOMessage');
-
The Conditions element branches the dialog depending on the value of the 'format' variable.
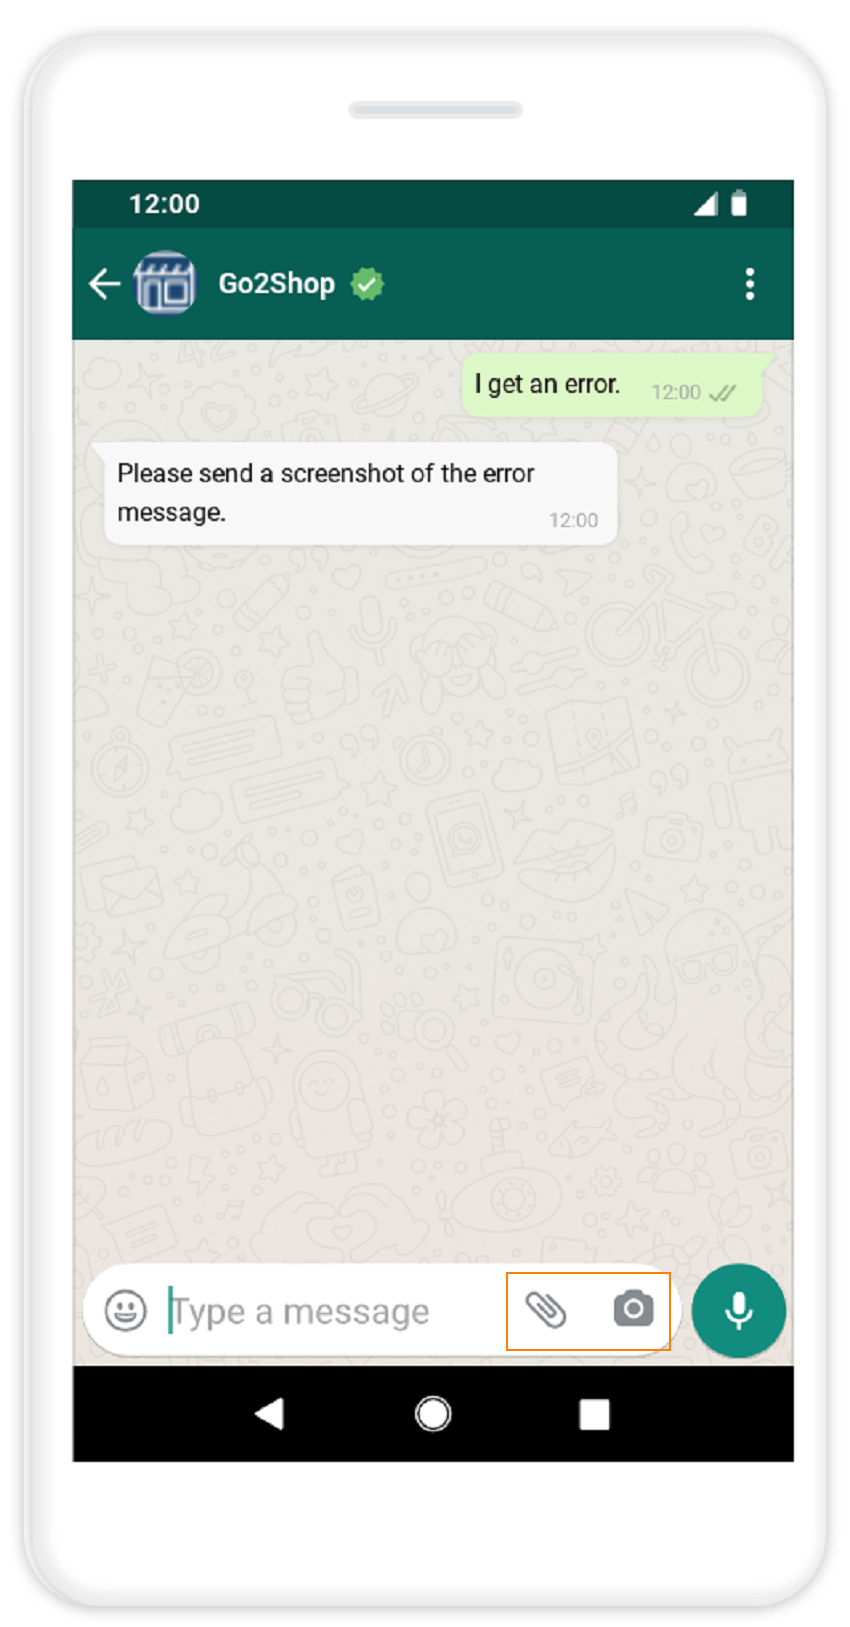
For WhatsApp messages, the code in this example works only if the end user uses the correct icon in WhatsApp to send the file. If the end user uses the Image icon in WhatsApp to send an image, the received file is recognized as an image. But if the end user uses the Attachment icon in WhatsApp to send an image, the received file is not recognized as an image.
Change Date Format
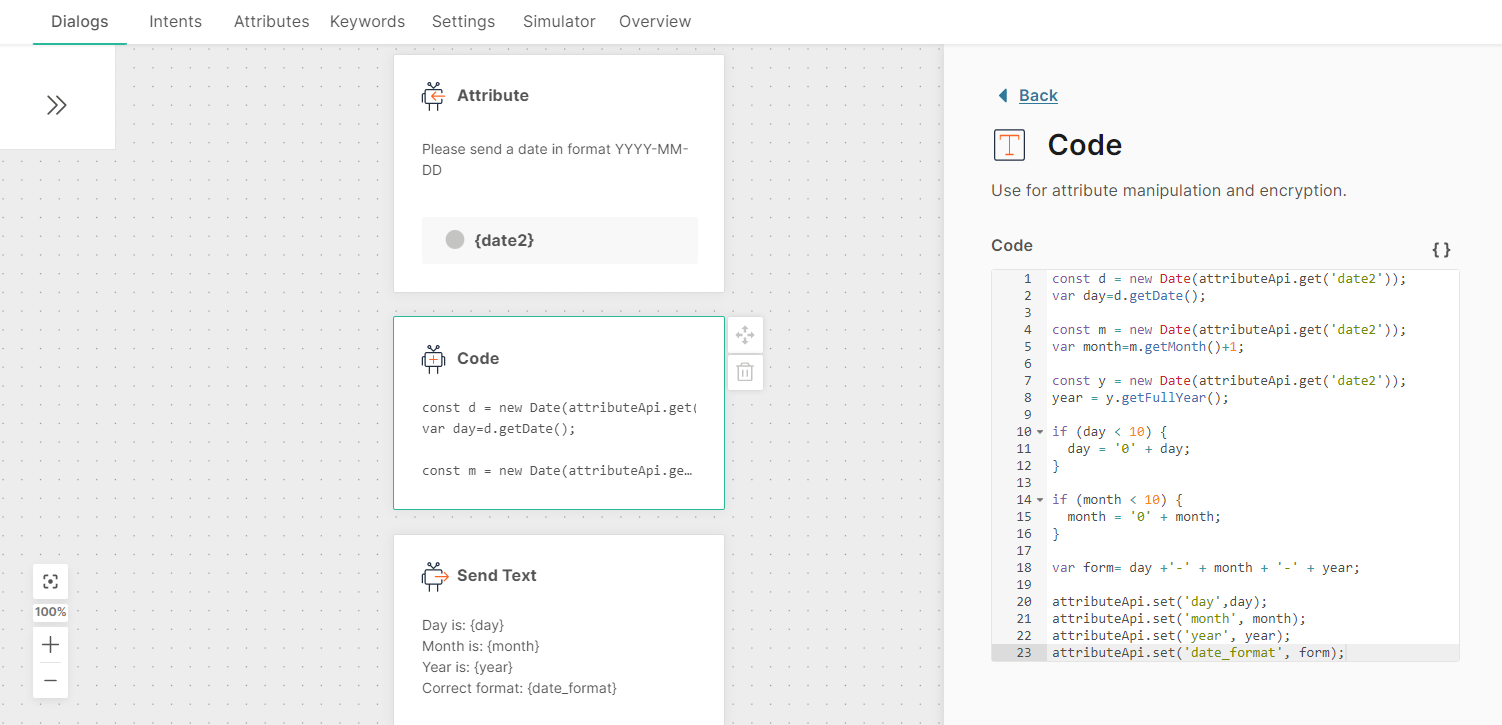
A standard attribute that has the attribute type, date, stores the date in the format YYYY-MM-DD. If end users send the date in a different format, it is treated as an invalid input.
This example shows how to use the Code element to save the date in the format DD-MM-YYYY.
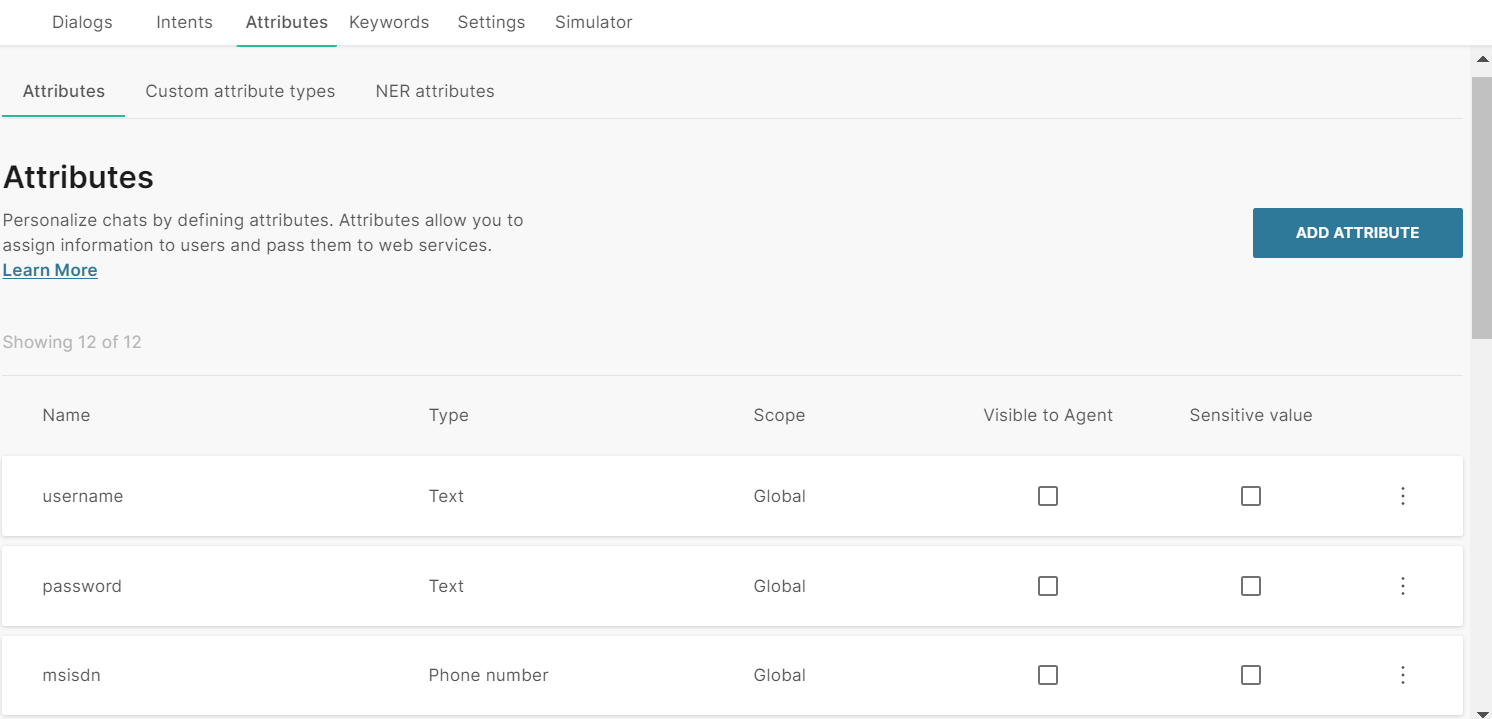
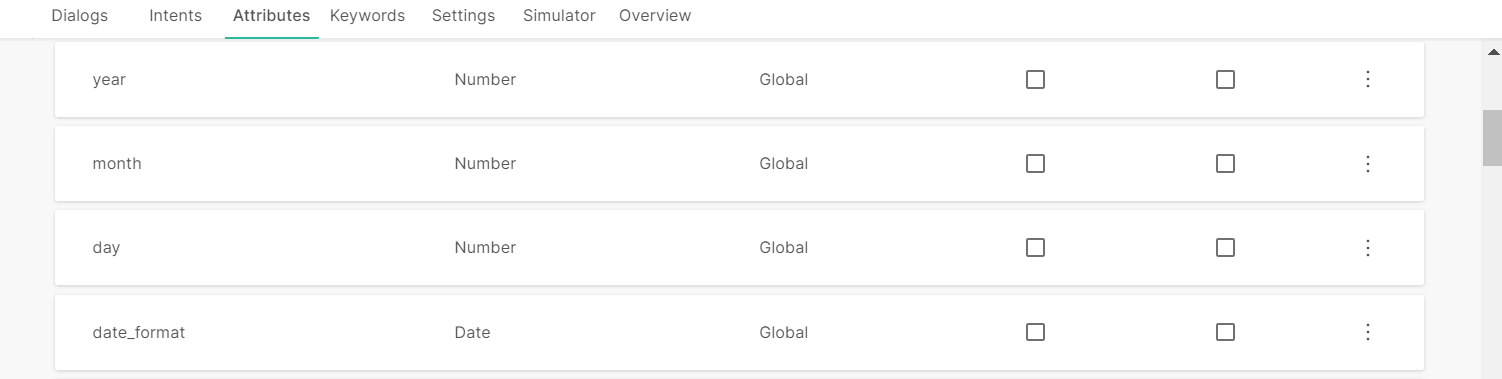
Set up Attributes [#set-up-attributes-change-date-format]
Create attributes and configure the fields as shown in the following image.
Code [#code-change-date-format]
Dialog [#dialog-change-date-format]
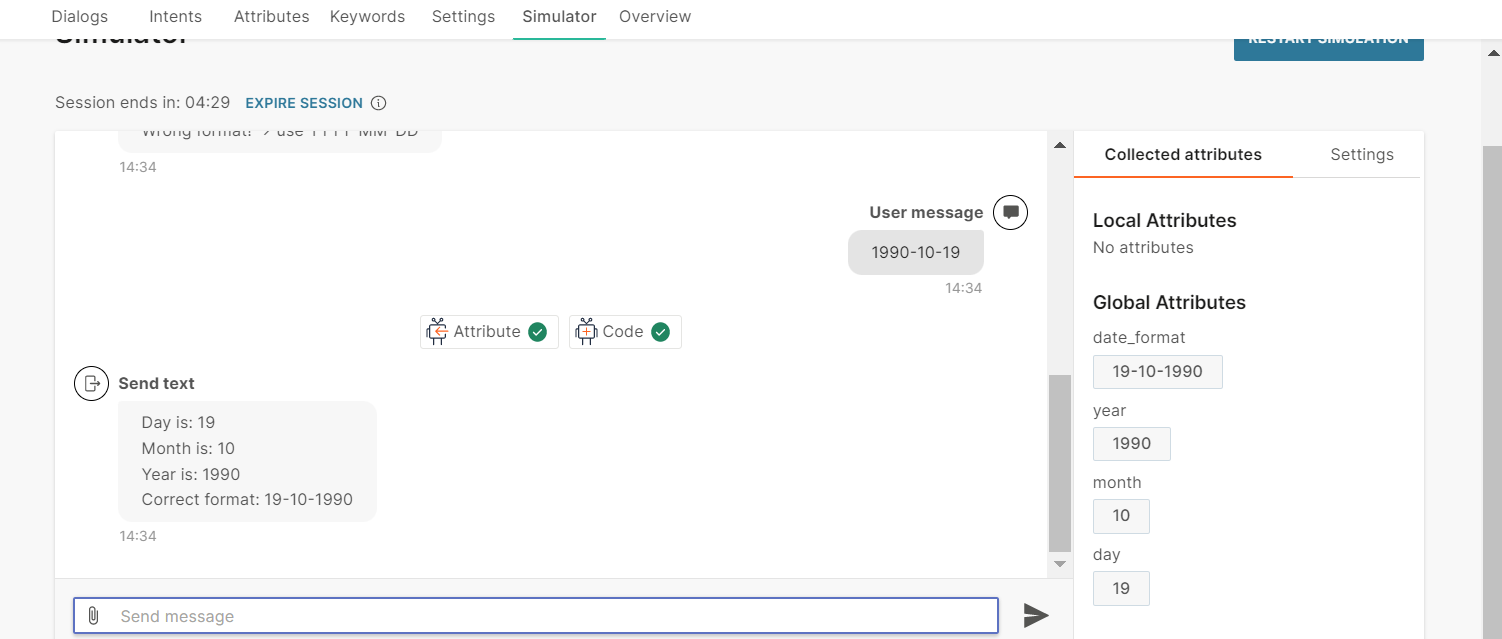
Simulator [#simulator-change-date-format]
Change Phone Number Format
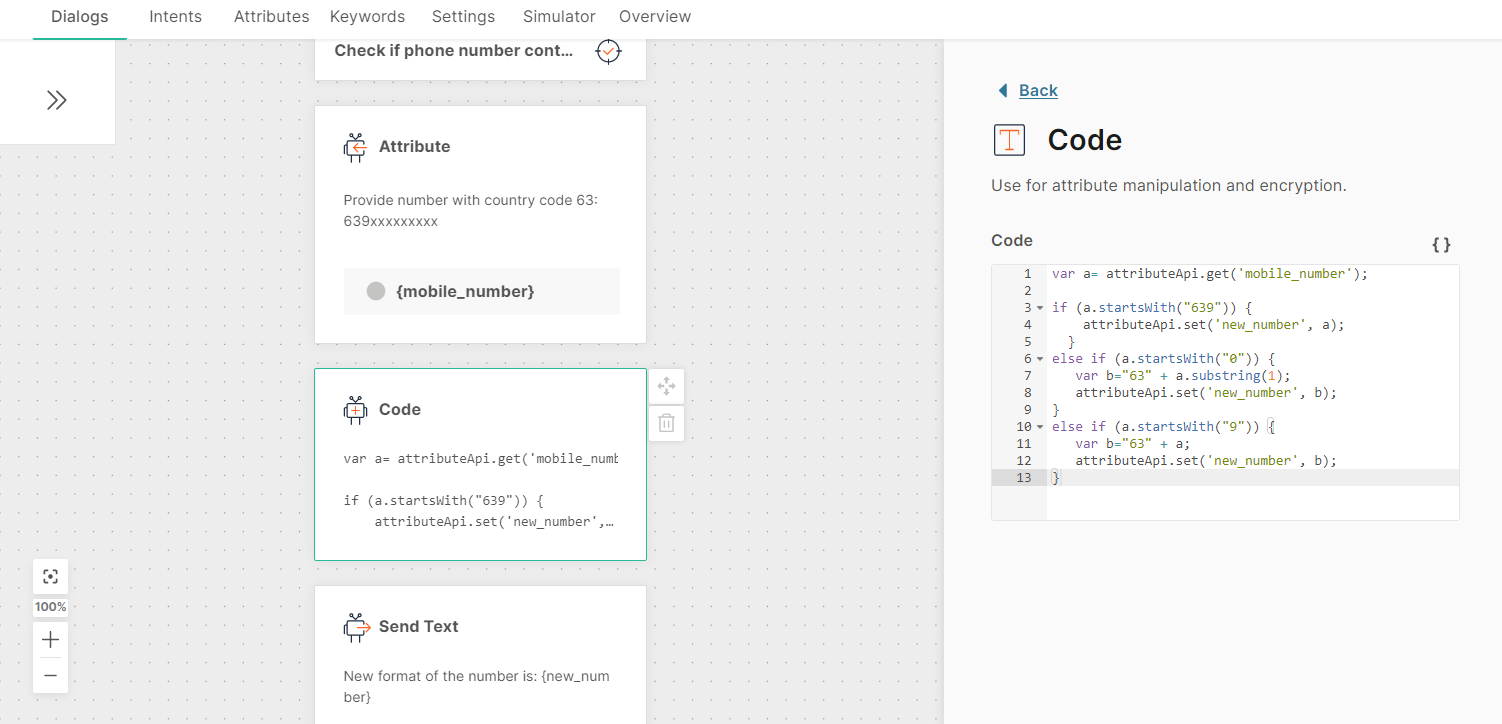
If end users send you a phone number in an incorrect format, you can convert it to the required format. This example shows how to do the following:
- If the number starts with the country code, there is no change.
- If the number starts with 0, it remove the 0 and add the country code.
- If the number does not start with either the country code or 0, add the country code.
This example uses the country code 63.
Code [#code-change-phone-number-format]
Dialog [#dialog-change-phone-number-format]
Find the nearest location
You can calculate the location of a service that is nearest to the end user. Example: Location of the nearest ATM.
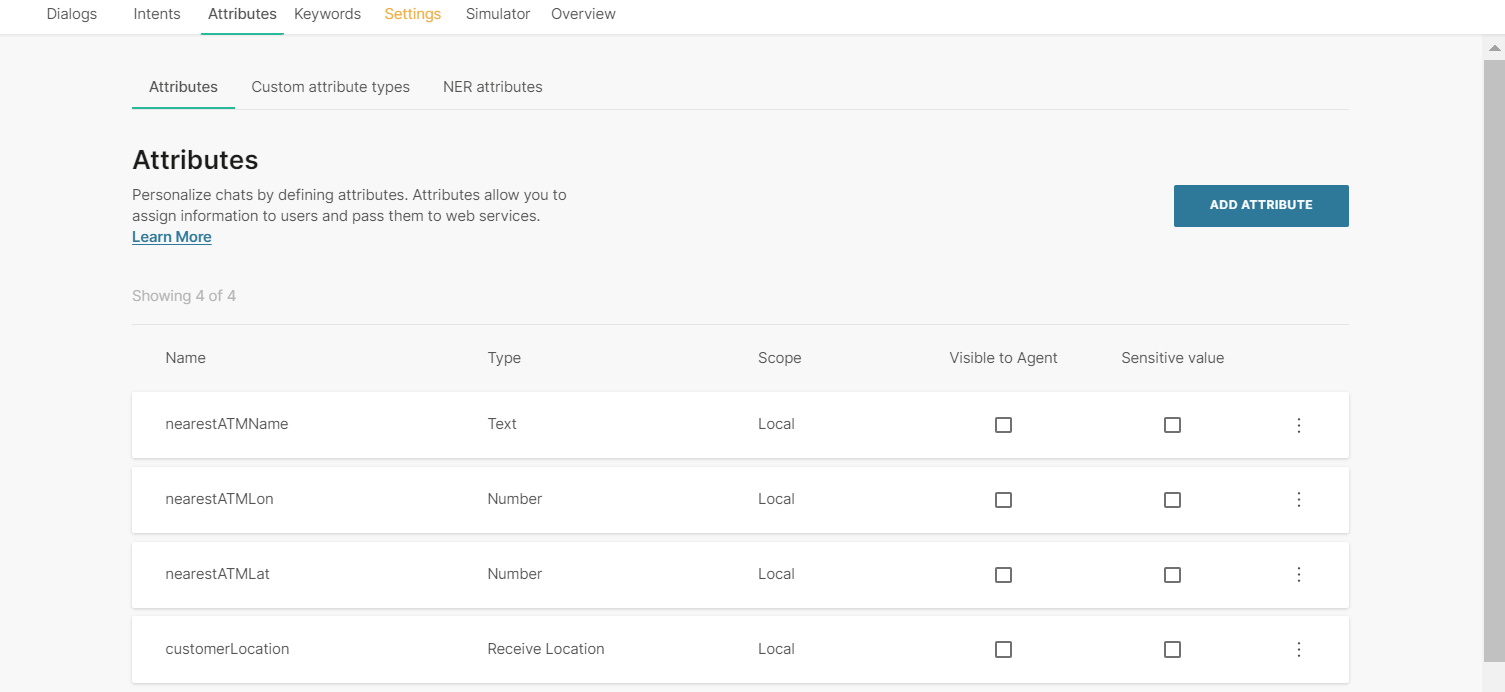
Set up Attributes [#set-up-attributes-find-the-nearest-location]
Create attributes and configure the fields as shown in the following image.
Code [#code-find-the-nearest-location]
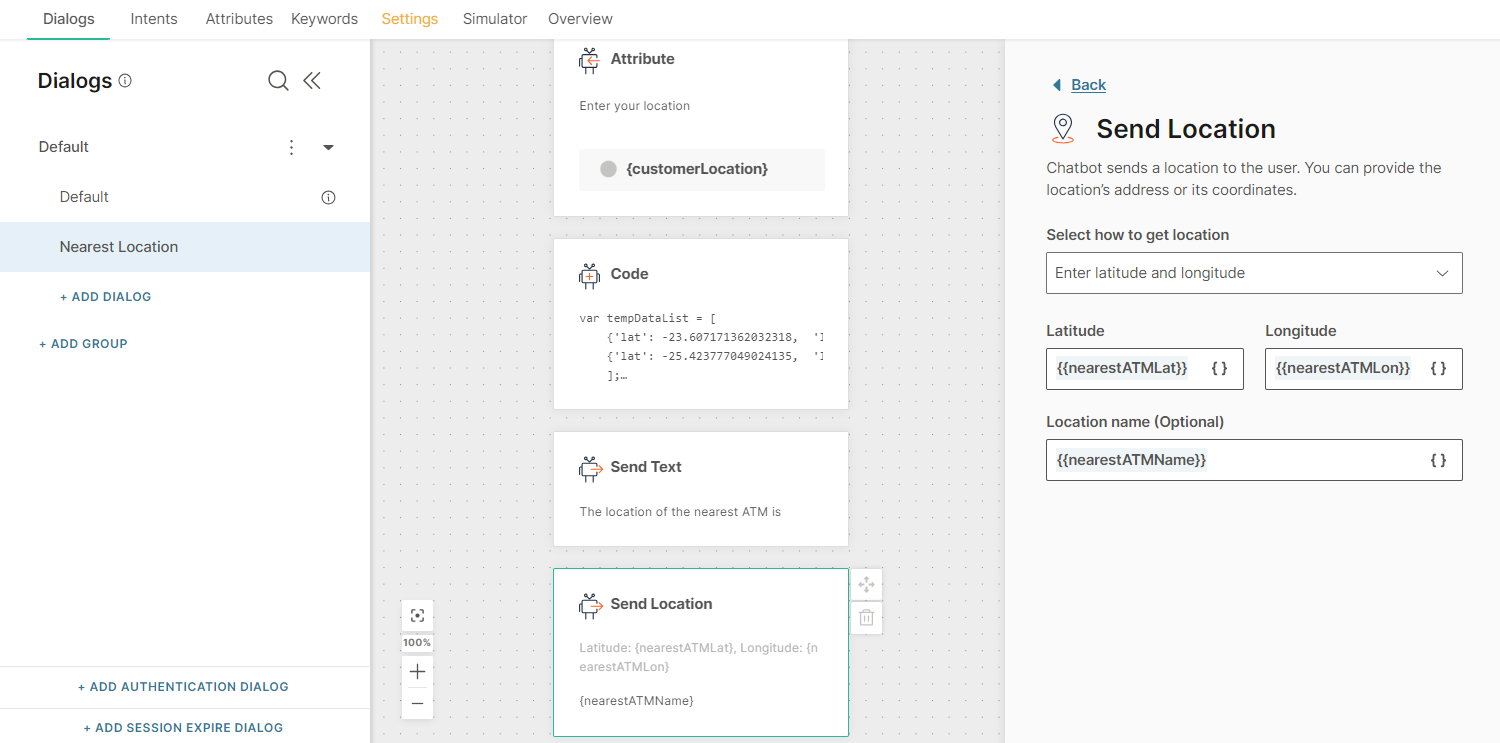
Dialog [#dialog-find-the-nearest-location]
The following is an example of the dialog.
Simulator [#simulator-find-the-nearest-location]
