Chatbot Settings
The Settings tab gives an overview of the chatbot configuration.
You can view and update the following information. Any changes that you make are saved automatically.
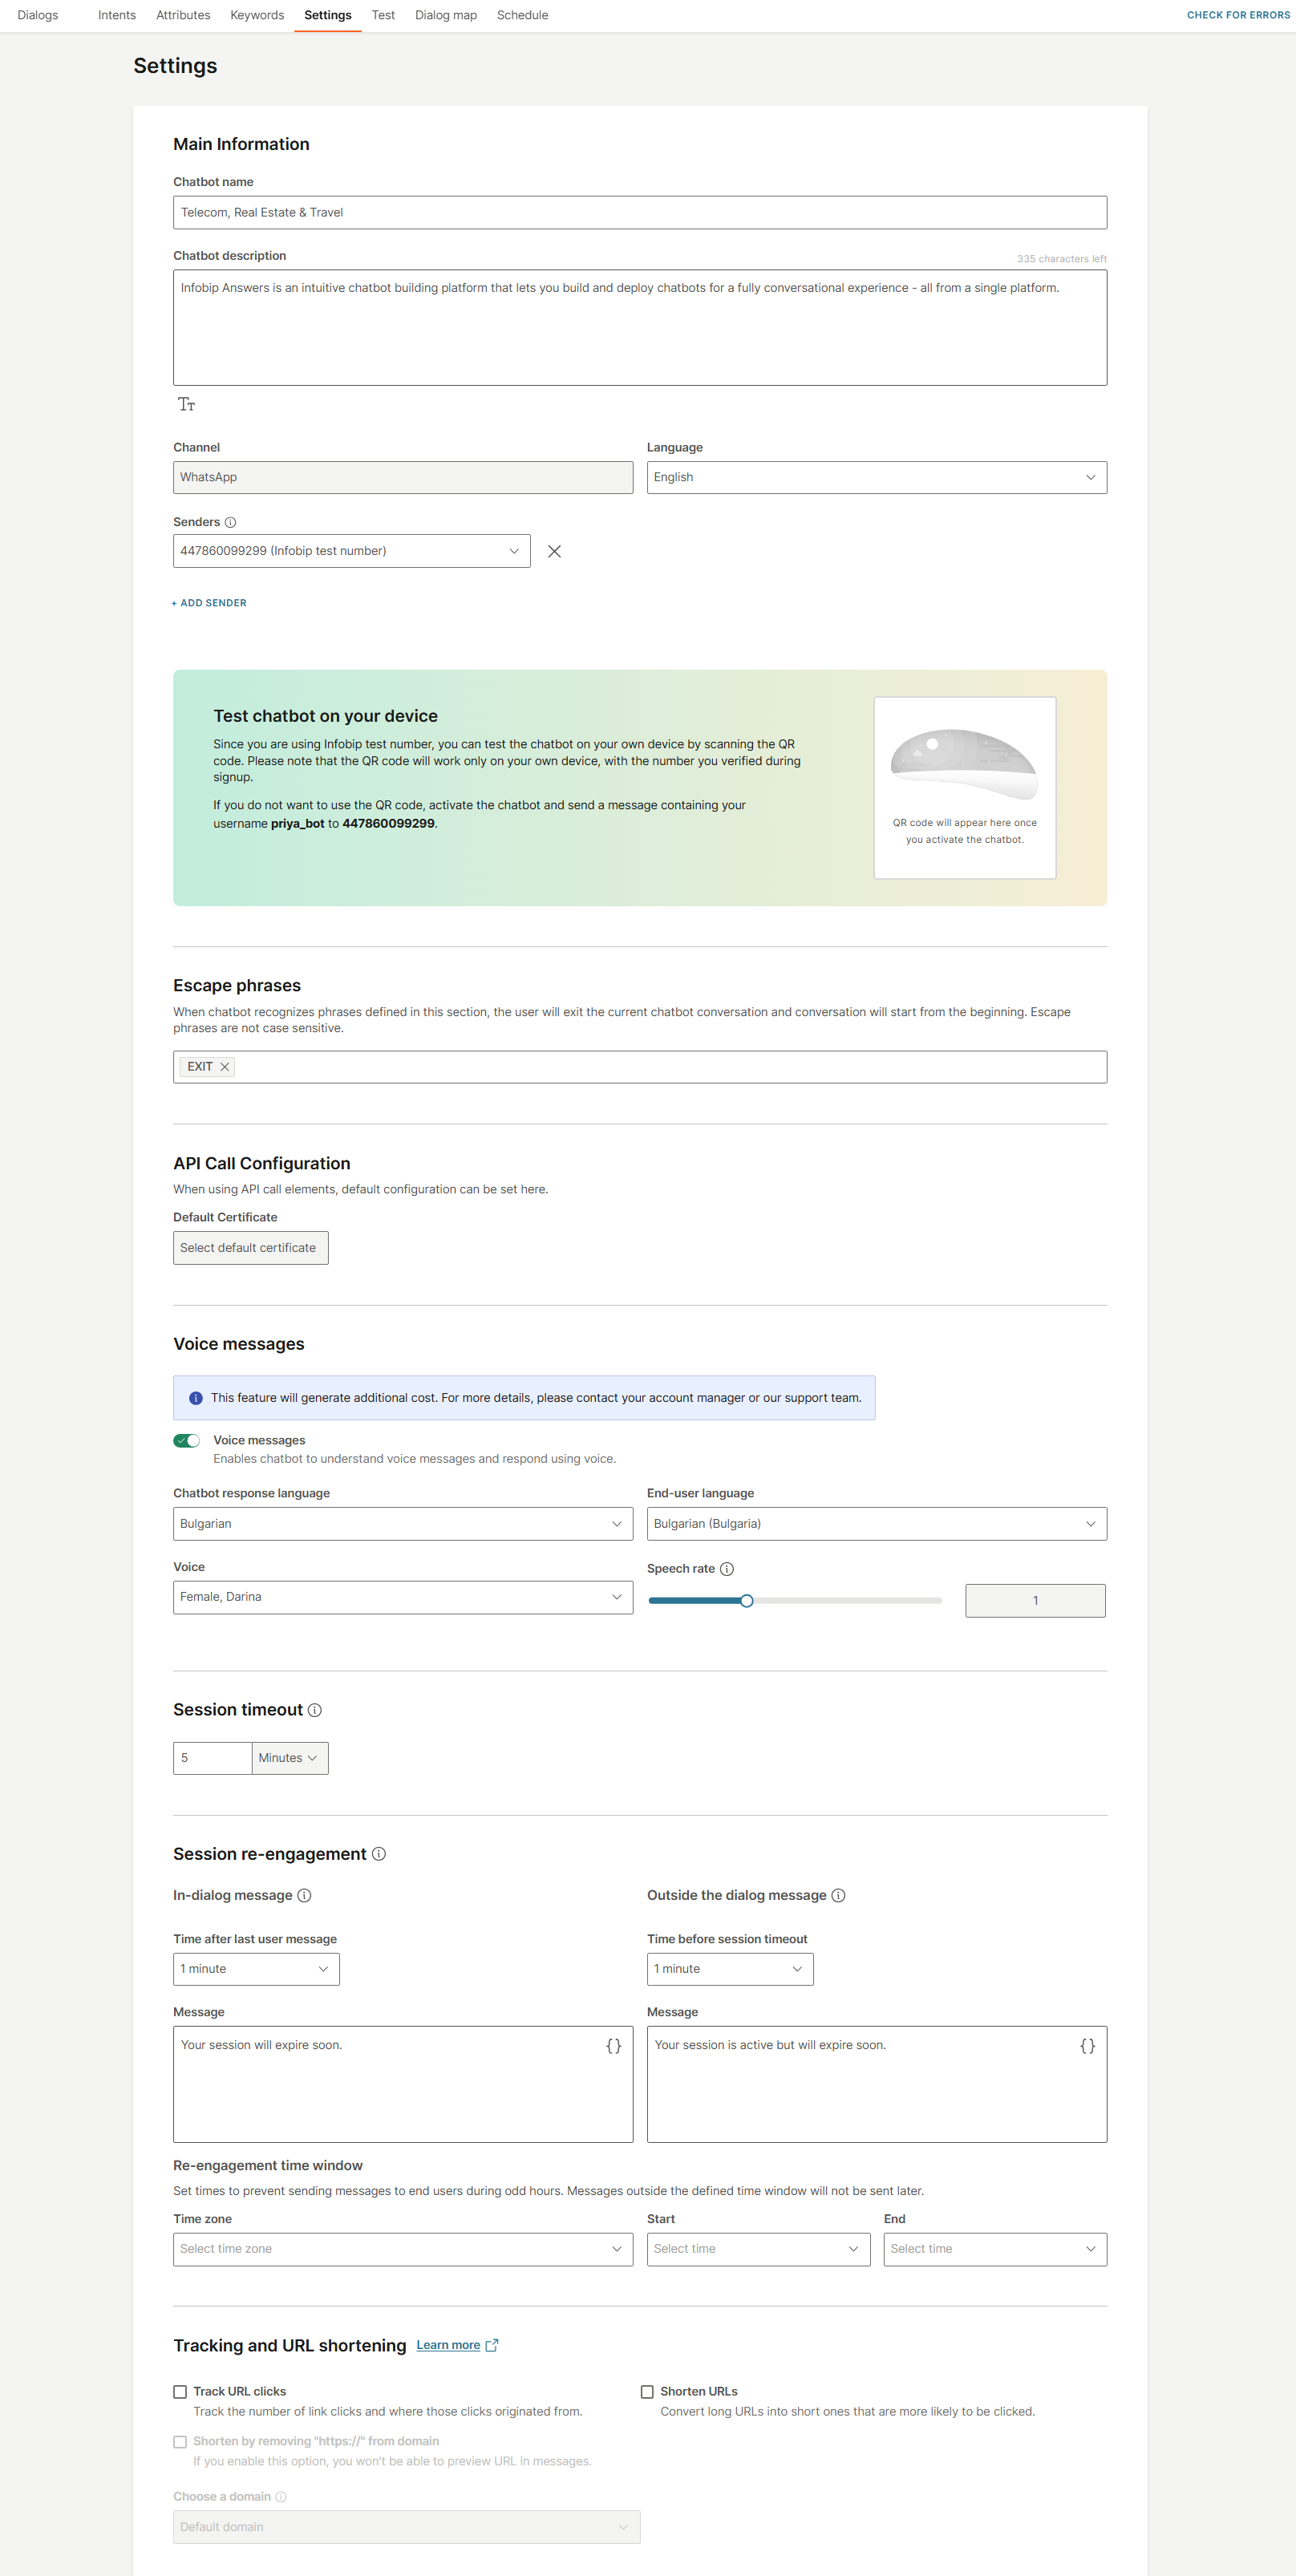
Chatbot name
The name of the chatbot. Specify a unique name so that you can identify the chatbot.
You can edit the name at any point before you activate the chatbot.
If a chat is transferred from the chatbot to Conversations, the chatbot name is displayed as the sender for all messages that are sent by the chatbot to the end user.
Chatbot description
Add the purpose of the chatbot. You can add a maximum of 500 characters.
Channel
The channel that you selected when you created the chatbot.
You cannot change the channel after you create the chatbot.
Sender [#sender]
Specify one or more senders that the chatbot uses to communicate with the end user.
Sender setup
If you have only one sender, it is selected by default.
You can design the chatbot without selecting a sender, but you must specify at least one sender before activating the chatbot.
You cannot use the same sender in multiple active chatbots. For more information, refer to the Activation documentation.
You can add multiple senders to your chatbot only if you have the Scale package.
Infobip test sender
(Self-service customers only) If you select the Infobip test sender, you cannot share the chatbot with others. You can test the chatbot only on your device with the number that you verified during signup.
Sender information by channel
The type of sender depends on the channel that you select.
| Channel | Sender |
|---|---|
| Apple Messages for Business | Apple Business ID |
| Instagram Messaging | Instagram Business Account ID |
| LINE | LINE Official Account ID |
| Live Chat | UUID |
| Messenger | Messenger ID |
| Open Channel | Open Channel ID |
| RCS | Phone number |
| SMS | Phone number |
| Telegram | Telegram ID |
| Viber Bots | Chatbot name |
| Viber Business Messages | Phone number |
| Phone number |
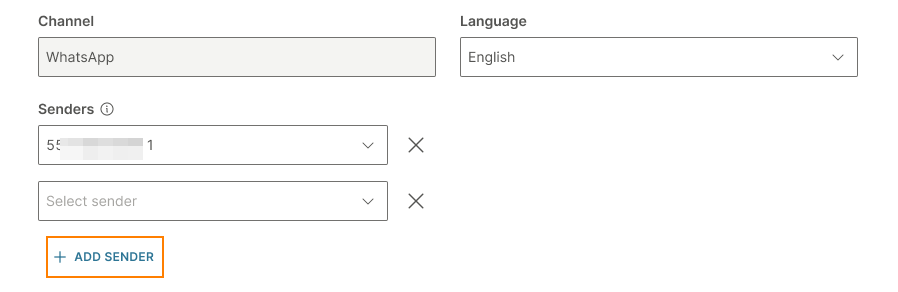
Add a sender to an Inactive chatbot [#add-to-inactive-chatbot-sender]
To add a sender, select the required sender in the Settings tab > Sender field.
To add more than one sender, select Add sender and select the required sender.
(WhatsApp only) To register a sender, select Register WhatsApp number.
When you activate the chatbot, it is activated on all the senders that you add.
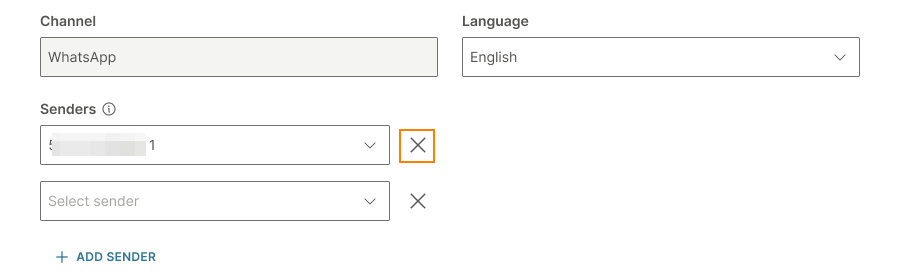
Remove a sender from an Inactive chatbot [#add-to-inactive-chatbot-sender]
In the Settings tab > Sender field, select x next to the sender that you want to remove.
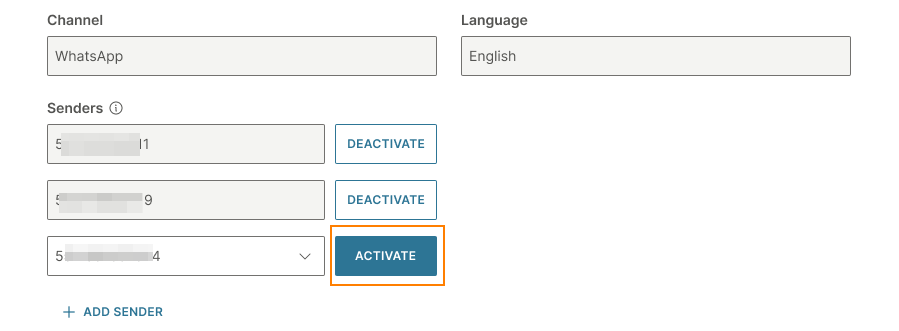
Add a sender to an Active chatbot [#add-to-active-chatbot-sender]
You can configure additional senders for an active chatbot.
Do the following to add a sender.
- Go to the Settings tab > Sender field.
- Select Add sender.
- Select the required sender. (WhatsApp only) To register a sender, select Register WhatsApp number.
- Select Activate next to the sender.
The chatbot is now active on the newly-added sender.
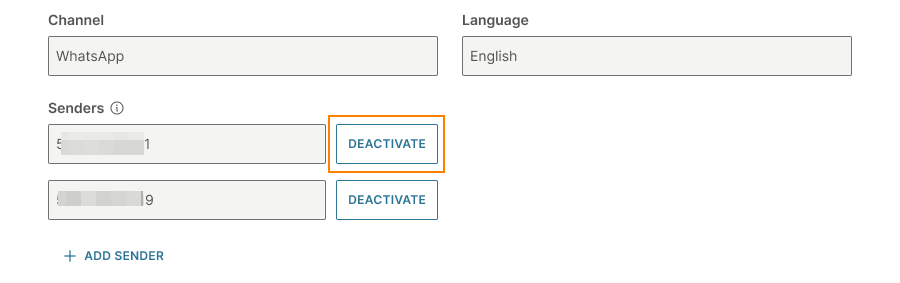
Deactivate a sender for an Active chatbot [#remove-from-active-chatbot-sender]
When you deactivate a sender from an active chatbot, the chatbot is deactivated only on that sender. The chatbot remains active on all other senders that are configured for the chatbot.
Do the following.
- Go to the Settings tab > Sender field.
- Select Deactivate next to the sender that you want to remove.
The chatbot is deactivated on the selected sender. However, the sender is still displayed in the chatbot.
Language
The language in which the chatbot sends messages to the end user.
Supported languages [#supported-languages-language]
Albanian, Arabic, Armenian, Awadhi, Azerbaijani
Bashkir, Belarusian, Bengali, Bhojpuri, Bosnian, Brazilian Portuguese, Bulgarian
Chhattisgarhi, Croatian, Czech
Danish, Dogri, Dutch
English, Estonian
Faroese, Finnish, French
Georgian, German, Greek, Gujarati
Haryanvi, Hindi, Hungarian
Indonesian, Irish, Italian
Javanese
Kannada, Kashmiri, Kazakh, Konkani, Korean, Kyrgyz
Latvian, Lithuanian
Macedonian, Maithili, Malay, Maltese, Marathi, Marwari, Moldovan, Mongolian, Montenegrin
Nepali, Norwegian
Odia
Pashto, Persian (Farsi), Polish, Portuguese, Punjabi
Rajasthani, Romanian, Russian
Sanskrit, Santali, Serbian, Sindhi, Sinhala, Slovak, Slovenian, Spanish, Swedish
Turkish
Ukrainian, Urdu, Uzbek
Vietnamese
Welsh
Other (Latin)
Other (non-Latin)
Supported languages for AI chatbots [#supported-languages-for-ai-chatbots-language]
For AI-driven chatbots, choose a language in which words are separated by a space. So, you can use most of the languages that are supported by Answers to build an AI chatbot. You cannot use languages in which words are not separated by a space. Example: Chinese, Japanese, Thai, and Lao.
Change chatbot language [#change-chatbot-language-language]
You can change the language of the chatbot through the Settings tab at any time.
Change language for AI chatbots [#change-language-for-ai-chatbots-language]
You can change the language for AI chatbots. However, if your AI chatbot contains NER attribute types that the new language does not support, these attributes would be invalid. You must correct the error before you activate the chatbot.
Example: Your chatbot language is English and you create the Start Date NER attribute with the Date attribute type. If you then change the language to Arabic, the Start Date NER attribute would be invalid because Arabic does not support the Date NER attribute type.
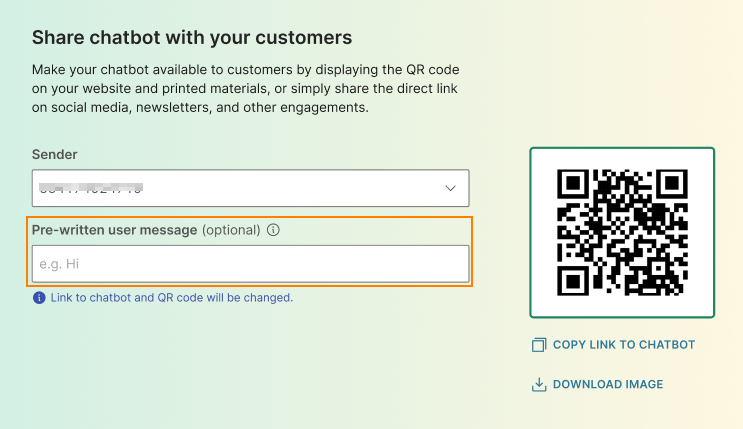
QR code and chatbot link [#chatbot-settings-qr-code-link]
This section is applicable only for active WhatsApp chatbots.
After you activate your WhatsApp chatbot, the QR code and link to the chatbot are displayed.
Use the QR code and link to do the following.
- Enable end users to contact your chatbot. Share the QR code and link with end users through your public-facing communication media. Example: Display the QR code on your website and printed materials, or share the link on social media and newsletters.
- Scan the QR code or use the chatbot link to test your chatbot.
View QR code for a sender [#qr-code]
Each sender has a different QR code. To view the QR code for a specific sender, select the sender from the list in the Sender field.
To download the QR code, select Download image.
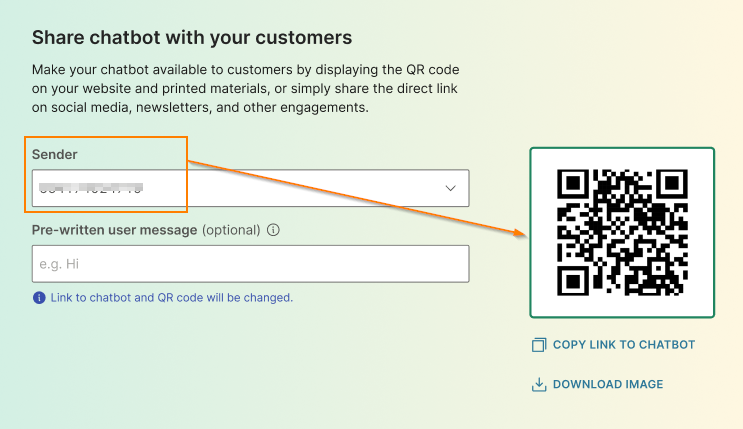
View the chatbot link for a sender [#chatbot-link]
Each sender has a different chatbot link. To view the chatbot link for a specific sender, select the sender from the list in the Sender field.
Select Copy link to chatbot.
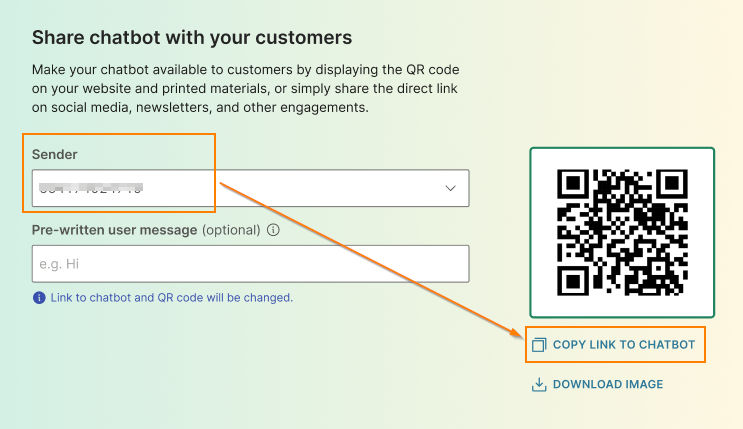
Update the welcome message [#welcome-message]
When an end user uses the QR code or the link to the chatbot, their WhatsApp app opens to start a conversation with your chatbot. A pre-written message, Hi, is added automatically in the message box. The end user can send this predefined message to your chatbot to start the conversation.
You can customize this pre-written message for each sender. Select a Sender and then specify the required message in the Pre-written user message field.
When you update this field, the QR code and chatbot link change.
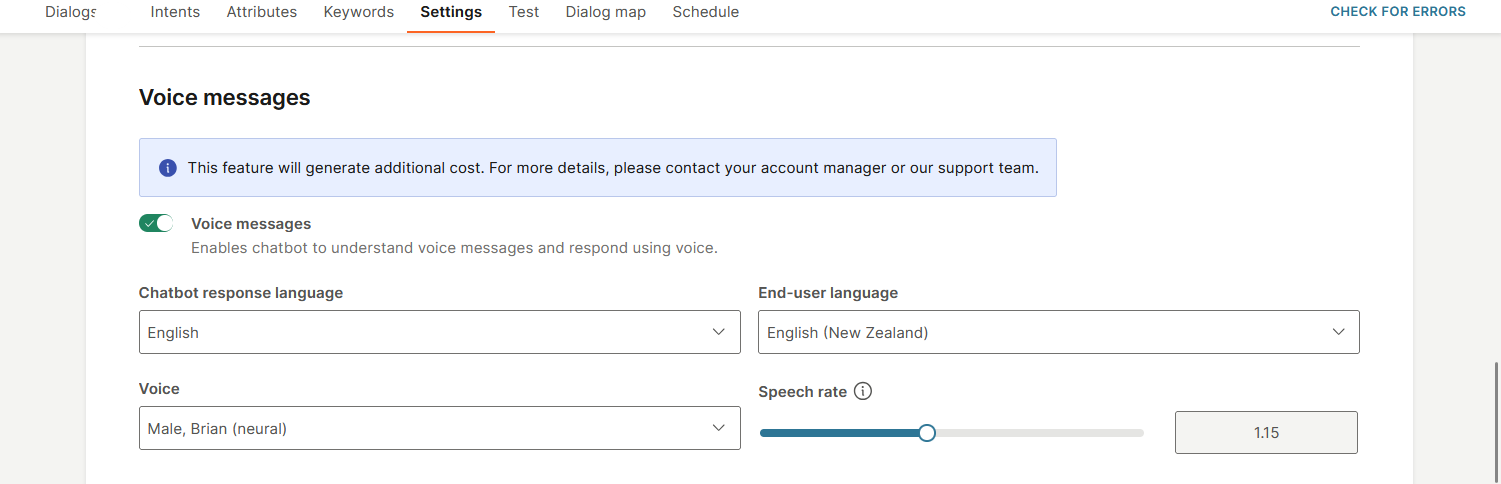
Voice messages [#voice-messages]
Enable voice functionality so that your chatbot can send and receive voice messages. When you enable voice functionality for the chatbot, both text-to-speech and speech-to-text services are enabled.
For information about how to use voice functionality in your chatbot, refer to the Create a voice-enabled chatbot documentation.
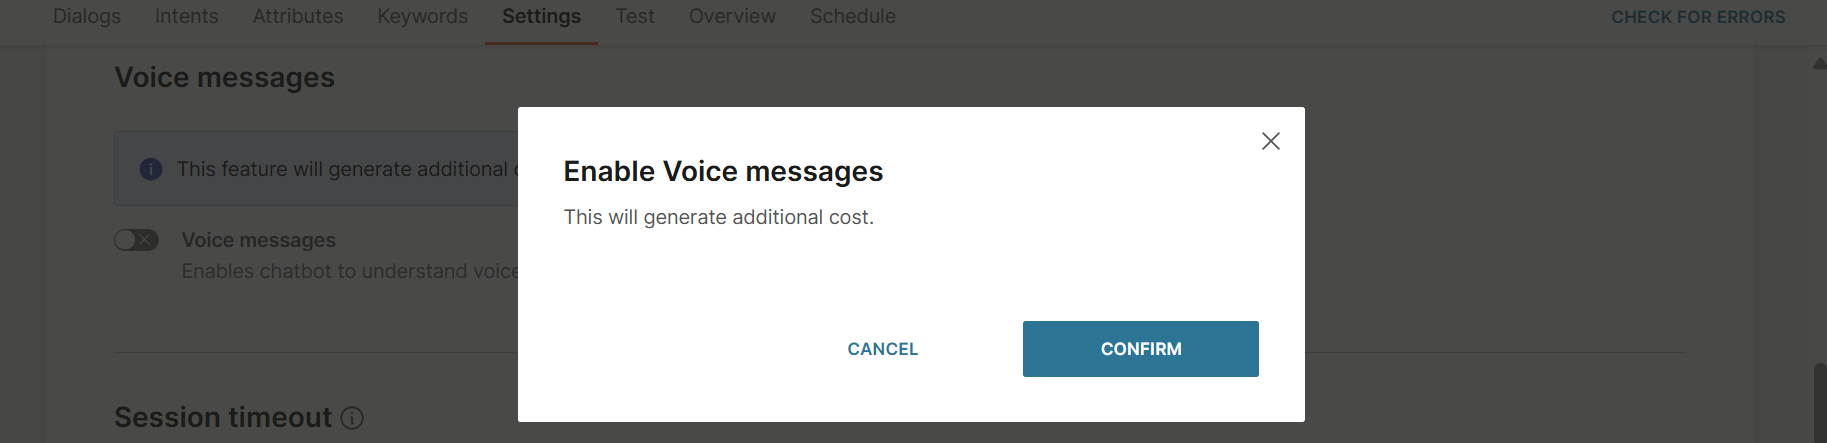
Voice functionality is an add-on feature and has additional costs. Commonly used words and phrases may be stored for a time, and will not incur additional costs.
Voice functionality is currently available only for WhatsApp.
Enable voice functionality [#enable-voice-functionality]
Follow these steps to enable voice functionality.
-
In the Voice messages section, enable voice messages.

-
In the confirmation screen, select Confirm.
-
Configure the following:
-
Chatbot response language: Language in which the chatbot communicates with the end user.
-
End-user language: Language in which the chatbot expects the end user to communicate.
-
Voice: Profile used for the voice messages sent by the chatbot. You can select whether the voice is male or female, and the voice name. Example: Male (Alonso).
The available voices depend on the language that you select in the Chatbot response language field.
Voices that are marked as neural have more natural, human-like speech.
-
Speech rate: The speed at which the chatbot reads the message to the end user. The minimum value is 0 (slowest speed) and the maximum value is 2 (fastest speed). Select the required decimal value.
-
For information about how to use the voice functionality in your chatbot, refer to the Voice-enabled chatbots documentation.
Disable voice functionality [#disable-voice-functionality]
If you disable this functionality, you must replace all Voice elements in your chatbot with other elements, such as Text.
If voice functionality is enabled in other chatbot elements, these messages will be sent as text messages instead.
Follow these steps to disable voice functionality.
-
In the Voice messages section, disable Voice messages.

-
In the confirmation screen, select Turn off.
Escape phrases [#escape-phrases-settings]
Escape phrases are phrases that end users are likely to use when they want to restart the conversation. Example: Help, Menu, Back, Start, or Exit.
Configure escape phrases for your chatbot. When the end user sends one of the configured escape phrases, the chatbot exits the current dialog and redirects the flow to the dialog that has the Default intent.
Guidelines and best practices [#guidelines-escape-phrases]
- The chatbot recognizes escape phrases only if the end user's message contains the exact phrase and does not contain other words.
- Escape phrases are not case sensitive.
- Do not use the same word as a keyword and as an escape phrase. If you do, the chatbot might not take the expected action. Example: You use Exit as a keyword in a User Response element and as an escape phrase. When the end user replies Exit to the User Response element, the chatbot might take action for the escape phrase instead of taking action for the keyword.
Configure an escape phrase [#configure-escape-phrases]
To configure an escape phrase, enter the phrase and press Enter.
You can add more than one escape phrase.
Session timeout [#session-timeout]
In some cases, the end user may not respond to the chatbot immediately. Configure the interval for which chatbot needs to wait for a message from the end user before ending the session. When the session ends, the session attributes and conversation context are deleted. If the end user sends a message after the interval, a new session starts from the introductory dialog.
The maximum session timeout interval is 24 hours.
Chatbot contains components [#chatbot-settings-session-timeout-chatbot-with-components]
If the chatbot contains components that have not finished processing, the chatbot session is extended automatically.
Example: The component is waiting for a response from the end user.
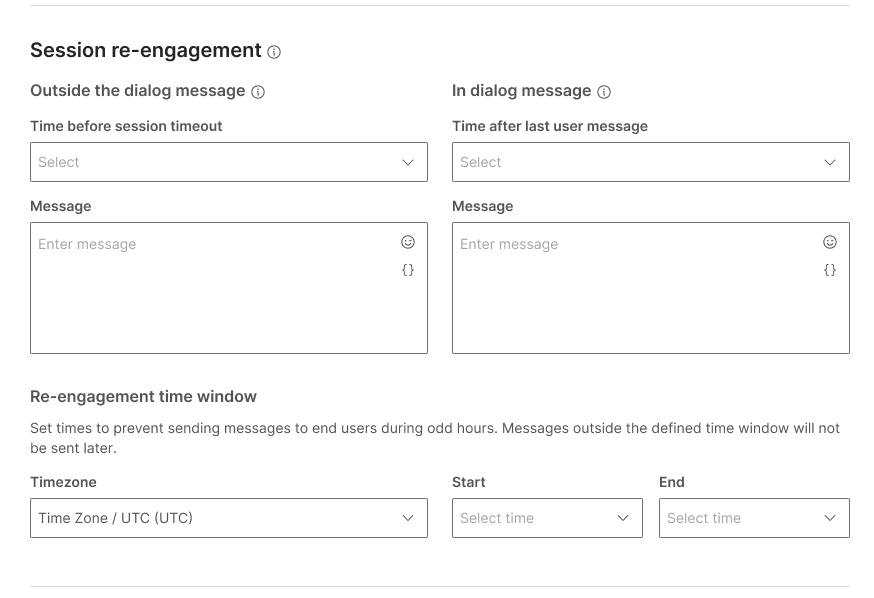
Session re-engagement
If an end user is idle, you can send them a reminder before their session expires. If they do not respond before the configured Session timeout, the session ends.
Configure the following:
-
Reminder time: The time after which the chatbot sends the reminder.
The maximum reminder time depends on the Session timeout setting. Example: If the session timeout is 5 minutes, the maximum reminder time is 2 minutes. If the timeout is 6 hours, the maximum is 3 hours.
-
Reminder message: The message to send to the end user.
You can configure reminders for one or more of the following cases:
- Outside the dialog: Sent when the end user has stopped sending messages outside a dialog. The chatbot is not expecting a response from the end user.
- In-dialog: Sent when the end user has stopped responding while inside a dialog. The chatbot is waiting for a reply from the end user. Example: A response to a Save user response or User response element.
Re-engagement time window
Configure a time window during which re‑engagement messages can be sent. This prevents reminders from being sent during undesirable hours, such as late at night.
If the reminder cannot be sent during this time window, it is not sent.
Configure the time zone, start time, and end time for the window.
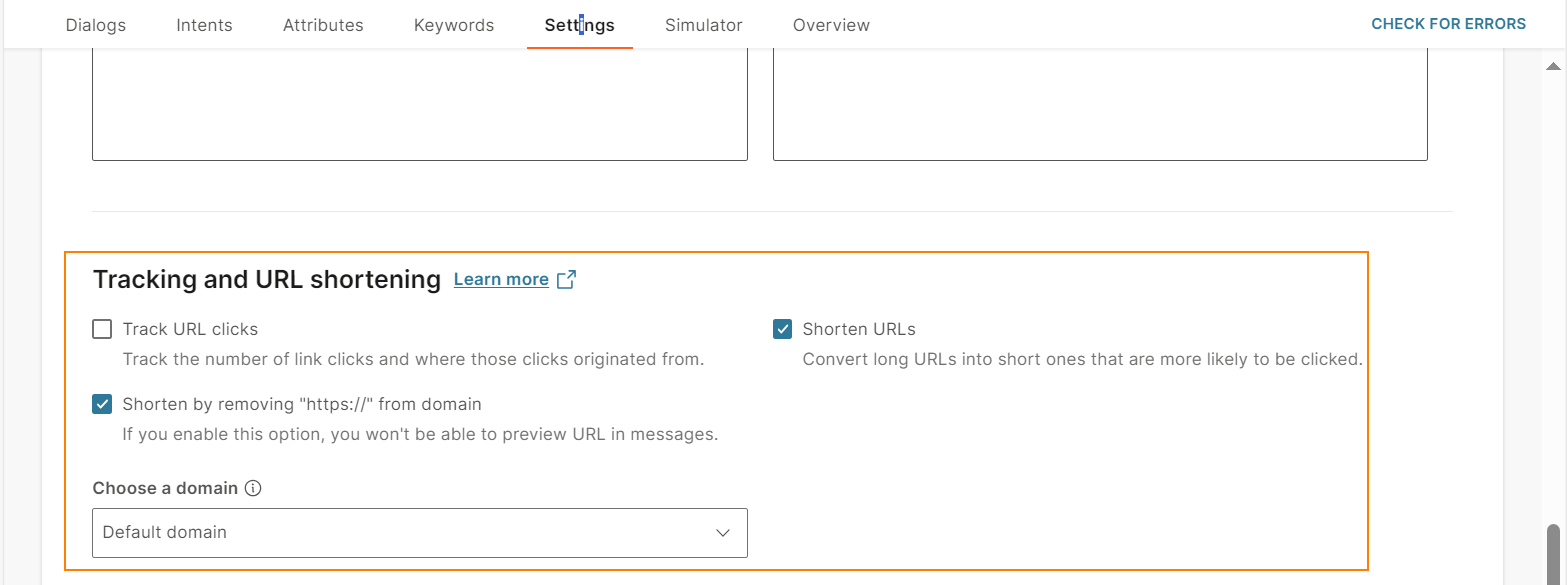
Tracking and URL shortening
If your messages contain links (URLs), you can do the following.
- Track URL clicks: Track the number of times an end user clicks a URL that you send them, and identify where the clicks originated from.
- Shorten URLs: Reduce the length of the URLs that you send to end users.
URL shortening and tracking is currently available only for WhatsApp.
You cannot use URL shortening and tracking for certain links, such as URLs for call-to-action buttons in WhatsApp message templates.
URL shortening [#url-shortening-url-shortening-and-tracking]
If the links (URLs) that you include in messages to end users are long or contain other parameters, end users might consider such URLs untrustworthy or spam.
Also, some channels might have a limit on the number of characters in a message. If a message contains long URLs, it increases the length of the message. If a message exceeds the character limit, the message might be divided into multiple messages, which could increase costs.
URL shortening enables you to shorten the length of the links that you share with end users. Shortening the links also reduces the screen space occupied by the link on the end user's device, and makes the links more readable.
Depending on the type of URLs in your message, follow one of these options.
- Shorten the entire URL: Use this option for URLs that contain a primary or default domain. Example: www.infobip.com. Follow the instructions in the Shorten URLs that contain default domains section.
- Shorten the URL but retain the custom domain: Use this option for URLs that contain a custom domain or subdomain. Example: www.dev.infobip.com. Use this option to can send personalized, branded links to end users. Follow the instructions in the Shorten URLs that contain custom domains section.
(Optional) For both primary and custom domains, you can also remove the 'http' or 'https' prefix from the URL.
The settings that you choose are applied to all the links in the message.
For more information, refer to the URL shortening documentation.
Shortened URLs are displayed only in live sessions. The simulator and previews in chatbot elements display the original URL. Also, reports in Analyze contain the original URL.
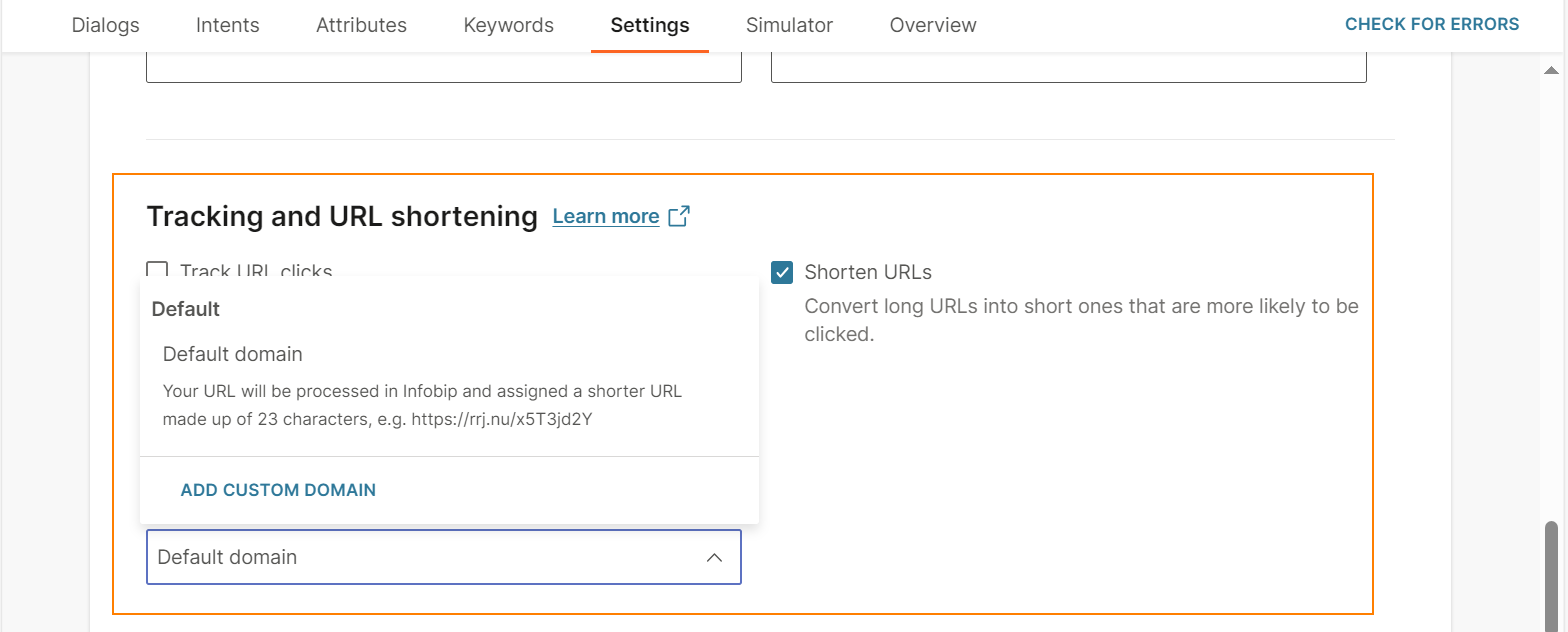
Shorten URLs that contain default domains [#shorten-urls-that-contain-default-domains-url-shortening-and-tracking]
- Select Shorten URLs.
- In the Choose a domain field, select Default domain.
- (Optional) To remove the protocol from the shortened URL, select Shorten by removing 'https://' from domain.
If you select this option, you will not be able to enable link preview in messages.
The URL is shortened as shown in the following example.
| Original URL | https://www.infobip.com/docs/answers/chatbot-settings#tracking-and-url-shortening |
| Shortened URL | https://rrj.nu/x5T3jd2Y The entire URL is shortened. |
| Shortened URL with protocol removed | rrj.nu/x5T3jd2Y The entire URL is shortened, and the protocol https is removed. |
Shorten URLs that contain custom domains [#shorten-urls-that-contain-custom-domains-url-shortening-and-tracking]
- Select Shorten URLs.
- In the Choose a domain field > Custom domain section, select the custom domain. If you do not see your custom domain in the list, select Add domain to register the domain.
- (Optional) To remove the protocol from the shortened URL, select Shorten by removing 'https://' from domain.
If you select this option, you will not be able to enable link preview in messages.
The URL is shortened as shown in the following example.
| Original URL | https://www.dev.infobip.com/docs/api/customer-engagement/moments |
| Shortened URL | https://www.dev.infobip.com/x5T3jd2Y The custom domain https://www.dev.infobip.com is retained. The URL content after the custom domain is shortened. |
| Shortened URL with protocol removed | www.dev.infobip.com/x5T3jd2Y The custom domain www.dev.infobip.com is retained, the URL content after the custom domain is shortened, and the protocol https is removed. |
URL tracking [#url-tracking-url-shortening-and-tracking]
URL tracking enables you to track the number of times end users click the URL that you send them. You can also identify where the clicks originated from. View this information in Analyze.
To enable URL tracking, select Track URL clicks.
To get a list of fields that are tracked when you enable this option and for more information about URL tracking, refer to the URL tracking documentation.
When you enable URL tracking, URL shortening is automatically enabled.
Typing indicator (WhatsApp only) [#whatsapp-typing-indicator]
When this feature is enabled, a typing indicator (three dots) is displayed during conversations to let end users know that the chatbot is generating a response. Example: The chatbot is retrieving information from an API.
This feature is enabled by default. You can disable it if required.
This feature is available only for WhatsApp chatbots.
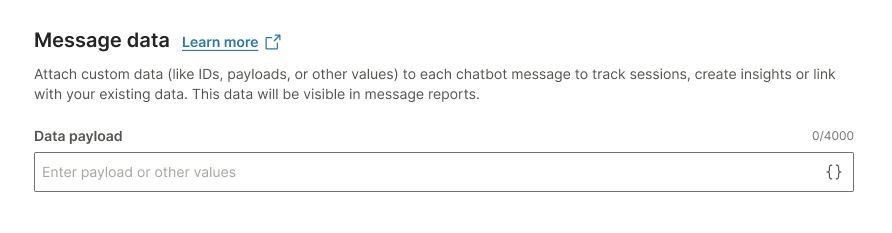
Message data (Optional) [#message-data-settings]
Add custom callback data, such as platform ID and payload, to messages that you send to end users.
This data is available in message reports. Use this data to enhance your analytics reports. You can do the following.
- Track sessions
- Create insights
- Link to your existing data
This data is not visible to the end user.
Specify the callback data [#message-data-specify]
Go to the Settings tab > Message data section in your chatbot. In the Data payload field, enter the callback data. Example: A string value, platform ID, or an attribute.
This data is now added to all messages that are sent by the chatbot.
The Data payload field can contain a maximum of 4,000 characters. You can also include attributes in this field.