Core Elements
Core elements are channel independent. These elements are present in the Chatbot receives, Chatbot actions, and Infobip products sections in the chatbot editor.
To view elements that are specific to a channel, refer to the Channel elements section.
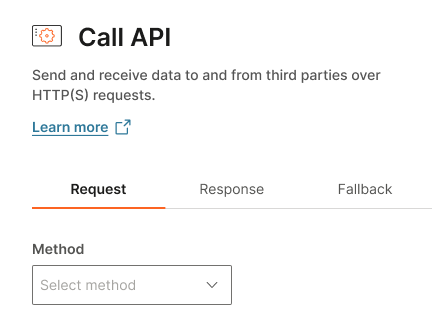
API [#api]
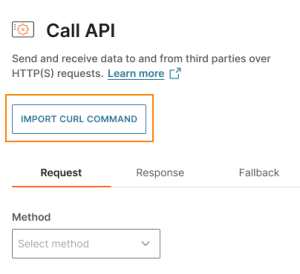
Use the API element to retrieve information from external systems and send information to these systems through your chatbot.
Configure the request and response parameters in the element. You can also do the following.
- Load an API request configuration by importing cURL command.
- Retry the API call.
- Configure a fallback option.
- Preview the API call.
- Test the element in the simulator.
Import an API call [#import-call-api]
You can load an API request configuration by importing cURL command from your API request collection. The headers and body of the request in the API element are automatically updated from the imported command.
The following are examples of scenarios where you can import an API request instead of configuring it manually.
- You have tested the API call over Postman and want to use the same data in the API element in your chatbot.
- You want to copy the Infobip API cURL command from the Internet and test it in the API element.
Do the following.
-
In the API element, select Import cURL command.
-
In the cURL field, enter the cURL command for the API.
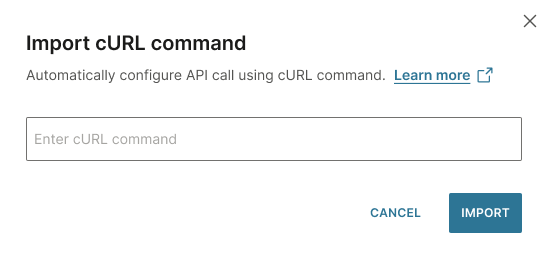
A GET request is made to the API endpoint and the data is fetched from the specified URL.
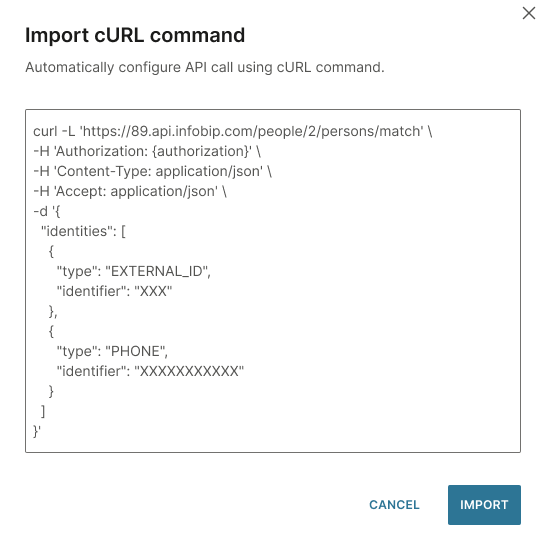
-
Select Import.
The fields in the element are now automatically updated.
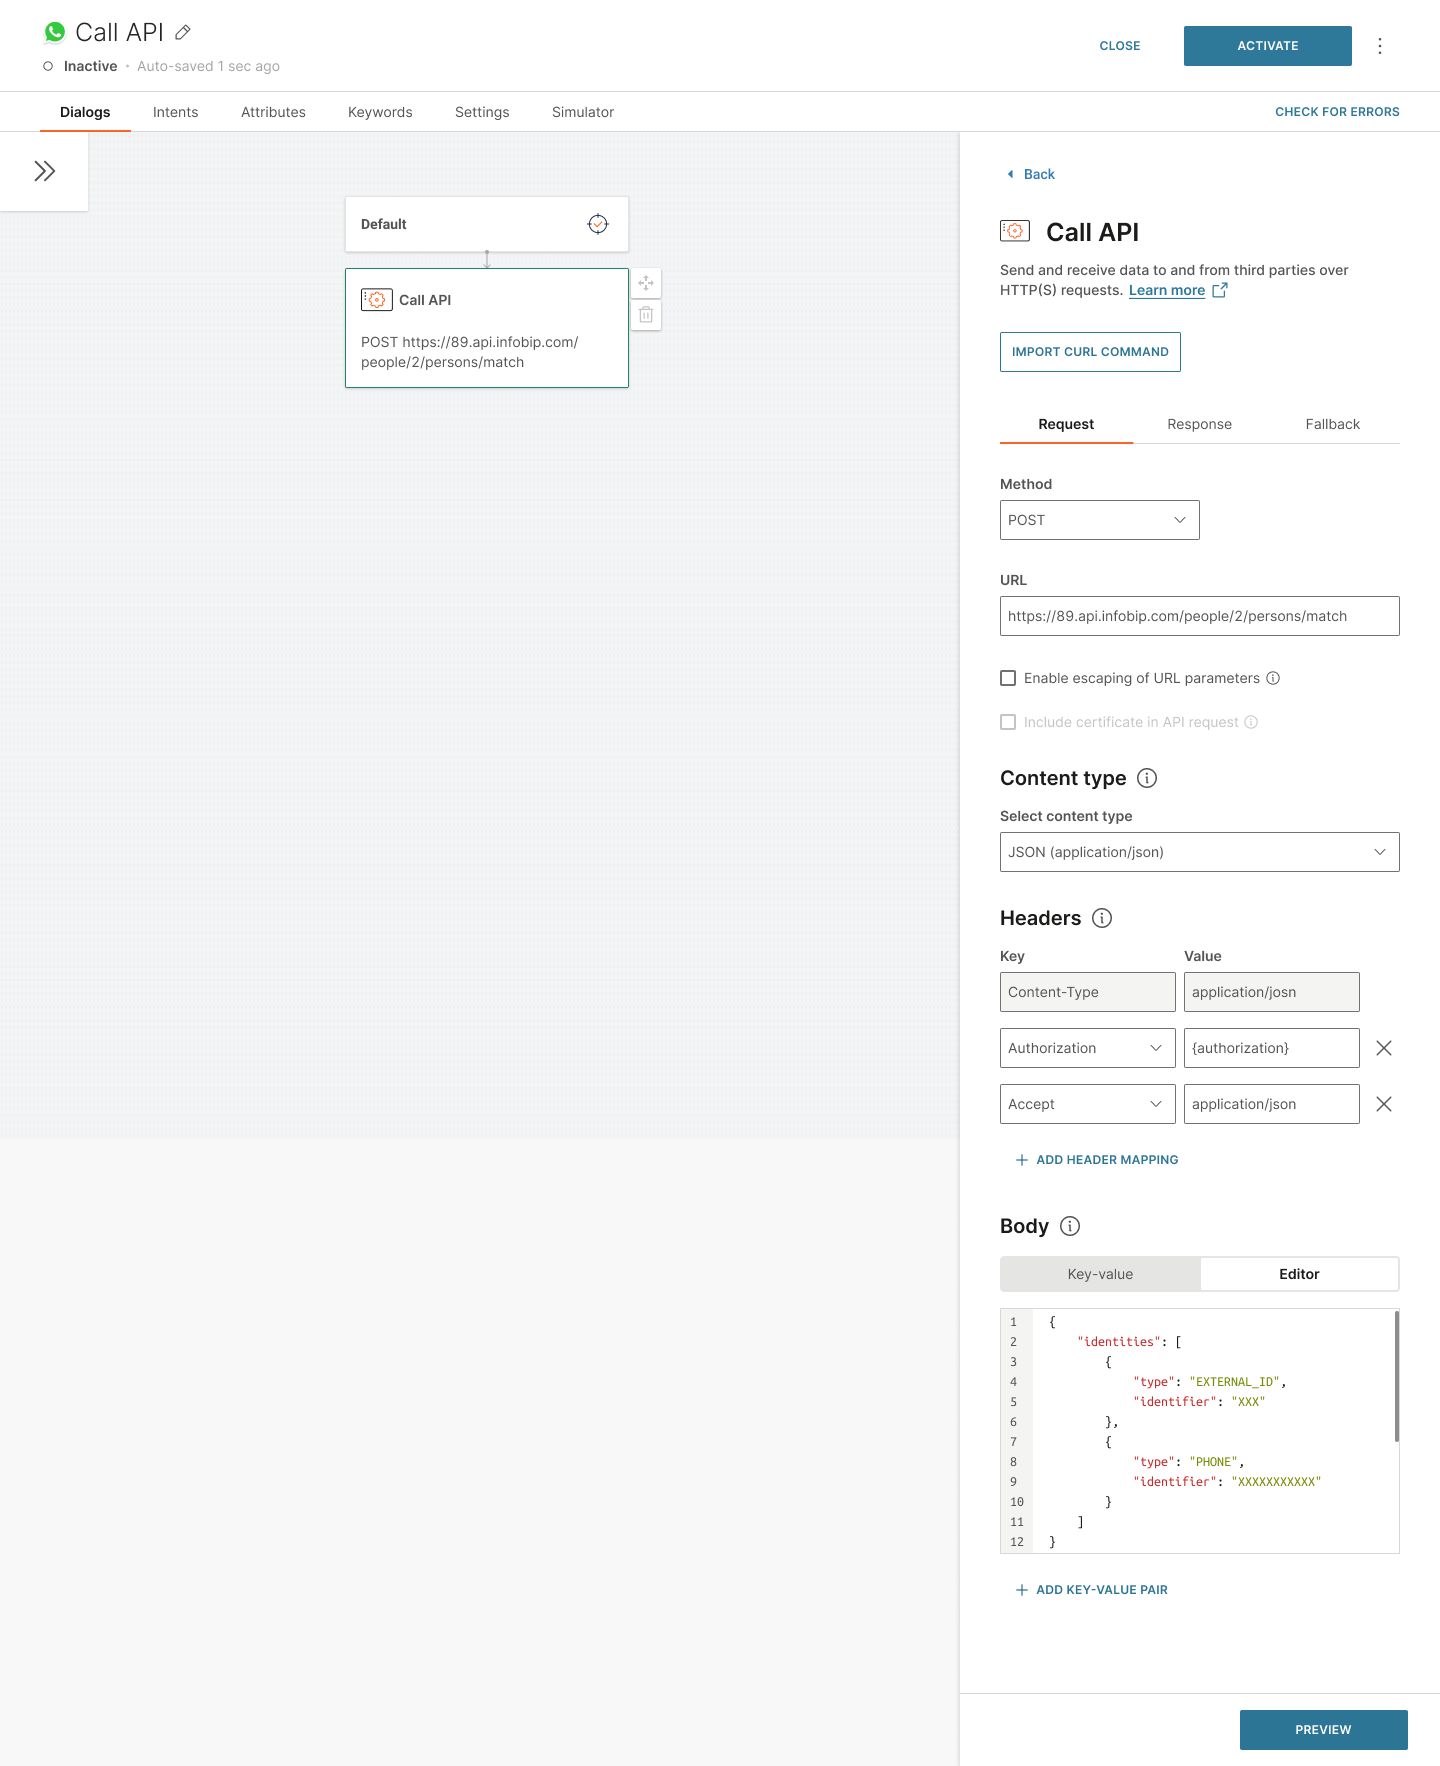
Request [#request-api]
Go to the Request tab and complete the following fields.
You cannot use inbound attributes or the lastReceivedMessage attribute in the fields in the Request tab.
Method [#method-api]
Choose one of the following API methods.
- Get
- Post
- Put
- Delete
- Patch
- Head
URL [#url-api]
Enter the base URL of your external system, along with the required endpoint. You can include placeholders.
The following is an example of a base URL. Do not use it in your code.
https://example.infobip.com/sms/2/text/advanced
where https://example.infobip.com is the base URL used in the send SMS endpoint.
Enable escaping of URL parameters [#enable-escaping-of-url-parameters-api]
Select this field if your base URL contains attributes that have one or more of the following:
- Non-ASCII characters
- Reserved characters
- Characters that are unsafe by web standards
Selecting this field replaces these characters.
Example: The base URL has parameters that return an empty space. Enabling the escape option escapes that character and returns a valid URL.
Include mTLS certificate in API request [#include-certificate-in-api-request-api]
Mutual TLS (mTLS) is an enhancement of the standard TLS protocol. It adds an extra layer of security by requiring both the client and server to authenticate each other. This ensures that both participants in the communication are verified, thus providing a secure communication channel that protects sensitive data from unauthorized access. Thus, using mTLS enhances trust and security in data exchanges.
To include mTLS certificates in your API requests, you need to provide both a valid client certificate and a private key. This setup enables your application to authenticate itself to the server, while the server also shares its certificate for verification.
To set up and use mTLS certificates, do the following:
- Set Up mTLS certificates: Before making mTLS requests, set up the necessary client certificate and private key. Contact Infobip Support to configure the certificates.
- Configure API requests: After your mTLS certificates are set up, configure your API requests to include the certificates. In the API call configuration, select Include mTLS certificate in API request.
- Multiple certificates (Optional): You can set up multiple mTLS certificates and choose a different certificate for each API element, depending on your security requirements.
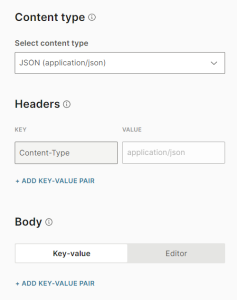
Content type [#content-type-api]
Specify the type of content for the request header. Example: Choose JSON to indicate that the request data is sent in JSON format.
Depending on the content type that you choose, the header and body are as follows:
| Content-type | Description | Header | Body |
|---|---|---|---|
| None | Select if your API has only a header and does not have a body. | No predefined key-value pair. Option to create key-value pairs. | N/A |
| Raw | Use for unstructured requests. Example: Requests that contain only numbers or blocks of texts. Also, use for custom content types that are not available on the predefined list. Example: text/xml. For custom content-type header, manually enter the required content-type header. | No predefined key-value pair. Option to create key-value pairs. | Editor |
| JSON | application/json: Select for most REST API calls. | Predefined key-value pair. (Content-Type, application/json) Option to create key-value pairs. | Key-value pair, Editor |
| Text | text/plain: The content is in a human-readable format. | Predefined key-value pair.(Content-Type, application/json) Option to create key-value pairs. | Editor |
| XML | application/xml: The content format is intended for computers. | Predefined key-value pair.(Content-Type, application/json) Option to create key-value pairs. | Editor |
| URL-encoded | application/x-www-form-urlencoded | Predefined key-value pair.(Content-Type, application/json) Option to create key-value pairs. | Key-value pair |
| Form Data | multipart/form-data: Use when sending binary (non-alphanumeric) data or a large sized payload | Predefined key-value pair.(Content-Type, application/json) Option to create key-value pairs. | Key-value pair |
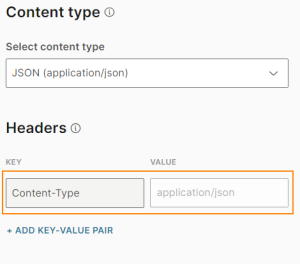
Headers (Optional) [#headers-optional-api]
Use the request header to provide information about the request so that the server can customize the response. Example: Use the Accept-Encoding header to specify the required encoding for the response.
This metadata is specified in key-value pairs of parameters and is sent along with the request. For some content types, the key-value pair has a predefined value that specifies the type.
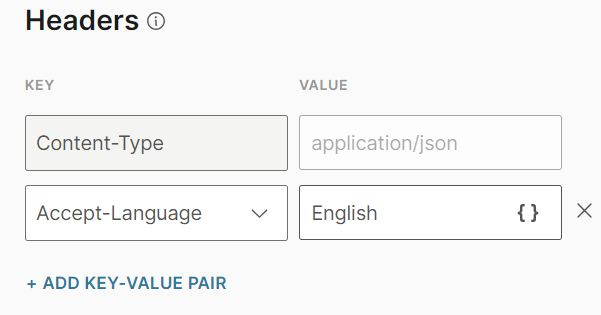
If you need additional values in your header, do the following:
- Click Add key-value pair.
- In the Key field, select the required criterion from the list. Example: Accept-language.
- In the Value field, enter the value. You can also add an attribute that contains the value.
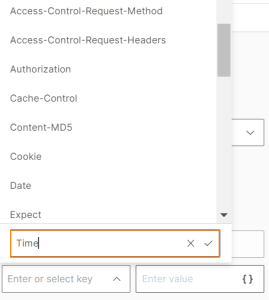
If a key-value pair is not in the list, do the following to add the values that you need for your API call.
- Click Add key-value pair.
- In the Key field, select Enter custom.
- Enter the name of the key.
- Click the checkmark.
- In the Value field, enter the value. You can also add an attribute that contains the value.
You cannot add multiple key-value pairs that have the same key. Example: You cannot add two key-value pairs that have the Accept-language key.
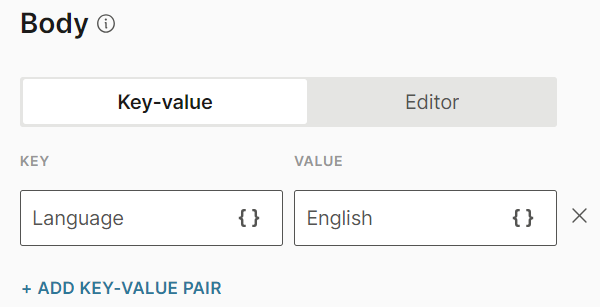
Body (Optional) [#body-optional-api]
Specify the body of the API call. Depending on the content type, you can use a Key-value pair and/or the Editor.
Key-value pair: To add a key-value pair, do the following:
- Click Add key-value pair.
- In the Key field, enter the required criterion. Example: Language. You can also add an attribute that contains the key.
- In the Value field, enter the value. You can also add an attribute that contains the value.
You cannot add multiple key-value pairs that have the same key. Example: You cannot add two key-value pairs that have the Language key.
Editor: Specify the text to include as the body of your request.
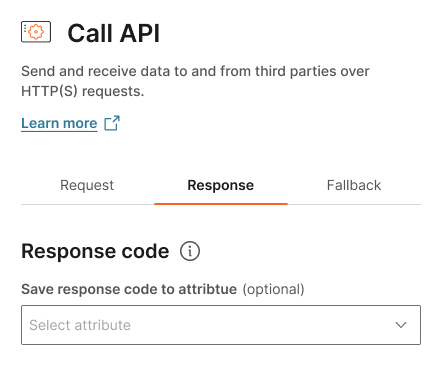
Response [#response-api]
Responses to API calls are saved in attributes.
For information about saving any XML files that you receive, refer to the how to section.
To save the response that you expect to receive, go to the Response tab, and complete the following fields.
Save response code to attribute (Optional) [#save-response-code-to-attribute-optional-api]
To save response types to your APIs, do the following:
- Create an attribute.
- Select the attribute from the Save response code to attribute list.
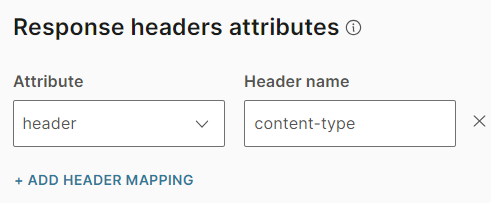
Response headers attributes [#response-headers-attributes-api]
To save the response header to an attribute, do the following:
- Create one or more attributes to save the response header.
- Select Add attribute.
- In the Attribute field, select the attributes from the list.
- In the Header name field, enter the name of the header. This field is not case sensitive.
Response body attributes [#response-body-attributes-api]
When you expect values in the return body of your API call and want to save them, do the following:
- Create one or more attributes to save the response body.
- Select Add attribute.
- In the Attribute field, select the attributes from the list.
- In the Path field, enter the path to the attribute. The path is the location in the JSON file hierarchy where the value of that attribute is located. Depending on the level where the attribute is located, include all the previous levels separated by a dot “.” in the attribute path.
Timeout [#timeout-api]
Specify how long you want to wait for the response. The minimum value is 1 second and the maximum value is 60 seconds. The default value is 10 seconds.
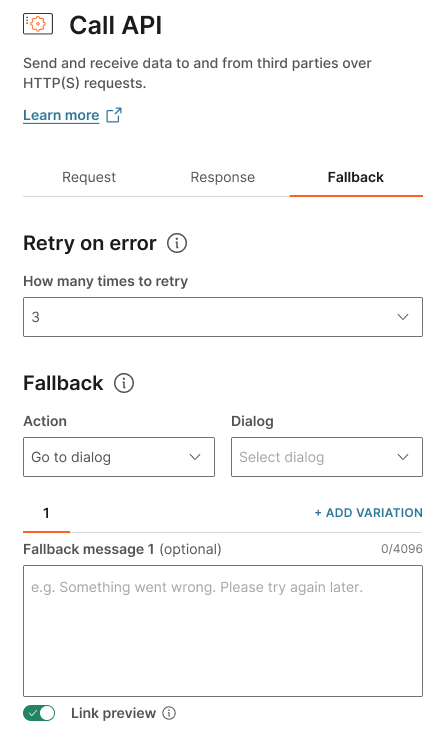
Fallback [#fallback-api]
Retry on Error
Use this option to retry the request in case of the following errors.
- 408
- 500, 502, 503, 504
- Timeout
For all other errors, Fallback is triggered.
In the How many times to retry field, do one of the following.
- Select the number of times the chatbot must retry the request. You can retry a maximum of 3 times.
- If you do not want to retry the request, select No retry.
Fallback
Use fallback to make sure that the end user gets a response from the chatbot even if there is an error. Example: The request fails, or the API element fails.
In such cases, the fallback action is triggered.
For more information about configuring these fields, refer to the Fallback documentation.
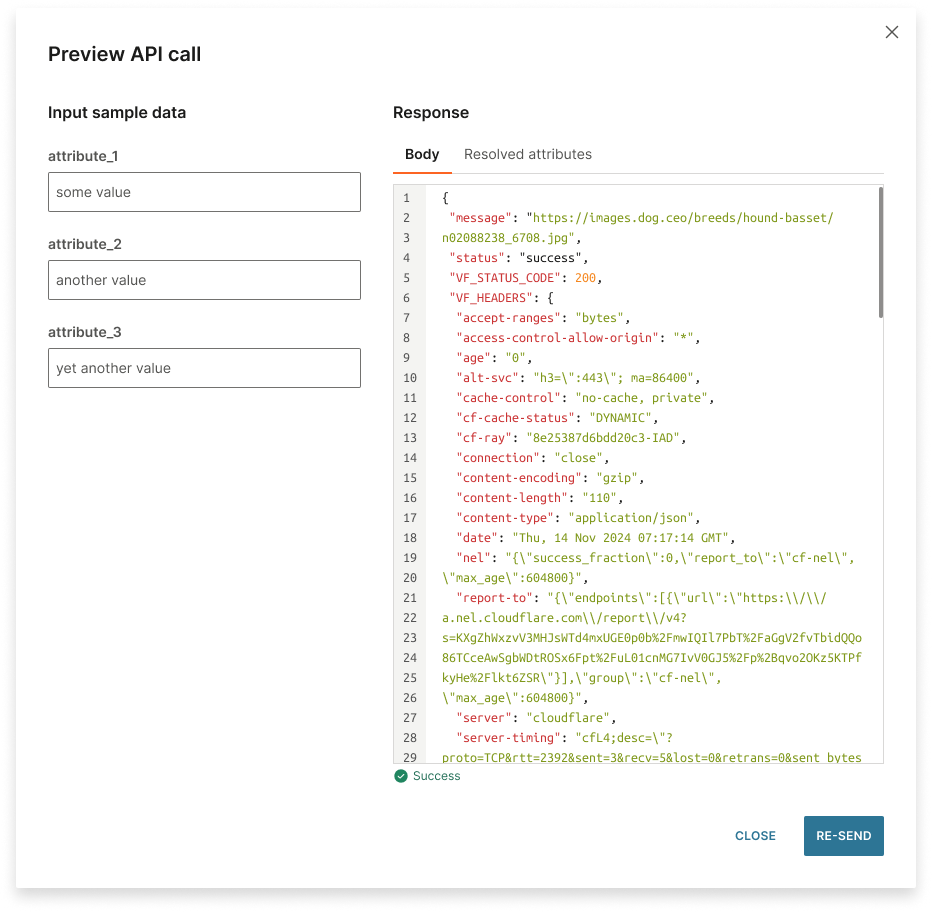
Preview the API call [#preview-api]
To check whether the API call works as expected, you can use predefined values, which represent real-life scenarios, in the payload.
Do the following.
- Select Preview in the API element.
- In the Preview API call window, enter sample values in the attribute fields.
- Select Send request.
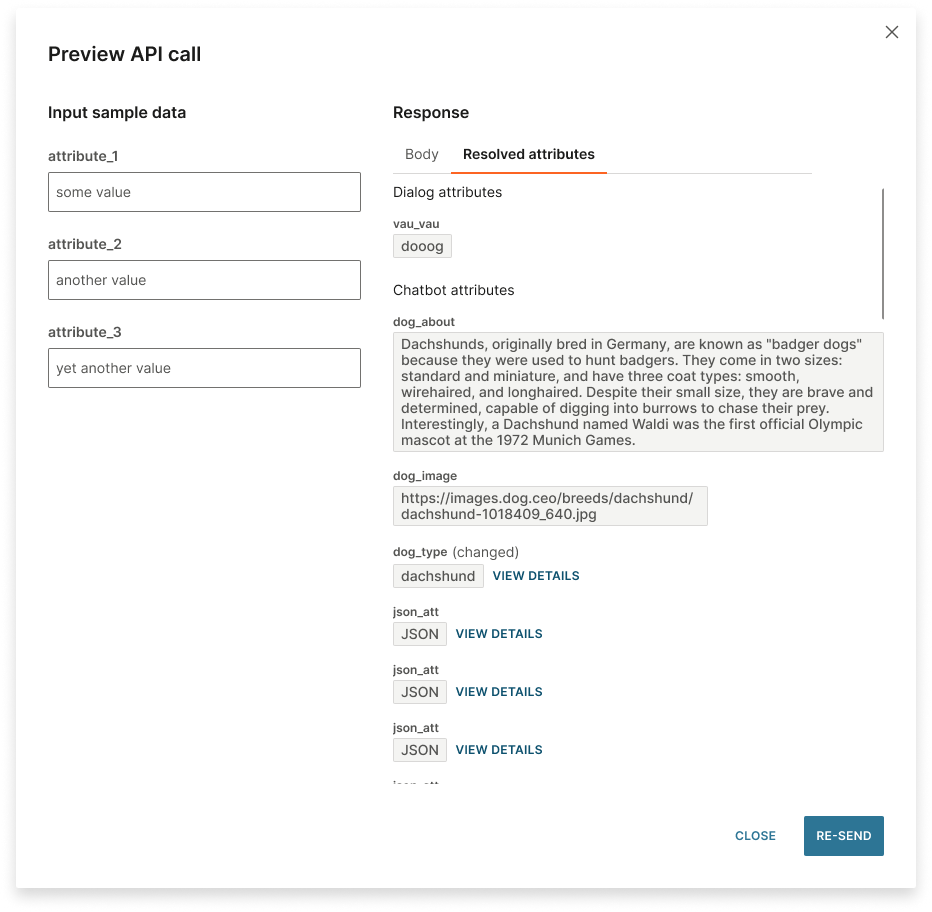
The response is generated and is displayed in a structured format, such as JSON. You can view the response data in the Body tab and the attributes that are updated in the Resolved attributes tab.
If there are any errors, a notification is displayed.
The following image shows an example of the response body.
The following image shows an example of the resolved attributes.
Test in the simulator [#simulate-api]
Simulate the API call to check whether the API element has been configured correctly and that it works as expected. In the simulator, you can see the API response that is saved in an attribute.
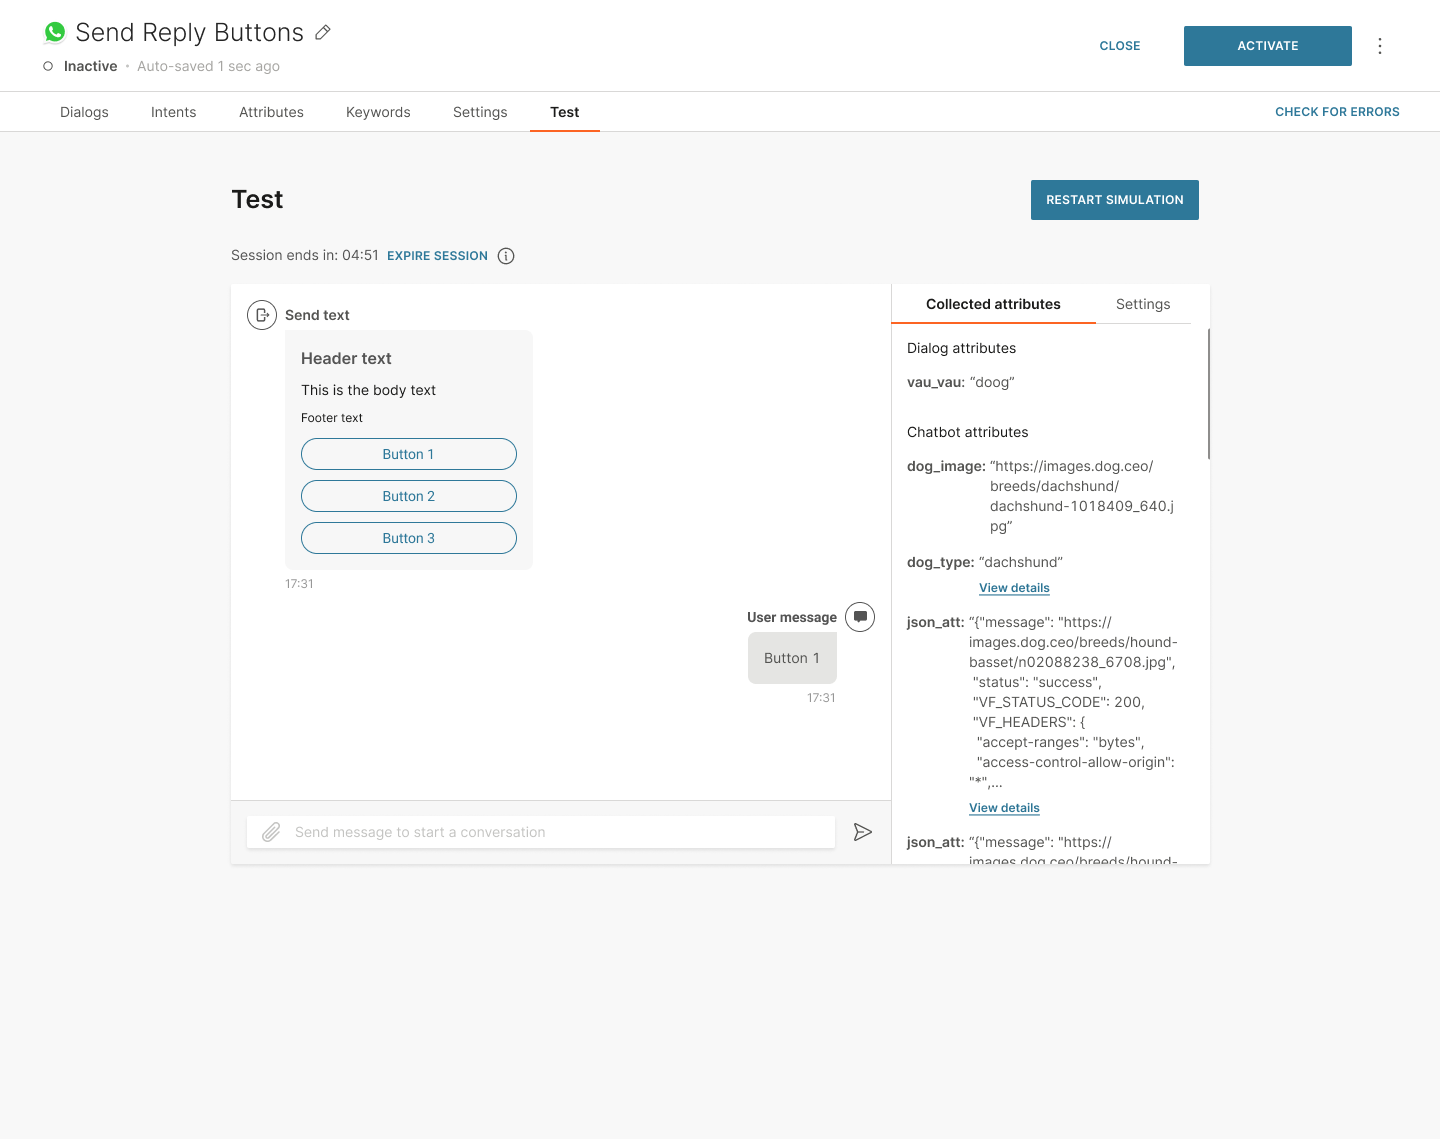
To simulate the API call, go to the Test tab in your chatbot and start the simulation.
SOAP API calls [#soap-api-calls-api]
SOAP API calls can be sent only in XML format. There can be only one root element, which acts as the envelope, in the file.
Most SOAP APIs use Web Service Definition Language (WSDL). WSDL defines the structure of the xml. Example: Whether an element or attribute can appear multiple times, whether it is required or optional, and the order of the elements. If the service with which you are interfacing has a WSDL, it will be easier to connect with it.
SOAP calls accept the values of text, xml, and xml list. Choose the format depending on how you want to use the values later in the Code element. Example: Whether there are xml tags that you want to extract from the response you receive.
Request [#request-api]
You can write XML for SOAP API calls in the following ways:
| Content type | Header | When to use |
|---|---|---|
| Raw | Key: Content-Type Value: text/xml | If end user can read the source xml document |
| XML | Predefined header (Key: Content-Type, Value: application/xml) | All other cases |
Response [#response-api]
SOAP response xml follows the same logic as the incoming request. In case of an error, the xml contains the message details.
SOAP versus REST API [#soap-versus-rest-api-api]
Consider using REST communication protocol for the following reasons.
- SOAP APIs are slower and more complex than REST APIs.
- SOAP APIs can with only with XML files.
- SOAP APIs do not cache information.
Authentication
The Authentication element is only available for the Authentication dialog and is used to trigger authentication at the end of authenticated dialog flows.
Set up a secured chatbot using authentication
Close Session
Use this element to terminate the entire session. This element is not configurable and only works by ending the chat with the end user when they reach this stage of the conversation.
If the user continues to talk with a chatbot that has closed the session, the chatbot will treat it as a new session and will start afresh.
It requires no configuration – but bear in mind that when you add it to the dialog, the element will finish the conversation between the end user and the chatbot. In case the user wants to continue talking with the bot, they will have to start the conversation from the beginning.
Code [#code]
The Code element gives you flexibility when designing a chatbot. The element enables you to manipulate data, process API responses, store and extract values from attributes, and encrypt data.
Refer to the Use cases and Examples for more information.
Available classes [#code-classes]
The following classes are available:
-
attributeAPI: Enables you to work with the attributes in the platform by using the following functions:
- GET
- SET
-
encryptionUtils: Supports the following hash functions:
- MD5
- SHA-1
- SHA-256
- SHA-512
Configure the element [#code-configure]
You can either enter the code manually or generate it through GenAI.
Enter the code manually [#code-configure-manual]
Use JavaScript to write the code manually.
Use GenAI to create and manage code [#code-configure-genai]
EARLY ACCESS
Instead of manually typing or troubleshooting the code, use GenAI.
You can do the following:
- Create code with AI: Generate code from scratch.
- Edit with AI: Enhance or add functionality to existing code.
- Improve code readability: Make existing code more readable.
- Fix code: Correct errors in existing code.
You can revert changes made by GenAI by using the Undo option.
This feature is in Early access. To enable it in your account, contact your Infobip account manager.
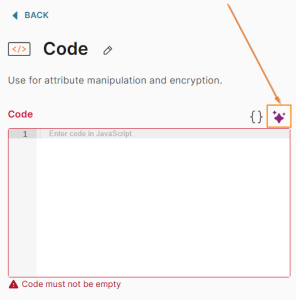
Create code with AI
Use GenAI to generate the code from scratch. Give instructions to GenAI, describing what you want it to do. Example: Include the potential input, expected output, and exceptions.
To use this feature, the Code field must be blank.
Do the following:
-
Select the GenAI icon.
-
In the page that opens, enter the description of the code.
Example: To check working hours, use the following code:
Create a function that will check current working hours. The store is open Mon-Fri from 6 AM to 2 PM.
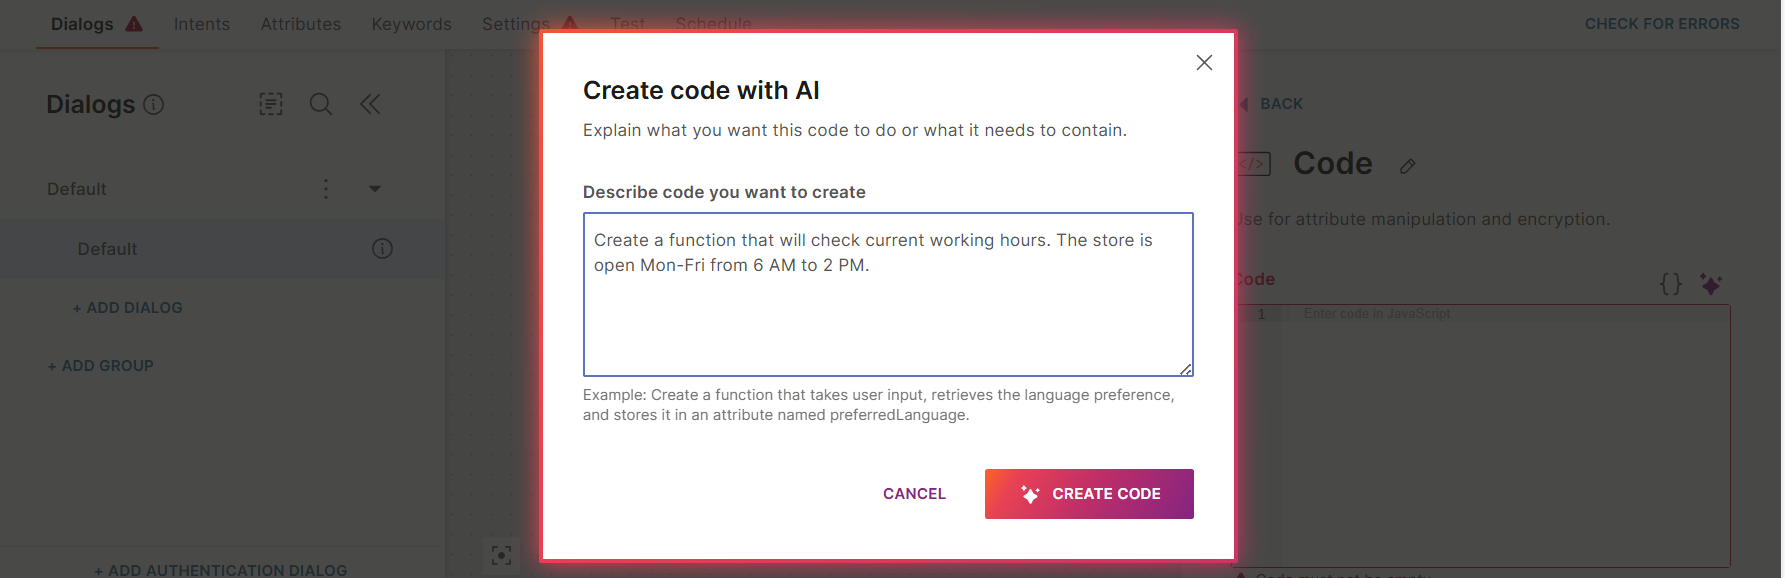
-
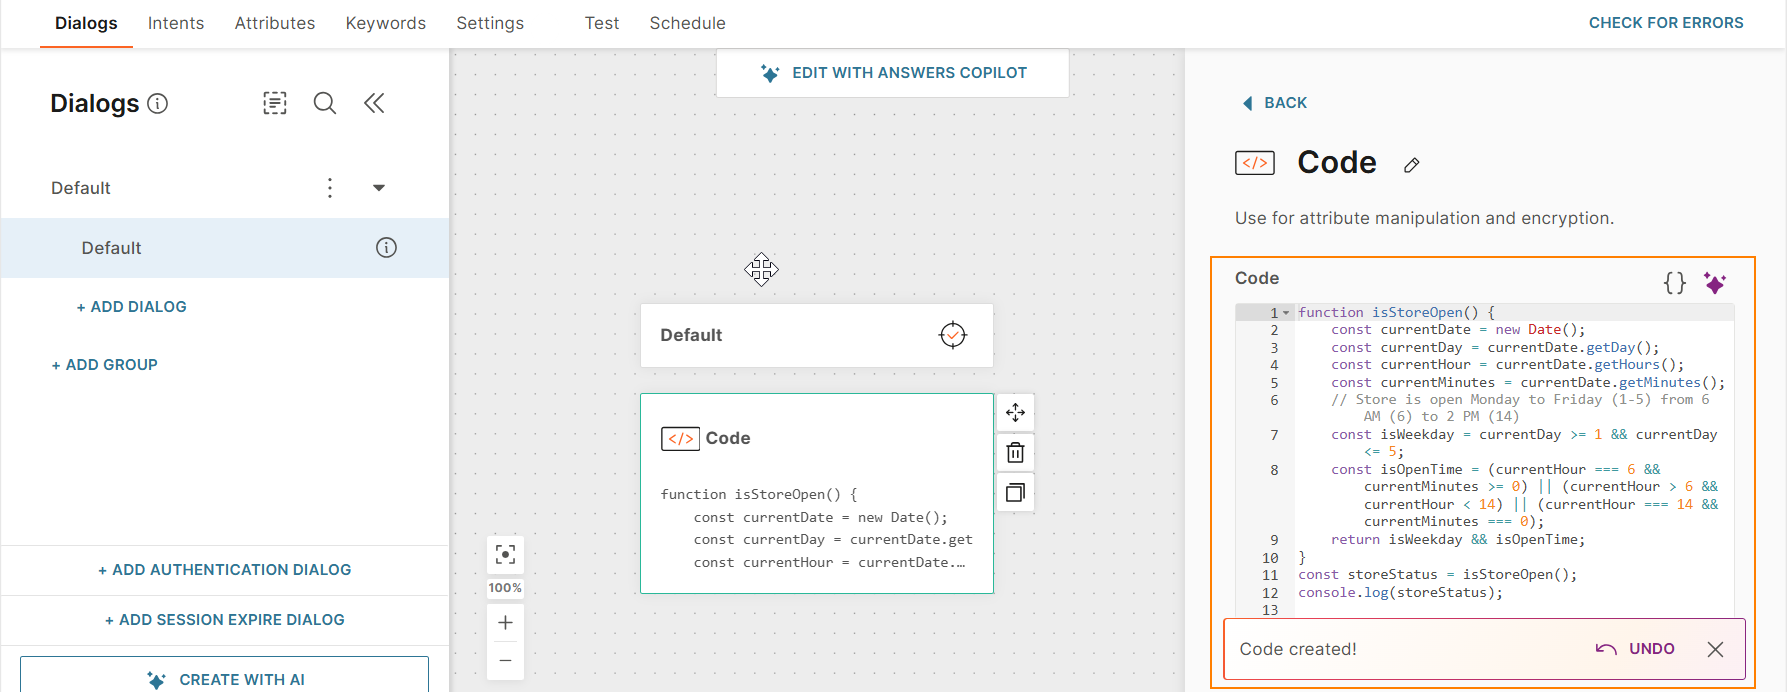
Select Create code.
GenAI creates the code.
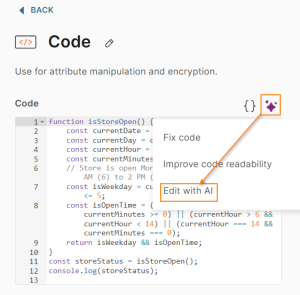
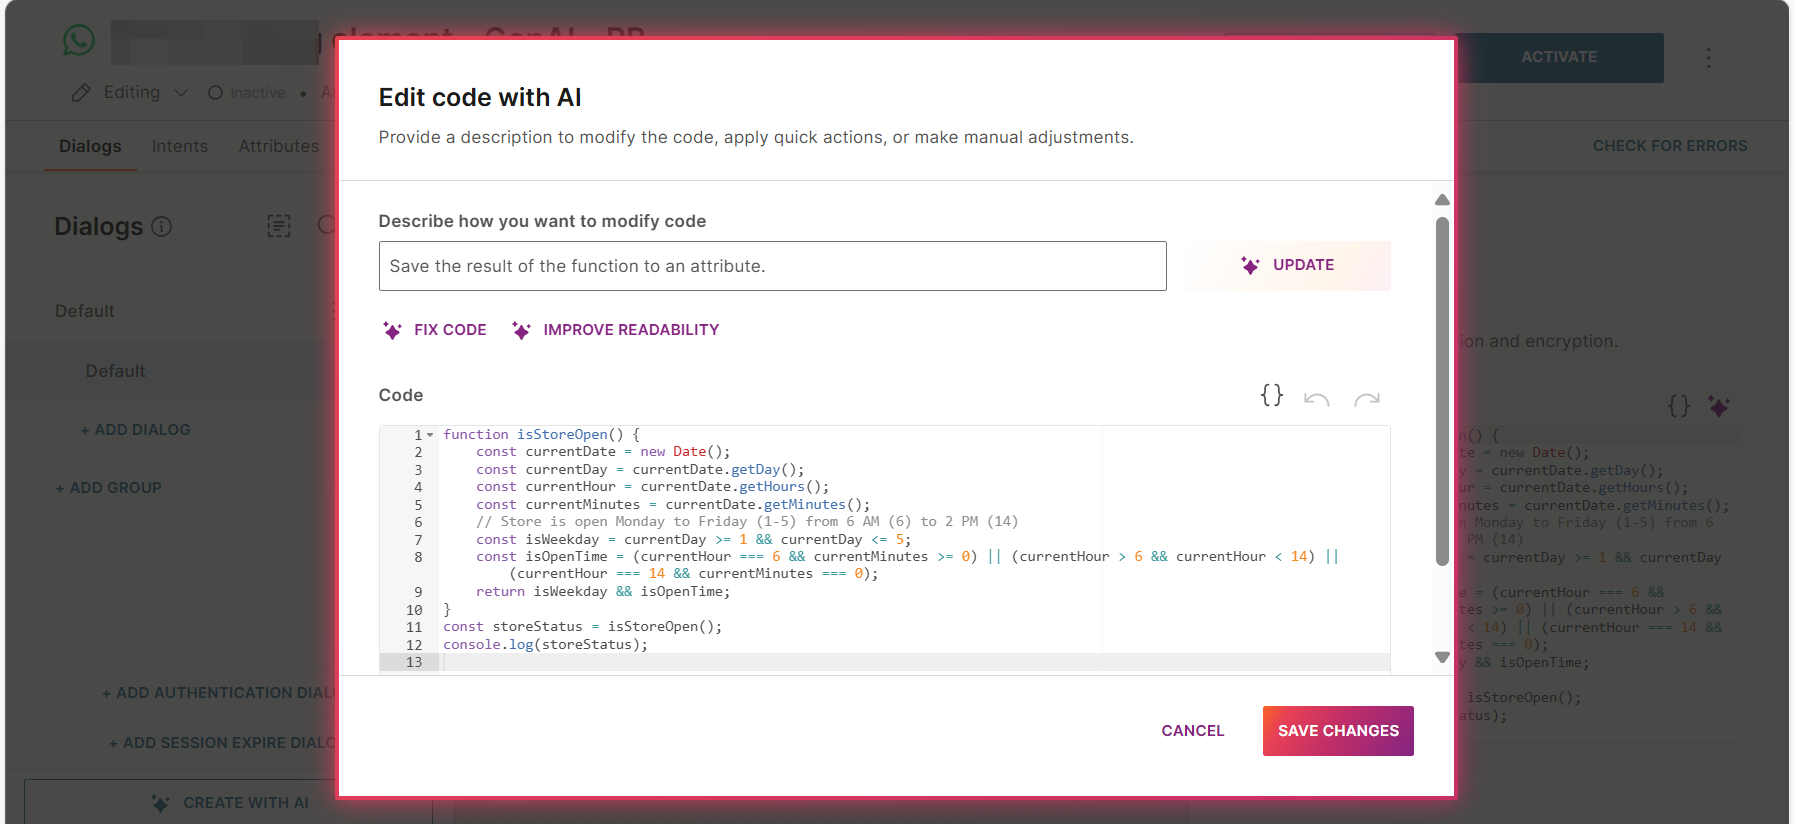
Edit with AI
To update existing code, do the following:
-
Select the GenAI icon > Edit with AI.
-
In the screen that opens, add instructions to GenAI.
Example: To save the results of the code to an attribute, use the following instructions:
Save the result of the function to an attribute.
-
GenAI updates the Code element with the additional functionality.
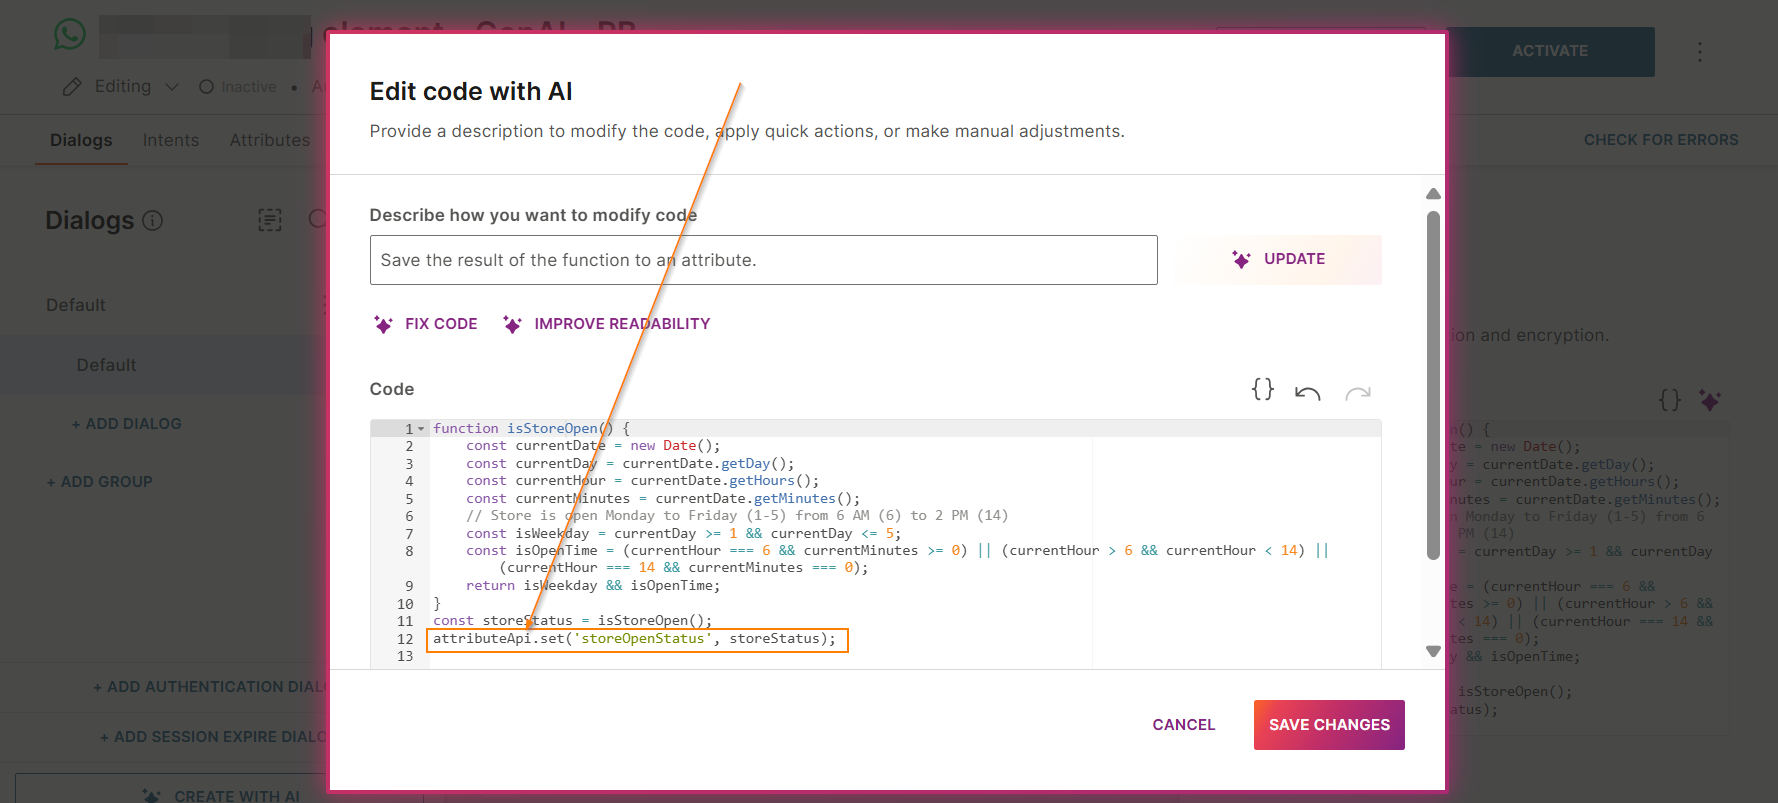
-
Select Save changes.
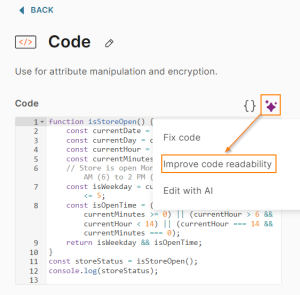
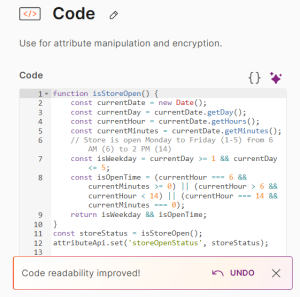
Improve code readability
To improve the readability of existing code, select the GenAI icon > Improve code readability.
GenAI updates the Code element with the improved content.
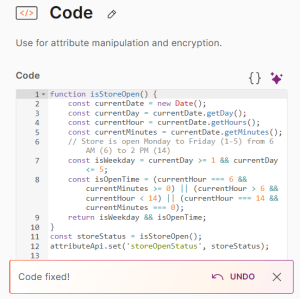
Fix code
To correct errors in existing code, select the GenAI icon > Fix code.
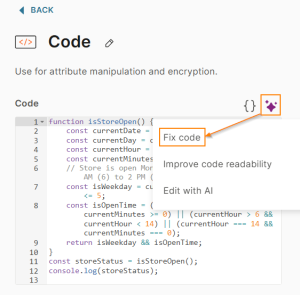
GenAI updates the Code element with the corrected code.
Use cases [#code-use-cases]
This section shows how to use the Code element. For more examples, refer to Code in Coding element.
You can use the Code element to do the following:
Randomize existing information
Use counters
After adding counters, you can add the Conditions element to branch the results.
Transfer large JSON files into attributes to enable data manipulation
Add encryption to attributes

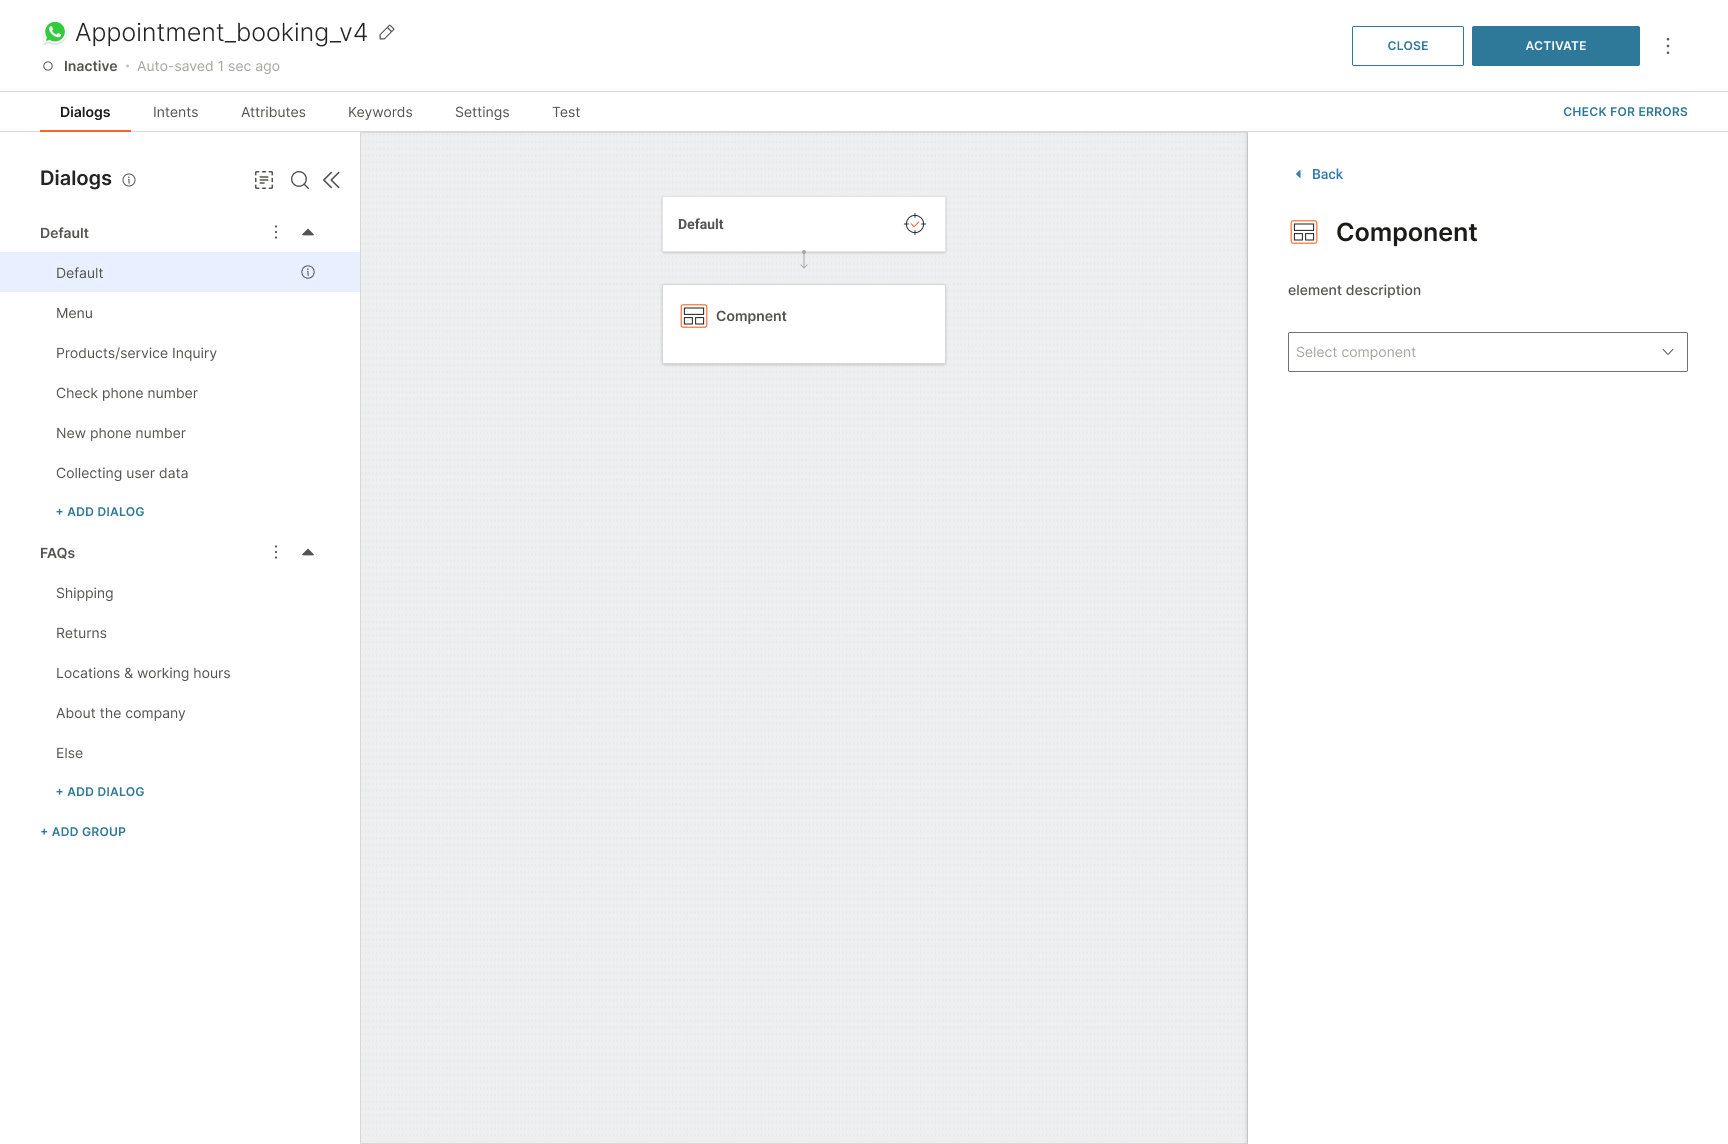
Component [#component]
Use the Component element to add a component to your chatbot.
Configure the element
-
In the side panel of the element, do one of the following:
- Select an existing Active component from the list.
- To create a new component, select Go to components.
-
Configure the input attribute values for the component. You can either enter the values manually or add other attributes that contain the values.
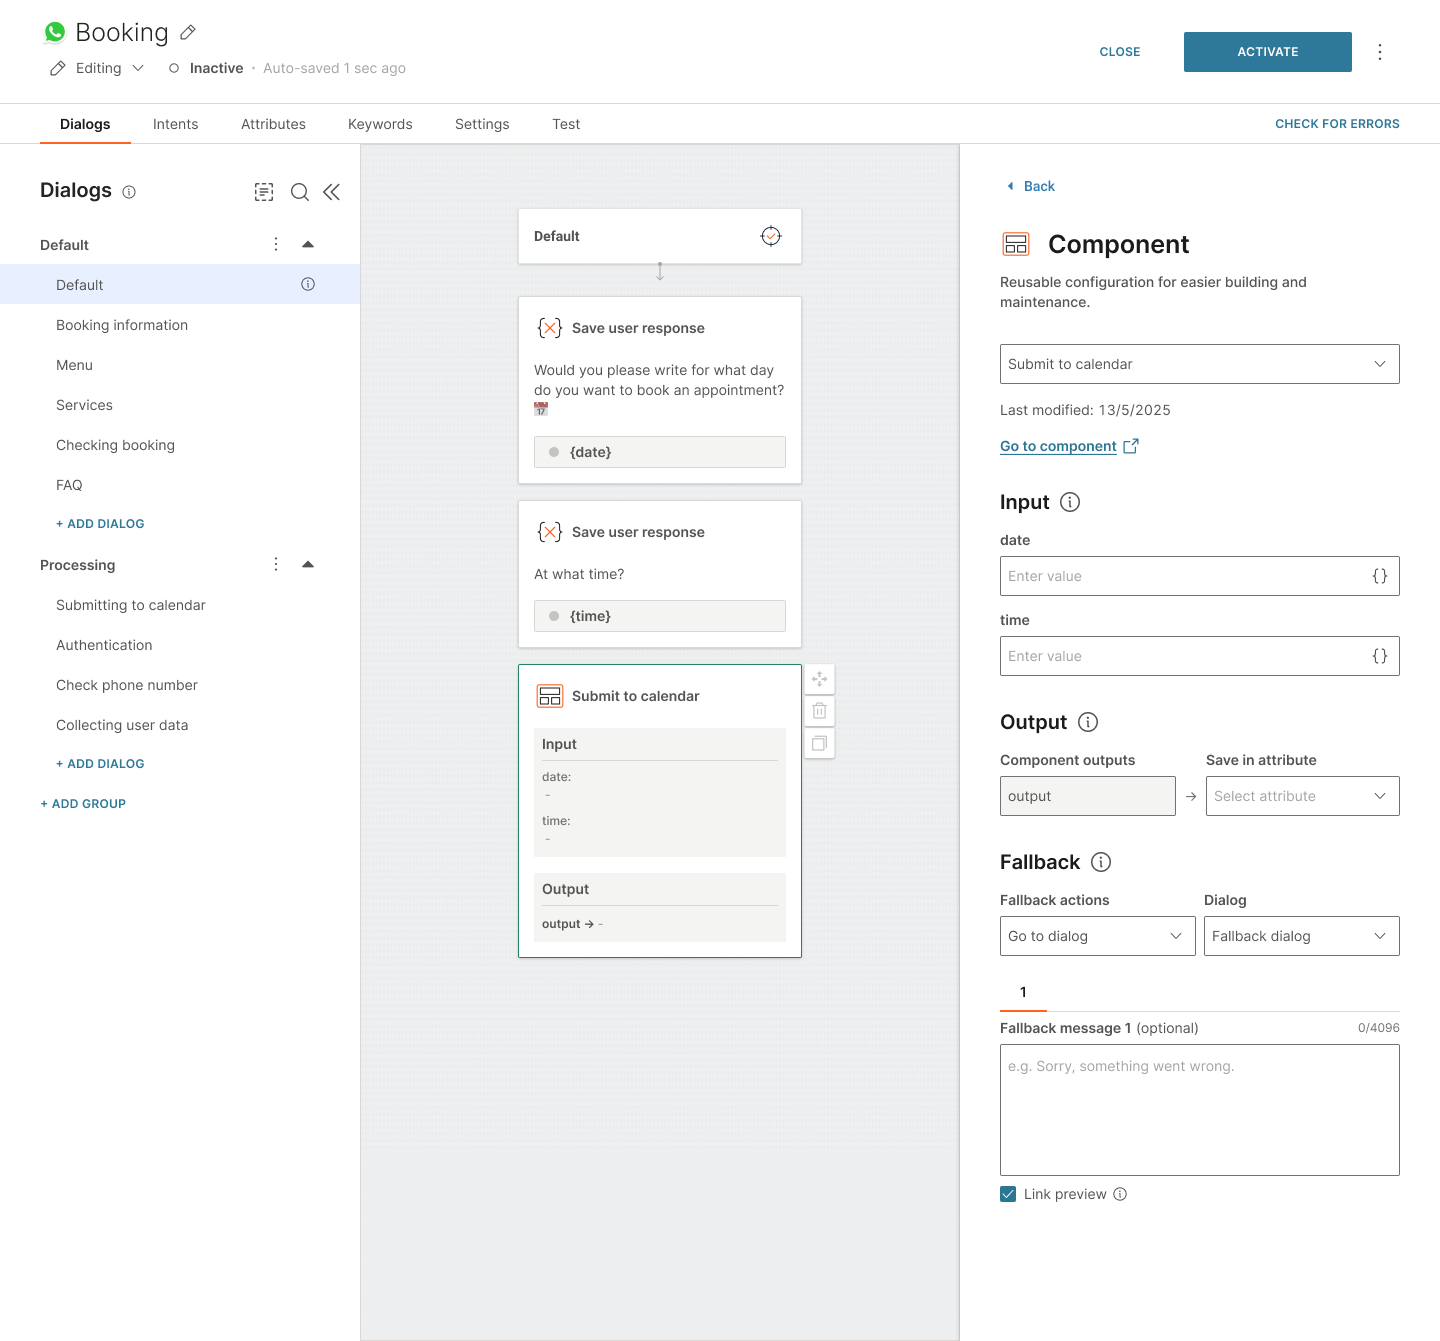
-
Save the output from the component in chatbot attributes. You can use these attributes later in the chatbot.
-
Configure a fallback.
Conditions
Use the Conditions element to branch the end user's journey based on specific conditions.
Conditions can be based on the following:
- End user's response. Example: Depending on the option that the end user selects, the chatbot takes the relevant action.
- Internal events. Example: If the chatbot is successful in updating the Person profile in People, it takes a specific action. If the chatbot is not successful, it takes a different action.
The Conditions element uses attributes to evaluate the conditions. The chatbot checks whether the attribute value matches the value specified in the condition.
The Conditions element contains multiple conditions. After you configure the element, you can specify the action that the chatbot needs to take for each condition.
In the following example, depending on the end user's response, they are directed to the relevant dialog.
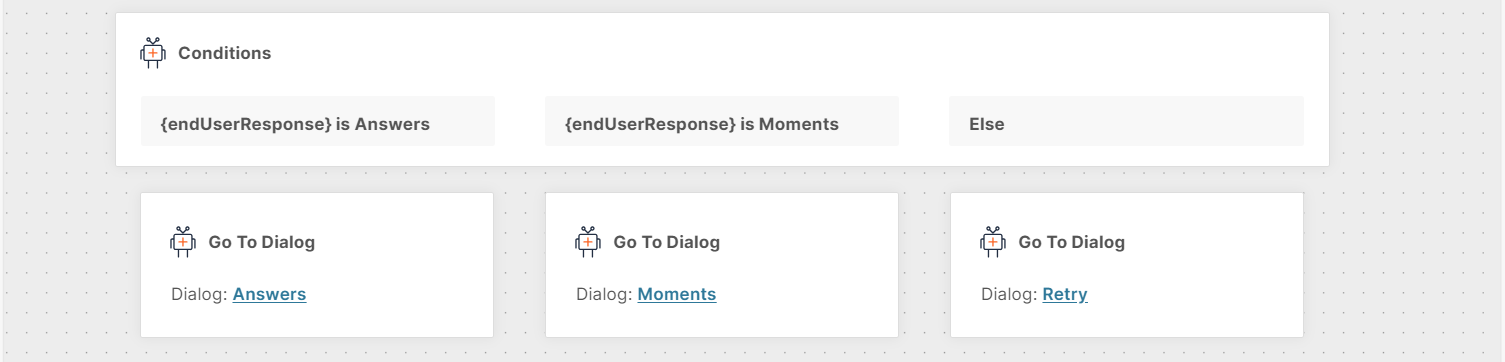
Add a Conditions element to the chatbot [#add-a-conditions-element-to-the-chatbot-conditions]
Guidelines [#guidelines-conditions]
- You can add only one Conditions element to a dialog.
- The element has an inbuilt Else condition. You cannot remove or rename this condition.
- You must add a minimum of 1 condition in addition to the inbuilt Else condition.
- Add as many conditions as required to branch the conversation.
- Add a minimum of 1 element for each branch, including Else.
- If the dialog already has an AI assistant element, you cannot add this element to a branch in the Conditions element.
- For AI chatbots, if you do not add the To dialog element to a branch, the NLP engine resolves the intent of the end user's message and directs the flow to the relevant dialog.
Add the Conditions element [#add-the-conditions-element-conditions]
In the chatbot editor, drag the Conditions element from the Chatbot Actions section.
Do the following for each condition within the element.
-
Select the attribute that contains the information to evaluate. You can select one of the following:
- Use a predefined attribute. Use this option when you want to validate internal events.
- Use an existing standard or NER attribute.
- Create a new standard or NER attribute.
-
Specify the operator. The available operators depend on the attribute type. Example: If an attribute is Boolean, only is and is not are available.
-
Specify the value against which the attribute needs to be matched. You can also select another attribute in this field.
The operators is null and is not null do not require any value.
The condition value is not case sensitive.
-
To evaluate the attribute against multiple values, select And and Or.
For more information about how attribute values are validated in the Conditions element, refer to the Attribute validation documentation.
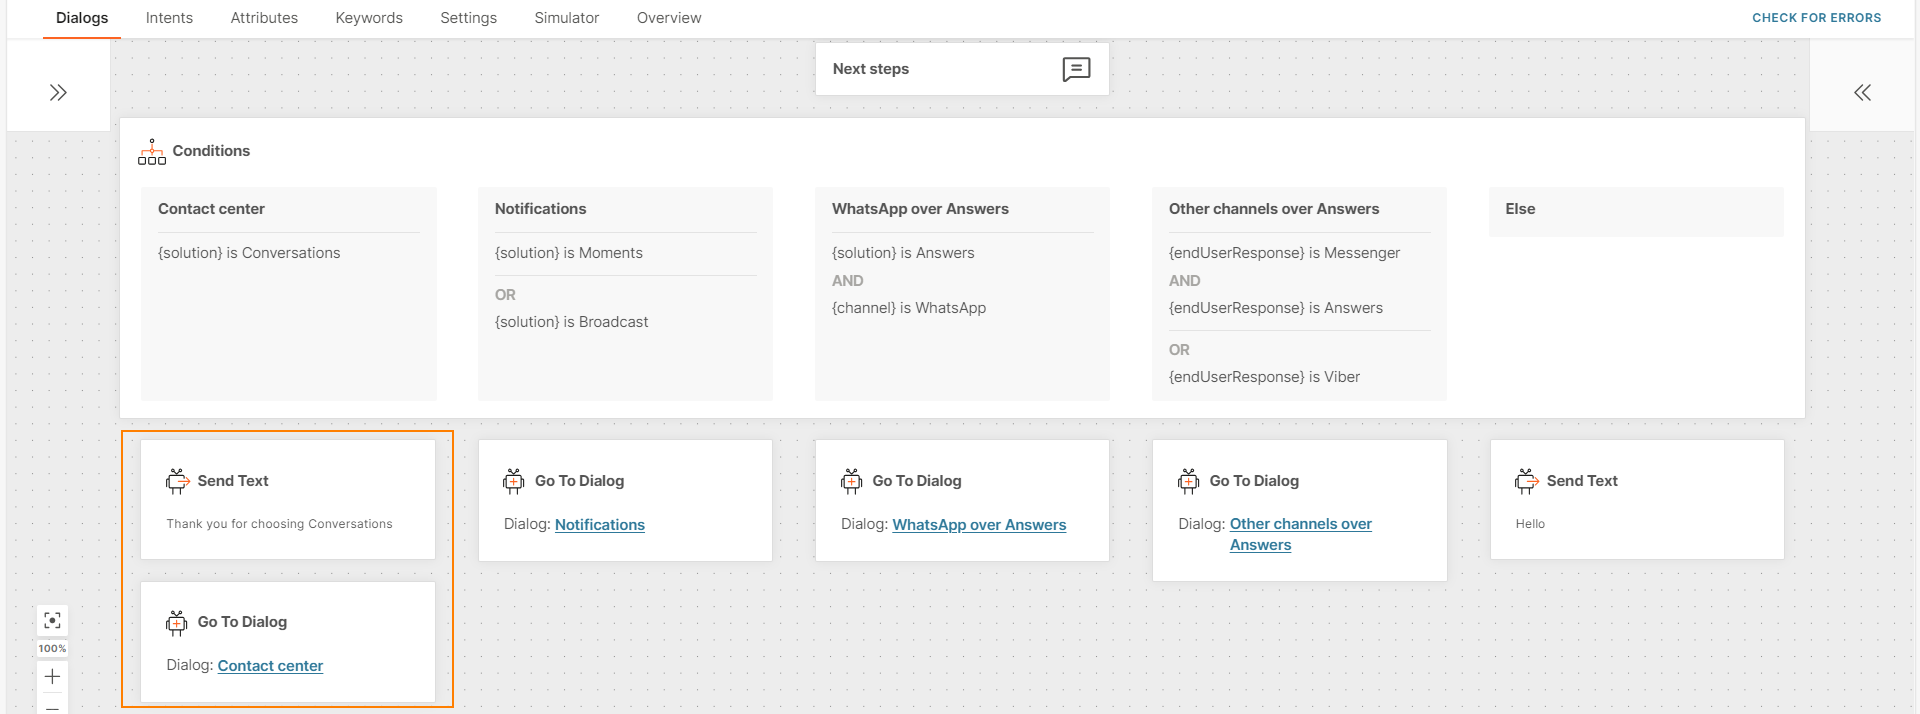
Configure the branches [#next-steps-conditions]
Specify the next steps for each branch of the Conditions element.
The following are some examples.
- Send a message to the end user. Example: If the end user's input matches the value Yes, send them a Thank you message.
- Use the To dialog element to direct the end user to the relevant dialog.
- Use the Save user response element to save the result of a validation. Example: If the end user's input matches the value Yes, update the OptInObtained attribute to True.
- Update databases. Example: If the end user's phone number has changed, use the People profile element to add the phone number in People.
Example [#example-conditions]
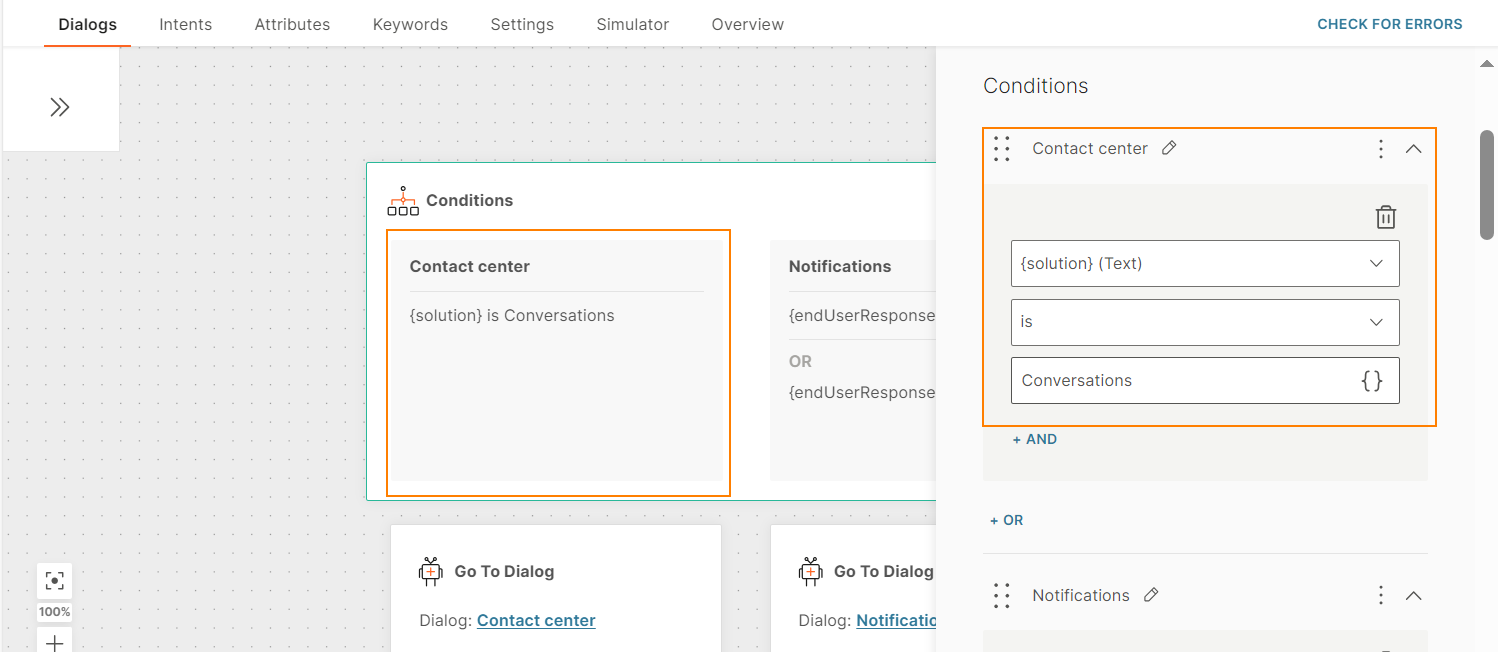
Simple condition [#simple-condition-conditions]
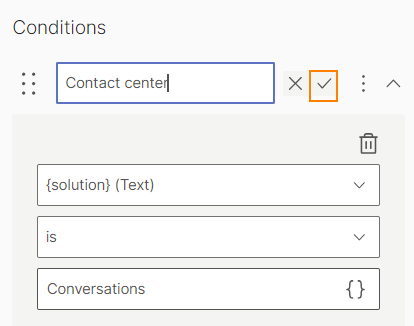
In the following example, a standard attribute solution is matched against the value Conversations by using the operator is.
The condition is (solution is Conversations).
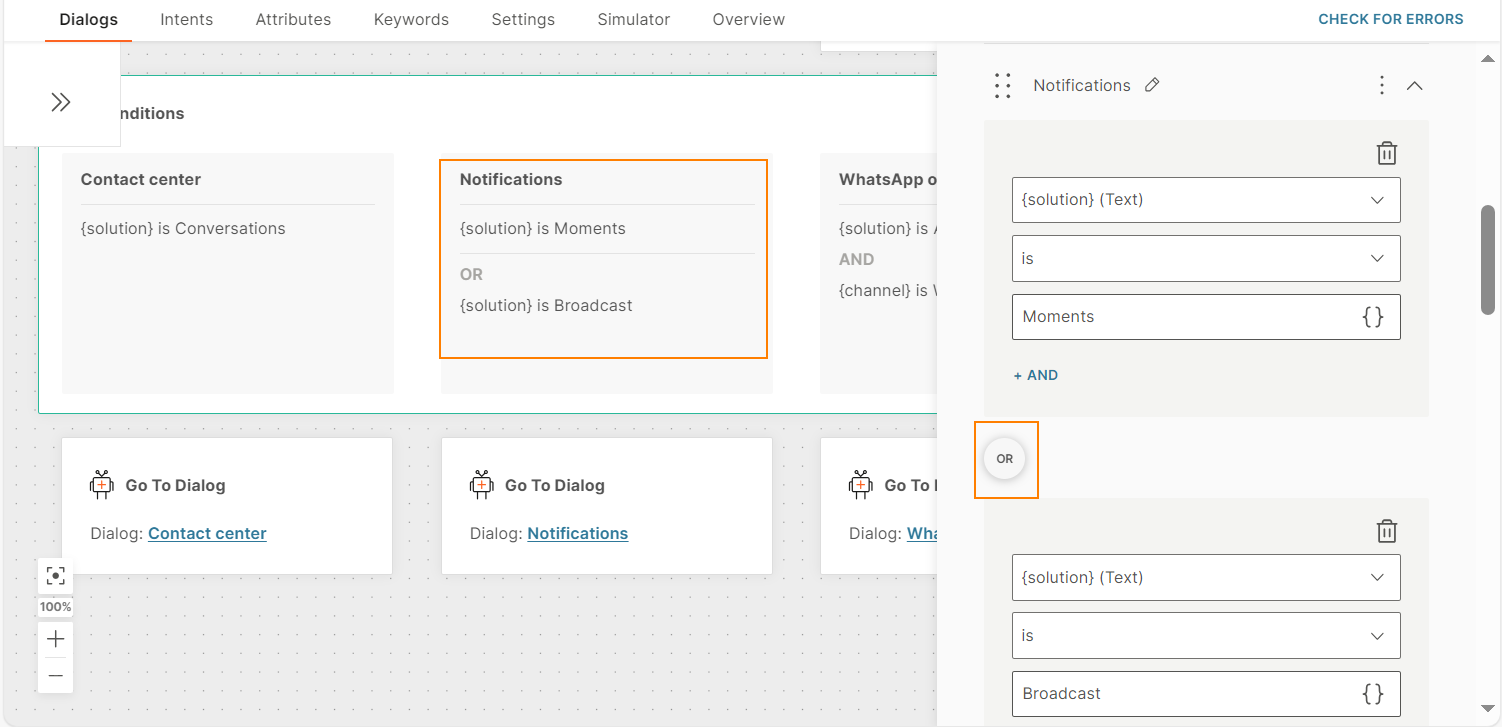
Condition that uses OR operator [#condition-that-uses-or-operator-conditions]
In the following example, the OR operator is used to include multiple criteria within the same condition. If one of the criteria is met, the chatbot takes the relevant action for this condition.
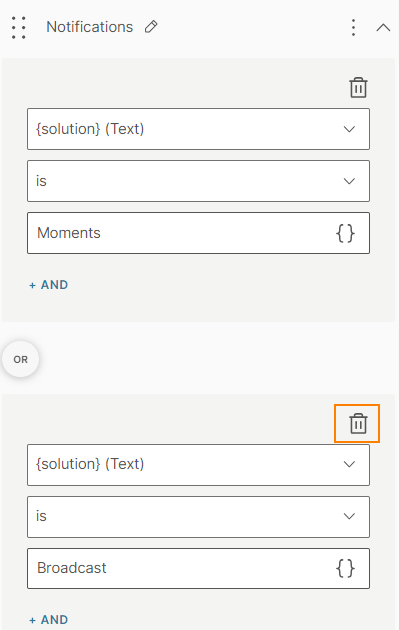
The condition is (solution is Moments OR solution is Broadcast).
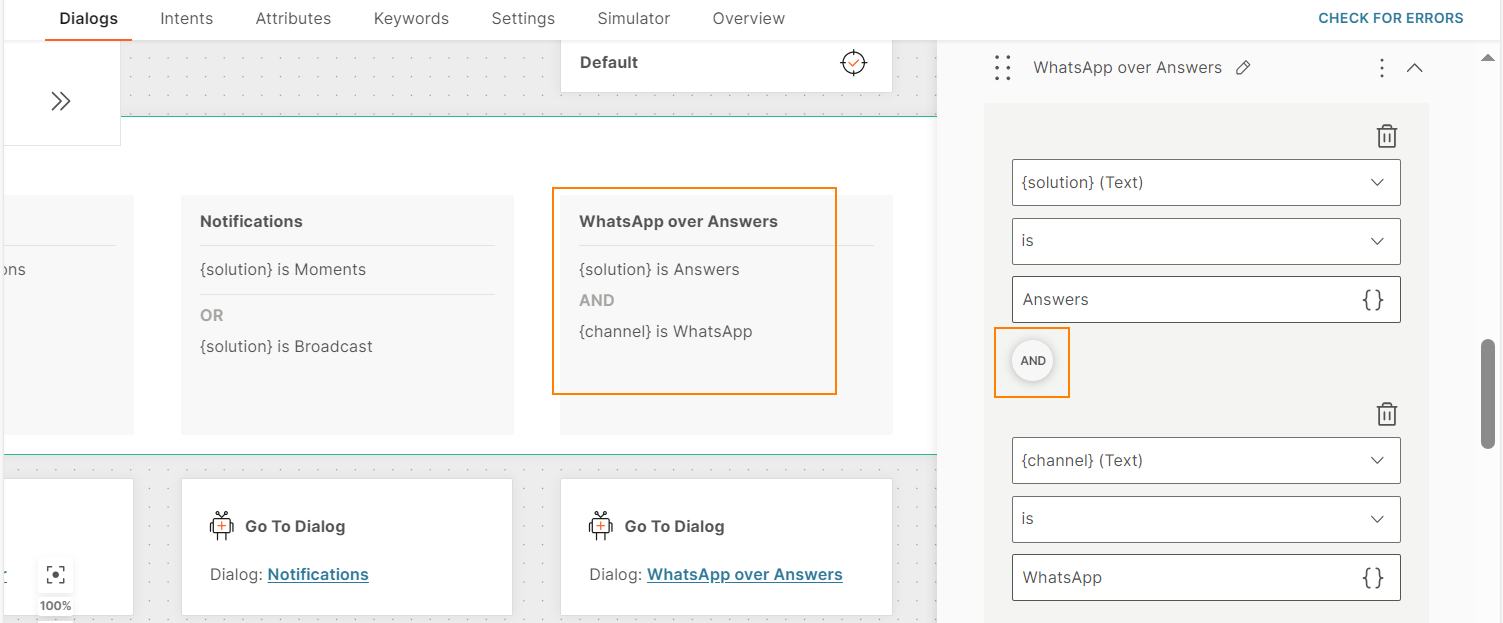
Condition that uses AND operator [#condition-that-uses-and-operator-conditions]
In the following example, the AND operator is used to include multiple criteria within the same condition. If both the criteria are met, the chatbot takes the relevant action for this condition.
The condition is (solution is Answers AND channel is WhatsApp).
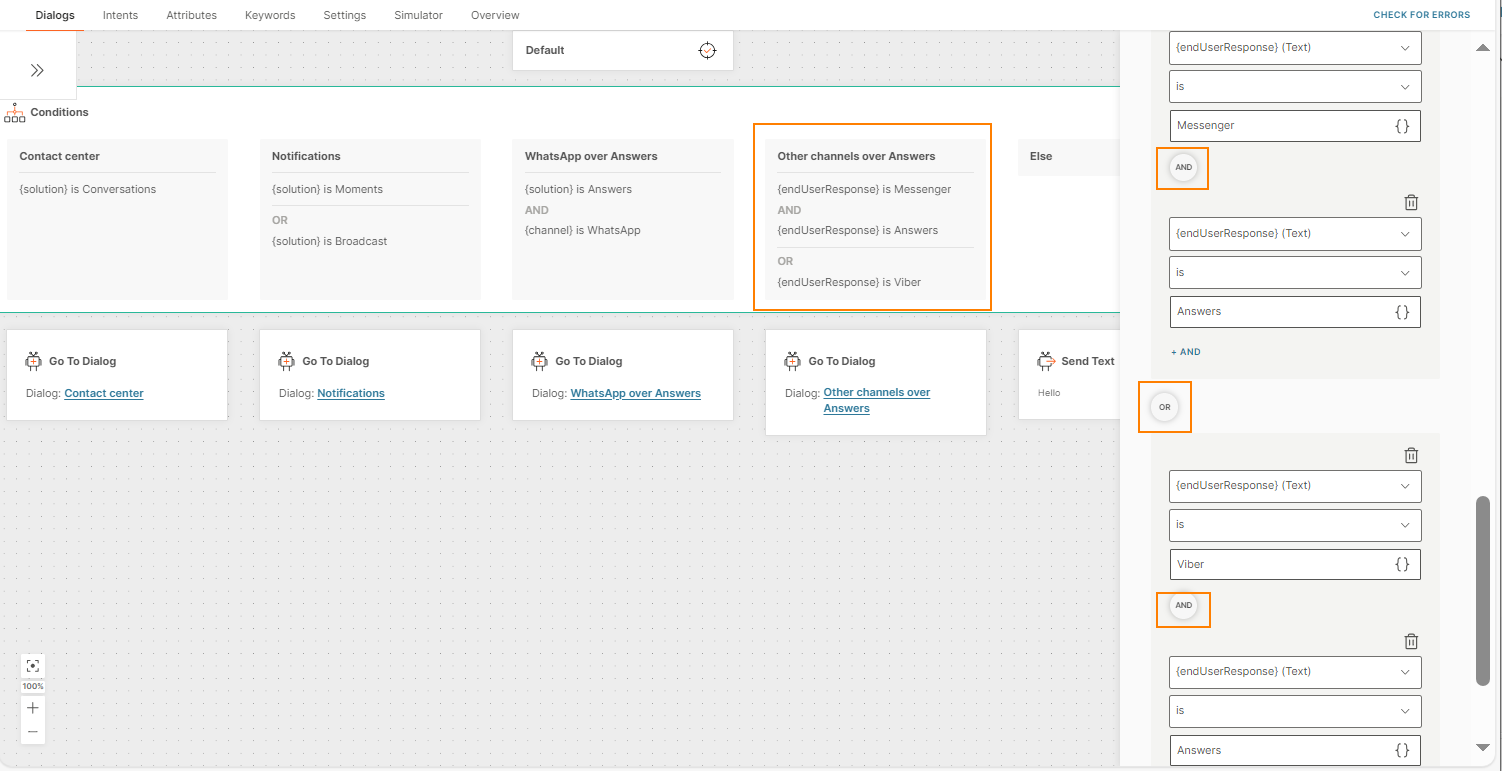
Condition that uses OR and AND operators [#condition-that-uses-or-and-and-operators-conditions]
In the following example, both AND and OR operators are used to include multiple criteria within the same condition.
The condition is ((channel is Messenger AND solution is Answers) OR (channel is Viber AND solution is Answers)).
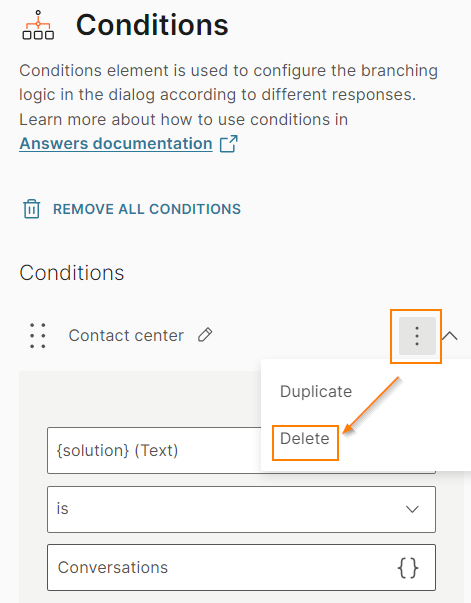
Delete a condition [#delete-a-condition-conditions]
To delete a condition, select the three dots and select Delete.
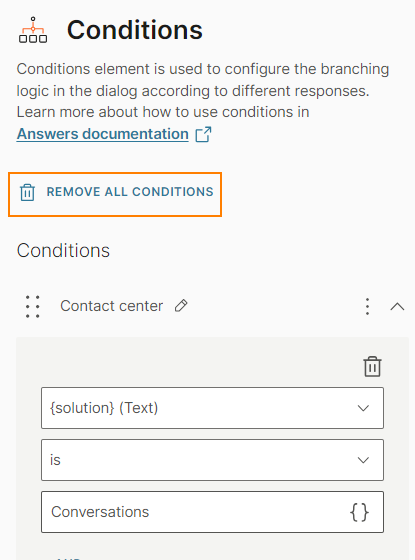
Remove all conditions [#remove-all-conditions-conditions]
Select Remove all conditions.
Delete criteria within a condition [#delete-criteria-within-a-condition-conditions]
You can delete a specific criterion within the condition.
Example: The condition shown in the following image is (solution is Moments OR solution is Broadcast). You can remove one of the criteria, solution is Broadcast, without deleting the other criteria in the condition.
Select the Delete icon.
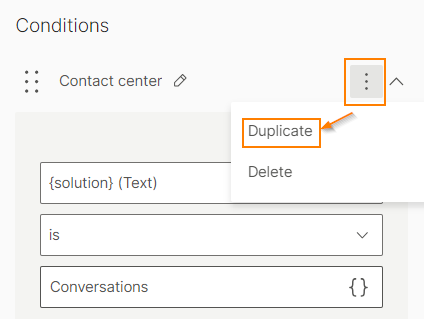
Duplicate a condition [#duplicate-a-condition-conditions]
To duplicate a condition, select the three dots and select Duplicate.
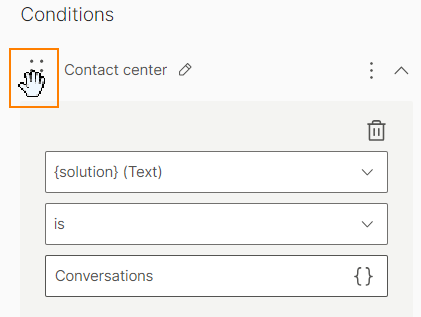
Reorder conditions [#reorder-conditions-conditions]
Select the six dots before the condition name and drag the condition to the required location.
Rename a condition [#rename-a-condition-conditions]
Select the pencil icon next to the name of the condition.
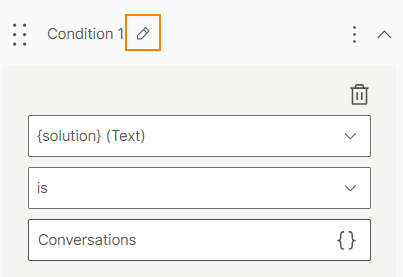
Add the name and select the checkmark.
Conversation tags [#conversation-tags]
Add conversation tags to tag conversations in your chatbot. You can add tags based on information obtained from the end user's message or an action completed by the end user. Example: If an end user follows the appointments flow in the chatbot, add the conversation tag, appointments.
You can then use the tags to do the following.
- Conversations: Direct the end user to the correct queue in Conversations based on the tag. Refer to the example.
- Reporting: Track end users' activities in different dialogs. Example: You can track end users who used the appointments flow in the chatbot.
Use the Conversation tags element to add a tag to a conversation flow.
Prerequisites [#prerequisites-conversation-tags]
Conversations must be enabled in your account.
Configure the element [#configure-conversation-tags]
To use the Conversation tags element in your chatbot, drag the element from Infobip products.
In this element, you can either select existing tags or create new tags. You can add multiple tags.
To create a new tag, do the following:
- In the Conversation tags menu, select Create new tag.
- Type the name of the tag and select the checkmark.
Example for redirecting to the correct queue[#example-agent-redirect-conversation-tags]
You have a chatbot that manages appointments and payments. In Conversations, you have separate queues for appointments and payments. When an end user comes from the chatbot to Conversations, you want to direct them to the correct queue.
In the chatbot, add conversations tags to mark the appointments flow and the payments flow. If the end user selects Appointments, the appointments tag is added. If the end user selects Payments, the payments tag is added.
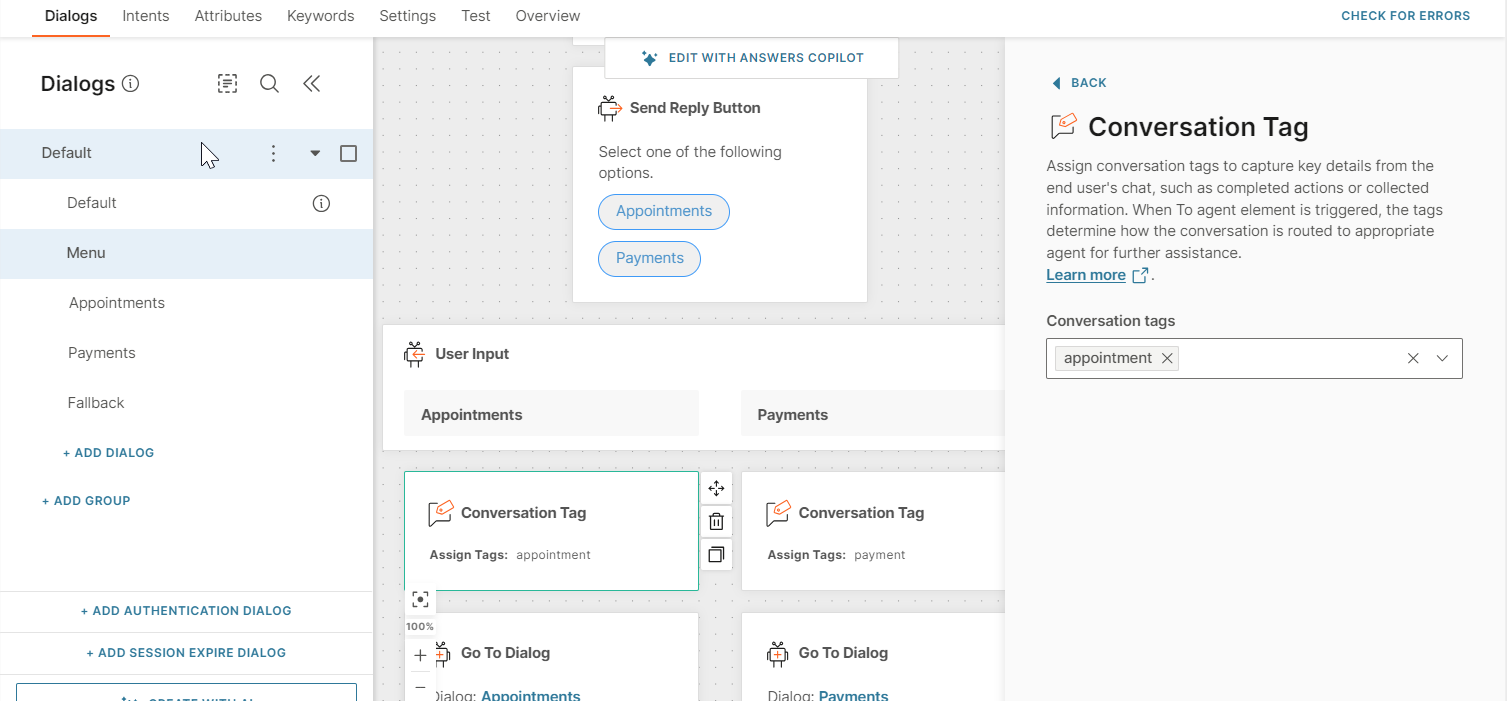
In the Appointments flow, the end user is redirected to an agent in Conversations. This flow has the Appointments tag. In Conversations, use this tag to direct the end user to the Appointments queue.
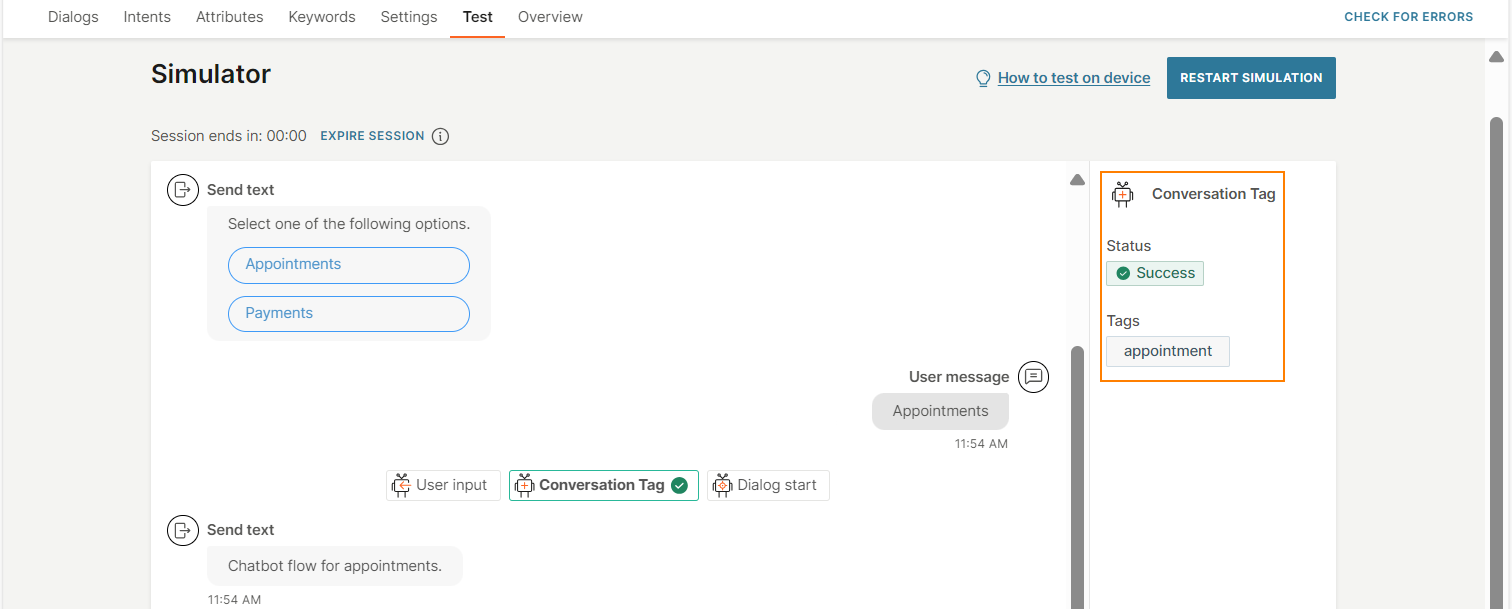
Simulation [#simulation-example-redirect-conversation-tags]
In the simulator, when you select Appointments, the conversation tag appointments is assigned.
CSAT survey
Use customer satisfaction surveys to gather feedback from the end user about the service they received through the chatbot. End users can provide a numeric score and provide comments. You can then use this feedback to optimize the chatbot.
Use the CSAT survey element to obtain feedback.
To configure this element, complete the following fields.
Scoring question [#scoring-question-csat-survey]
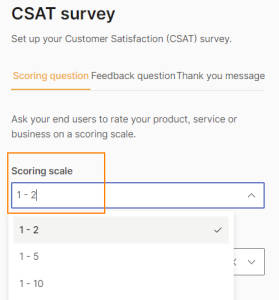
Scoring scale [#scoring-scale-csat-survey]
Use a scoring scale for end users to rate your product, service, or business.
Choose one of the following scales.
- 1-2
- 1-5
- 1-10
Answers uses the following logic for the CSAT scores:
- 1 - 2 scale: 1 = negative | 2 = positive
- 1 - 5 scale: 1 to 3 = not satisfied | 4 to 5 = satisfied
- 1 - 10 scale: 1 to 6 = not satisfied | 7 to 10 = satisfied
Scoring question message [#scoring-question-message-csat-survey]
Add a message for the end user. Example: You can request them to provide a score or guide them with the scoring logic.
The message can contain a maximum of 4,096 characters, including spaces, special characters, new line, emojis, and attributes.
Repeat count [#repeat-count-csat-survey]
In case you do not receive a valid response from the end user, the chatbot sends the scoring question message again.
This field has a predefined value of 1.
Fallback message [#fallback-message-csat-survey]
The message that the chatbot sends in case in case the end user enters an invalid response or performs an unknown action.
The message can contain a maximum of 4,096 characters including spaces, special characters, new line, emojis, and attributes.
If the end user does not respond to the survey, it times out after 5 minutes.
Feedback question (Optional) [#feedback-question-optional-csat-survey]
Send a message to the end user asking them for additional feedback or information.
The chatbot sends this message after the end user sends a valid response to the scoring scale. Whereas the end user's response to the scoring scale is a numeric value, the response to the feedback question message is text.
The feedback question message can contain a maximum of 4,096 characters including spaces, special characters, new line, emojis, and attributes.
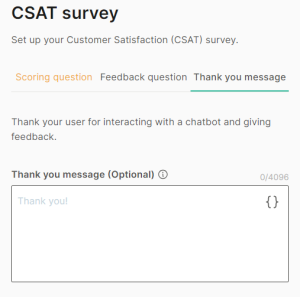
Thank you message (Optional) [#thank-you-message-optional-csat-survey]
Send a message to the end user thanking them for providing feedback. This message is also an acknowledgement that the chatbot has received the survey response.
The chatbot sends this message when end users complete the CSAT survey.
The message can contain a maximum of 4,096 characters including spaces, special characters, new line, emojis, and attributes.
Next steps [#next-steps-csat-survey]
- If you add the CSAT survey element to a standard dialog, add the Close session element after the CSAT survey element, to close the session.
- If you add the CSAT survey element to the Session Expire dialog, you do not need to do anything else.
Guidelines and best practices [#guidelines-and-best-practices-csat-survey]
Add the CSAT survey element to the Session Expire dialog.
Analytics [#analytics-csat-survey]
You can view CSAT analytics in the User analytics.
If you have advanced analytics (Early access), you can view CSAT analytics in the following sections:
- Predefined dashboards - Voice of the customer
- CSAT metrics in Custom dashboards
Delay
Use the delay element to add as long or as short pauses as desired to mimic the natural tempo of talking to a human. Delay simply adds a pause between elements.
Insert the delay between any elements where it would fit in a normal conversation, and set the delay time in seconds.
People Custom Event
Use the People Custom Event element to pass an event from Answers to People. You can save the event in the specified person profile. You can then use the event information when the end user interacts with your chatbot again or use the information in other Infobip solutions.
Drag the People Custom Event element from Infobip products. Complete the following information.
Contact information [#contact-information-people-custom-event]
You need to specify the Person profile in which you want to save the event.
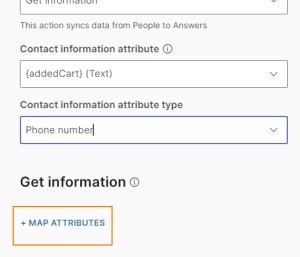
Contact information attribute: In this field, select the Answers attribute that contains the end user's contact information. You can select one of the following:
- The predefined attribute, endUserDestination. The attribute value is automatically obtained through the chatbot session.
- A standard attribute that you create. Example: phoneNumber. Use other chatbot elements to get the contact information from the end user and save it in this attribute.
The attribute value is matched with the attribute in the person profiles in People. If a match is found, the custom event is added to the corresponding person profile.
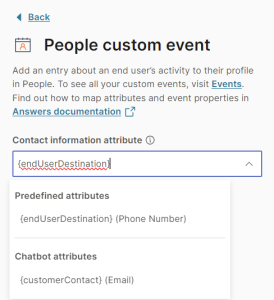
Contact information attribute type: Select the attribute type. Make sure this field matches the data type of the attribute that you selected in the Contact information attribute field. You do not need to configure this field if you selected endUserDestination in the Contact information attribute field.
Answers supports the following field values: Phone Number, Email, Internal ID, External ID, Push registration ID, and channel-specific IDs, for example, Facebook ID.
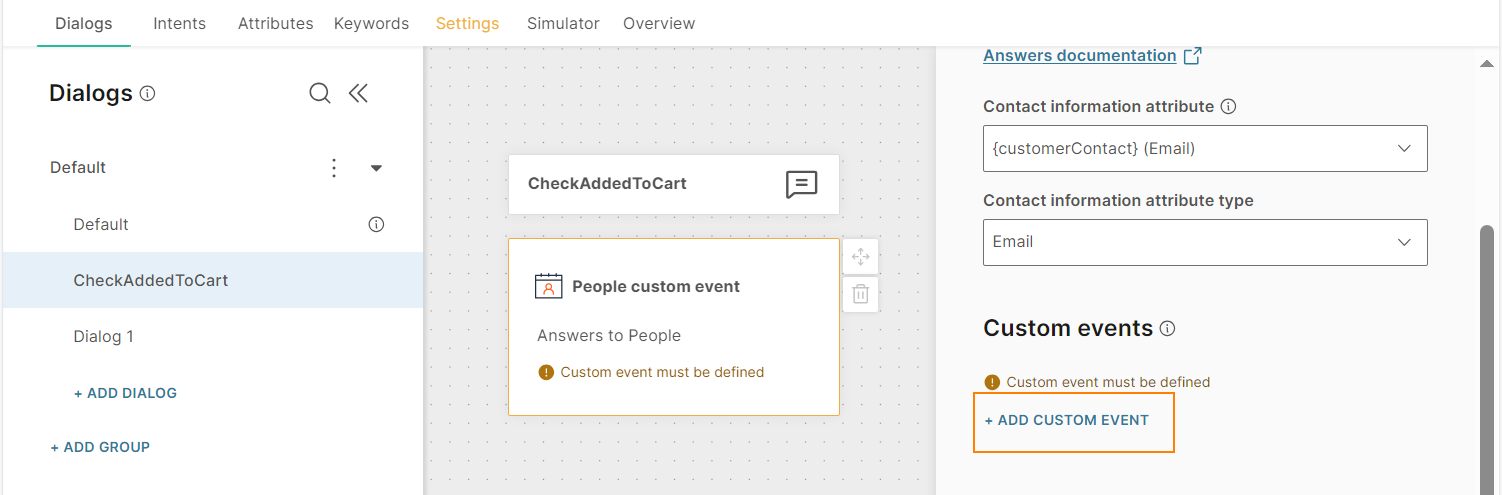
Custom events [#custom-events-people-custom-event]
In the Custom events section, specify the event that will be saved against the Person profile.
Do the following:
-
Select Add custom event.
-
Either create a new event in People or select an existing event from People. Example: AddedToCart.

-
(Optional) To add properties to the event, select Add attribute mappings. For each attribute, do the following.
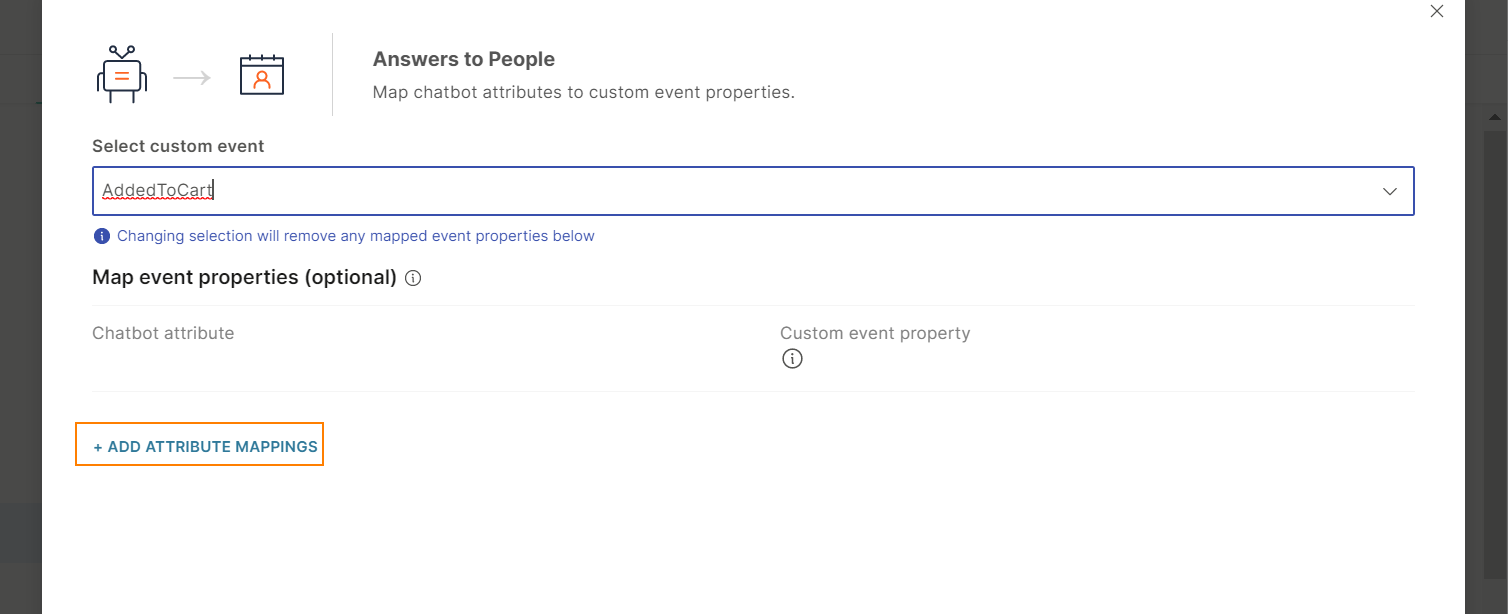
-
Choose the Answers attribute that contains the event properties. Example: addedCart, productID, productName, and productPrice.
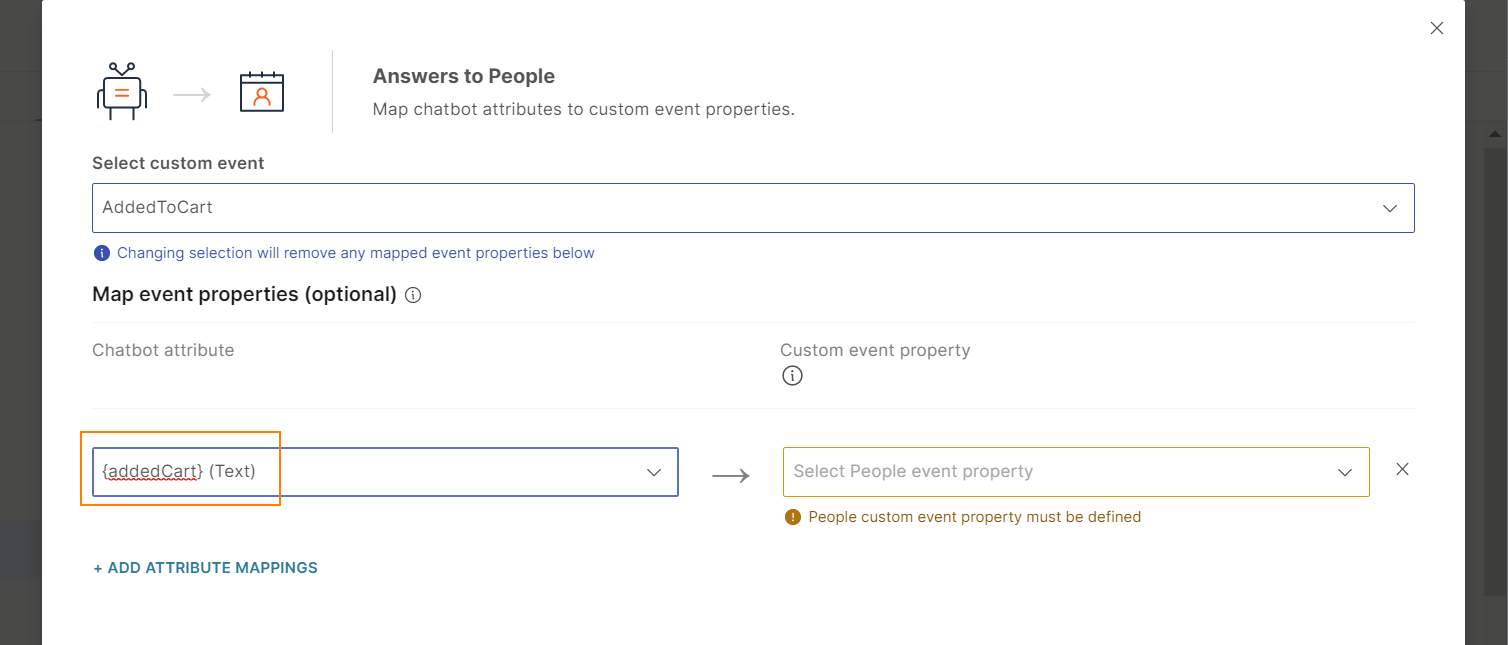
-
Choose an equivalent event property, which you created for the event in People. Example: addedCart, productID, productName, and productPrice. Make sure that the Answers attribute type and People event property are compatible.
Answers does not support dateTime property. If you want to pass a dateTime value into an event, save the value in a Text attribute in your chatbot and map the attribute to a Text property type.
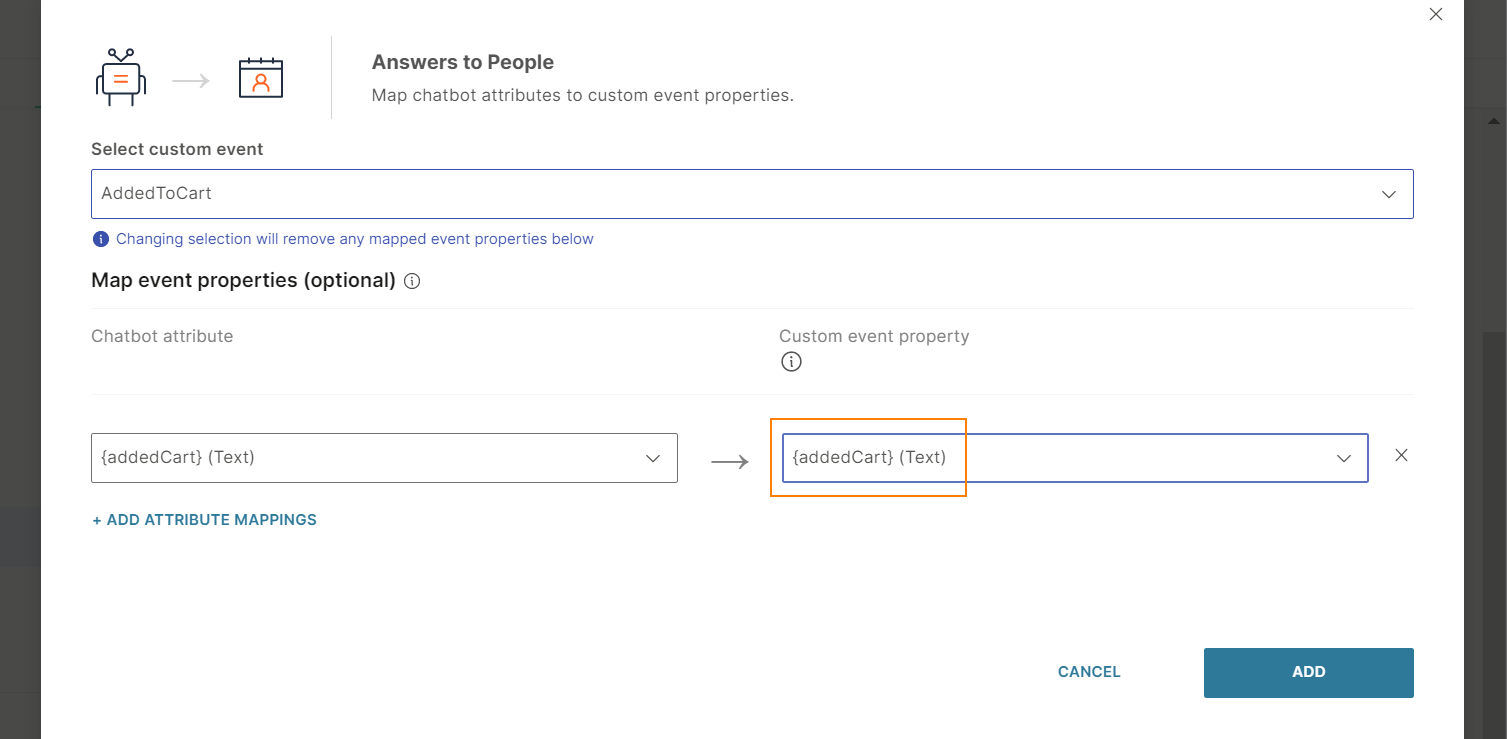
-
Select Add.
-
For more information about using the People Custom Event element in your chatbot, refer to the Custom Events in People documentation.
People profile
When end users contact your chatbot, you might want to store information about them in People or use existing information about them, which you have stored in their profiles in People, during the conversation.
Use the People profile element in Answers to share information between Answers and People. You can do the following:
- Update existing profiles in People. Example: If the end user shares their email address during their conversation with the chatbot, you can save this information in their profile in People.
- Create a new profile in People and add information to it. Example: If a new end user shares their email address during their conversation with the chatbot, you can create a profile in People and save the email address to the profile.
- Get information from an existing profile in People. You can then use this information in your chatbot flow. Example: You can use the information to personalize the conversation or to authenticate the end user,
To use the People profile element in a chatbot, drag the element from Infobip products. Complete the following information:
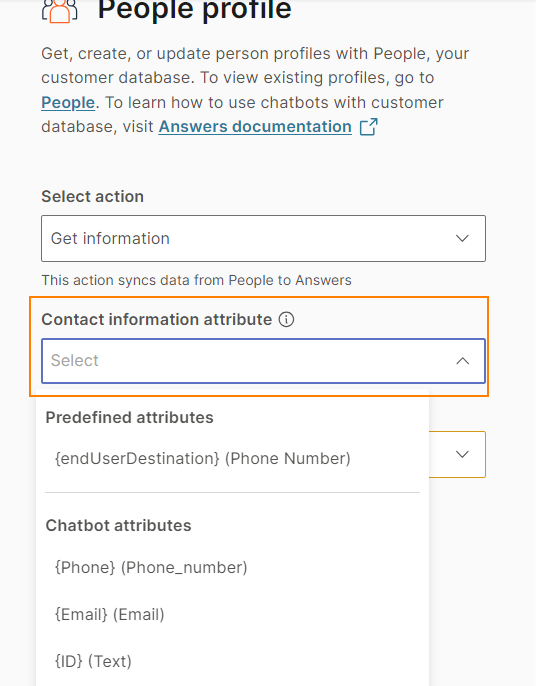
Select action [#select-action-people-profile]
Select one of the following:
- Get information: Gets the value of a People attribute from the selected profile and saves it in an attribute in Answers.
- Create or update person profile: Saves the value of an Answers attribute in a People attribute in the selected profile. If the profile does not exist, creates a new profile in People and then saves the value of the Answers attribute in a People attribute.
Contact information [#contact-information-people-profile]
You need to specify the Person profile to which you want to save or retrieve information.
Contact information attribute : In this field, select the Answers attribute that contains the end user's contact information. You can select one of the following:
- The predefined attribute, endUserDestination. The attribute value is automatically obtained through the chatbot session.
- A standard attribute that you create. Example: phoneNumber. Use other chatbot elements to get the contact information from the end user and save it in this attribute.
The attribute value is matched with the attribute in the person profiles in People. If a match is found, the information is added to or retrieved from the corresponding person profile.
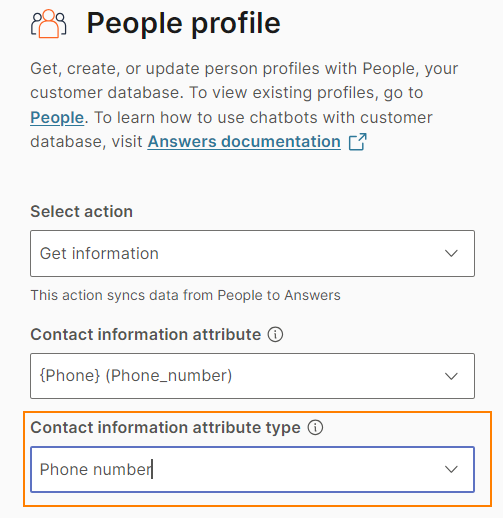
Contact information attribute type: Select the attribute type. Make sure this field matches the data type of the attribute that you selected in the Contact information attribute field. You do not need to configure this field if you selected endUserDestination in the Contact information attribute field.
Answers supports the following field values: Phone Number, Email, Internal ID, External ID, Push registration ID, and channel-specific IDs, for example, Facebook ID.
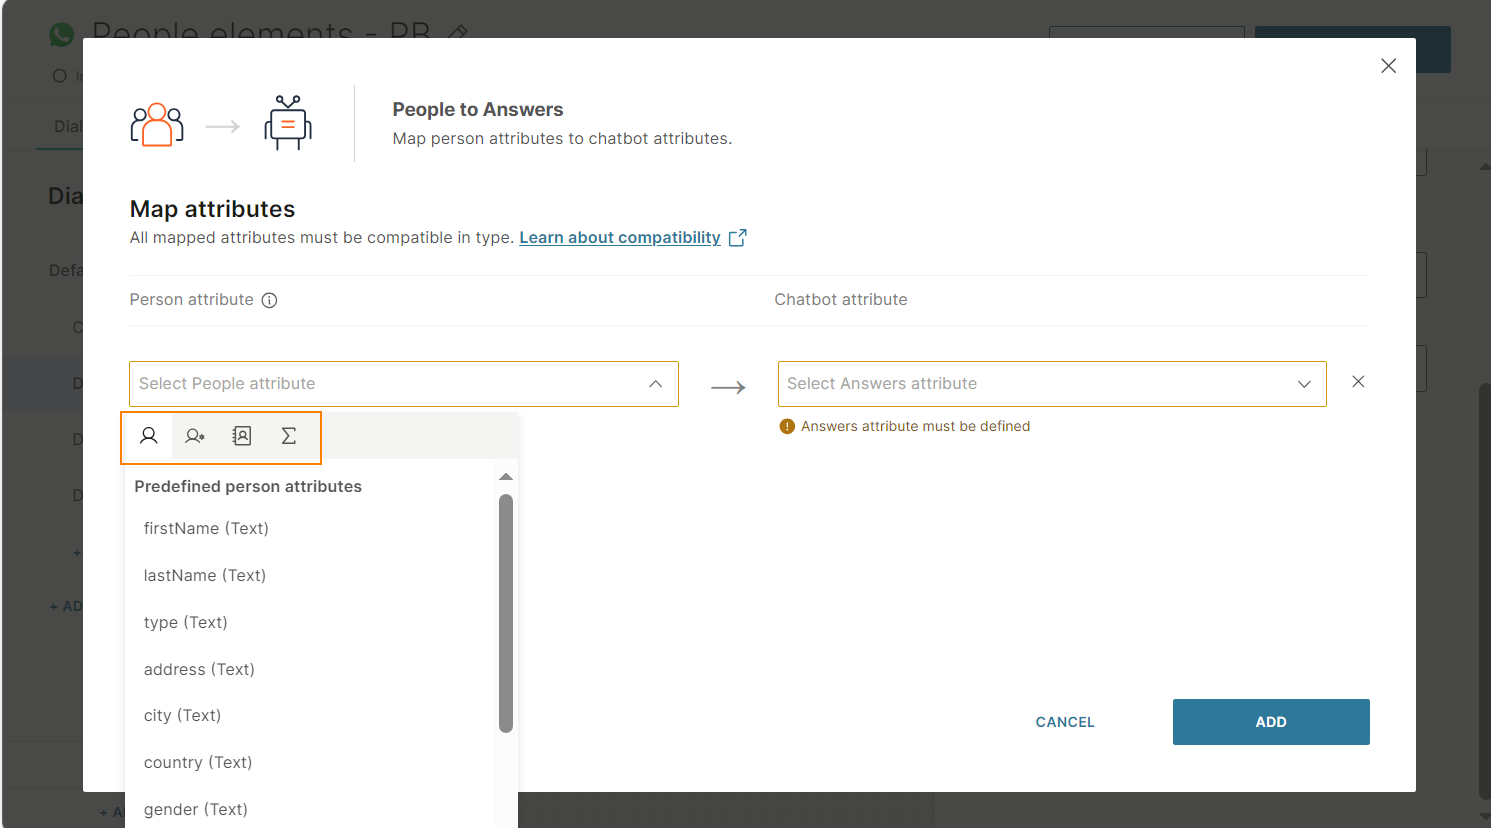
Map attributes [#map-attributes-people-profile]
The People profile element uses attributes to share information between Answers and People.
So, for the selected profile, you need to map attributes in Answers to attributes in People. Make sure that the attribute types are compatible with each other.
-
Select Map attributes.
-
For each attribute that you want to map, do the following:
- In the Person attribute section, select the attribute from People.
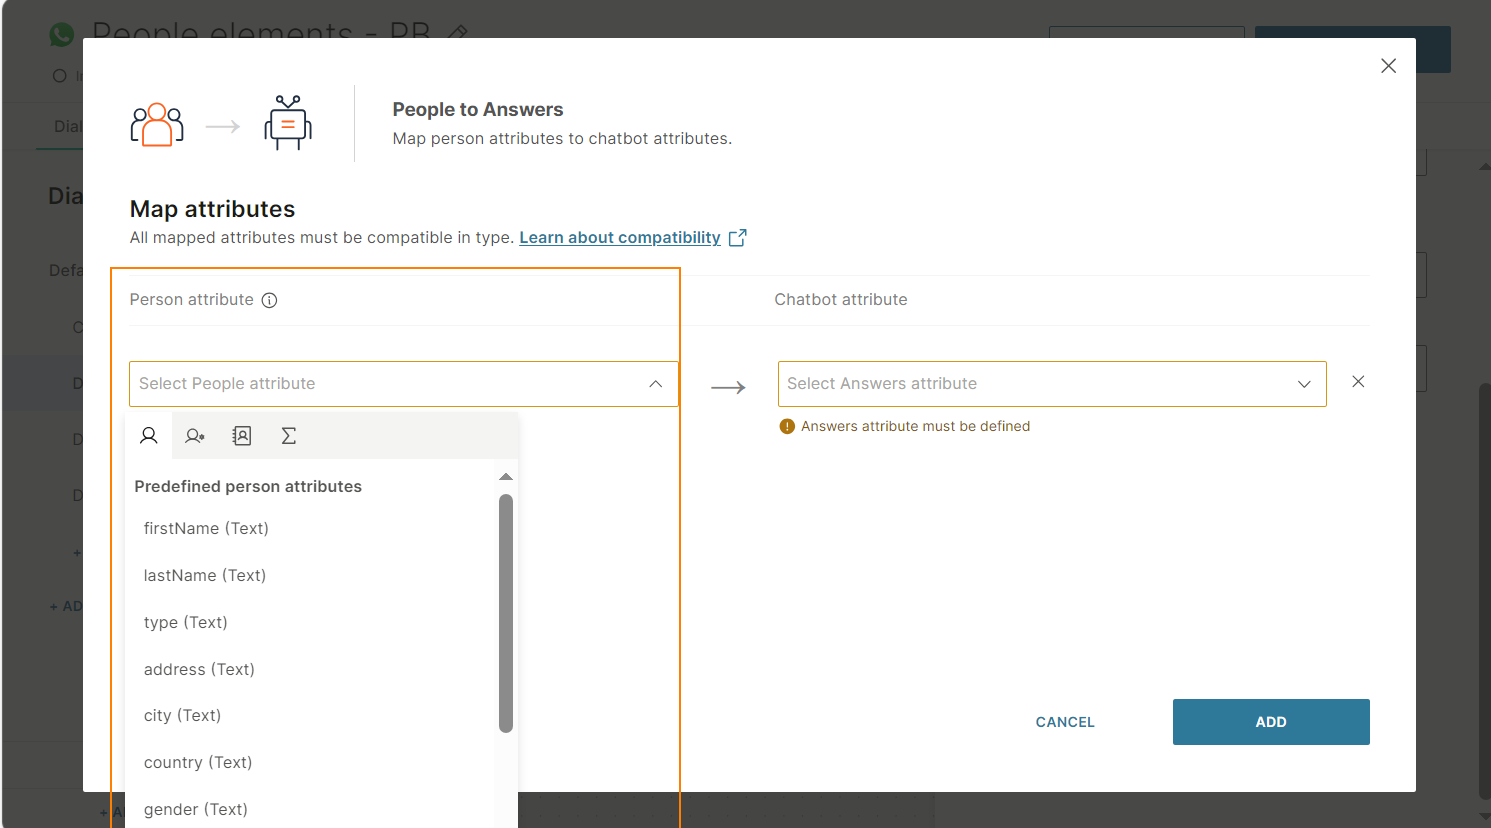 You can select a predefined attribute, custom attribute, or computed attribute. If the Select action field is Create or update person profile, you cannot select a computed attribute.
- Select an attribute in Answers. You can select either a standard attribute or a predefined attribute. If the Select action field is Get information, you can select only a standard attribute.
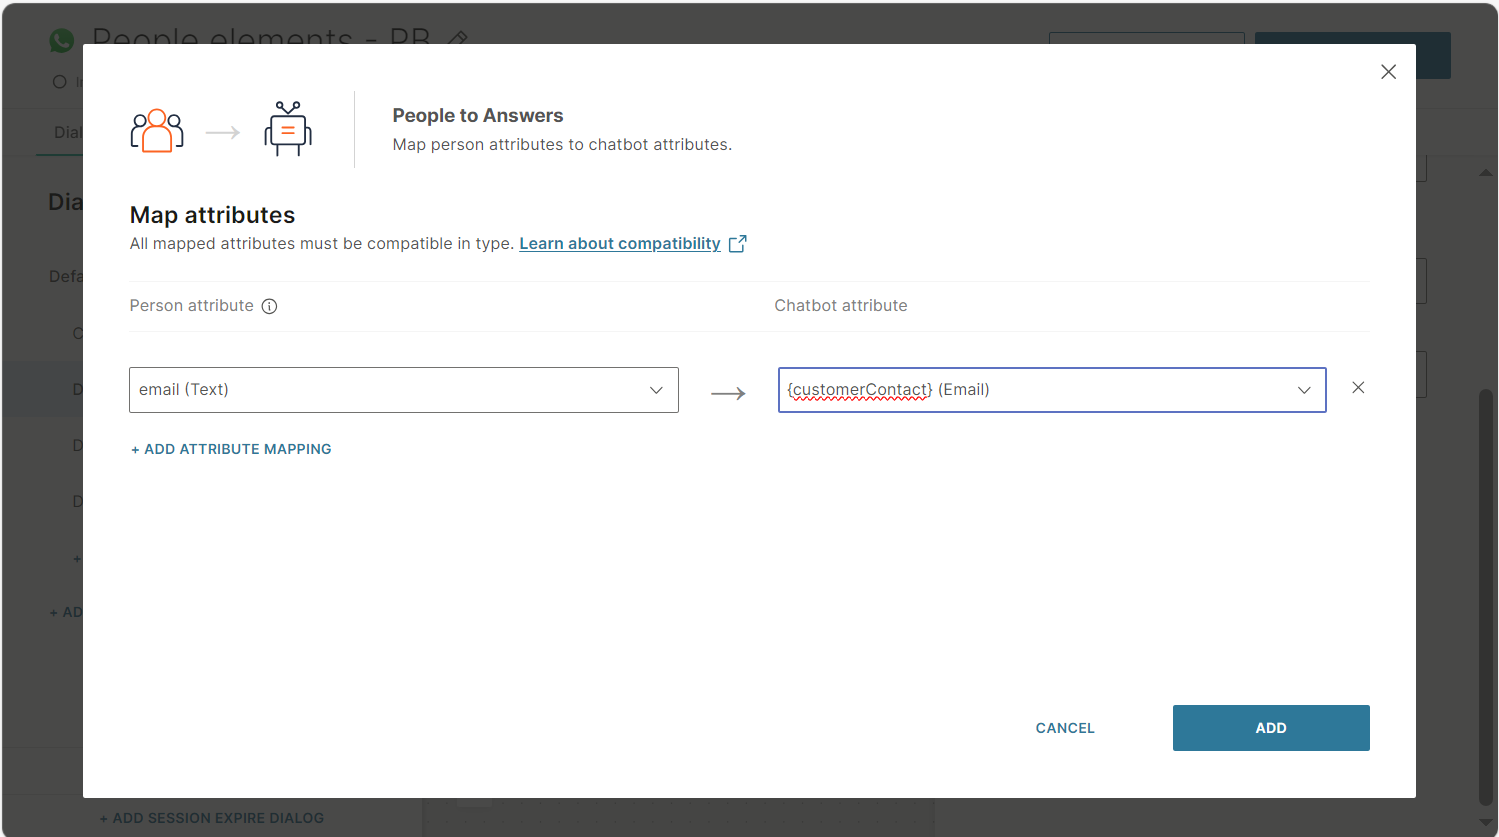
- Select Save.
- In the Person attribute section, select the attribute from People.
For more information about using People attributes in your chatbot, refer to the Attributes documentation.
For more information about using the People profile element in your chatbot, refer to the Create a People chatbot documentation.
People tags
When end users contact your chatbot, you can use tags that are present in their person profiles in People to take the relevant action.
Example: The tag for an end user's profile is purchased Moments product. When the end user contacts your chatbot, you can ask them if they want help with the Moments product.
Use the People tags element in Answers to update tags in People.
To use the People tags element in a chatbot, drag the element from Infobip products. Complete the following information:
Select action [#select-action-people-tags]
Select one of the following:
- Add tags: Add existing tags to a profile or create new tags.
- Get tags: Verify whether the specified tags are present in a profile.
- Remove tags: Remove tags from a profile.
Contact information [#contact-information-people-tags]
You need to specify the Person profile for which you want to add, remove, or get tags.
Contact information attribute : In this field, select the Answers attribute that contains the end user's contact information. You can select one of the following:
- The predefined attribute, endUserDestination. The attribute value is automatically obtained through the chatbot session.
- A standard attribute that you create. Example: phoneNumber. Use other chatbot elements to save the contact information in this attribute.
The attribute value is matched with the attribute in the person profiles in People. If a match is found, the tags are added, removed, or obtained from the corresponding person profile.
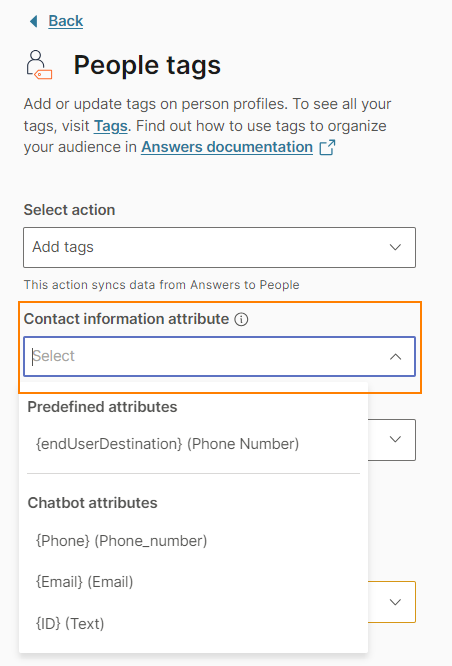
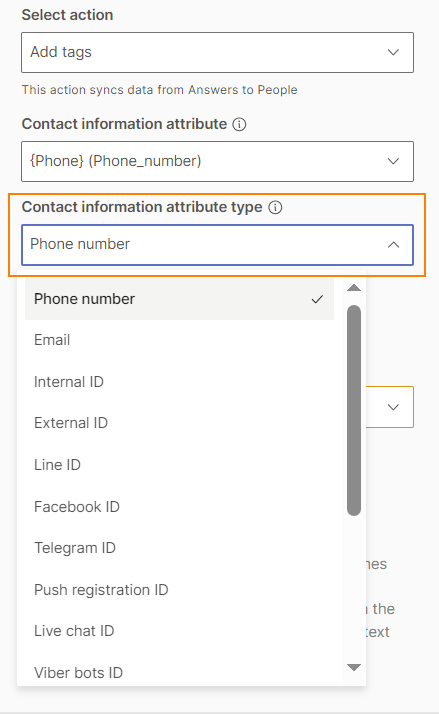
Contact information attribute type: Select the attribute type. Make sure this field matches the data type of the attribute that you selected in the Contact information attribute field. You do not need to configure this field if you selected endUserDestination in the Contact information attribute field.
Answers supports the following field values: Phone Number, Email, Internal ID, External ID, Push registration ID, and channel-specific IDs, for example, Facebook ID.
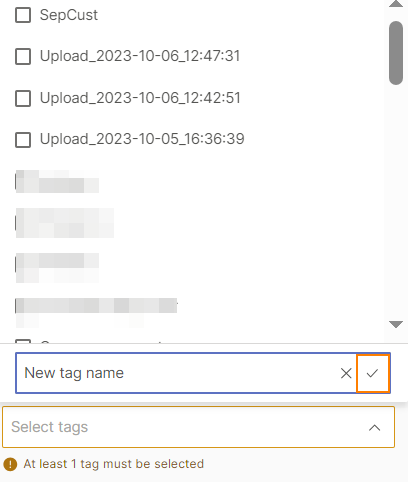
Add existing or create new tags [#add-existing-or-create-new-tags-people-tags]
In the Select tags to add field, select existing tags or create new tags. You can add multiple tags.
To create a new tag, do the following:
- Select Create new tag.
- Type the name of the tag and select the checkmark.
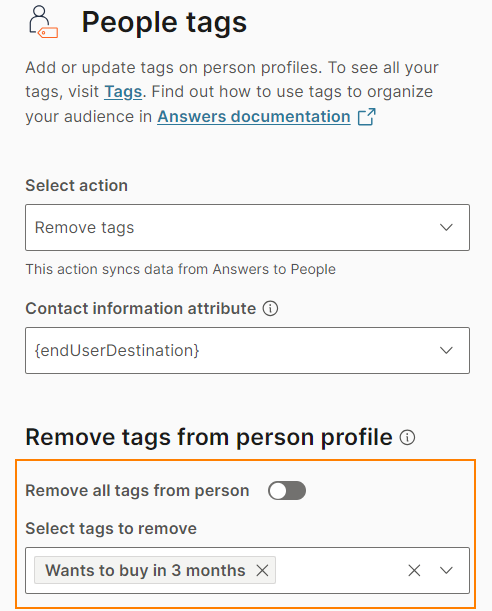
Remove tags [#remove-tags-people-tags]
In the Select tags to remove field, select one or more tags.
To remove all the tags from the profile, select Remove all tags from person.
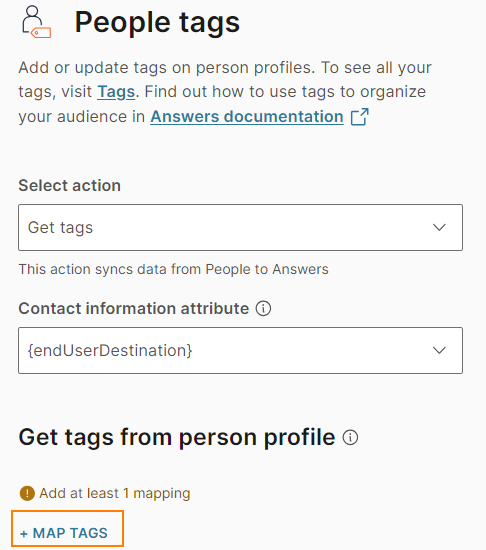
Get tags [#get-tags-people-tags]
If a specified tag is present in the person profile, the value of the selected Answers attribute is True. Otherwise, the value is False.
-
Select Map tags.
-
To verify whether a tag is present in the profile, do the following for each tag.
- Select Add tag mapping.
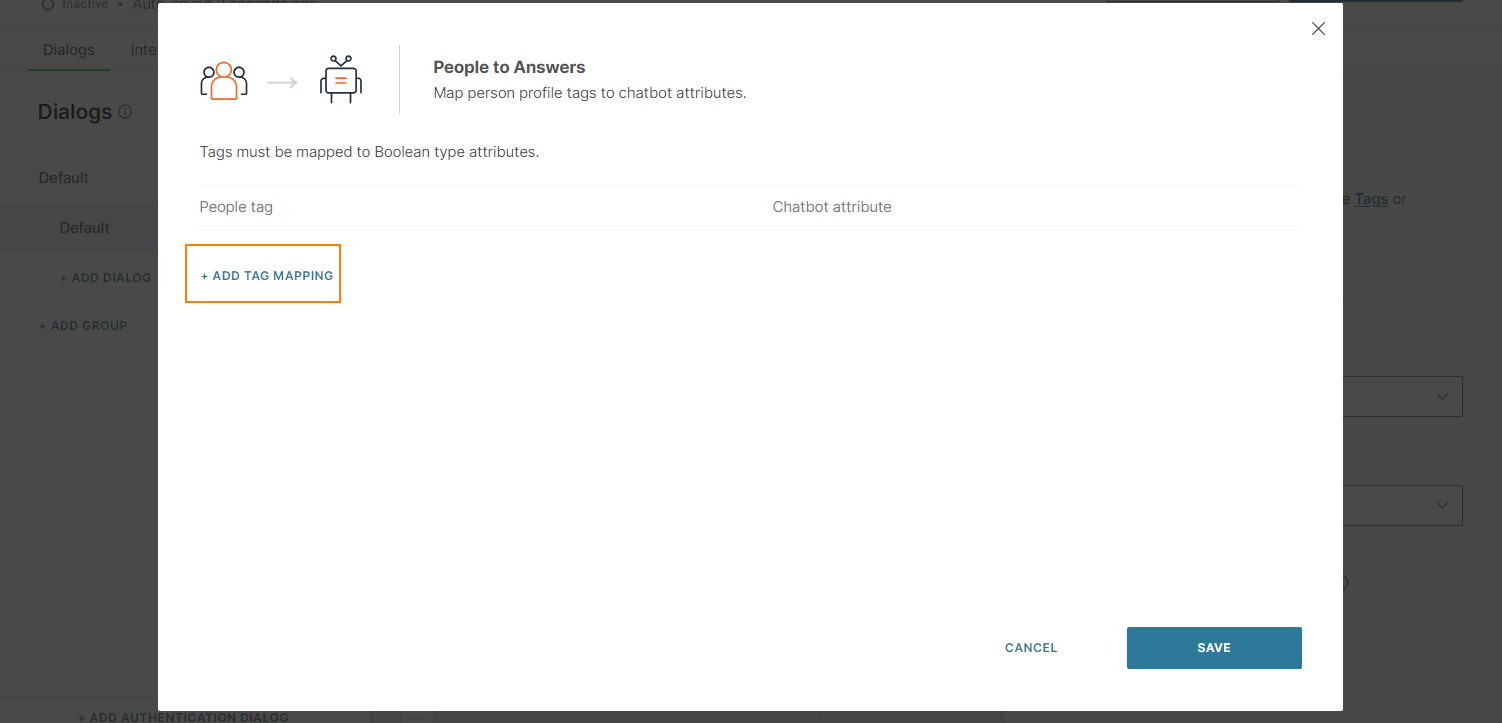
- In the People tag field, select the People tag that you want to verify.
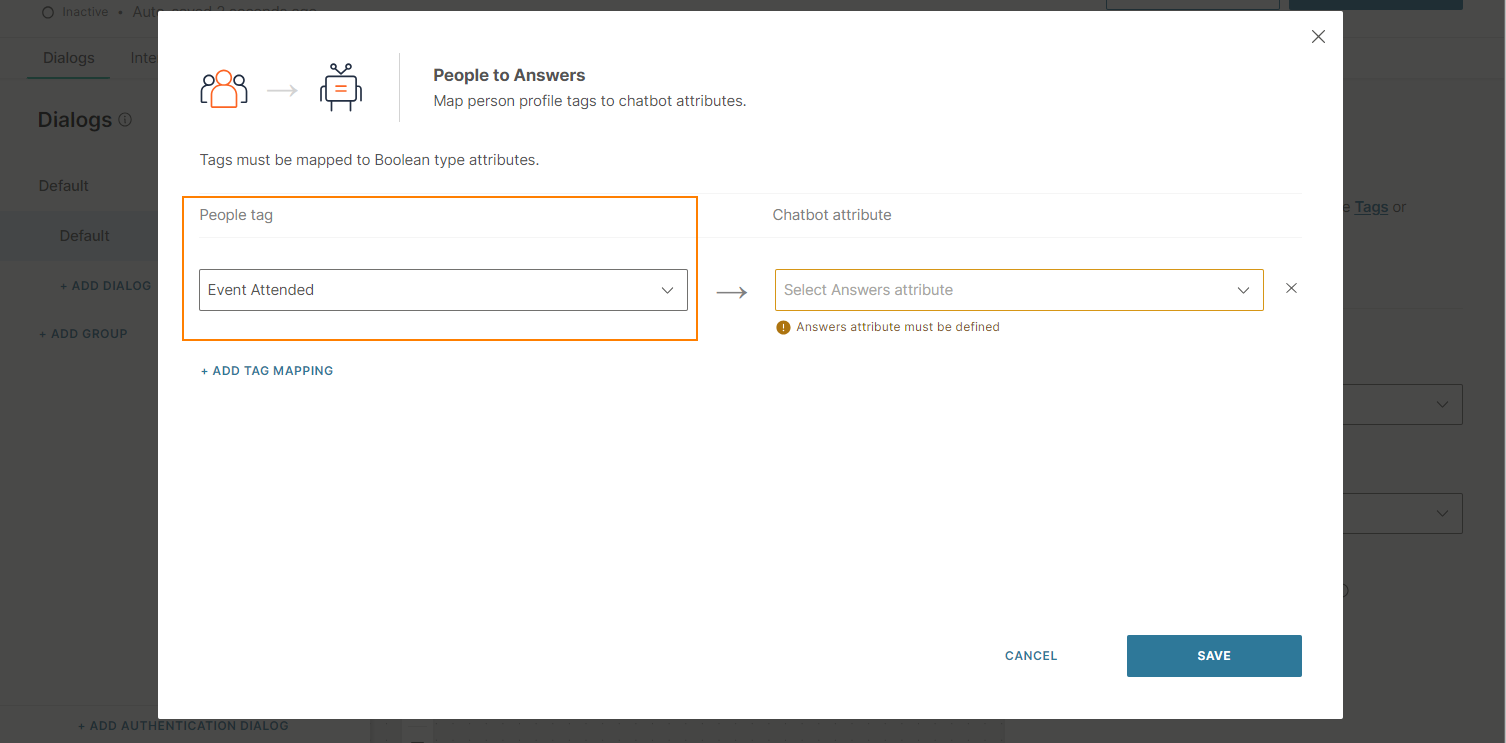
- In the Chatbot attribute field, either select an attribute or create a new attribute to save the result of the verification. You can only use a Boolean attribute.

- Select Save.
- Select Add tag mapping.
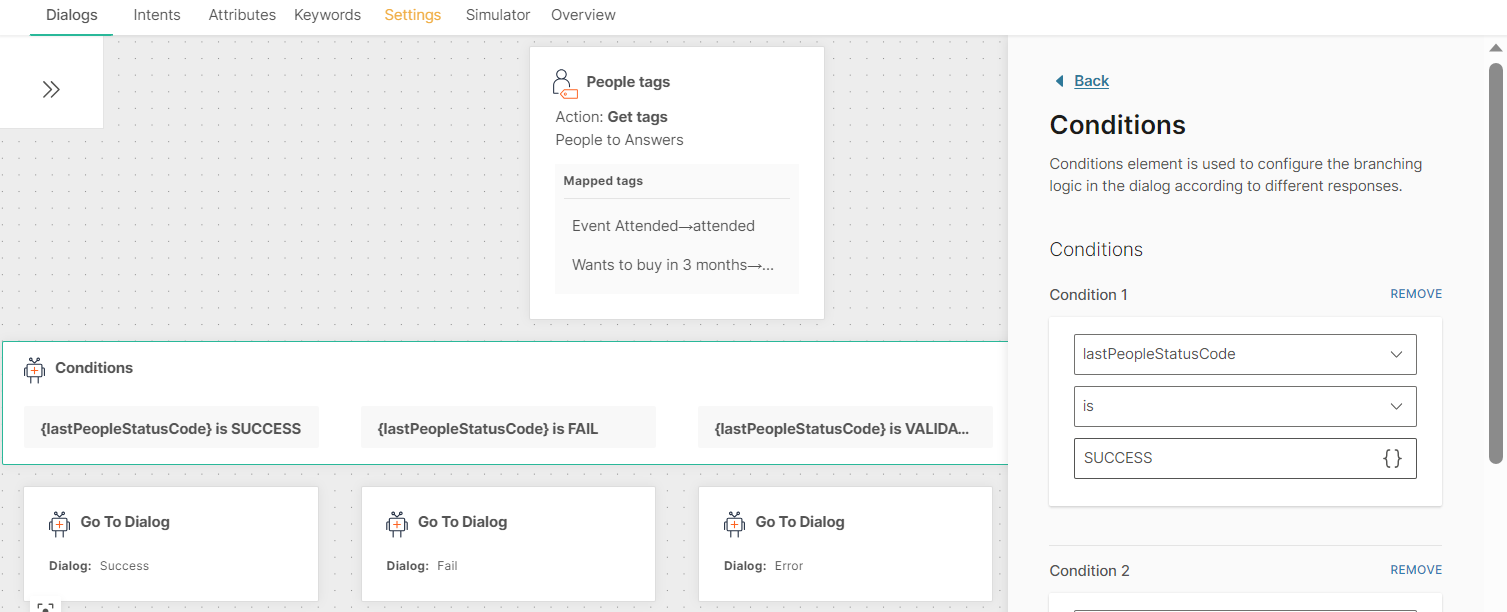
Validate status of profile update [#validate-status-of-profile-update-people-tags]
Use the lastPeopleStatusCode predefined attribute to verify whether the tags were updated successfully. You can then take the relevant action.
Example: Use the Conditions element to direct the flow to the relevant dialog.
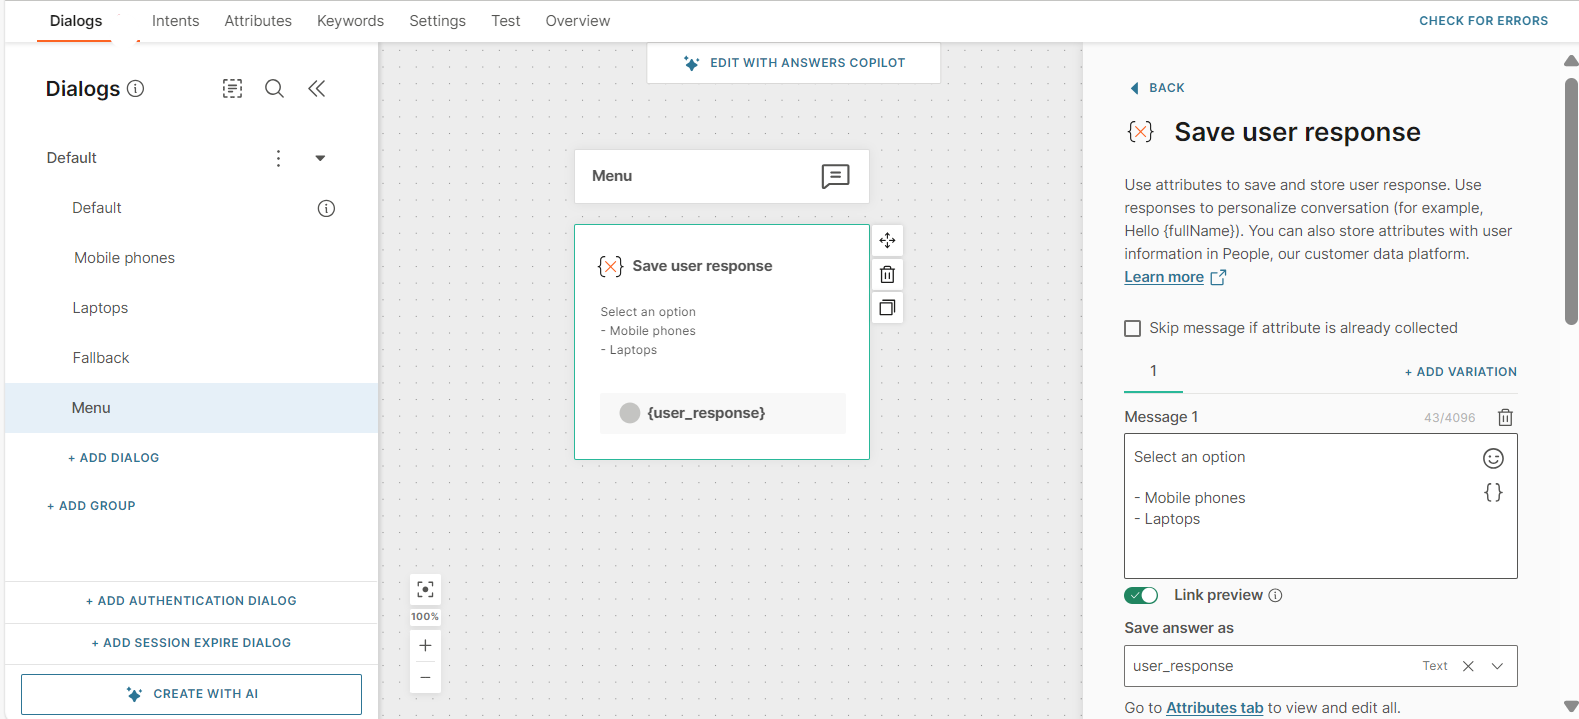
Save user response [#chatbot-elements-core-save-user-response]
Use the Save user response element to capture information from the end user and save it in an attribute.
In the element, specify the attribute in which the response needs to be saved. You can then use the attribute value to do various things such as branch the flow or save the value in the end user's profile in People.
How to use the element [#save-user-response-how-to-use]
The following sections show how to use the Save user response element to save information in an attribute. For an example of how to use this attribute value to branch the flow, refer to the How attributes work documentation.
Get and save end user's response
Use the Save user response element to ask the end user for a response as well as save the response in an attribute.
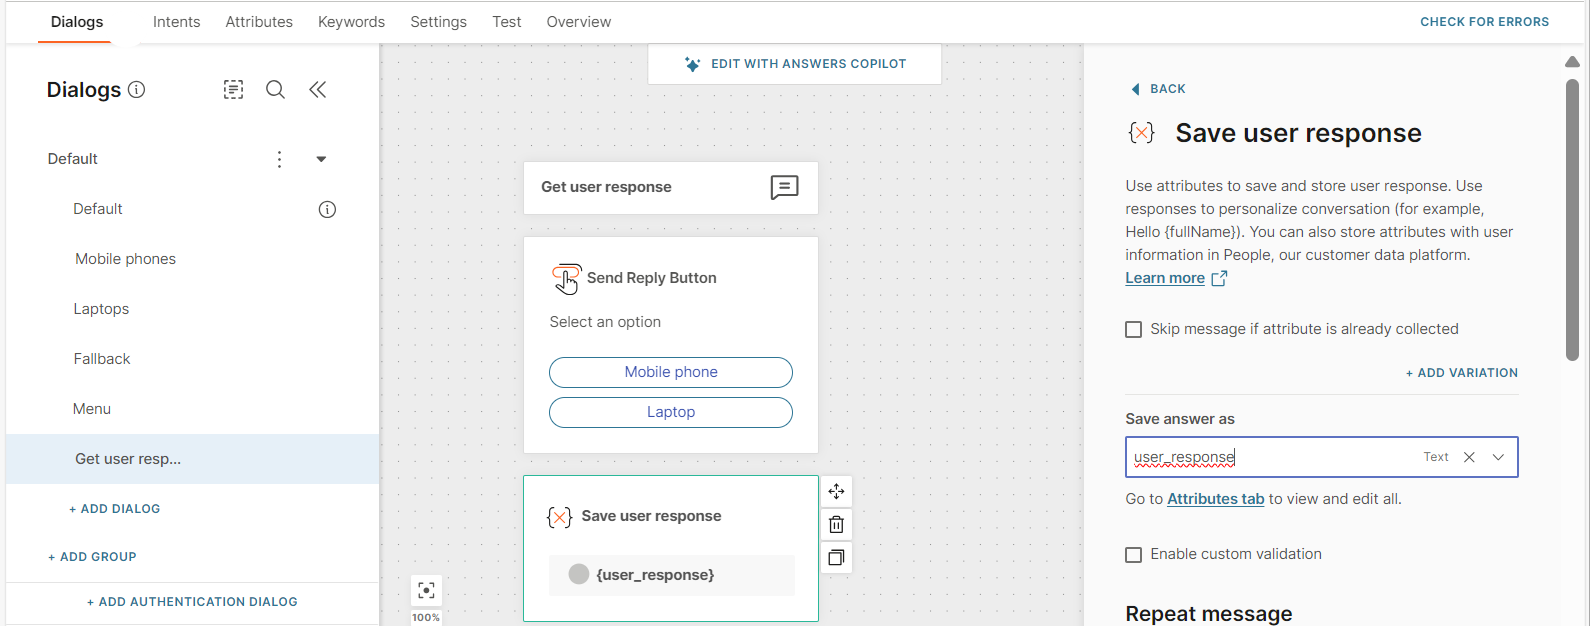
Save response from other elements
When the end user responds to another chatbot element, you can save this response by using the Save user response element.
Example: Add a Reply button element to ask the end user to select an option. After this element, add the Save user response element. The end user's response is saved in an attribute that is specified in the Save user response element.
Configure the element [#save-user-response-configure]
To add a Save user response element to the chatbot, in the chatbot editor, drag the element from the Chatbot receives section.
In the element, configure the following fields.
Skip question if attribute is already collected
In some cases, the attribute that you select in the Save user response element might already have a value. Example: Your NER-enabled chatbot already captured this information from a different message, or the end user already sent you the required information in a different message.
If you do not want to overwrite the attribute value, select the Skip question if attribute is already collected field.
If you select this option, the chatbot sends the message in the Message field only if the attribute is empty.
Message
Enter the message that asks the end user for information. Example: Hello, userName. Please specify the order ID.
You can personalize the message by using placeholders.
The message can contain a maximum of 4.096 characters including spaces, special characters, new line, emojis, and attributes.
If you add the Save user response element after a button, reply, or quick reply, delete the Message field. The postback value from the button, reply, or quick reply is saved in the attribute that you specify in the Save answer as field.
To add variations of the message, select Add variation.
Link preview (Optional)
Set whether the end user can see a preview of links that you share in the Message field. This field is available only if the chatbot uses the WhatsApp channel.
Save answer as
Save the response from the end user in an attribute.
Do one of the following.
- If you have already created the attribute, select the attribute.
- Create a new attribute. Select Create new attribute and configure the fields. For more information about these fields, refer to the Fields in a standard attribute documentation.
Enable custom validation
You can use regex to check, match, or validate the attribute value. Example: Check if the attribute value contains a phone number.
Select Enable custom validation. In the Validation regex pattern field, enter the regex pattern.
The validation supports Basic regular expressions (BRE) standard.
Repeat message
If the end user sends an invalid response to your message, send them your message again. The end user can then send you another response.
The Repeat option repeats the message from the Message field.
For more information, refer to the Repeat message section.
Fallback
Use fallback to make sure that the end user gets a response from the chatbot even if there is an error.
Example: The message sending fails or the end user sends an incorrect response that the chatbot cannot handle.
In such cases, the fallback action is triggered.
For more information, refer to the Fallback section.
Timeout
In some cases, the chatbot waits for a long time for the end user to provide a response. You can configure a timeout for such situations.
If the end user does not respond to your message within a specified time duration, you can choose to take actions such as directing the end user to the main menu or transferring them to an agent.
Specify a minimum of 15 seconds and a maximum of 14400 seconds (240 minutes).
The timeout duration must be less than the session timeout duration.
For more information, refer to the Timeout section.
To Agent
When there are complex questions or requests that the chatbot cannot manage, use the To Agent element to transfer the chat to a human agent.
Example: The chatbot is not designed or trained to answer a specific question, or the chatbot cannot understand the end user's message.
You must have one of the following enabled to use this element.
- Infobip Conversations solution
- Infobip Conversations API solution to integrate with an external contact center solution.
When you redirect to an agent, the agent takes over the chat. Chats cannot be sent back to the chatbot.
Tags [#tags-to-agent]
Add tags to the conversation to route the support request or chat to the right queue in Conversations and external contact center solutions.
Example: If you add the tag account_management, the request is routed to the account_management queue in Conversations.
Create a tag [#create-a-tag-to-agent]
- In the All tags section, click Create tag.
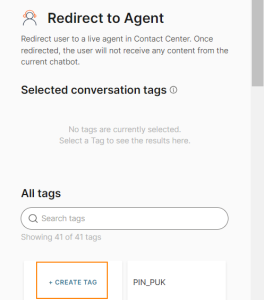
- Type the name of the tag.
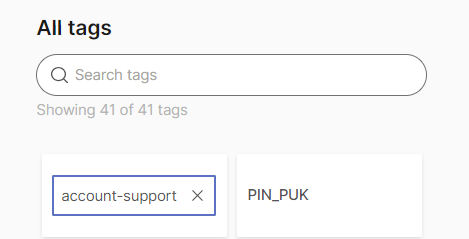
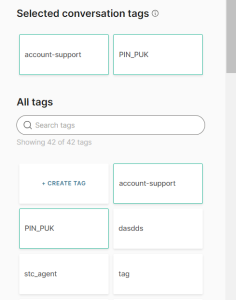
Add a tag to the conversation [#add-a-tag-to-the-conversation-to-agent]
In the All tags section, select one or more tags to add to the conversation. The selected tags are displayed in the Selected conversation tags section.
To Dialog
Use this element when you are ready to send the user on to another dialog when they reach this point in the conversation. It can be to a dialog with an intent to finish the conversation, or it can simply be a transition to a new dialog based on a different intent where the end user is asking for new information.
For intent-driven chatbots, you can select which attributes to be transferred over to other dialogs. Use the share attribute option to enable the attribute selector.
You can add as many attributes as you have set up already, but make sure to take into consideration those which are used in the intent and have values that can be transferred. Once selected, the attribute is no longer selectable.
User response [#user-response]
Use the User response element to validate the end user's message and branch the chatbot flow accordingly.
The User response element processes the end user's message in the following order.
-
Validates the end user's message against the keywords that you define. If there is a match, the User response element branches the conversation accordingly.
-
Uses natural language processing (NLP) for AI chatbots. The User response element validates the end user's message against the intents that you define. If there is a match, the chatbot directs the flow accordingly.
NLP is triggered only if keyword matching fails.
-
Uses fallback options.
In the following example, the User response element branches the flow based on keywords.
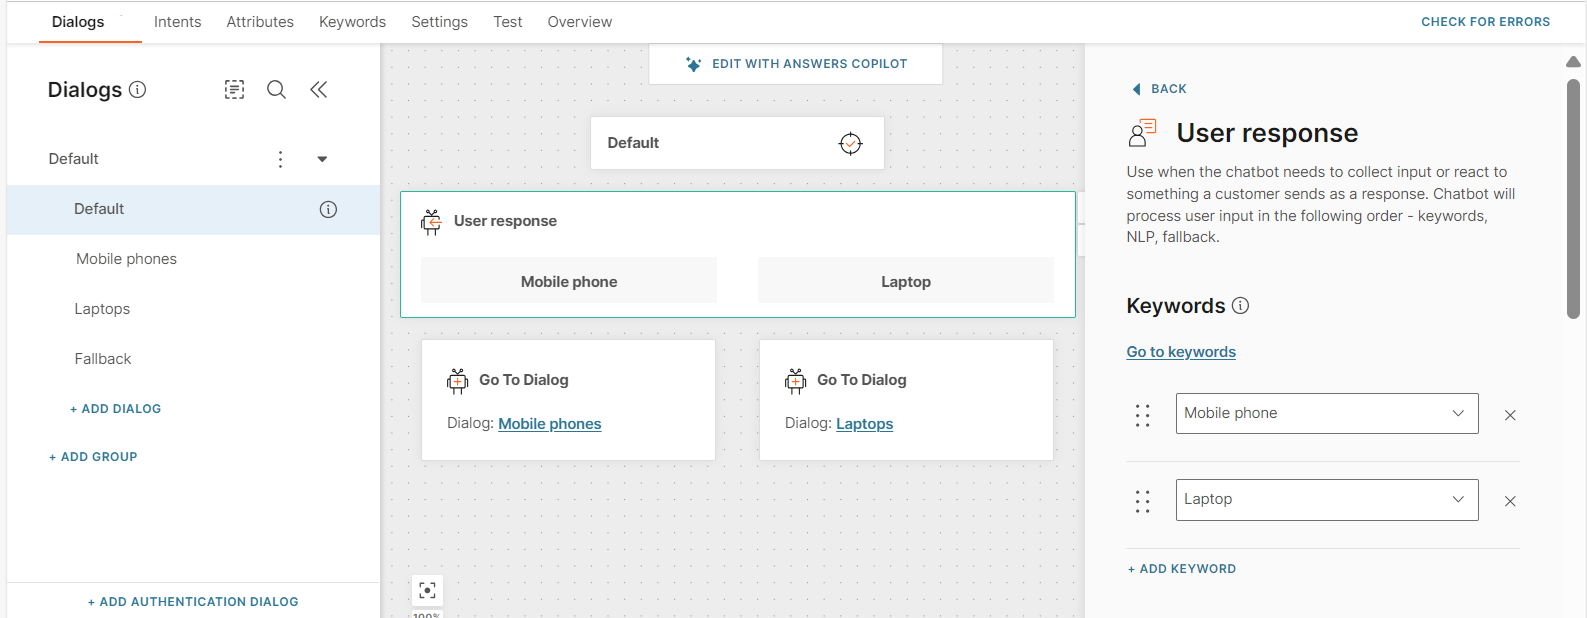
To add a User response element to the chatbot, in the chatbot editor, drag the element from the Chatbot receives section.
You can add only one User response element to a dialog.
Configure the element [#user-response-configure]
In the element, configure the following fields.
Keywords
Add keywords
To add keywords, select Add keyword.
Do one of the following.
- If you have already created keywords, select the keyword.
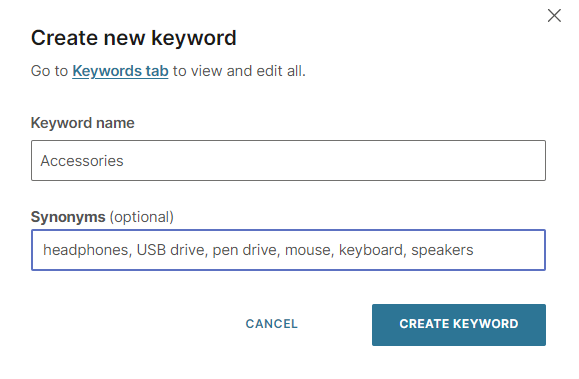
- Create a new keyword. Select Create new keyword and complete the fields.
Reorder keywords
To reorder keywords, select the six dots before the keyword and drag the keyword to the required location.
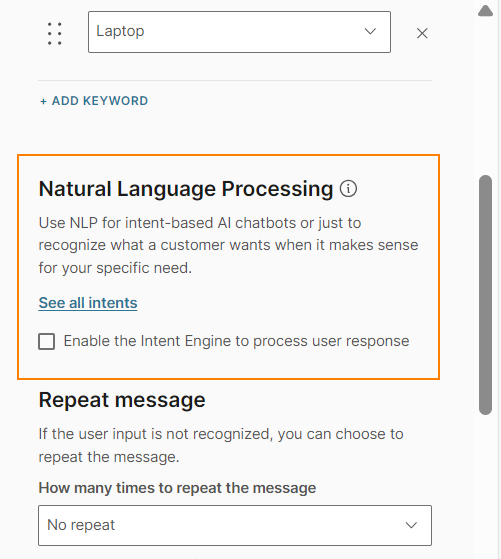
Natural language processing
For AI chatbots, if you want to validate the end user's response against intents, select Enable the intent engine to process user response.
Repeat message
If the end user sends an invalid response to your message, the chatbot needs to know what to do.
Use the Repeat option to ask the end user to send the response again.
For more information, refer to the Repeat message section.
Fallback
Use fallback to make sure that the end user gets a response from the chatbot even if there is an error.
Example: The message sending fails or the end user sends an incorrect response that the chatbot cannot handle.
In such cases, the fallback action is triggered.
For more information, refer to the Fallback section.
Timeout
In some cases, the chatbot waits for a long time for the end user to provide a response. You can configure a timeout for such situations.
If the end user does not respond to your message within a specified time duration, you can choose to take actions such as directing the end user to the main menu or transferring them to an agent.
Specify a minimum of 15 seconds and a maximum of 14400 seconds (240 minutes).
The timeout duration must be less than the session timeout duration.
For more information, refer to the Timeout section.
Webhook
A webhook is a user-defined HTTP callback in a webpage and is used to interact with external services or APIs to fetch data or perform actions. The webhook is triggered by a specific event that you define. When a trigger occurs, the webhook registers the event, collects the required data, and sends it back to the URL that is specified in your HTTP request. Example: The triggered event requires the end user to provide authorization criteria.
Webhooks are used for real-time notifications and data synchronization.
In a chatbot design, webhooks usually follow the API element. Use the API element to send the webhook URL to an external system. When the requested data or criteria is available, the webhook destination URL sends the request back. The webhook then saves the response in an attribute that you define.
Configure the element [#configure-the-element-webhook]
To use the Webhook element in a chatbot, drag the element from Chatbot actions. Complete the following fields:
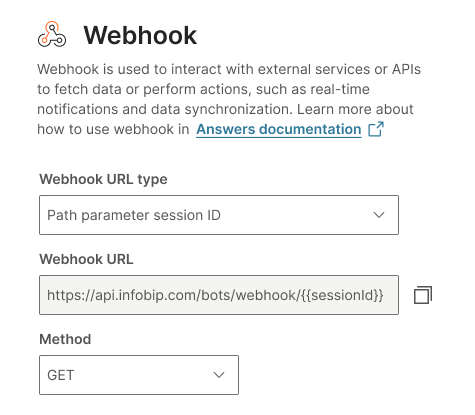
Webhook URL type: Specify whether to use the sessionID as a parameter in the path or the body of the request.
Session id body parameter name: If Webhook URL type is Body parameter session id, specify the name of the parameter that contains the session ID. This name is automatically added to the webhook URL.
Webhook URL: This URL is predefined. You must not change this URL. Depending on the webhook URL type, the URL is updated automatically.
Method: Set the Method to either POST or GET. If Webhook URL type is Body parameter session id, you can select only POST.
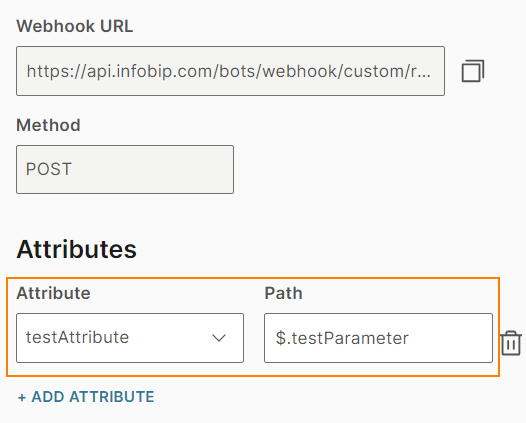
Attributes: Define the attributes where the values are saved.
If the Method field is set to POST, do the following:
- In the Attribute field, select the attribute.
- In the Path field, define the path to the parameter where the attribute value is saved. The path is the location in the JSON file hierarchy where the value of the attribute is located. Levels are defined by the number of entries separated by a dot “.”. The maximum throughput for each endpoint is 100 requests per second. The maximum throughput for each endpoint for each IP is 50 requests per second.
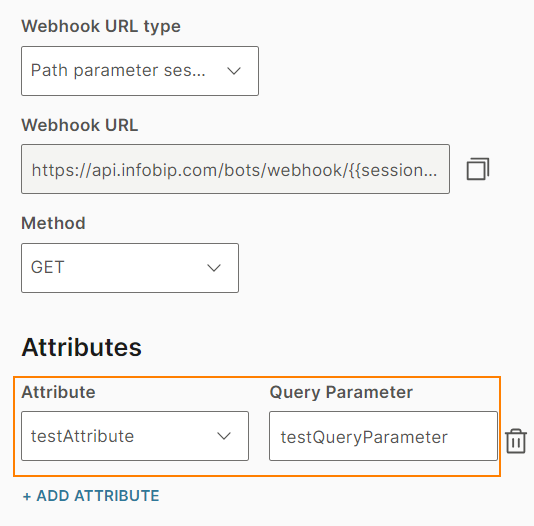
If the Method field is set to GET, do the following:
- In the Attribute field, select the attribute to which you want to save the value.
- In the Query parameter field, select the parameter that contains the required value.
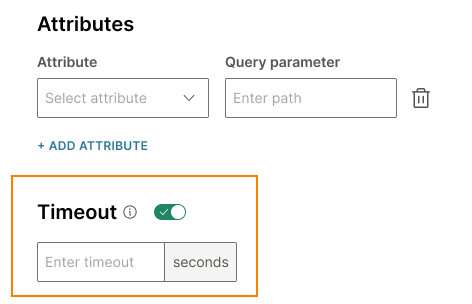
Timeout: Enable timeout for the webhook to make sure that the conversation continues even if the response from the external service or API is delayed or unavailable.
Specify how long the chatbot needs to wait for the response. You can set a minimum timeout of 1 second and a maximum timeout of 900 seconds.
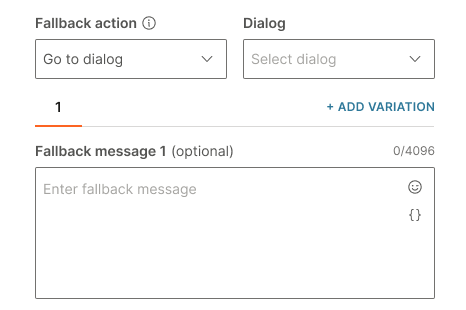
Fallback: Specify the action that the chatbot needs to take when timeout occurs. The Fallback section contains the following fields:
-
Fallback action: You can either transfer the chat to an agent (Connect to agent) or send the end user to another dialog (Go to dialog).
-
Dialog: If the Fallback action is Go to dialog, choose the relevant dialog. Example: You can go back to the default dialog, the menu, or the closing dialog.
-
Fallback message (Optional): Send the end user a message when timeout occurs to inform them that there is an issue. Example: Sorry, we are experiencing technical difficulties. Please try again later.
The message can contain a maximum of 4.096 characters including spaces, special characters, new line, emojis, and attributes.
To add variations of the message, select Add variation.
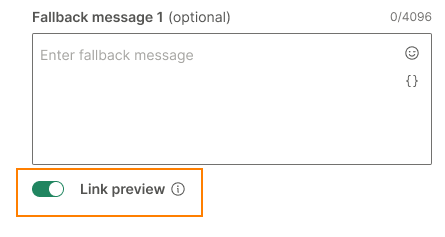
Link preview (Optional): Set whether the end user can see a preview of any link that you share in the Fallback message field. This field is available only if the chatbot uses the WhatsApp channel.
Webhook request codes [#webhook-request-codes-webhook]
- 200- Successful
- 40401- Unsuccessful. No session.
- 40026- Unsuccessful. Session cannot handle request.
Example of using Webhook element [#example-of-using-webhook-element-webhook]
The following example shows how to use a Webhook element with an API element to authorize your end user through an external authorization service.
- Use the API element to send an authorization request, which contains the webhook URL, to the service.
- The chatbot waits for the response.
- The chatbot receives a response from the external authorization service. The response contains the URL for the user authorization.
- In the chatbot, store the URL in an attribute that is defined in the API element.
- Use the Text element to send this authorization URL to the end user. Ask them to authorize themselves through the URL.
- After the end user authorizes themselves, the webhook receives a request from the external authorization service. This request contains a token that the end user is authorized. This token value is stored in an attribute in the Webhook element, in case further authorization is required.