Create a chatbot from scratch
This section gives an overview of the process to create a chatbot from scratch.
- Log on to the Infobip web interface (opens in a new tab).
- In the menu on the left, go to Answers > Chatbots.
- Select New chatbot.
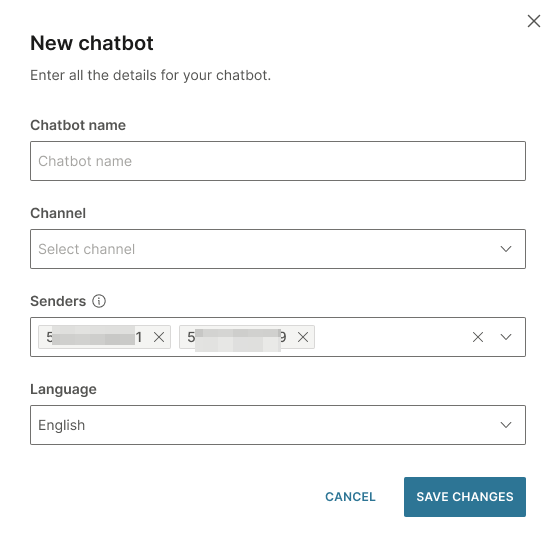
- Complete the following fields.
-
Chatbot name: Enter a name for the chatbot. Specify a unique name so that you can identify the chatbot.
-
Channel: Select the required channel.
-
Sender: Specify one or more senders that the chatbot uses to communicate with the end user. If you have only one sender, it is selected by default.
(WhatsApp only) To register a sender, select Register WhatsApp number.
You can select the sender any time before you activate the chatbot.
For more information about senders, refer to the Sender documentation.
-
Language: Choose the chatbot language. You can create different chatbots for different languages.

-
- Select Create chatbot. The chatbot editor opens at the Dialogs tab.
- Based on the chatbot flow, create the required dialogs and add elements to the dialogs.
- (Optional) Add attributes to capture and store information.
- Depending on the type of your chatbot, do the following.
- Rule-based chatbot: Create keywords. Refer to the example of creating a simple chatbot and a rule-based chatbot.
- AI chatbot: Add intents and configure natural language processing. For more information, refer to AI chatbots.
- Integrated chatbot: Integrate your chatbot with other Infobip solutions or with external solutions. For more information, refer to Integrated chatbots and Integrations.
- Secured chatbot: Add security options to the chatbot.
- Configure the chatbot settings.
- Test the chatbot in the simulator.
- (WhatsApp and Open channel only) Test the chatbot on your device and simultaneously view the conversation flow live in Answers.
- Activate the chatbot.
- View the analytics for your chatbot.