Quickstart
Jump straight into the Answers solution by quickly learning your way around the web interface, some basic terminology, and building your first simple keyword-based chatbot.
Note that this quick start section is intended to give you a high-level overview of the system and how to get started in it. Make sure to check out the relevant sections of the docs for more complex chatbot requirements and tutorials.
Terminology
Before getting started with Answers it is important to familiarize yourself with some core terminology which is heavily used throughout the web interface and documentation.
Make sure to check out the relevant sections of the docs for a deeper understanding of some of these terms.
Building blocks of a chatbot: Chatbots are made of the following:
- Keywords allow the chatbot to identify and route end users to the next relevant dialogs in the chat depending on their responses. Keywords also work with synonyms so as not to have to add multiple similar words separately.
- Attributes add context to your conversations as it would by humans interacting. They are used to capture information about your customers to be stored and used in communication exchanges.
- Dialogs are the building blocks that make up the various parts of your chatbot conversation and are based on Intents. They are made up of various elements and are responsible for routing end users on to the relevant next steps in the customer journey.
- Elements are the building blocks that make up your dialogs. Various element types are available across different channels and can be anything from simple text to conditional routing.
- Components: A component is a reusable block that does a specific task. It is a smaller version of a chatbot and can be shared across multiple solutions. A component can only be used within a solution, such as a chatbot.
AI Chatbots: In addition, AI chatbots include the following:
- Intents define the end-goal of the conversation or in other words the reason why the user is starting the conversation. Intents are made up of training phrases to help provide the chatbot with context.
- Named Entity Recognition (NER) is an AI-powered feature of Answers and is used to capture relevant conversation entities with the aim of training the chatbot. It works by classifying user inputs into predefined categories.
Templates are predesigned chatbots that uses example content, configuration, and integration to simulate real-life chatbots.
You can use a chatbot template in the following ways:
- Use it as it is for testing and learning. You can activate the template immediately.
- Use it as a base to build a chatbot. Instead of creating a chatbot from scratch, use a template to create the chatbot. Customize the chatbot for your use case and requirements, and use it in a live environment.
- Use it as a base to build advanced chatbots to use in a live environment.
Each template is for a specific channel and language.
User roles
In order to create/edit/import chatbots you need to be assigned the role of Answers Designer or Answers Manager. If you have another user role you will only have view permissions.
Chatbots page [#chatbots-page]
In the Answers > Chatbots section, you can view and manage all your chatbots, as well as access chatbot-specific analytics.
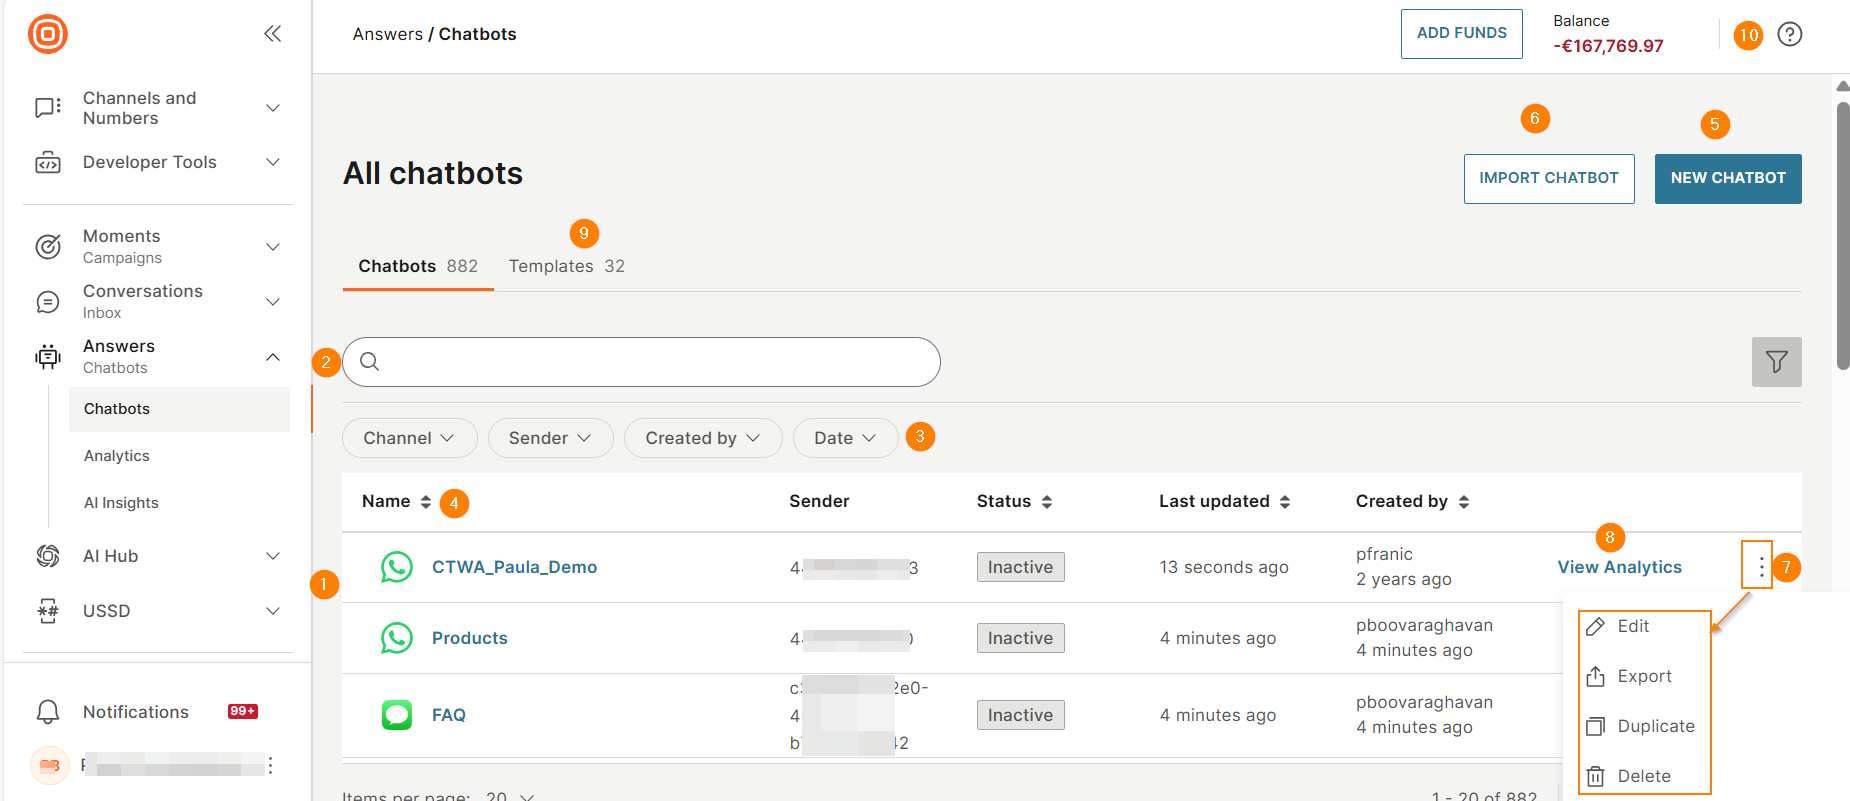
You can do the following.
- View a list of chatbots. Each chatbot shows the following information.
- Chatbot name: Name of the chatbot.
- Sender: The senders that the chatbot uses to communicate with the end user.
- Status: Shows whether the chatbot is in Active or Inactive state.
- Last updated: The date the chatbot was last updated.
- Created by: Name of the chatbot creator and the date the chatbot was created.
- Search for a chatbot. Use the search box.
- Filter chatbots by channel, sender, and chatbot creator. You can also filter by a range of created dates and modified dates.
- Sort chatbots. Select a column header to sort.
- Create a chatbot from scratch.
- Import previously exported chatbots, including their settings and setup.
- Edit, duplicate, export, and delete chatbots.
- View the performance of a chatbot. This option is available only for chatbots that have collected data. Select View analytics.
- Go to the Templates page.
- Access Infobip's resources such as help with using Answers, see use cases, and the latest release notes.
Chatbot editor [#chatbot-editor]
The chatbot editor is where you can design the chatbot.
It has the following sections:
- Dialog side panel: Lists the dialogs and dialog groups in the chatbot.
- Canvas: This section is where you can design a dialog.
- Build side panel: Lists all the chatbot elements that are available to use in the dialog. Drag an element from this side panel to the canvas to add it to the dialog.
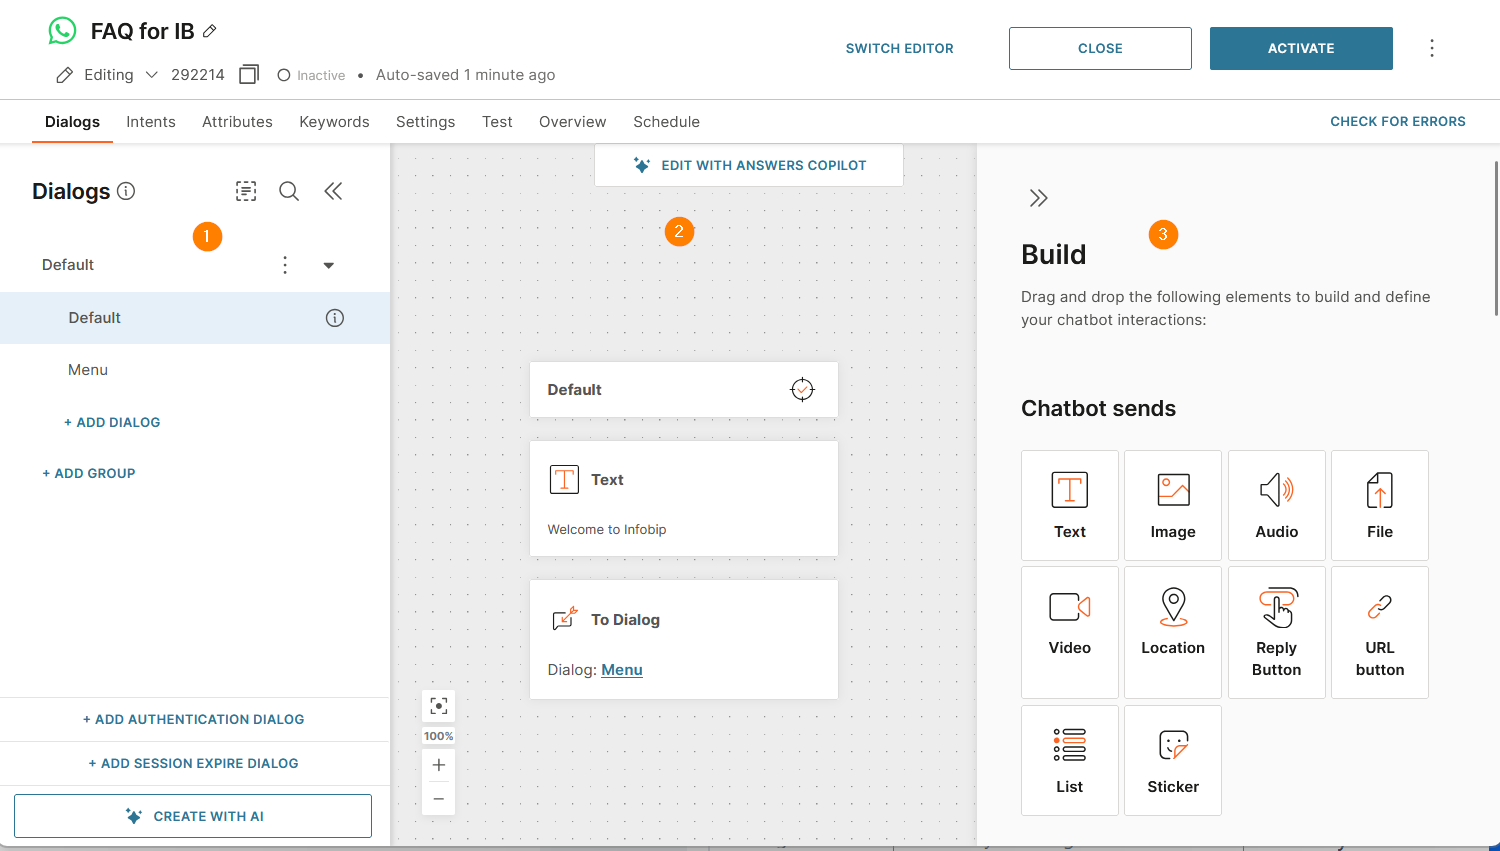
In the chatbot editor, you can do the following:
-
Name your chatbot.
-
Select Editing or Viewing mode. Use Viewing mode when you want to avoid making changes to the chatbot.
-
View the chatbot ID, which uniquely identifies the chatbot. You can also copy the ID.
-
View the status of the chatbot.
-
View when the chatbot was last saved.
-
Search within the chatbot.
-
Activate or deactivate the chatbot.
-
Select the three dots menu to do the following:
- Duplicate the chatbot.
- Save the chatbot as a template.
- Schedule activation and deactivation of the chatbot.
-
Collapse the Dialog and Build side panels.
-
Close the chatbot to go the Chatbots page.
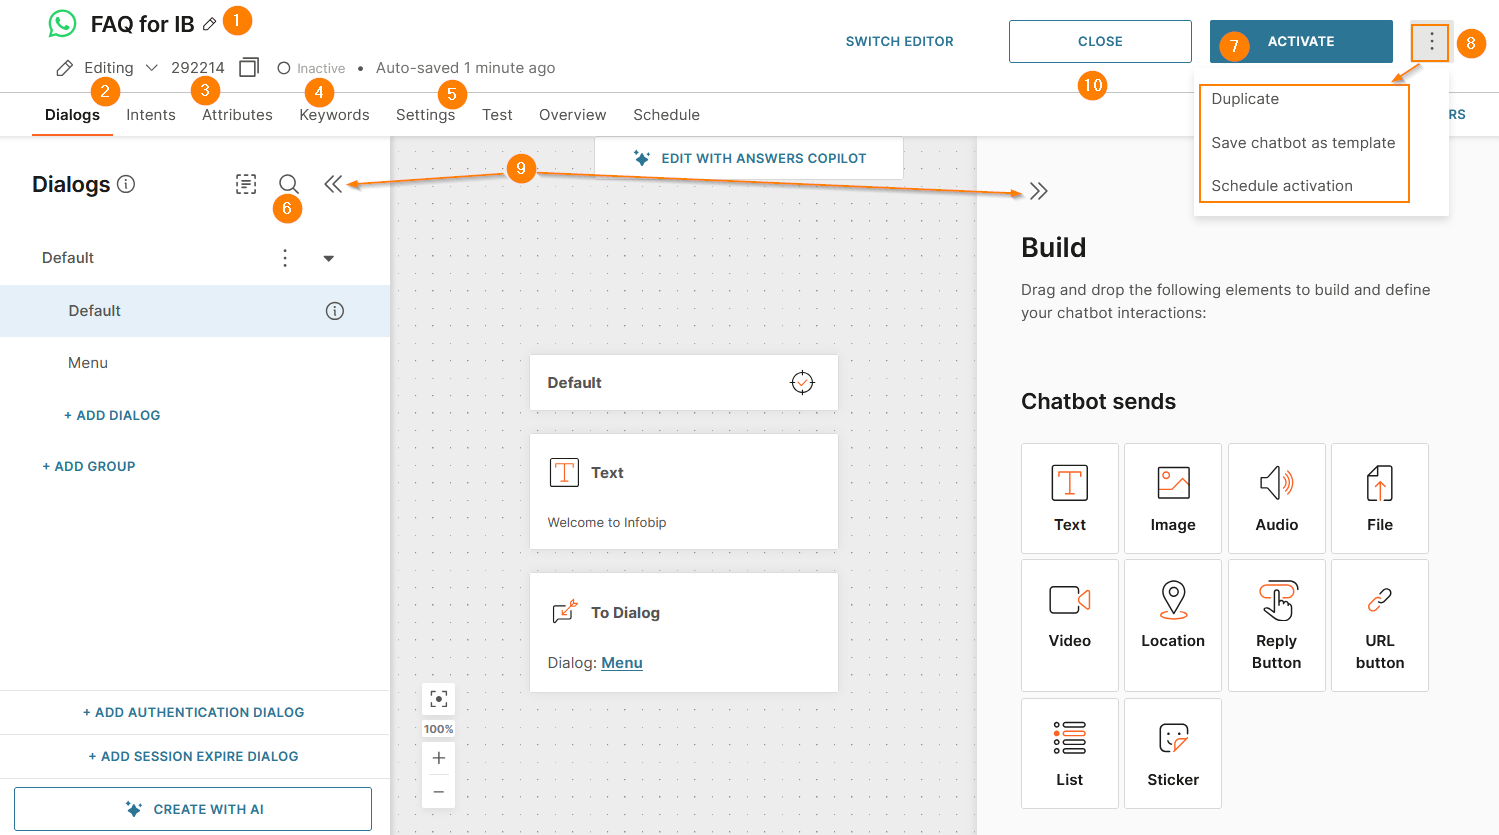
Search within the chatbot [#search]
You can search for a word or a phrase within a chatbot. The search results include all dialog names, element names, and the content of chatbot elements that contain the search term.
Select a search result to view the corresponding dialog or element that contains the search term.
The following image shows the search results for the word product.
Build a simple chatbot
This is a quick guide to building your first simple chatbot. Note that detailed explanations are omitted from this tutorial for the sake of brevity. Make sure to check out the relevant sections of the docs for more information.
For this guide, you will be creating a simple keyword-driven chatbot. Keyword-driven chatbots are equally as powerful as AI-driven bots, however, the customer journey solely relies on response association to keywords, attribute storing, and conditions.
This tutorial is broken up into two main parts. The parameters behind the chatbot's logic, and the physical composition of the chatbot customer journey which end users will experience.
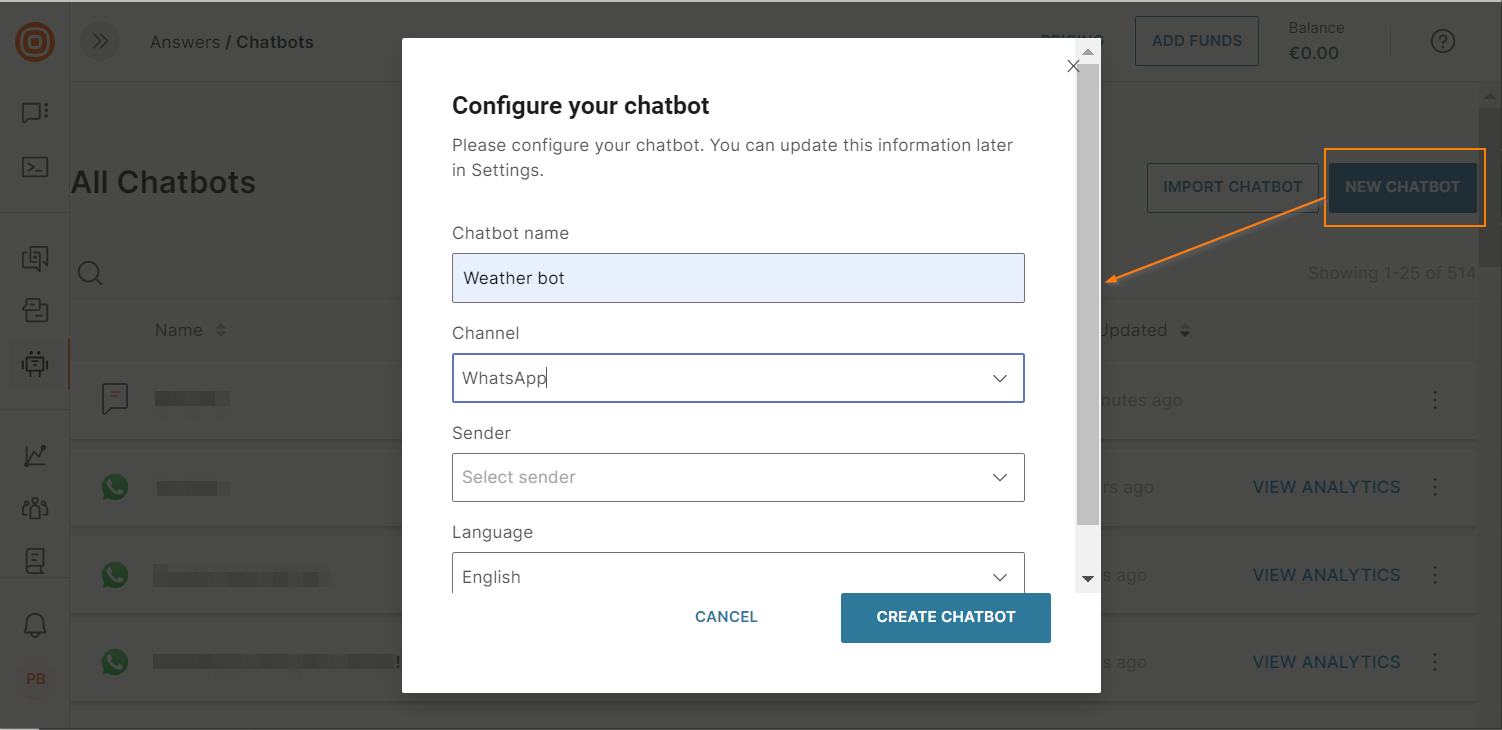
Let's build a simple weather app. Log in to the web interface and head to the Answers dashboard. Once there click Create chatbot to begin. Only users with create permissions can create chatbots.
- Give your chatbot a name (recommended unique), and select the channel you will be using. Define the sender account (optional at this stage), and set the chatbot language. Hit Create chatbot.
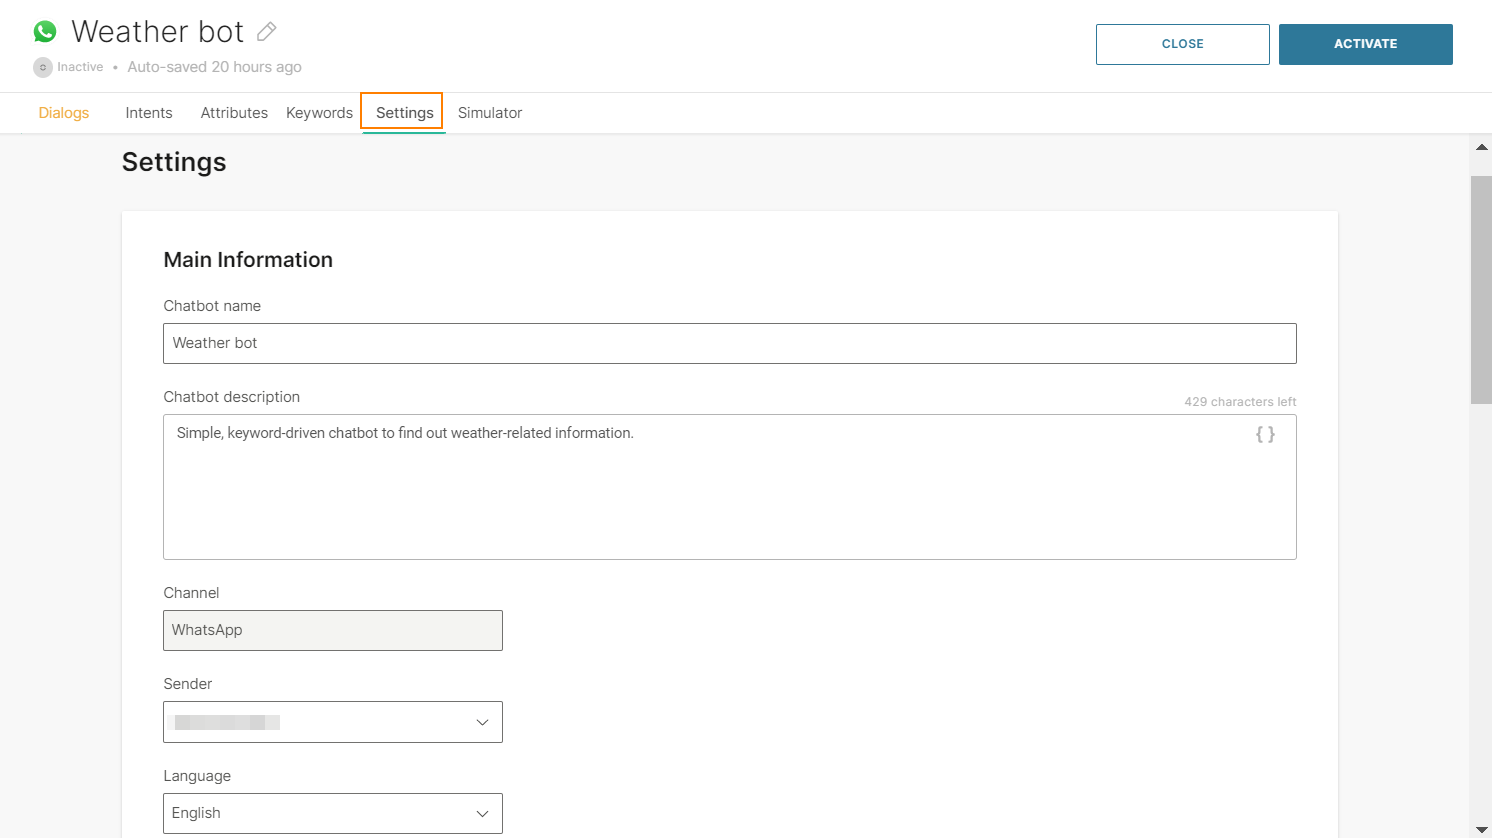
- Now you should be in the chatbot editor in Dialogs. Go to the Settings tab if you need to make any immediate edits to the information provided in the previous step. Here you can also add your escape phrases and chatbot timeout logic.
- First, we need to add some keywords for the chatbot to recognize. Go to the Keywords tab. Here, you're going to add all the words which are going to allow your chatbot to understand where to route users in the conversation based on their responses. We are adding keywords now so that we can use them later when building the customer journey.
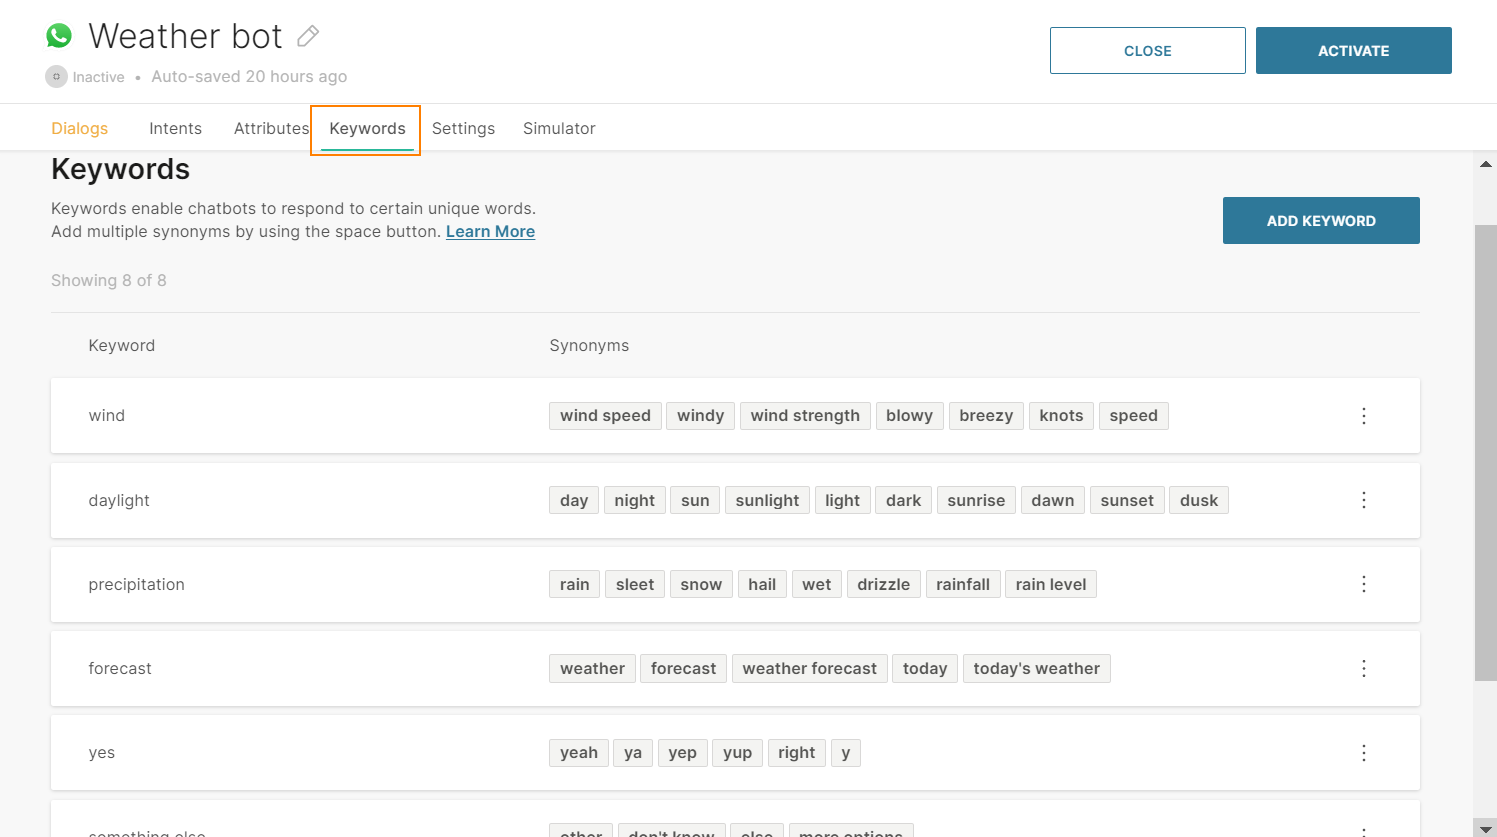 Make sure to provide as many synonyms as possible for your keywords so that your chatbot doesn't get stuck with what to do.
 - Now go to the Attributes tab. Here, you are going to create the custom objects needed to capture and store the specific information we need for this example. As we are expecting various API responses for this chatbot, let's create those attributes to store those responses.
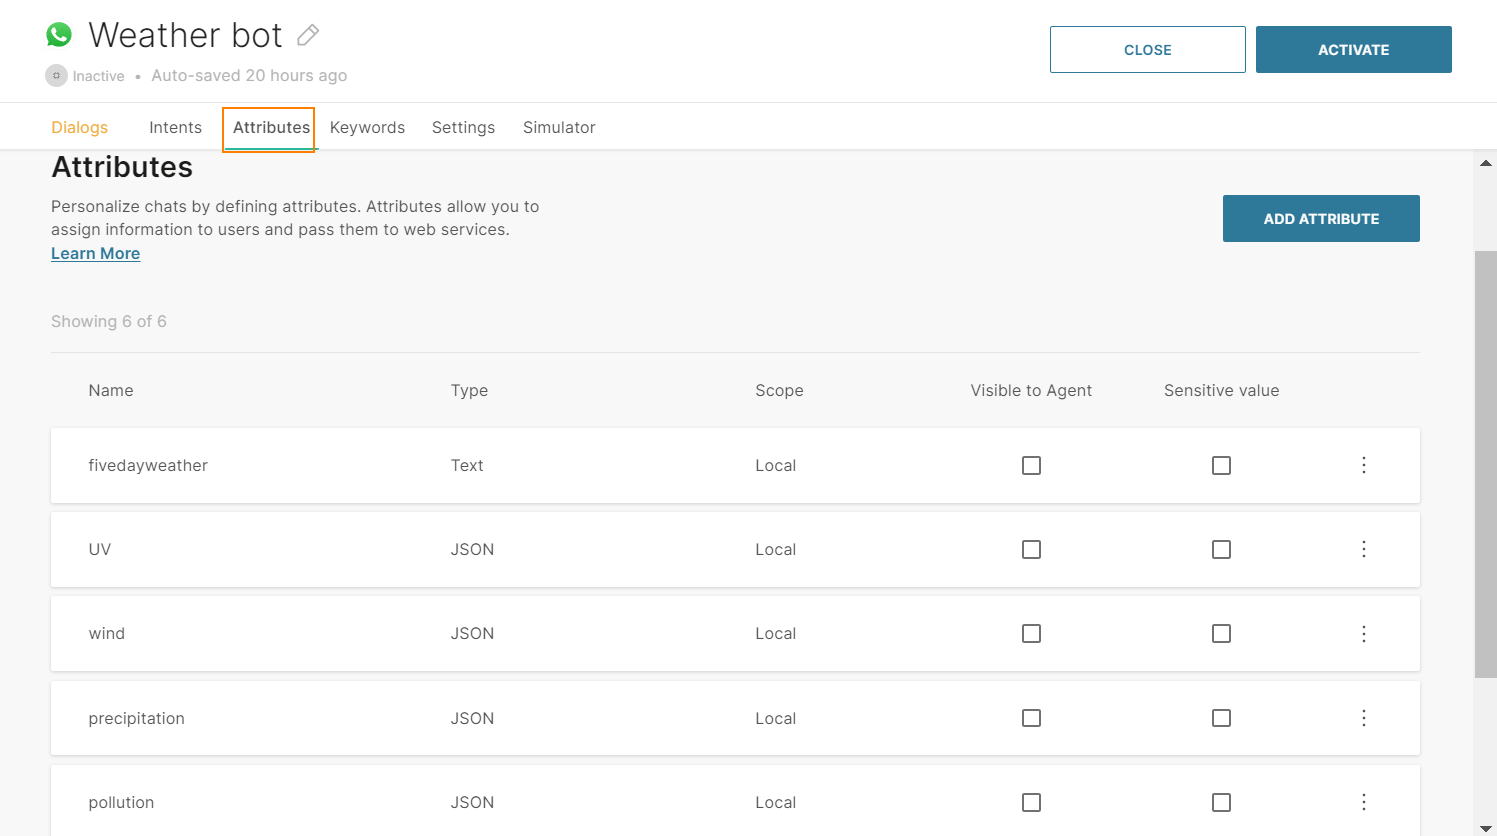 Set the value type depending on what format you are expecting to receive your response in (JSON, XML, etc.)
 - Intents are used in AI-powered chatbots running on training phrases enabling the chatbot to work beyond just keyword recognition. Make sure to check out the section on intent-driven chatbots for more information and guides on how to build these types of chatbots.
Now it's time to put your chatbot together! Go back to the Dialogs tab and get ready to build the customer journey.
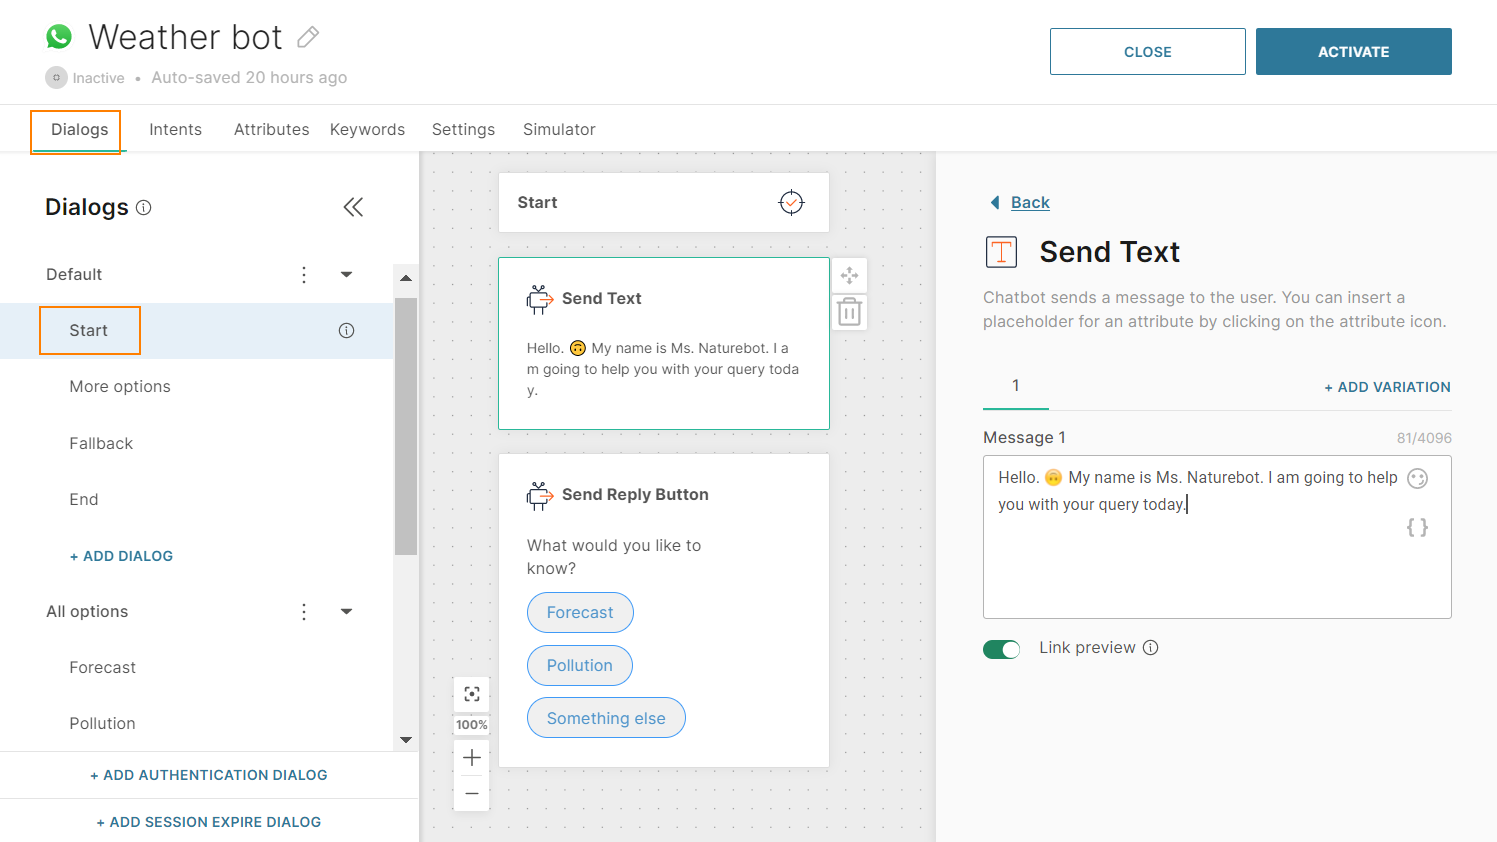
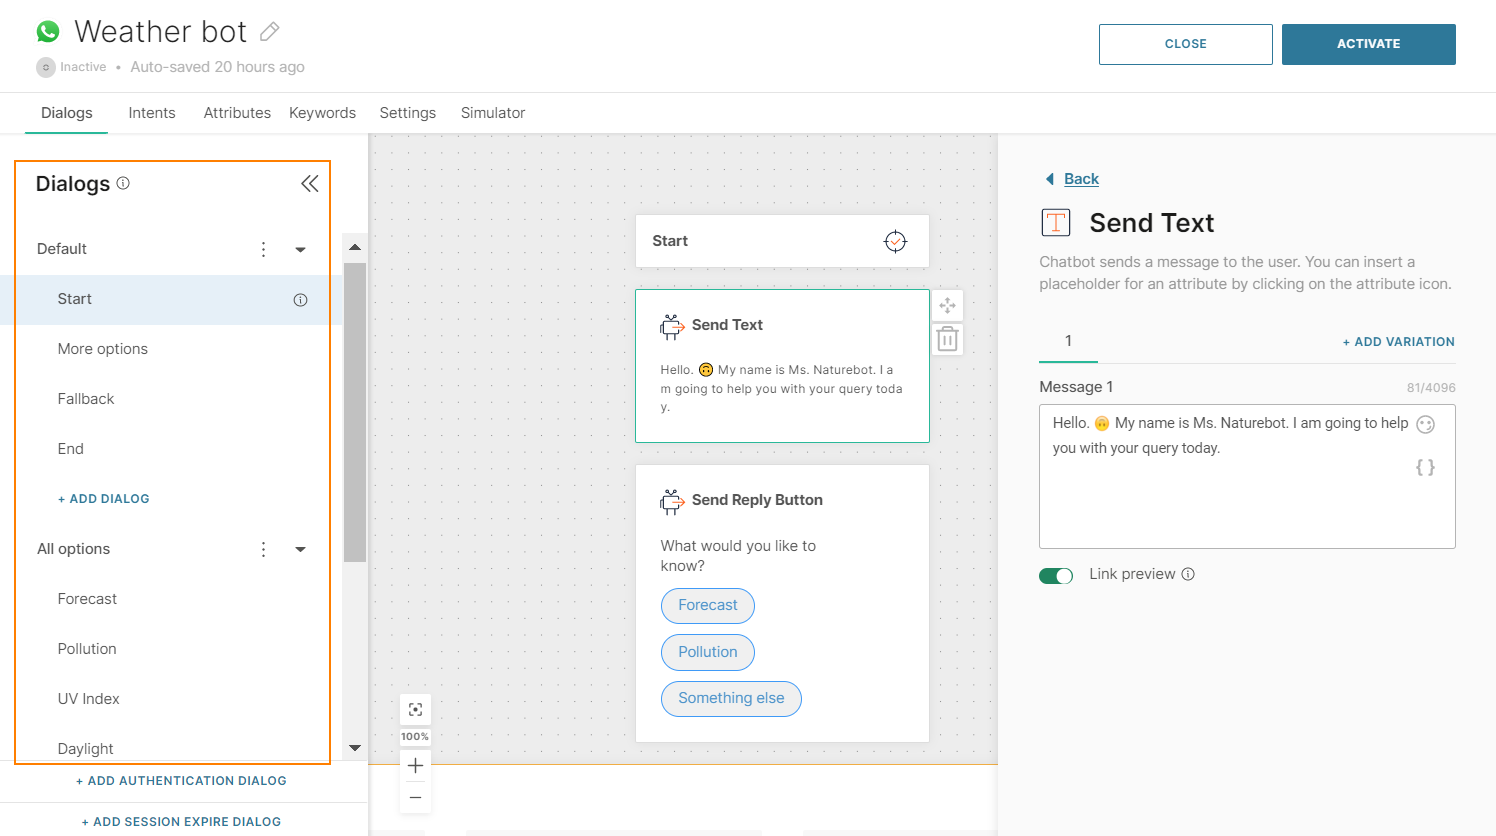
- The main steps in the customer journey when conversing with chatbots is broken up into dialogs. By default, you will be in the Default dialog, which we will use for a greeting message, and quickly find out what the user wants to know.
Pull the Text element into the editor and add a greeting. Add the Reply button element underneath and present users with a few options to choose from based on your keywords. Set the Postback value to match the relevant keyword.
- Let's create the global dialog structure for this chatbot. Use the +Add dialog option and add dialogs as required for separate topics of conversation. These should correspond to your keywords.
 You do not need to populate these dialogs with any channel elements yet. We will come back to this later.
If your dialogs are largely made up of the same content and/or logic, build a base dialog first then use the duplicate option
You do not need to populate these dialogs with any channel elements yet. We will come back to this later.
If your dialogs are largely made up of the same content and/or logic, build a base dialog first then use the duplicate option - Let's add an "end" dialog so that we can redirect users to it when they're finished with their query. Add a new dialog and use the Text element to add a goodbye message. Place the conditions element underneath and add a condition. Set the condition to lastReceivedMessage to is not null.
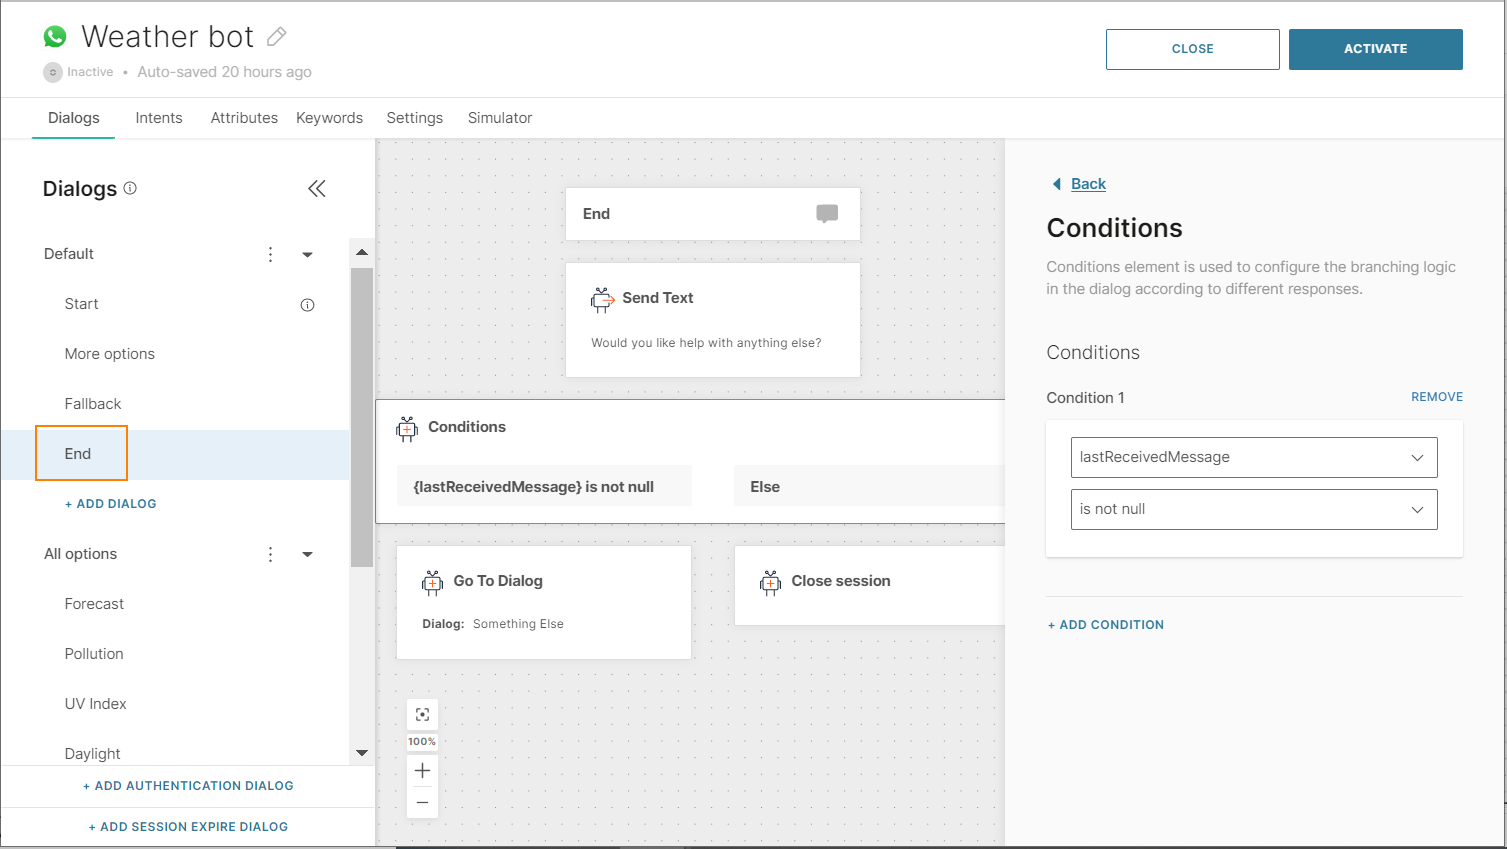 Place the To dialog element under the condition and select a dialog. Place the Close session element under Else.
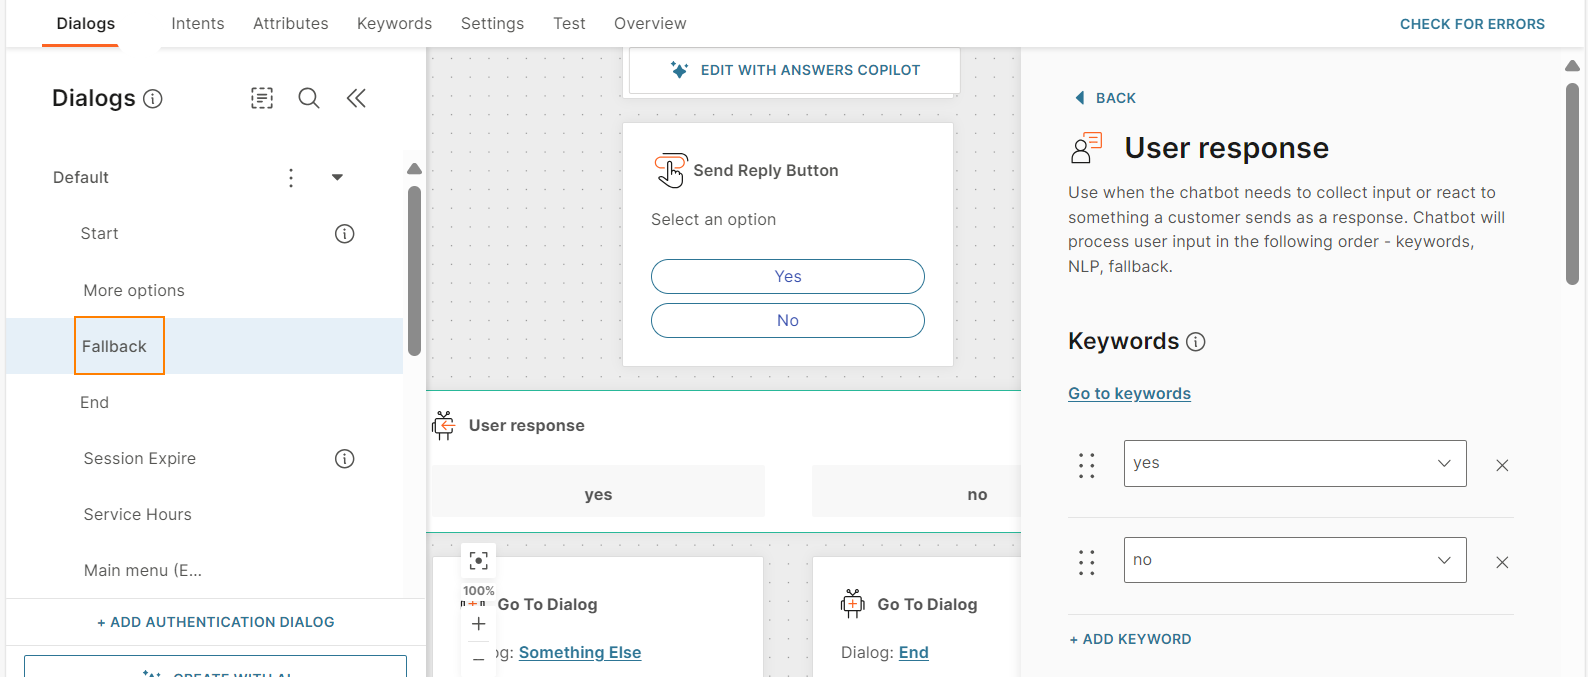
 - Now go back to the Default dialog and add the User Response element. Select your keywords related to the options you added above. When a user selects an option from your reply button, the chatbot will take that response and route it to the appropriate dialog.
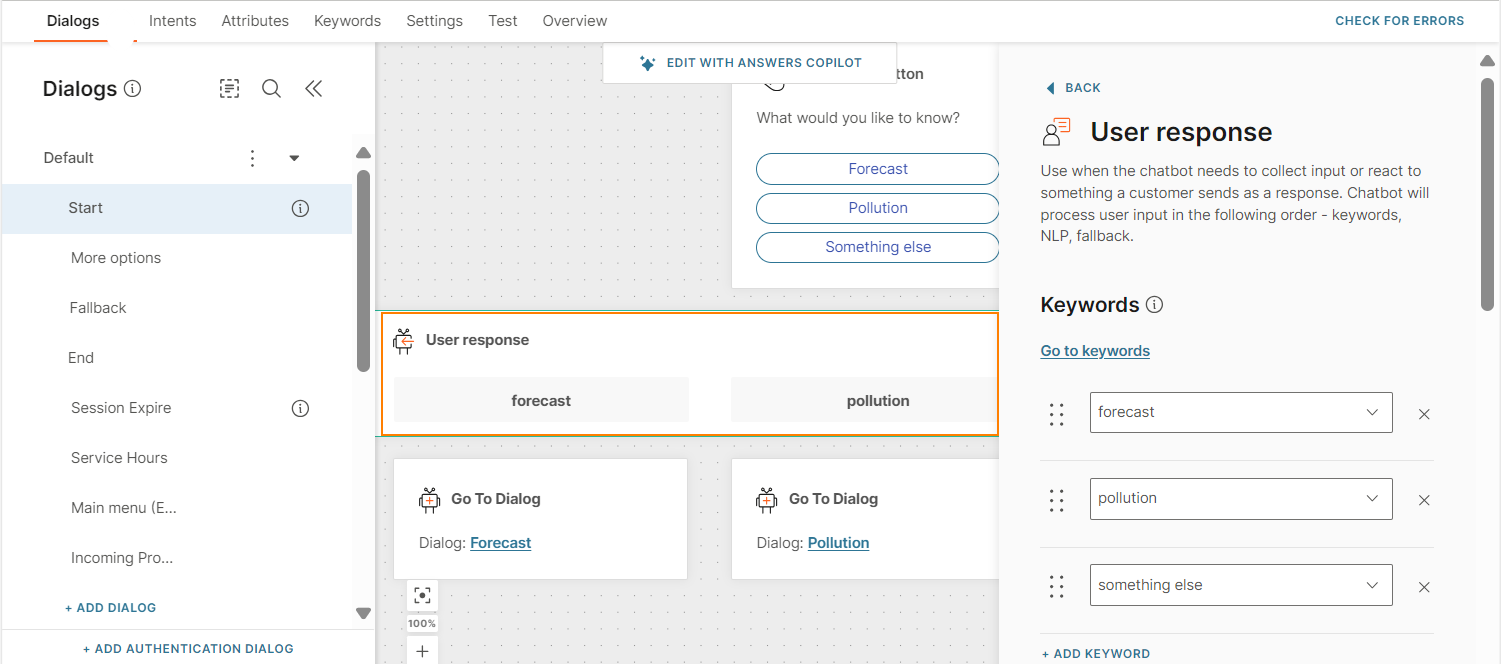
5.Drag the To dialog element under each user response option and set it to the corresponding dialog matched with the keyword. Make sure to add a fallback action for the User response element so that the chatbot knows how to handle unrecognized inputs from the user. Select a dialog to fall back to, or alternatively create a dedicated fallback dialog.
- Your additional dialogs can now be set up and configured as requested as per their dedicated function. For this example, the Forecast dialog makes a call to a weather app via API and saves the response to the dedicated attribute.

- Configure the response settings on how to store data from the response, either from headers or from the body. Then add in the desired channel element which will display the response in a readable format to users.
- Make sure to route users on to the next steps in the customer journey, for example, back to the main menu, or to the "end" dialog.