Workspace overview
Your Conversations workspace consists of two main panels:
- My Work
- All Work
Understanding how these panels work will help you manage conversations efficiently and stay organized.
My Work panel
My Work is the main agent dashboard where you can:
- Check conversations assigned to them
- Check details about each conversation
- Manage conversations and conversation details
- Create new conversations
On the left side, you can see the list of conversations assigned to them. The conversations list contains conversations with the following status:
- Open
- Waiting
- Solved (depending on the configuration)
Conversations are listed by date of the last customer message received (last received is always on top of the list). Conversations marked as Closed are not shown on the list.
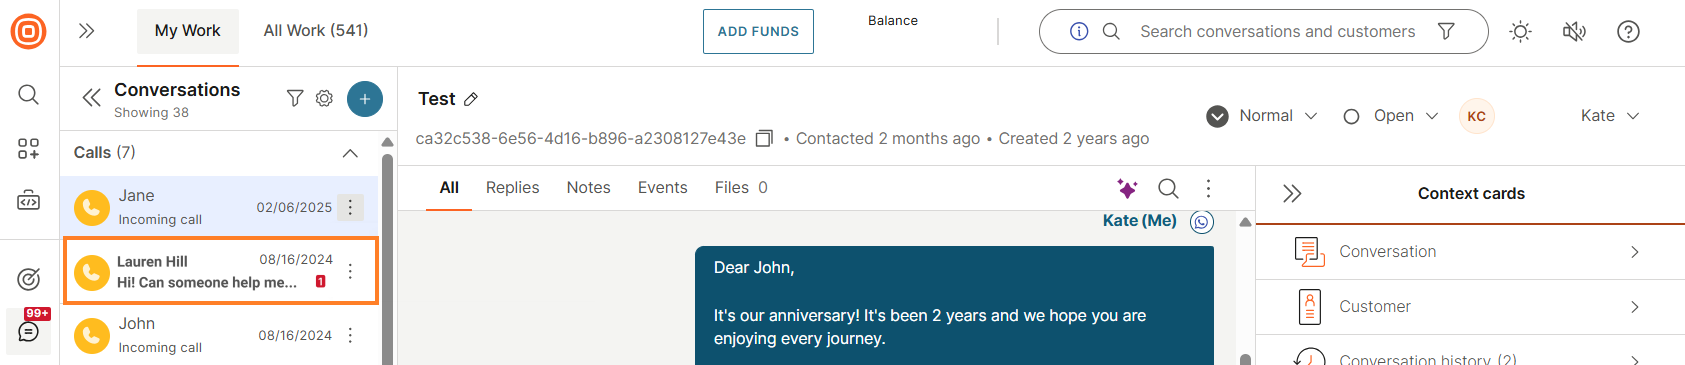
Conversations containing unread message(s) will be bolded and the counter with the number of unread messages will appear next to it.
For each conversation in the right-side panel, you can check the following:
- Timestamp of the received message
- Customer name
- Preview of the last received message
What you can do in My Work [#what-you-can-do-in-my-work-my-work-panel]
Within the selected conversation, you can do the following:
- Type, send, and receive messages
- Change conversation priority, topic, and status
- Type public notes
- Reassign conversation (you can take unassigned conversations or move your conversations to other agents, however, you cannot take over conversations assigned to other agents)
However, supervisors and admins can change the assignee without limitations:
- Change queue
- Type summary
- Manage tags
- Manage customer profile
The main part of the conversation is the interaction between agents and customers where agents can see the conversation history.
For example, if the customer uses messages to establish their brand on one channel and then later on another channel, messages can be part of one continuous conversation.
When a customer message is received for the first time, a conversation is created with the following attributes:
- Conversation name
- Conversation ID
- Participants (customer/agent(s)/bot)
- Date of creation
- Message status (default one is Open)
- Message text
- Message channel indicator
- Customer info (if customer recognized)
Message features [#message-features-my-work-panel]
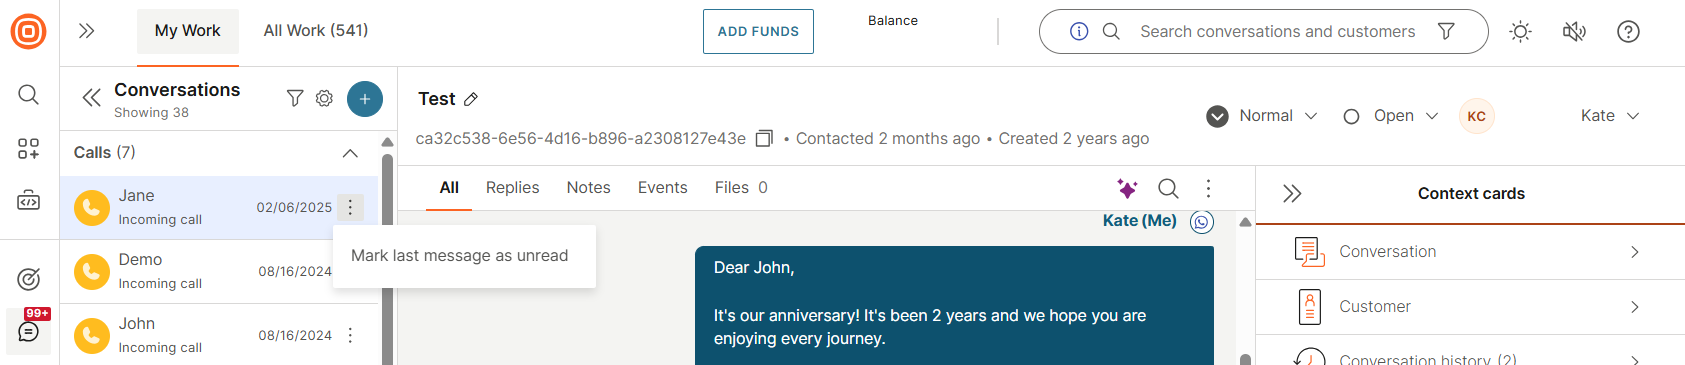
Mark message as unread
Sometimes you will see customer messages but cannot handle them right away. These messages are automatically marked as read.
You have the option to mark messages as unread so that they do not end up unnoticed. You can get back to them as soon as possible.
Message status
Different message statuses can occur:
- Single grey tick ✓ - The message is in the sending process
- Double grey tick ✓✓ - The message has been delivered to the user
- Double green tick ✓✓ - The message was seen by the user
- Red triangle ▲ - A delivery error occurred or the processing failed
Message preview
The message preview allows you to quickly preview the conversation details without opening the specific conversation.
With this, you can easily review the message content, understand the urgency of the matter, and prioritize the conversation among all the others.
Message errors
In instances where a message fails to be delivered, you will be provided with detailed insights including the error code name and ID.
With this information, you can pinpoint the underlying reasons behind message failures, and efficiently approach to tackle any potential issues.
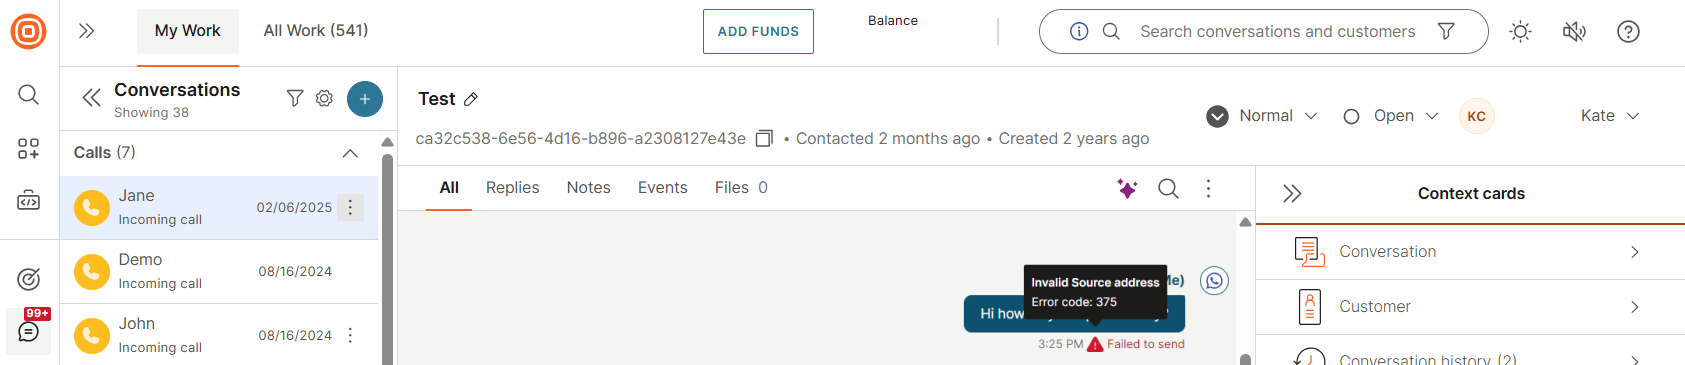
Refer to the Response status and error codes page which contains a comprehensive list of all codes and actionable steps necessary for resolving any encountered issues.
Filter conversations by status [#filter-conversations-by-status-my-work-panel]
To filter conversations by status:
- Select the filter icon in the My Work side panel.
- From there, you can filter your current conversations by selecting from the following statuses:
- Open
- Waiting
- Solved
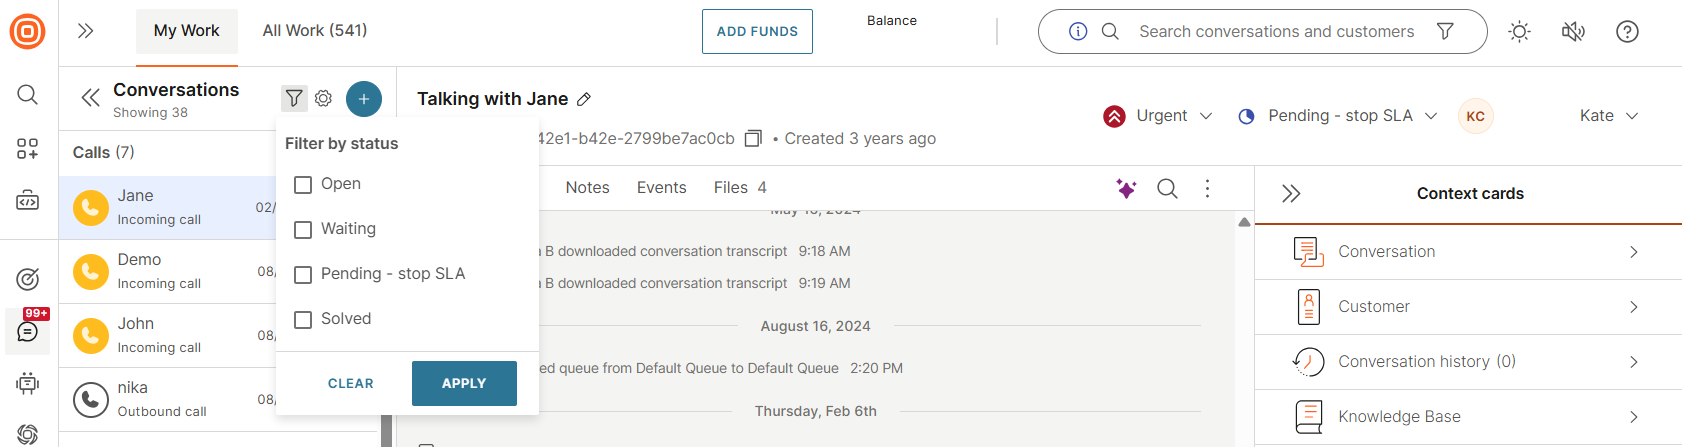
- If the Solved status is greyed out from the filter, it indicates it has been set to be hidden from My Work.
Sorting, ordering, and grouping [#sorting-ordering-and-grouping-my-work-panel]
The sorting, ordering, and grouping options in My Work efficiently organize, prioritize, and group conversations, reducing manual work and offering a clearer view of priorities.
Accounts not using social channels have access to all three options. However, accounts that use social channels will only have access to the Group by option.
Select the cog icon in the top-right corner to access the following options:
- Sort by
- Order by
- Group by
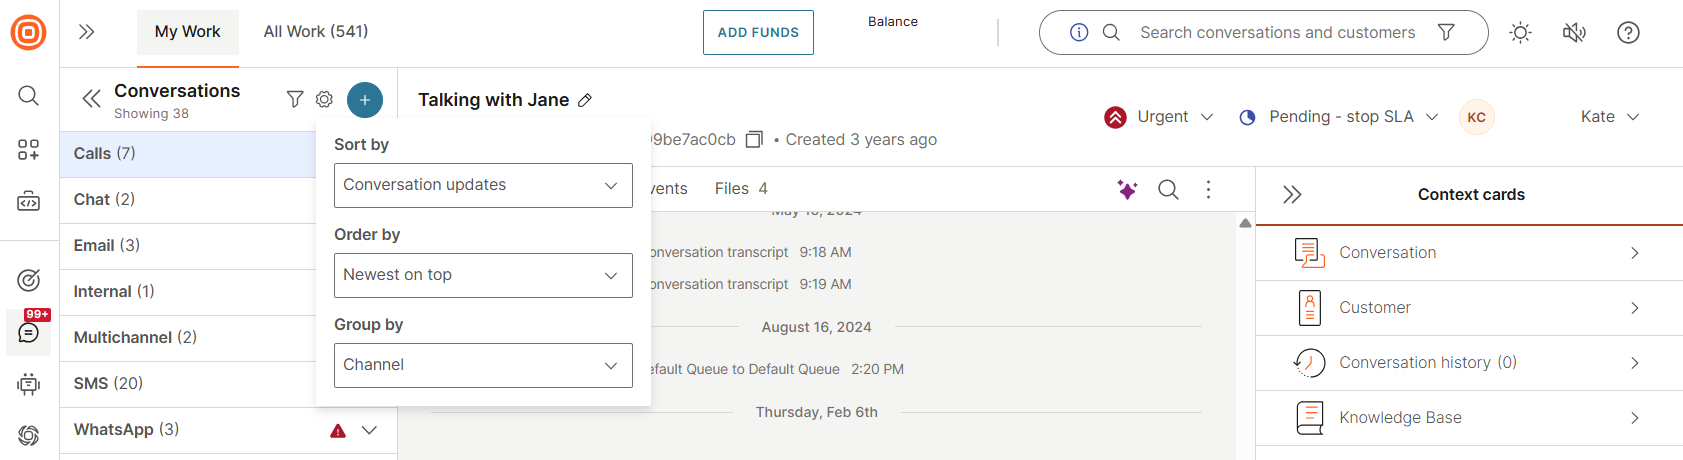
Sort by
The Sort by option offers the following sorting possibilities:
- Conversation updates - Lists conversations sorted by the most recent date and time of modification
- All messages - Lists conversations sorted by the time and date of the last message sent by either the agent or the customer
- Customer messages - Sorts based on the customer messages
- Conversation assigned - Lists conversations based on the time and date when the conversation was assigned to the agent
The default sorting is set to Conversation updates.
The following actions will influence the sorting under this option:
- Conversation created with message
- Assigned, reassigned, unassigned
- Conversation merged
- Message sent/received
- Conversation callback
- Create note
- Route conversation
- Auto assignment
- Add/remove conversation to/from queue
- Unbind/bind the form
- Link/Unlink customer
- Change (priority, status, summary, topic)
Order by
The Order by option offers the possibility to order the conversations by:
- Newest on top
- Oldest on top
Group by
The Group by option allows you to organize conversations based on:
- Status
- Queue
- Priority
- Channel
This feature enables you to group and customize your conversations on the My Work page, offering more flexibility for your specific needs and use cases. Sorting and ordering are implemented within each group.
Queue and channel grouping
For Queue and Channel grouping, you will only see groups where they have at least one assigned conversation.
For instance, if an agent belongs to 10 queues, they will only see the queues that contain their assigned conversations. As a result, the list of groups updates dynamically.
Additionally, these two groups are sorted alphabetically.
Status and priority grouping
For Status and Priority grouping, even if an agent has no assigned conversations, the groups are still displayed but without the option to expand them. For example, in the case of priority grouping, the drop down will show the following:
- Urgent (0)
- High (10)
- Normal (5)
- Low (0)
Unlike Queue and Channel grouping, the Priority grouping follows a fixed order (as shown above) rather than alphabetical sorting.
As mentioned above, if your account is using social channels, you will only see the Group by option.
For accounts with SLA enabled, these conversations will remain pinned at the top of the list and ordered based on the SLA. If all conversations have SLA, the sorting, ordering, and grouping will follow the selected preferences only when two or more conversations have the same SLA.
The sorting, ordering, and grouping preferences are stored locally in your cache.
As long as you do not clear your cache, your settings will be saved. This means that the next time you log in, the My Work page and list of conversations will be organized based on your previous selections.
My Work limit [#my-work-limit-my-work-panel]
The number of conversations visible to the agent on My Work is limited to 100.
If you have more than 100 assigned conversations at any moment, you can access all your conversations by selecting the View All option. This will open the All Work panel with this predefined filter.
Agents will only see up to 150 newest messages displayed in the conversation body. Older messages inside that conversation will not be displayed.
All Work
All Work allows supervisors, admins, and agents to list and group conversations based on specific criteria. The web interface offers predefined views and allows you to create custom views.
The All Work panel shows conversations and queues, including those assigned to other agents.
Conversations are grouped into views defined by filters, and these views can be private or global.
View types [#view-types-all-work]
- Predefined views - Industry-standard views that help you navigate between conversations:
- Unassigned - All open conversations without an assignee
- All - All open conversations regardless of queue
- All Chatbots - All conversations currently handled by bots
- My Conversations - All open conversations assigned to you regardless of queue
- Internal - Internal conversations
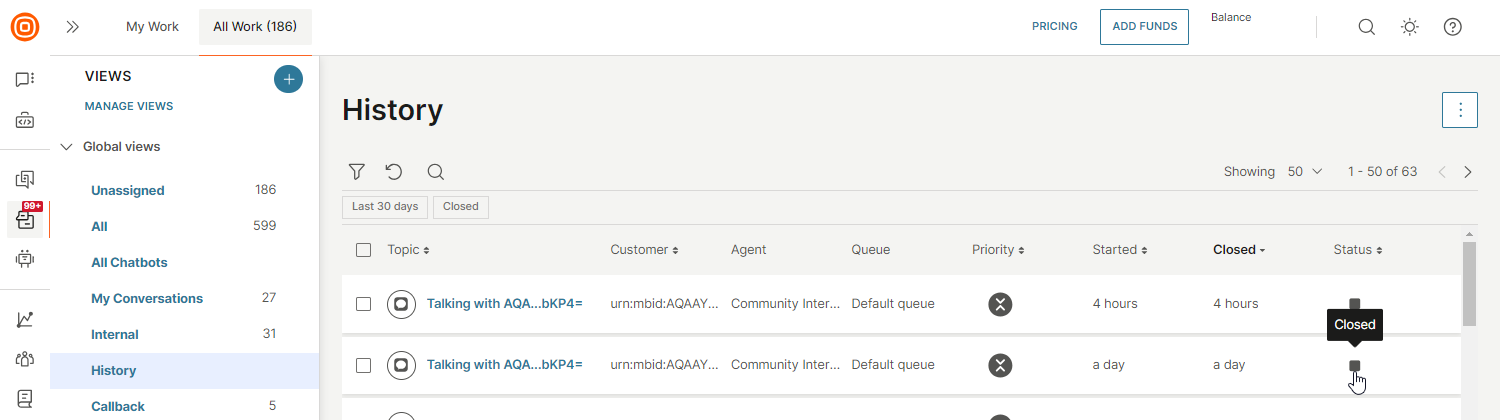
- History - All closed conversations regardless of queue
- Callback - Required callbacks
- Custom views - User-created filters for specific cases. These can be:
- Private - Created for individual use. Visible only to you and helps organize conversations for personal productivity.
- Global - Available to all users. Supervisors can create these views for all agents to use.
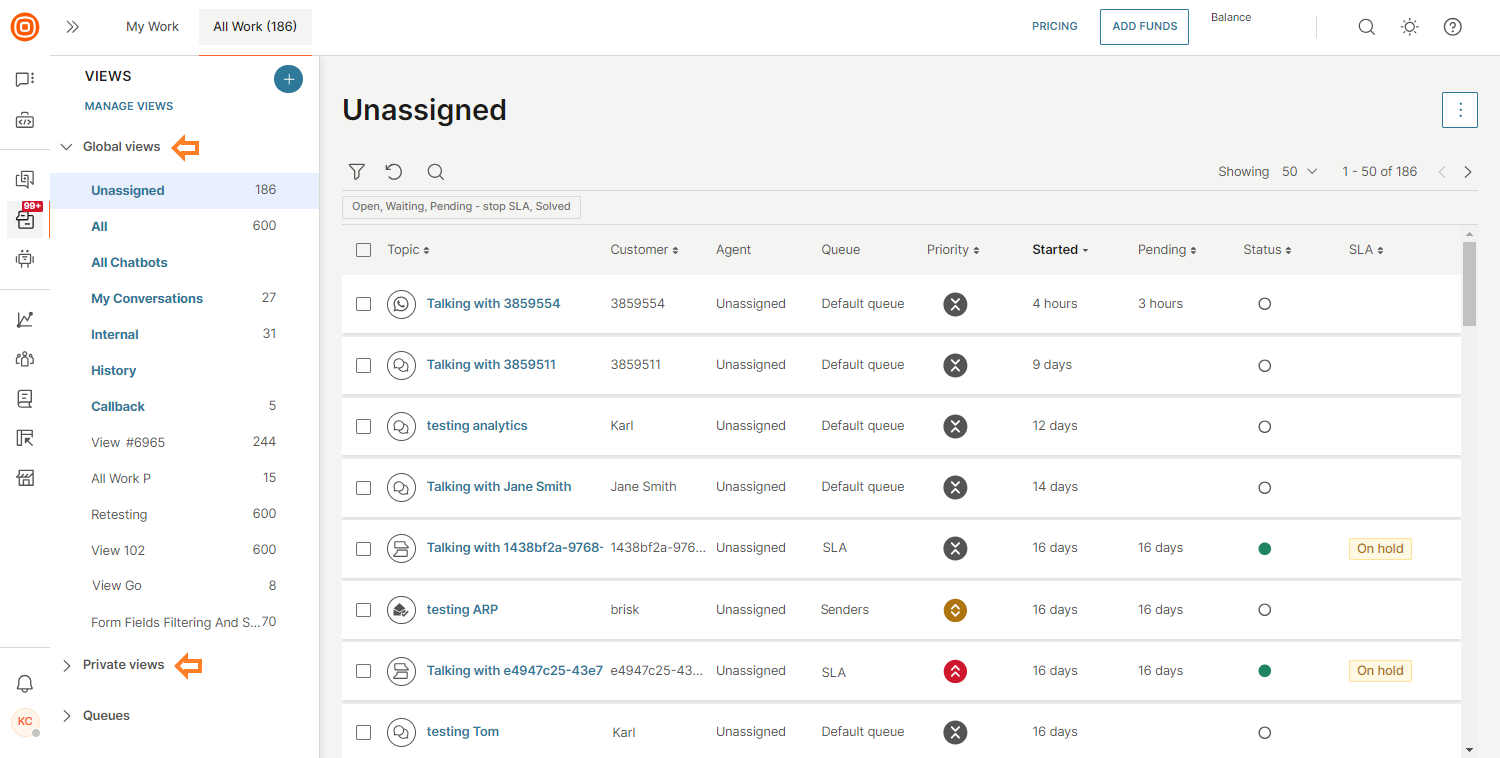
When you select a specific queue or view, all conversations within that queue or view appear. By default, the oldest conversations display first, sorted by pending time.
- Open a conversation by selecting it or assign it to you by clicking the Assign To Me button.
- Select a table header to sort by customer, priority, requested, or pending.
- By default, all conversations are sorted by the pending column in descending order to highlight the longest customer wait times.
Sorting and filtering [#sorting-and-filtering-all-work]
You can sort by many custom-added columns by selecting the header indicated by the arrows.
Common sorting options include:
- Customer
- Priority
- Status
By default, all conversations are sorted by the pending column in descending order to show the longest customer wait times.
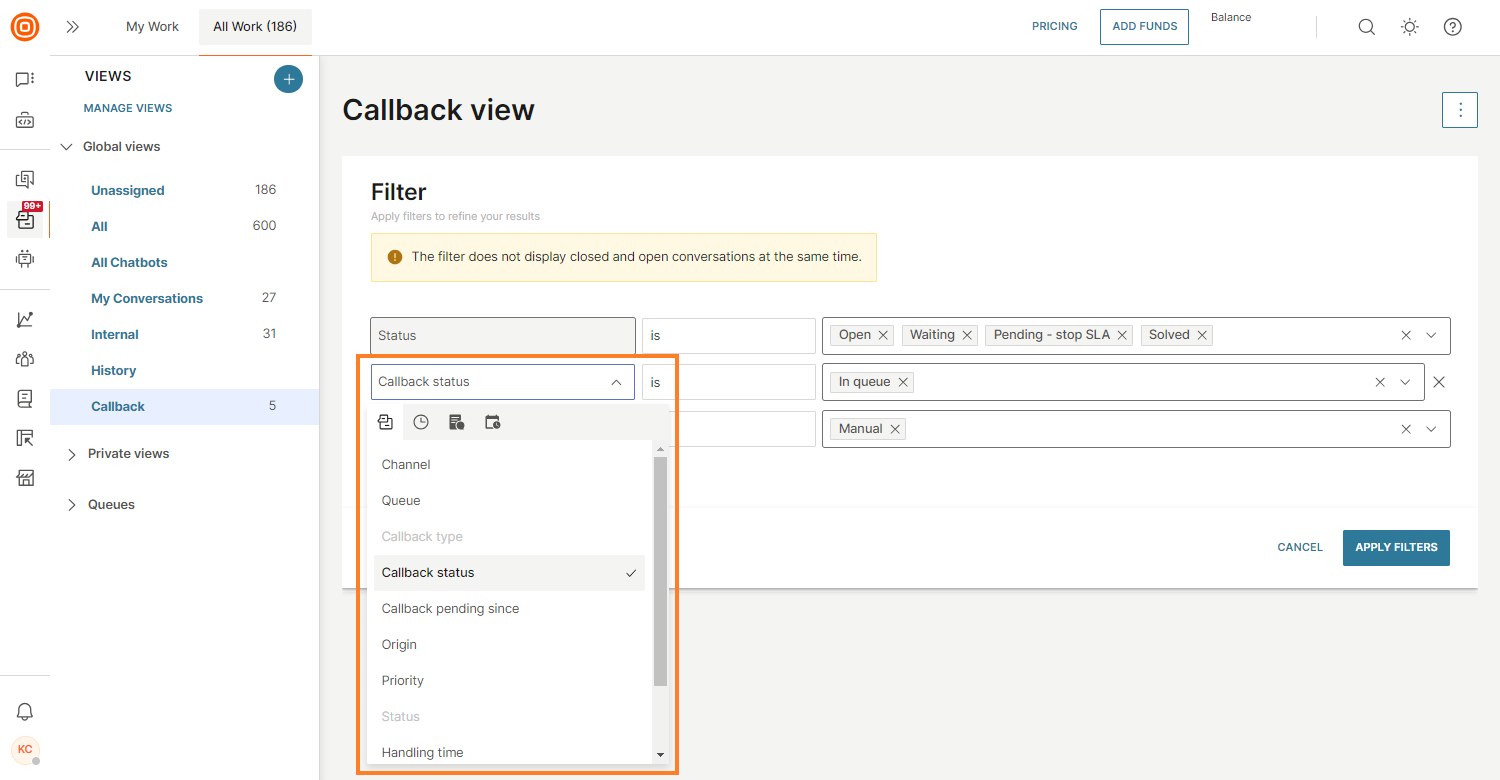
Advanced filtering options are available in All Work under Filters.
Predefined attributes
- Channel - Type of conversation channel
- Queue - Queue to which the conversation is assigned
- Callback type - Automated/Manual
- Callback status - Active/In queue/No reply/Done
- Callback pending since - Duration for which a callback is awaiting resolution
- Origin - Inbound or outbound conversation
- Priority - Priority of the conversation
- Status - Status of the conversation. You can choose Open, Waiting, or Solved (which can be combined) or Closed (cannot be combined with other statuses)
- Pending agent reply - Duration for which the customer has been waiting for a reply from an agent
- Handling time - Time range from below 5 minutes to more than 5 days
- Agent - Specific agent to whom the conversation is assigned
- Tags - One or many tags assigned to the conversation. When multiple tags are selected, you can choose the operator: ALL (AND between tags) or ANY (OR between tags)
- Sentiment - Sentiment of the conversation: positive, negative, or neutral
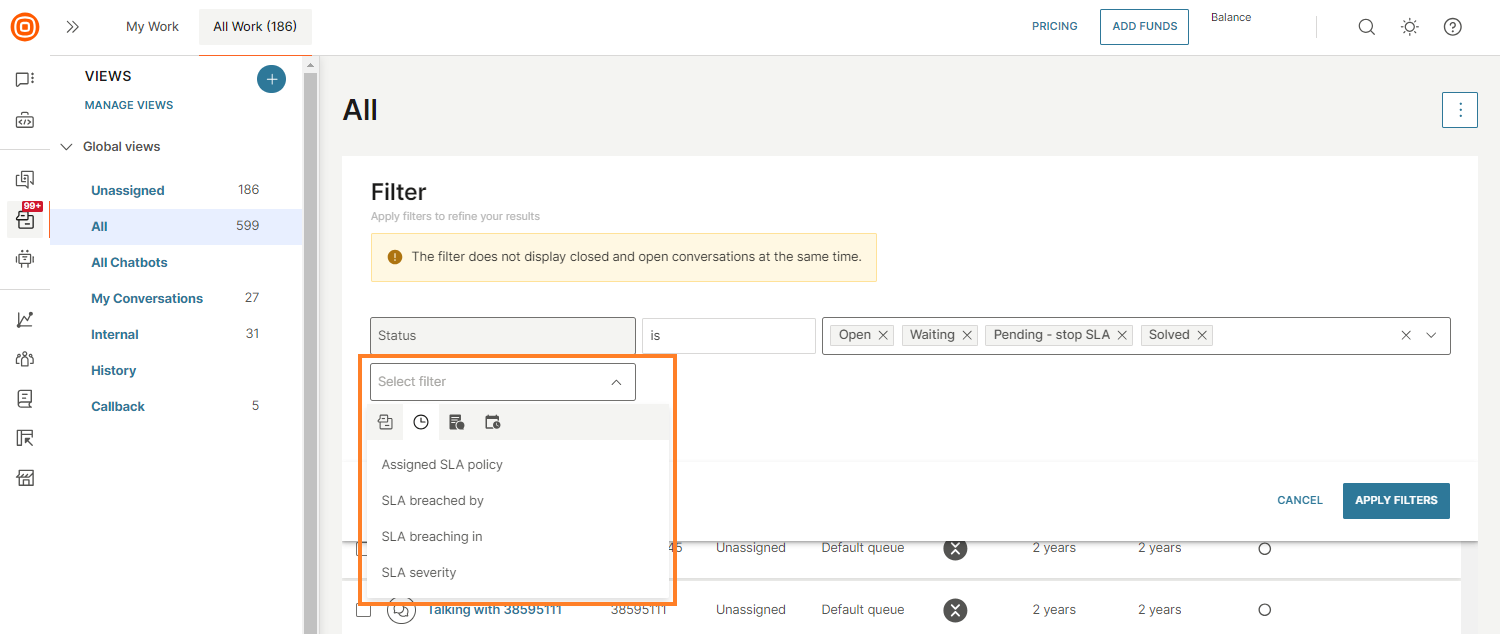
SLA filters
- Assigned SLA policy - All conversations with an assigned SLA policy
- SLA breached by - Time-based filter showing conversations that have already breached the chosen timeframe
- SLA breaching in - Time-based filter showing conversations close to breaching in the chosen timeframe
- SLA severity - Severity level of the SLA
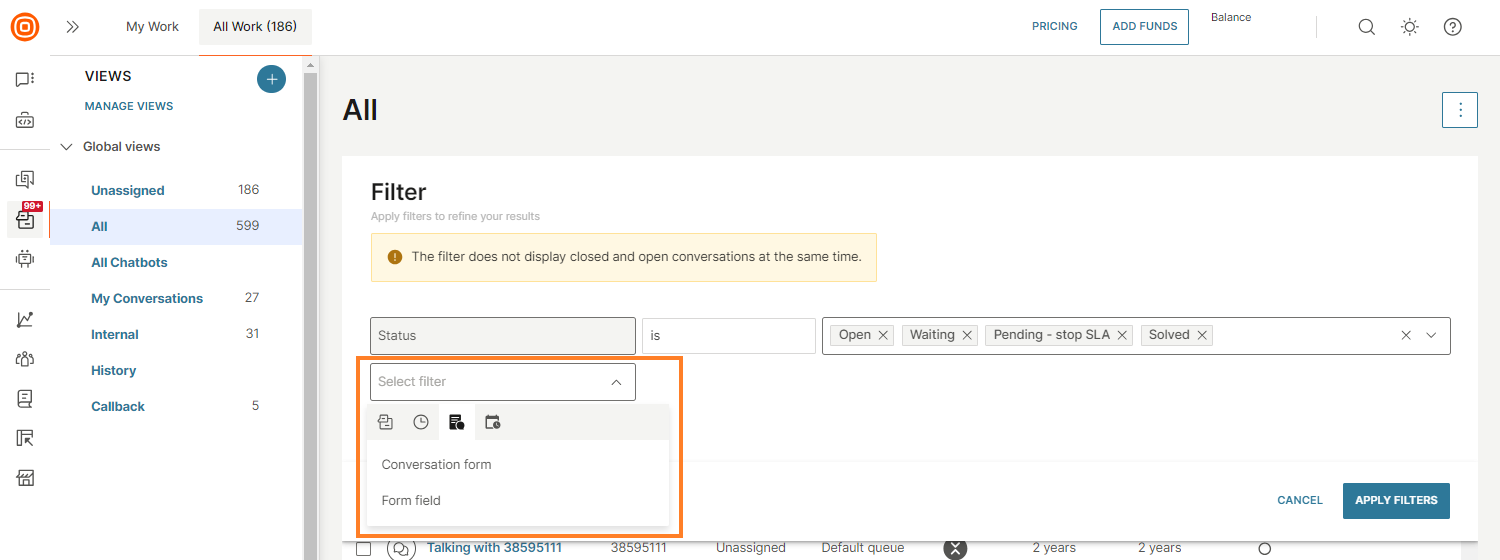
Conversation forms and form fields
- Conversation form - Filters conversations based on the assigned conversation form
- Form field - Filters conversations based on specific form attribute values
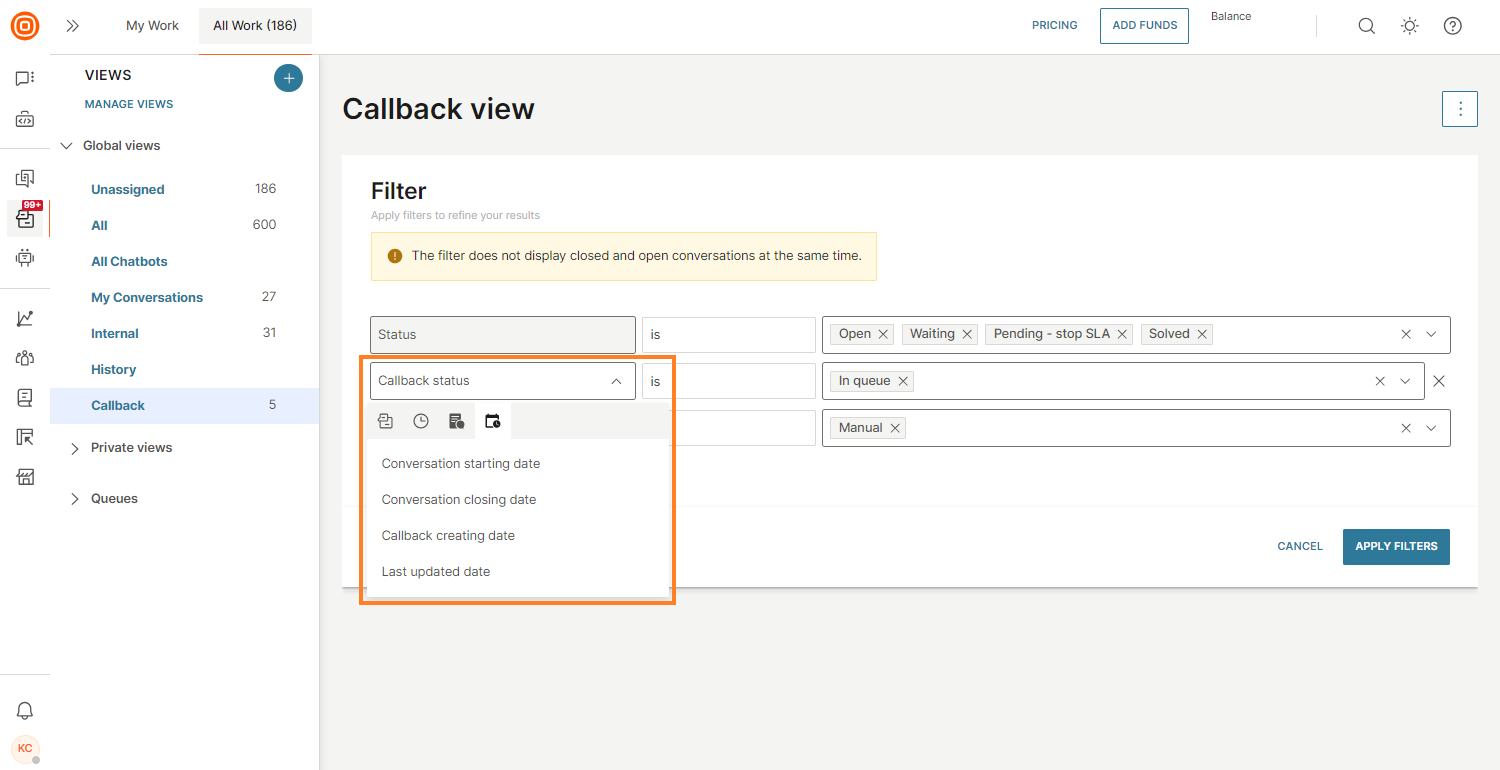
Date filters
- Conversation starting date - Time range when the conversation was started by an agent or customer
- Conversation closing date - Time range when the conversation was closed
- Callback creating date - Date range when the callback was created (available only in the predefined Callbacks filter)
- Last updated date - Date range when the last conversation update occurred (message from agent, call, or callback)
Closed conversations filtering [#closed-conversations-filtering-all-work]
In All Work, closed and non-closed conversations are placed in separate views. This means these conversations cannot be filtered together.
We recommend entering the conversation start date to get better results when filtering conversations.
When a conversation is closed, it moves to the History view. You can also create exclusive custom views (private and global) for closed conversations only.
Private and global custom views support selection of either closed or non-closed status in the filter. Selecting one automatically disables the other.

Temporary views created from Analytics show a generic warning message that by default only non-closed conversations appear, but the Closed status can be explicitly selected in the filters.
Service-level agreement [#service-level-agreement-all-work]
If your supervisor has set up at least one SLA policy, this displays in the All Work panel as a new column. You can see the SLA for every conversation where applicable.
This column shows:
- SLA time closest to achieving the breach
- Or SLA time with the largest breached time (if both currently counted SLA timers have already been breached)
SLA timers are tracked only for non-closed conversations. Closed conversations will not display any times in the SLA column.
You can also use filtering options to check conversations regarding SLA:
- Assigned SLA policy - All conversations with an assigned SLA policy
- SLA breached by - Time-based filter showing conversations that have already breached the chosen timeframe
- SLA breaching in - Time-based filter showing conversations close to breaching in the chosen timeframe
Queues [#queues-all-work]
Below Views, in the Queues section, you can find specific queues. Queues consist of any queue defined by the supervisor combined with the default queue.
The Default queue includes all open conversations that did not land in any user-defined queue. Each agent can see only those queues they are assigned to, while supervisors have access to all queues.
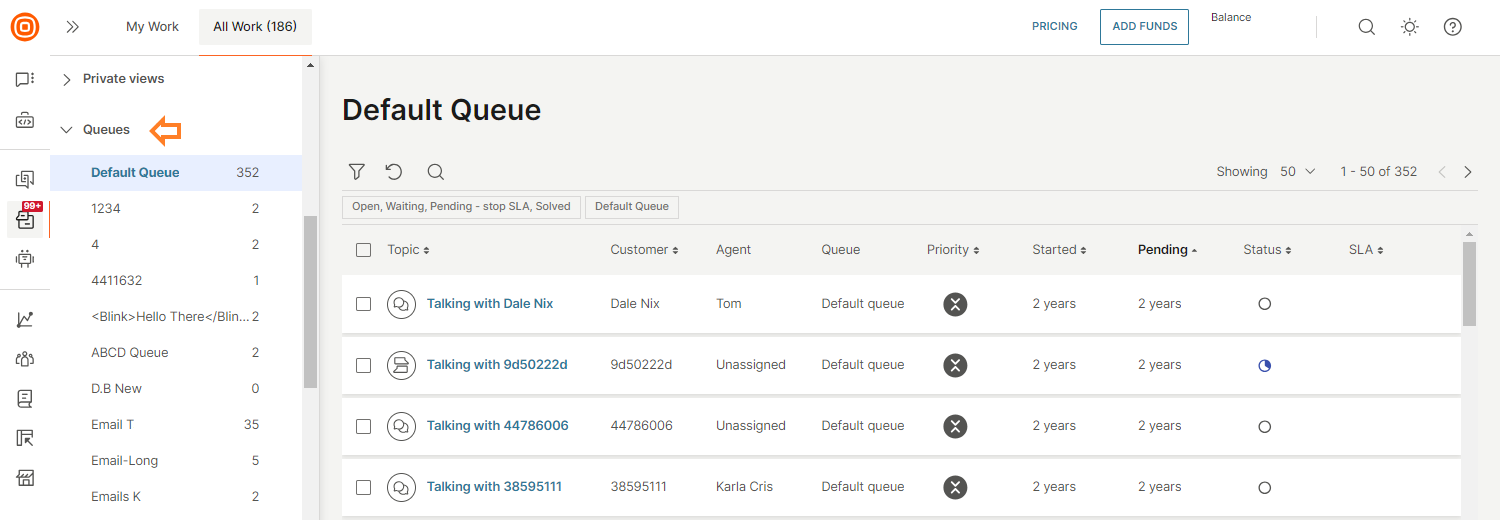
To learn more about queues, refer to Queues.
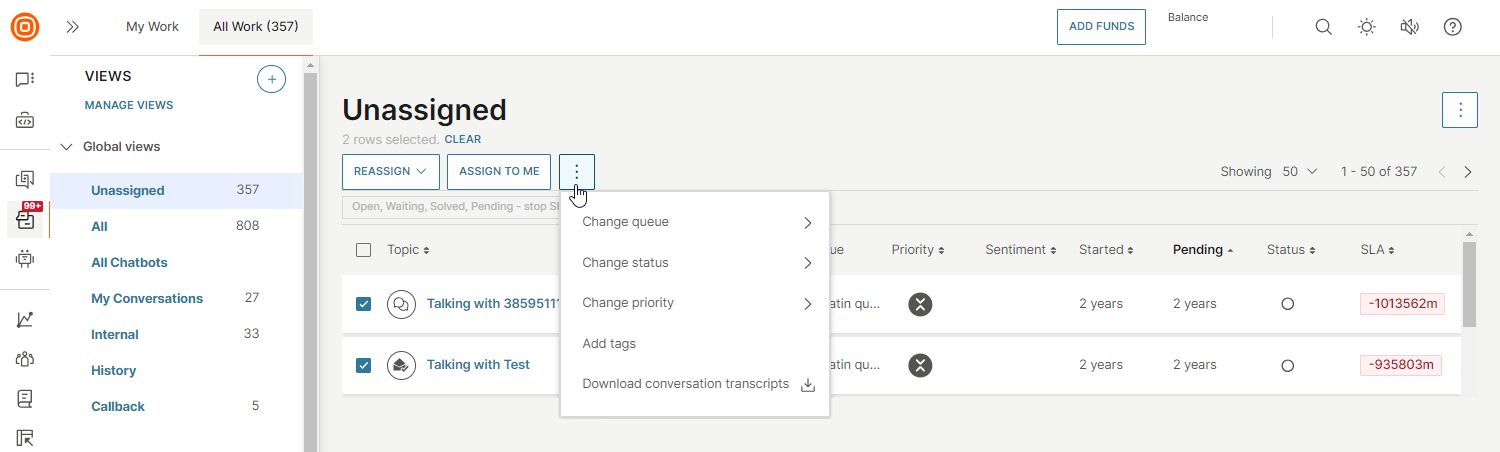
Bulk actions [#bulk-actions-all-work]
Bulk actions allow you to modify several conversations at once (for example, when an agent is on sick leave and all their tasks should be shared among the team).
The following bulk actions are available in the All Work panel:
- Assign/reassign list - The Reassign button appears after conversation(s) are selected. Supervisors can select it to choose agents to whom the conversation can be reassigned. The assignment logic follows regular assignment rules (for example, a conversation cannot be assigned to an agent who is not part of the current conversation queue).
- Change queue - Select the action to display a searchable list of available queues.
- Change status - Change the status by selecting the 3-dot icon.
- Change priority - Navigate to the 3-dot icon to select the action and change the priority.
- Add tags - Apply one or more tags to multiple conversations simultaneously.
- Download conversation transcripts - Download transcripts for selected conversations.
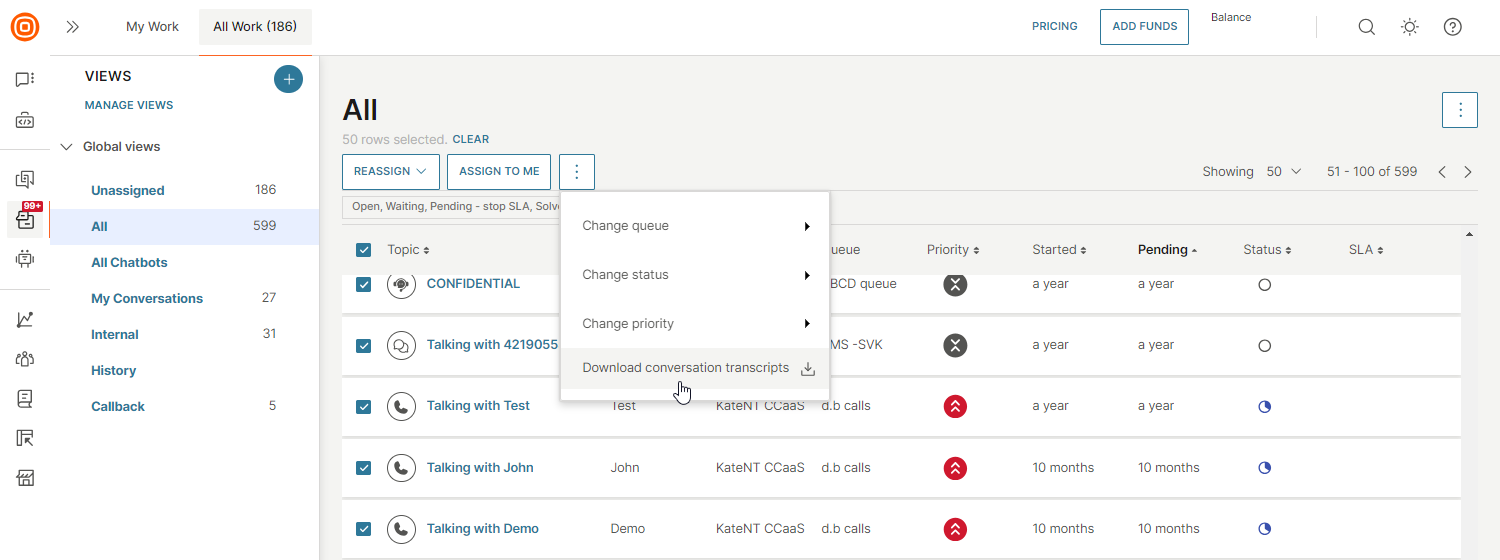
Download conversation transcripts
To download transcripts:
- Either select the upper left checkbox (which selects all conversations on the list), or select the checkbox next to specific conversations.
- Once you choose the conversation transcript(s) you want to download, select the three dots menu → Download conversation transcripts option.
- You can download up to 100 conversations and create a .zip file storing them in your selected file format (.txt, .xlsx, or .pdf).
When exporting as PDF, each file is named by conversation ID and includes the following information:
- Message timestamps
- Conversation status
- Channel
- Short ID or ticket ID (if available)
- Customer contact
- Assigned agent
- Full message history with sender information
- Date and time of export
Persistence in All Work [#persistence-in-all-work-all-work]
Persistence when switching between All Work and My Work tabs is particularly important when agents manually select their work and do not want to lose track of where they picked a conversation from.
With tab switching, you can access the last state of the page you visited, and with the back button, you can access multiple saved states. The system remembers the page, scroll position, filters applied, and more.
Persistence works on two levels:
- Persistence when switching between All Work and My Work tabs - When you select a conversation from All Work and open it, the conversation expands under the My Work tab. When you return to the All Work tab, you are directed to the view, filters, and scroll position you started with.
- Persistence when clicking the back button in the browser - When you select and open a conversation from All Work, the conversation expands. When you select the back button, you return to the last page and its saved state.
Upon returning to the All Work page, the opened conversation is highlighted. If it is located lower on the page, the system automatically scrolls to ensure the conversation is visible.