Agent guide on mobile
After logging in to the mobile app, you will see a list of all conversations assigned to you. Each conversation opens in a chat-style window where you can view messages and send replies.
In addition to responding to messages, you can update conversation statuses and manage your availability directly from the app.
Set status
Tap your agent avatar to open the Agent profile and set your current status.
If auto assignment is enabled in your contact center, you will still receive work while in Available status. Remember to set yourself Away or Offline during pauses or out of working hours. Locking the phone screen or putting the app in the background does not change your status. However, logging out of the app sets you Offline.
Send messages
Each open conversation appears in a chat window where you can view and send messages.
You can:
- Attach files (up to 10 MB) or share your location (depending on channel capabilities).
- Use your camera to capture and send images.
- Record and send voice messages, depending on the supported channel.
- Add internal notes by switching to Note mode. Notes are visible only to your contact center colleagues, and you can also attach files to them.
You can also change the conversation status directly in this view. Tap the status icon in the upper-right corner and select a new status.
Start conversations using a deep link
You can initiate new conversations in the Conversations mobile app using a deep link.
If you contact a customer through an external app, the Conversations app can be opened automatically with predefined variables such as the end user’s phone number, sender, and message template.
To start a conversation using a deep link:
- In the external app, select the link represented by the deep link icon.
- The link opens the Conversations mobile app.
- After logging in, you’ll be redirected to create a new conversation with predefined sender, recipient, and message template.
Supported deep link parameters [#supported-deep-link-parameters-start-conversations-using-a-deep-link]
The deep link URL must include only characters that are valid in URL encoding, but it does not have to strictly follow the Percent URL encoding format (see examples below). Using unsupported characters, such as punctuation marks, can cause the URL to break and result in errors.
The Conversations mobile app does not need to be running for the deep link to work. However, the agent must already be authenticated in the app. To avoid session timeouts that might interrupt the process, it is recommended to enable the Remember me option on the login screen.
| Parameter | Description | Required |
|---|---|---|
from | Sender (agent) identifier or number in the selected channel. For the Calls (WebRTC) channel, the sender value must be uppercase: CONVERSATIONS. | Yes |
to | Customer identifier or number in the selected channel. | Yes |
channel | Channel name as listed in the supported channels table. Channel name parsing is not case-sensitive. (Not supported for Email, Apple Business Chat, Google Play Reviews, Telegram, Facebook Posts, Instagram Posts, or internal channels.) | Yes |
topic | Identifier of the conversation topic. | No |
templateId | Identifier of the predefined message template. | No |
Channel names and enumeration values [#channel-names-and-enumeration-values-start-conversations-using-a-deep-link]
Review the table below, which lists channel names along with their enumeration values.
| Channel Name | Enumeration Value |
|---|---|
| SMS | SMS |
| Viber Business Messages | VIBER |
| Viber Bots | VIBER_BOT |
| Messenger | FACEBOOK_MESSENGER |
| RCS | RCS |
| LINE | LINE |
| Live Chat | LIVE_CHAT |
| KakaoTalk | KAKAO_SANGDAM |
| Instagram Messaging | INSTAGRAM_MESSAGING |
| Calls | CALLS |
Android example
iOS example
Start a conversation
To start a conversation:
- In the conversations list, tap the New Conversation icon.
- Fill in the From (sender) and To (recipient) fields for the first message.
- Compose and send your first message, or start a voice call.
Manage conversations
To manage chats with customers in the mobile app:
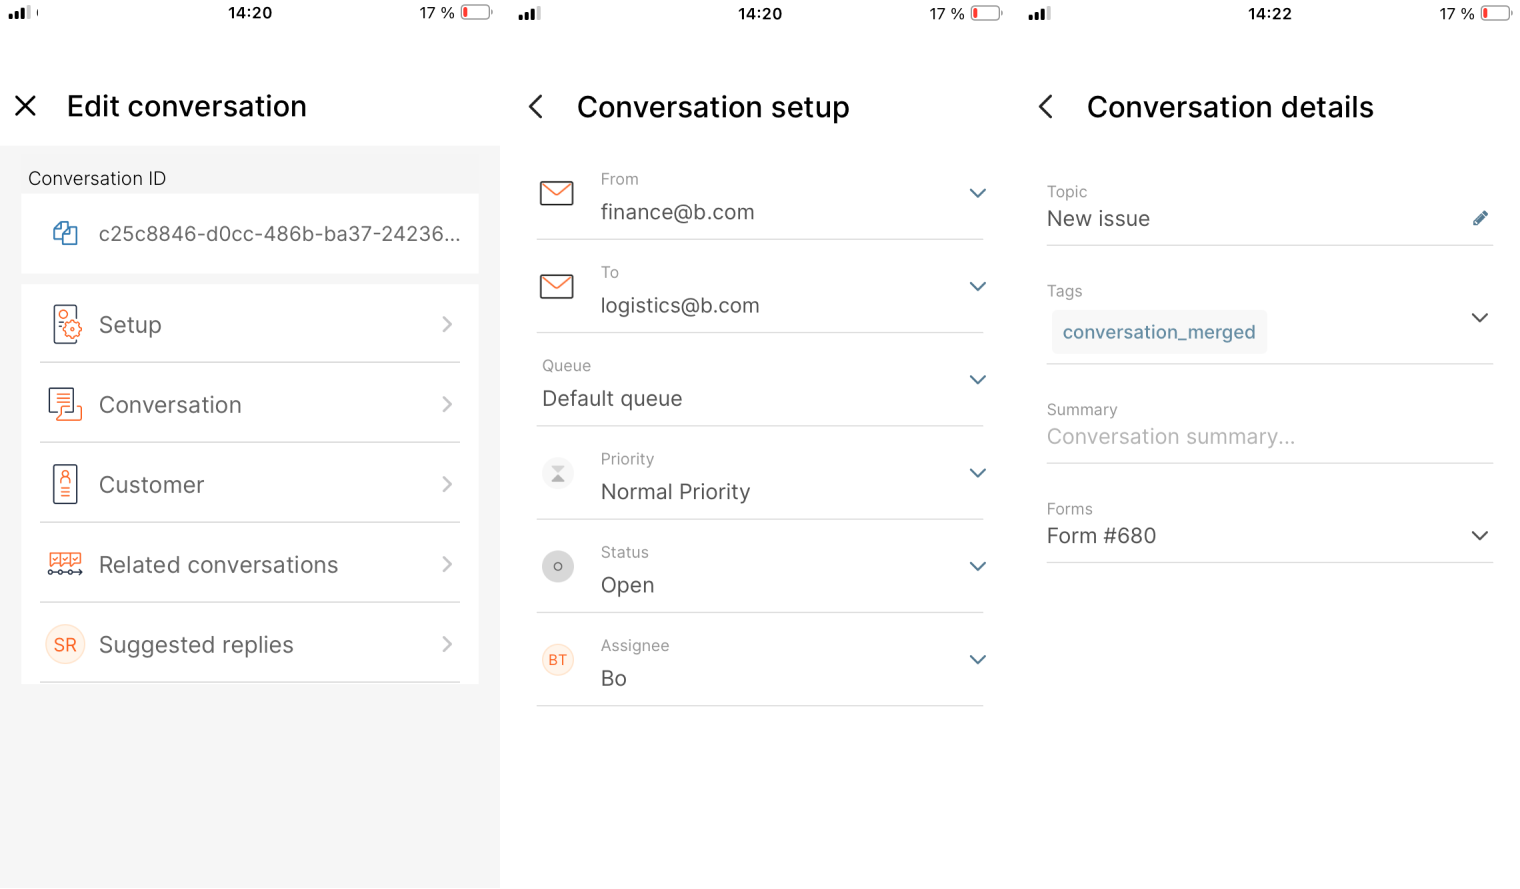
- Tap the Manage Conversation icon to access a variety of options.
- On the setup screen, you can:
- Select a different sender and/or channel (From).
- Select a different recipient (To) if another channel is available.
- Assign the conversation to a different Queue.
- Change the conversation Priority.
- Transfer the conversation to a different agent (Assignee).
- On the Conversation details screen, you can:
- Add or update the conversation Topic, Tags, or Summary.
- Select a Form and fill in its fields.
- On the Customer screen, you can view and edit customer details.
Learn more about managing conversations and customers.
Search in All Work
Use the magnifier icon to search for certain keywords and find conversations or messages in All Work that match your query.
Sorting in All Work
You can sort conversations in All Work by clicking the sorting option in the left corner. The conversations can be sorted by:
- Oldest pending (default sort, showing conversations with the oldest message on top)
- Latest pending (sorts conversations with the latest messages on top)
- Conversation status (sorts conversations by their status, in ascending alphabetical order)
- Customer name (sorts records by customer name where available, otherwise, depending on the channel, it sorts by the phone number, ID, and more, in ascending order)
- Queue name (sorts queues by those belonging to the Default queue on top, while the remaining queues follow alphabetically)
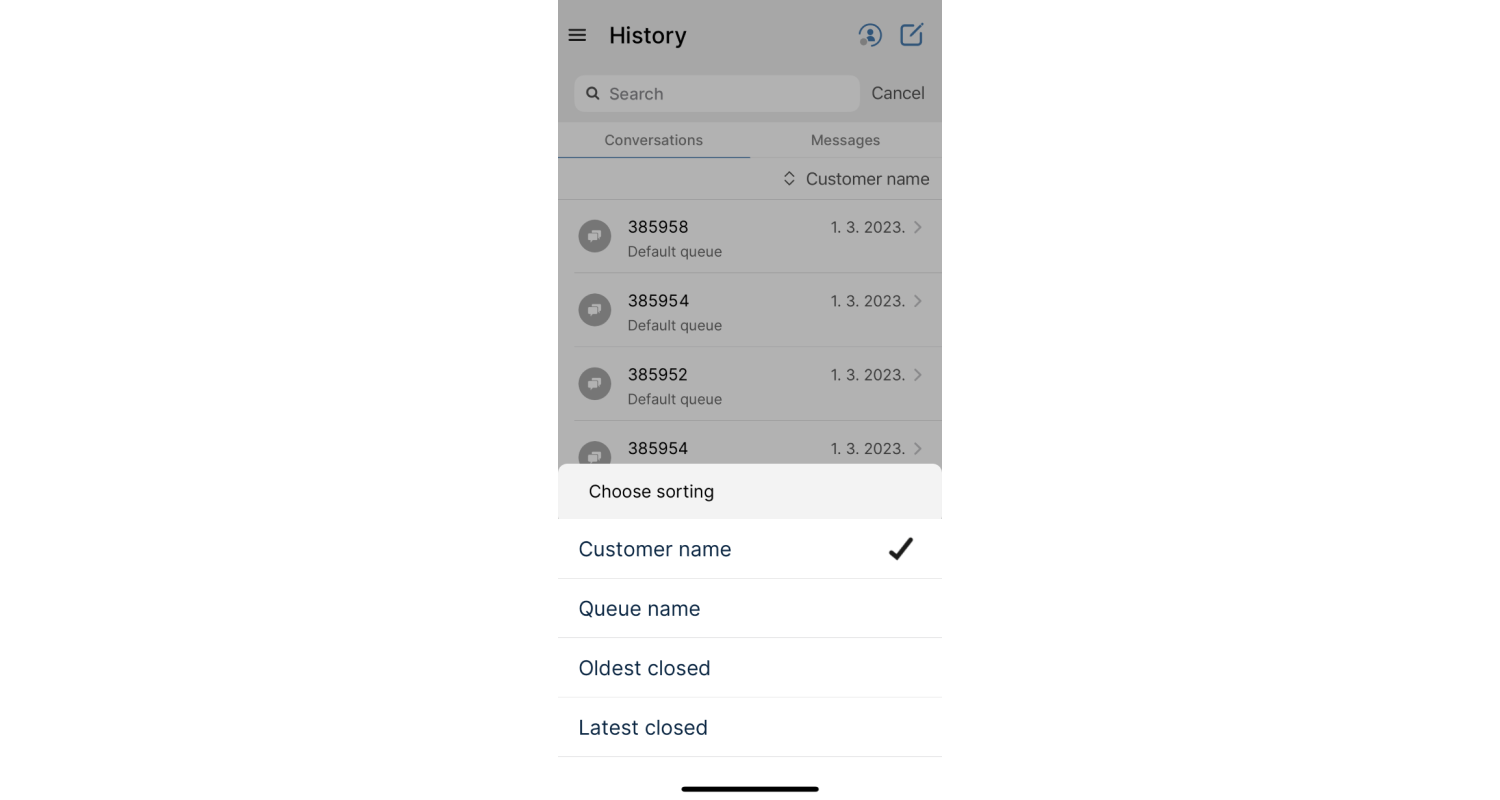
History view can be sorted by:
- Customer name (sorts records by customer name where available, otherwise, depending on the channel, it sorts by the phone number, ID, and more, in ascending order)
- Queue name (sorts queues by those belonging to the Default queue on top, while the remaining queues follow alphabetically)
- Oldest closed (default sort, showing conversations with the oldest closed date on top)
- Latest closed (sorts conversations with the latest closed date on top)
The Conversations mobile app also supports email communication, allowing agents to send, receive, and organize emails directly from their mobile devices.
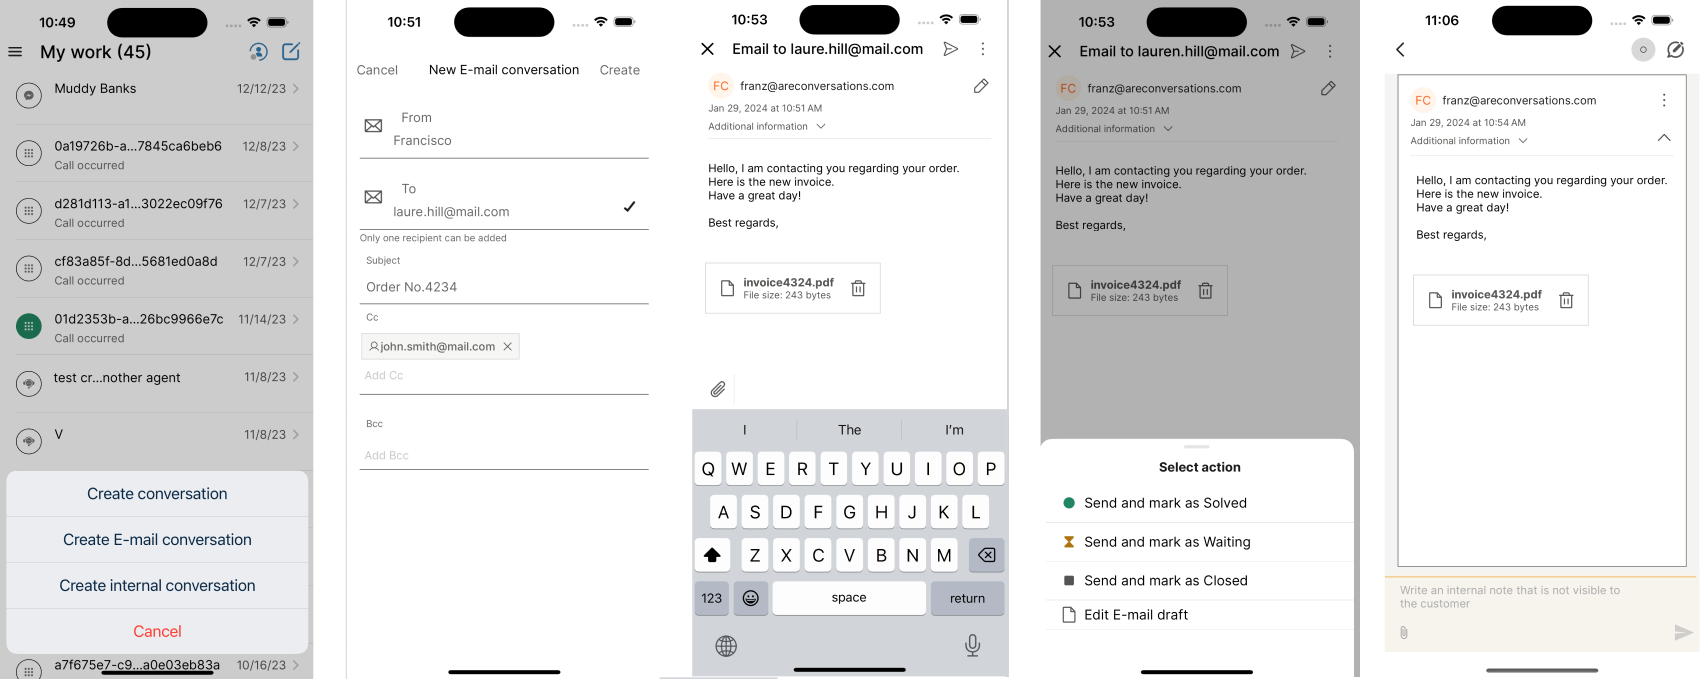
To create a new email conversation:
- Tap the pen icon in the upper-right corner.
- Select Create email conversation.
- Enter the following information:
- Recipient
- Email subject
- Cc and Bcc (optional)
- Select Create.
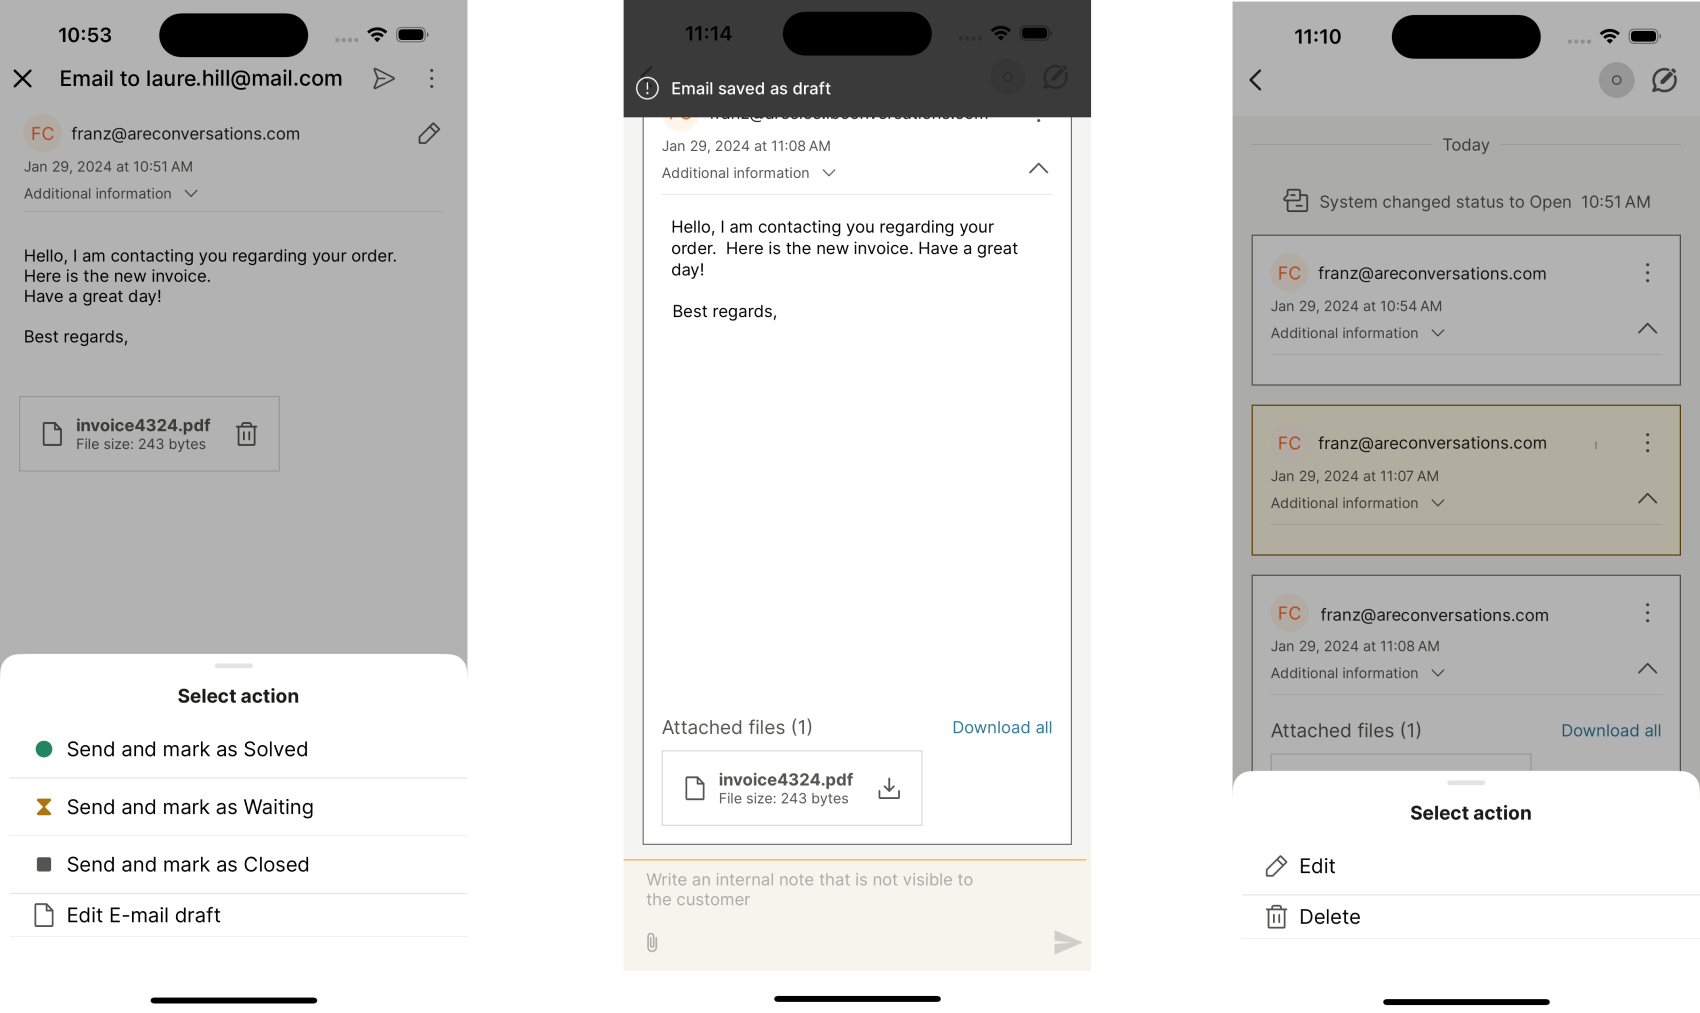
After entering the email details, choose one of the available send options:
- Send and mark as Solved
- Send and mark as Waiting
- Send and mark as Closed
- Edit email draft
Email attachments and drafts [#email-attachments-and-drafts-email]
If you want to attach files or images to your email message:
- Tap the attachment icon above the keyboard.
- Choose files from your gallery or file manager.
- To download attachments, either tap the download icon next to each file or use the bulk download option to get all attachments at once.
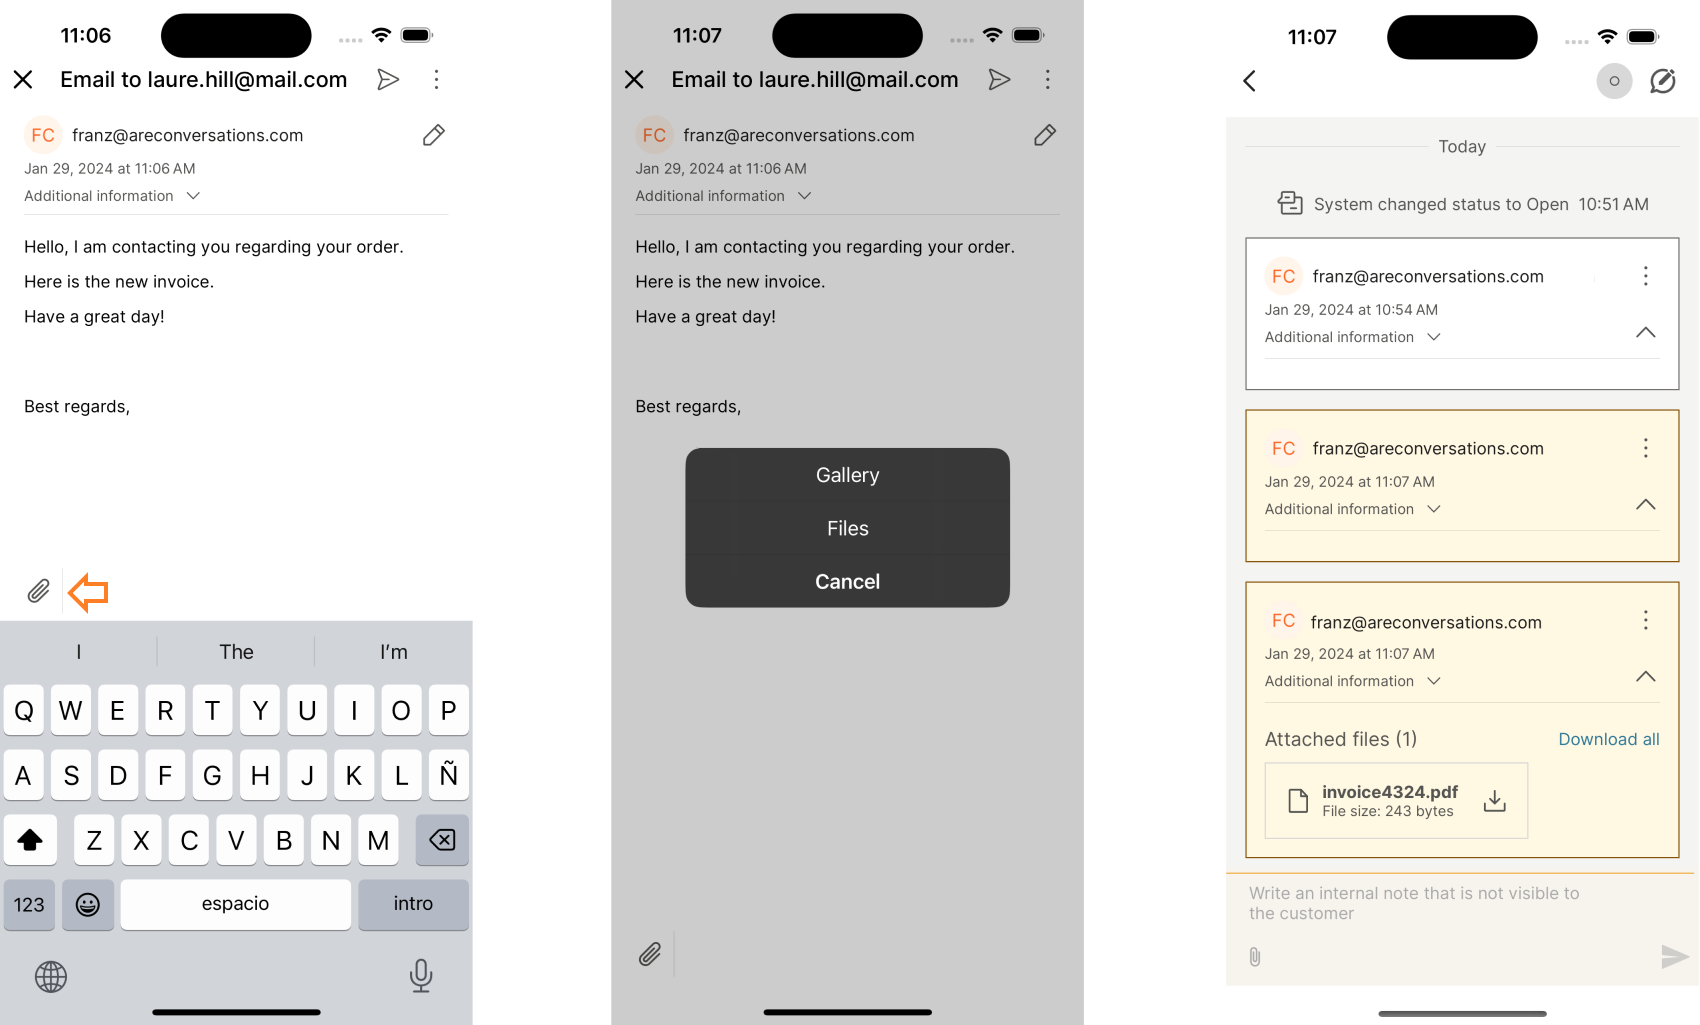
- You can also save your email as a draft by selecting Edit. This lets you return to it later to make changes or delete it if needed. If you close an unsent email, it will be automatically saved as a draft to prevent data loss.
Internal conversations
Internal conversations in the mobile app work the same way as on the web. This feature enables agents to collaborate with colleagues or seek assistance from other queues without leaving My work. Any agent can create an internal conversation, regardless of their role.
To create an internal conversation:
- In the Conversations list view, select the Create conversation button.
- From the menu, select Create internal conversation.
- Fill in the following fields in the new conversation form:
- Topic - Appears as the headline of the created conversation.
- Queue - Select the queue to assign the conversation to.
- Queue picker - Choose the queue from the list.
- Conversation ID (optional) - If entered, links the new conversation as a follow-up to the existing one.
- Message - Enter the content of your internal message.
- Select Create internal conversation to confirm or Cancel to discard.
Once created, you can assign the internal conversation to another agent or queue.
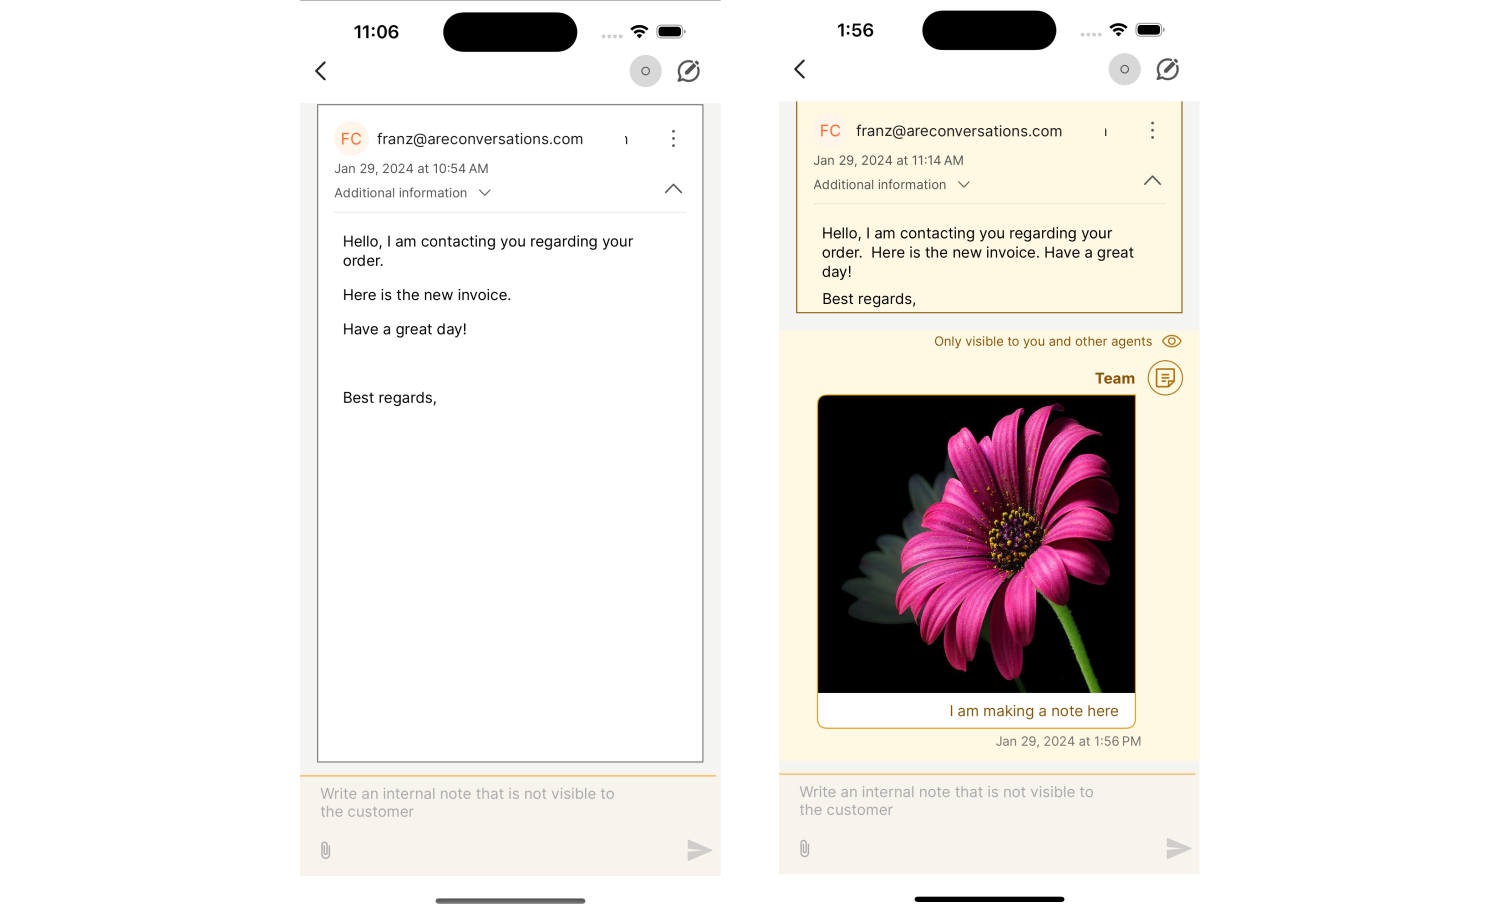
Internal notes
You can use internal notes to share important information with your team about a customer conversation. Add supporting documentation, screenshots, or other files to provide full context and help colleagues understand what actions have already been taken to resolve the customer’s issue.
Calls on mobile
With the Conversations mobile app, you can receive or initiate phone calls, Live Chat calls, and WhatsApp calls directly from your smartphone.
Handle real-time conversations without switching apps, ensuring fast and personal customer support.
Make calls [#make-calls-calls-on-mobile]
If calls are enabled for your account, you can receive and initiate phone calls through the mobile app. If calling is unavailable, contact your supervisor to verify your configuration.
To make a new call:
- Create a new conversation, select the Calls channel, and enter the recipient’s phone number.
- You can also generate and send a call link within chat channels. Once the customer receives and opens the link, they will be directed to a web page where they can initiate a call that connects directly to your mobile device.
Receive calls [#receive-calls-calls-on-mobile]
To receive calls:
- Ensure your status is set to Available (mobile).
- When there is an incoming call, you will hear the system ringtone and see a notification.
- You can accept or decline the call.
- During a call, you can mute your microphone, turn on the speaker or camera, place the call on hold, transfer it, or open the dial pad.
Call on hold [#call-on-hold-calls-on-mobile]
The Hold option allows you to place a customer on hold while investigating an issue or gathering information.
When a customer is placed on hold, they hear an audio cue or a pre-recorded announcement until the agent resumes the call. Each queue can have its own music on hold and announcement message, configured by supervisors.
While a call is on hold, the agent’s status changes to On hold, which is reflected in the agent panel. A corresponding Call on hold event is also recorded, allowing supervisors to monitor hold durations and ensure timely resolution of customer issues.
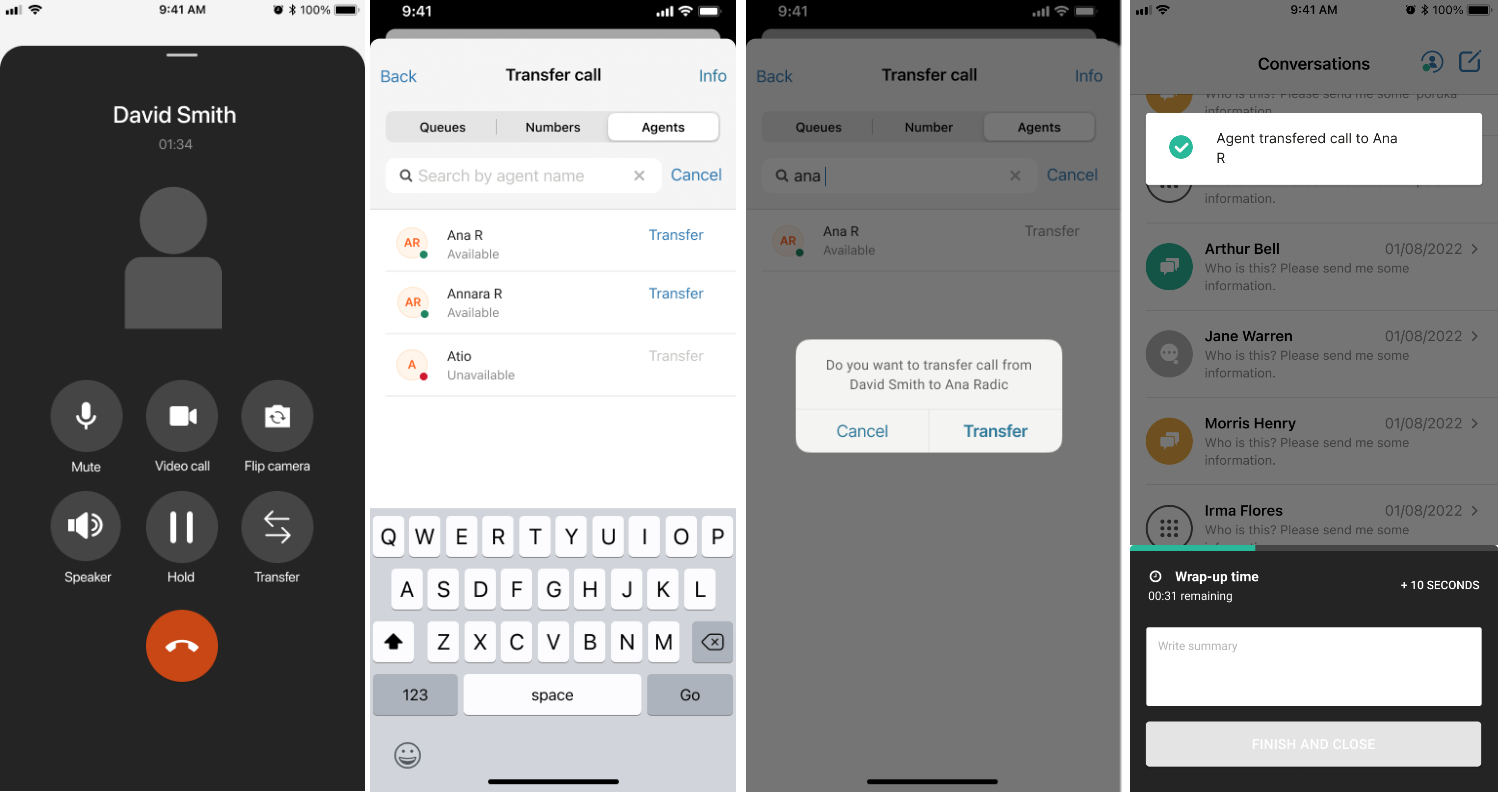
Transfer call to agent [#transfer-call-to-agent-calls-on-mobile]
The blind (cold) transfer allows you to transfer a call to another agent without speaking to them first.
When a call is transferred:
- The selected agent must be in the same queue as the conversation.
- The agent receives a ringing call and can choose to accept or reject it.
- The call ends on your side and continues between the customer and the receiving agent.
- The customer hears the ringing sound while being connected to the other agent.
To transfer a call:
- Tap the Transfer button during the call.
- Select the Agents tab (the tab name reflects the current queue).
- Search for or select an available agent from the queue (available agents are listed first).
- Complete the transfer, and the call continues with the chosen agent.
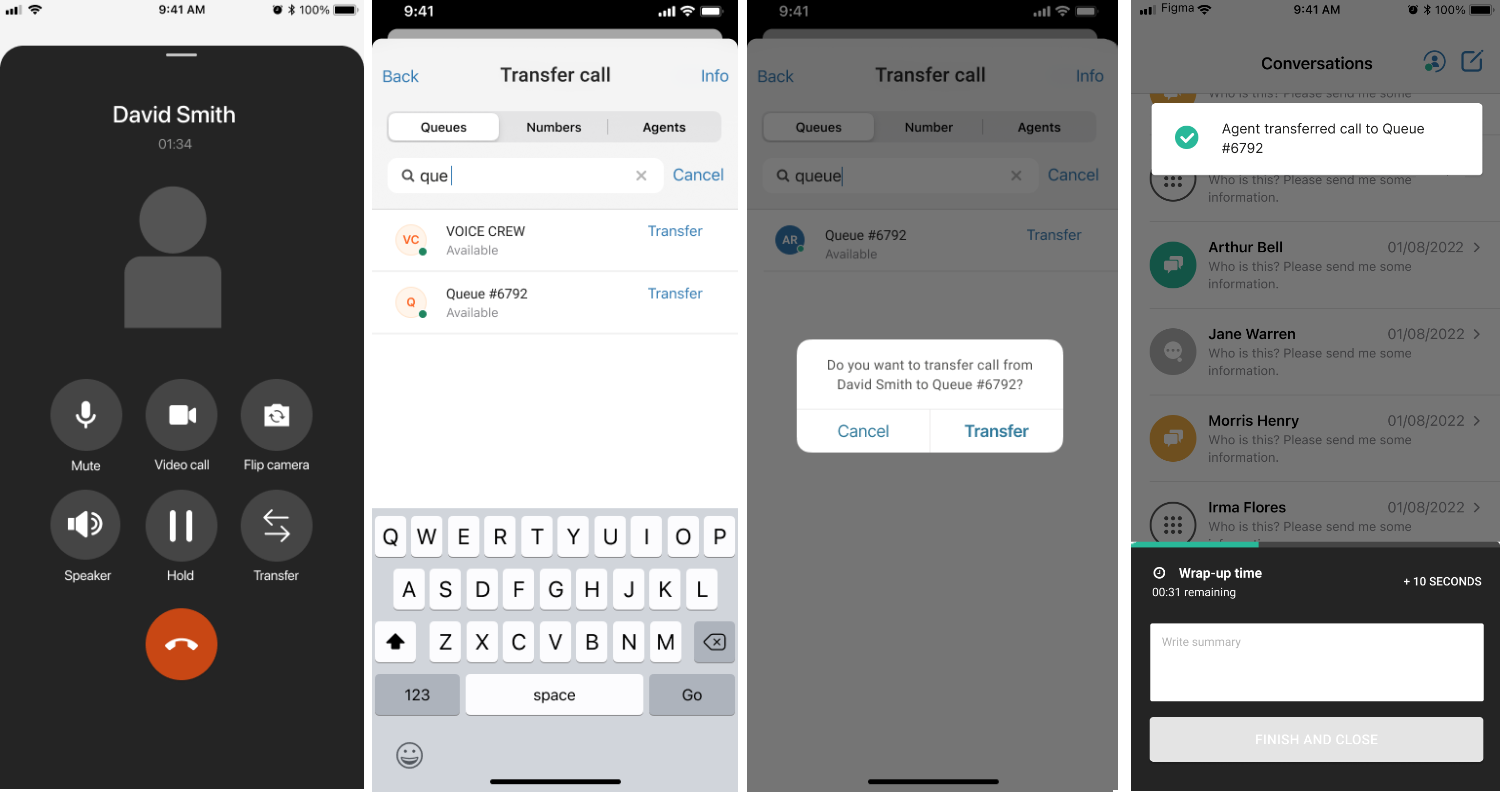
Transfer call to queue [#transfer-call-to-queue-calls-on-mobile]
You can transfer a call to an entire queue instead of a specific agent.
To transfer a call to a queue:
- During the call, tap the Transfer button.
- Select the Queues tab.
- Choose the desired queue from the list. Queues are shown in order of availability, with real-time statuses.
- Note: You cannot choose a specific agent from a different queue. If the transfer fails (for example, agent goes offline or is busy), a warning appears in the call modal indicating the call cannot be transferred.
Transfer call to external number [#transfer-call-to-external-number-calls-on-mobile]
You can transfer a customer to any valid E.164 formatted phone number, either stored in People under Contacts or entered manually.
Requirements:
- A system administrator or supervisor must pre-configure the app to allow external transfers.
- Depending on settings, agents may be restricted to numbers in People or allowed to enter numbers manually.
Steps to transfer:
- During an active call, tap the Transfer button.
- Select the Numbers tab.
- Enter or select the external number.
- Tap Transfer.
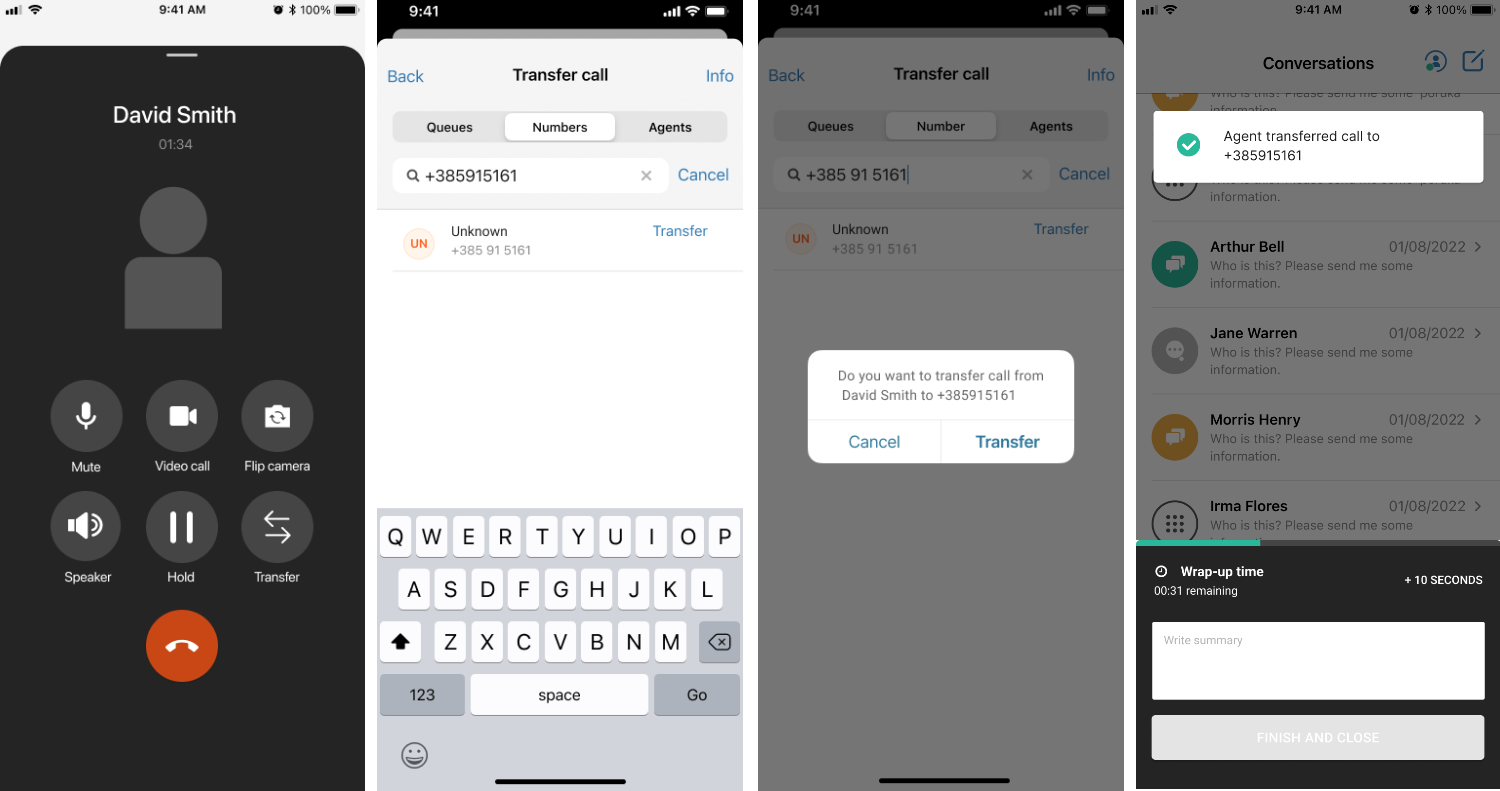
Behavior and notes:
- While dialing the external number, the customer hears music or a ringing sound. This stops once the call is established.
- If the external number is busy, not answering, or the transfer fails due to technical issues, the call may end or be returned to the agent.
- Call recording stops at the moment of transfer. The portion of the call after the transfer is not recorded.
- After the transfer, the wrap-up modal appears, allowing you to handle the conversation (for example, close it).
- A conversation event logs that the call was transferred to a specific number or person.
Wrap-up [#wrap-up-calls-on-mobile]
After a call ends, you can summarize it in the Wrap-up field. This allows you to quickly add notes or a summary during the designated wrap-up time.
If the wrap-up time is not sufficient, you can extend it by pressing the +10 seconds button in the wrap-up window, depending on the wrap-up setup.
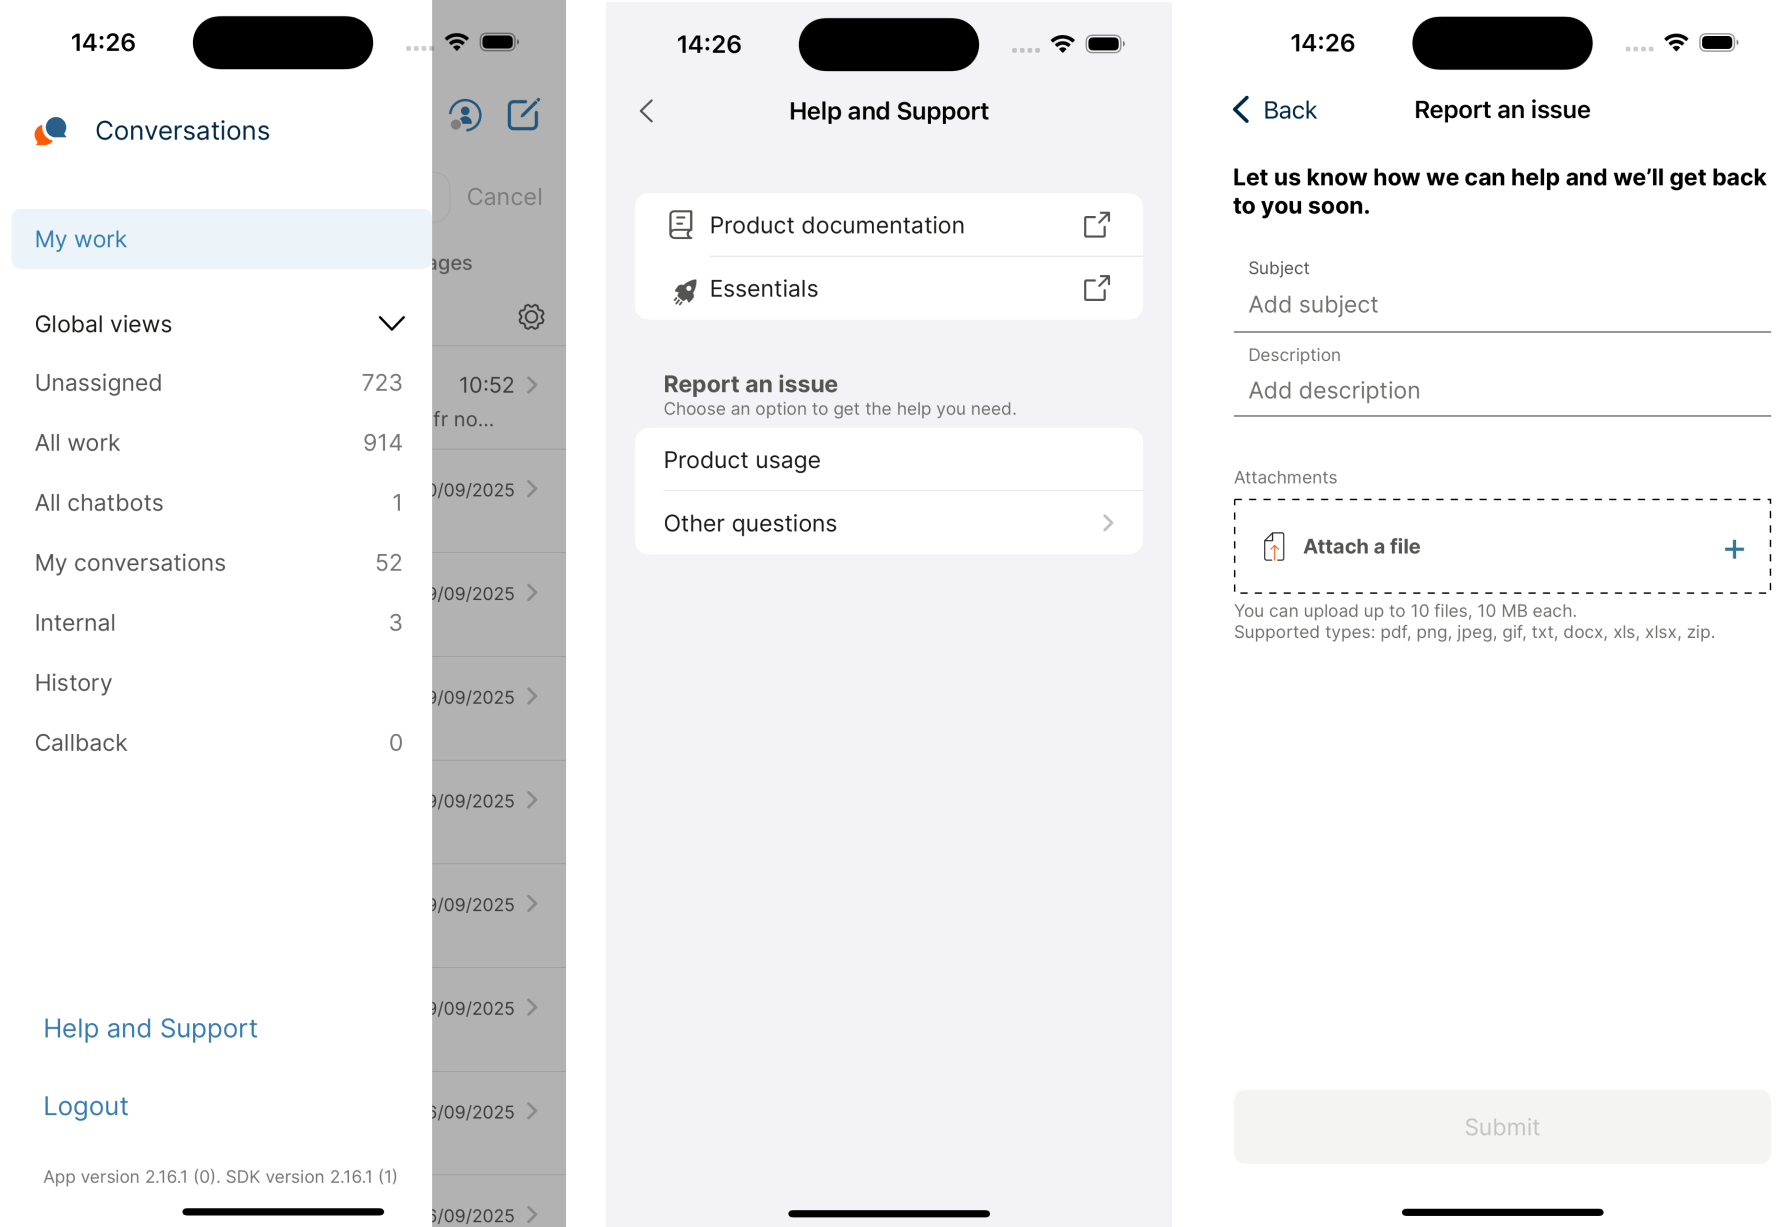
Send feedback
You can send feedback directly from the Help and Support section to report issues, suggest improvements, or provide general feedback about the mobile app.
The feedback option is accessible via the global menu on the left side under Global Views.
Context cards
Context cards display and update data fields linked to conversations from external systems. They help agents manage conversations more efficiently by providing quick access to relevant information, enabling faster query resolution.
Context cards are accessed in the conversation setup view by tapping the pencil icon in the top-right corner of an open conversation.
It is important to note the context card setup and the following usage differences:
-
Conversation setup:
- Sender
- Receiver
- Queue
- Priority
- Status
- Assignee
-
Conversation details:
- Topic
- Tags
- Summary
- Forms