Productivity tools
This guide covers the productivity tools available in Conversations to help you work more efficiently. Learn how to use AI-powered features, automate repetitive tasks with macros, manage internal notes, access knowledge base articles, and configure senders.
AI assistant
The AI assistant feature is not included in the price and is charged per use. Contact Support or your dedicated account manager for more information.
The Agent assistant is an AI assistant that uses advanced natural language processing and understanding to simplify your work by helping you summarize conversations, draft messages, and translate messages to and from multiple languages.
The AI assistant improves your overall efficiency and enables you to provide faster customer support.
AI assistant features are available in both My Work and All Work panels.
AI summary [#ai-summary-ai-assistant]
The AI summary feature helps you review conversation content. If you are taking over the conversation from another agent or want to check where you left off with the customer, the summary option generates a short summary of the entire conversation.
This feature may increase productivity and efficiency, particularly when you are working on many conversations at once.
To generate a summary for the conversation:
- Select the AI assistant icon in the top right corner. A pop-up menu appears.
- Select the Summarize conversation option.
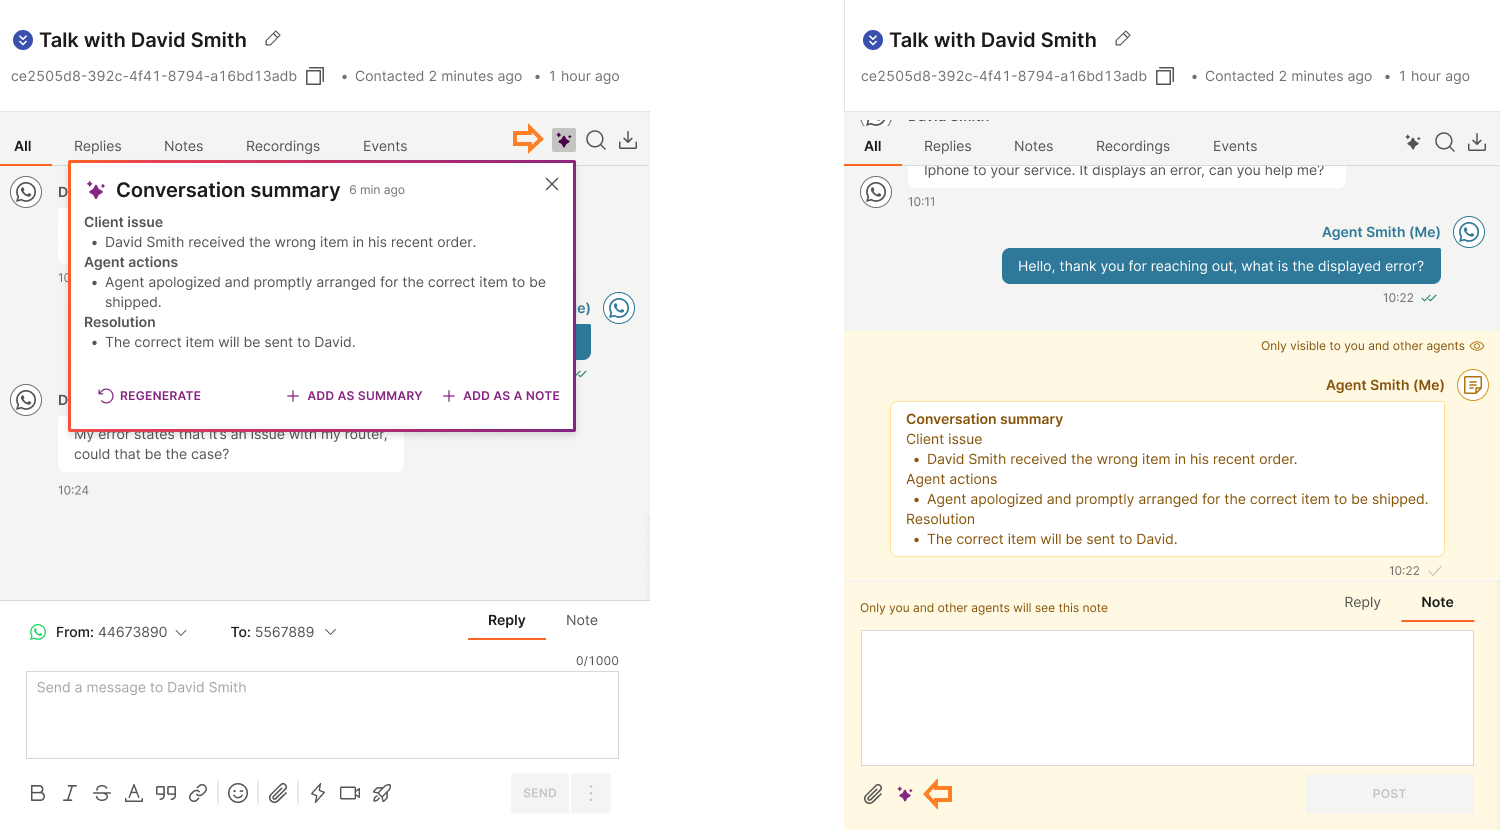
- Wait a few seconds while the AI assistant summarizes the conversation content.
- When finished, it displays the summary where you can also read the number of tokens used for this generation.
- You can copy the entire summary, or close the pop-up.
If you close the pop-up, the summary will not be saved. If you need it again, you will need to regenerate it.
Suggested replies [#suggested-replies-ai-assistant]
Suggested replies are powered by AI which generates up to three different suggestions for a quick reply to a customer message. This option improves your response time and reduces the number of steps you need to make when replying to a customer.
To use suggested replies:
- Select the AI assistant icon in the top right corner.
- Select the Generate suggested reply option.

- The system processes your request and generates three different potential replies. If you find any reply appropriate, select the Use option and it will populate the chat field with the content ready to be sent. You can also adjust it further if needed.
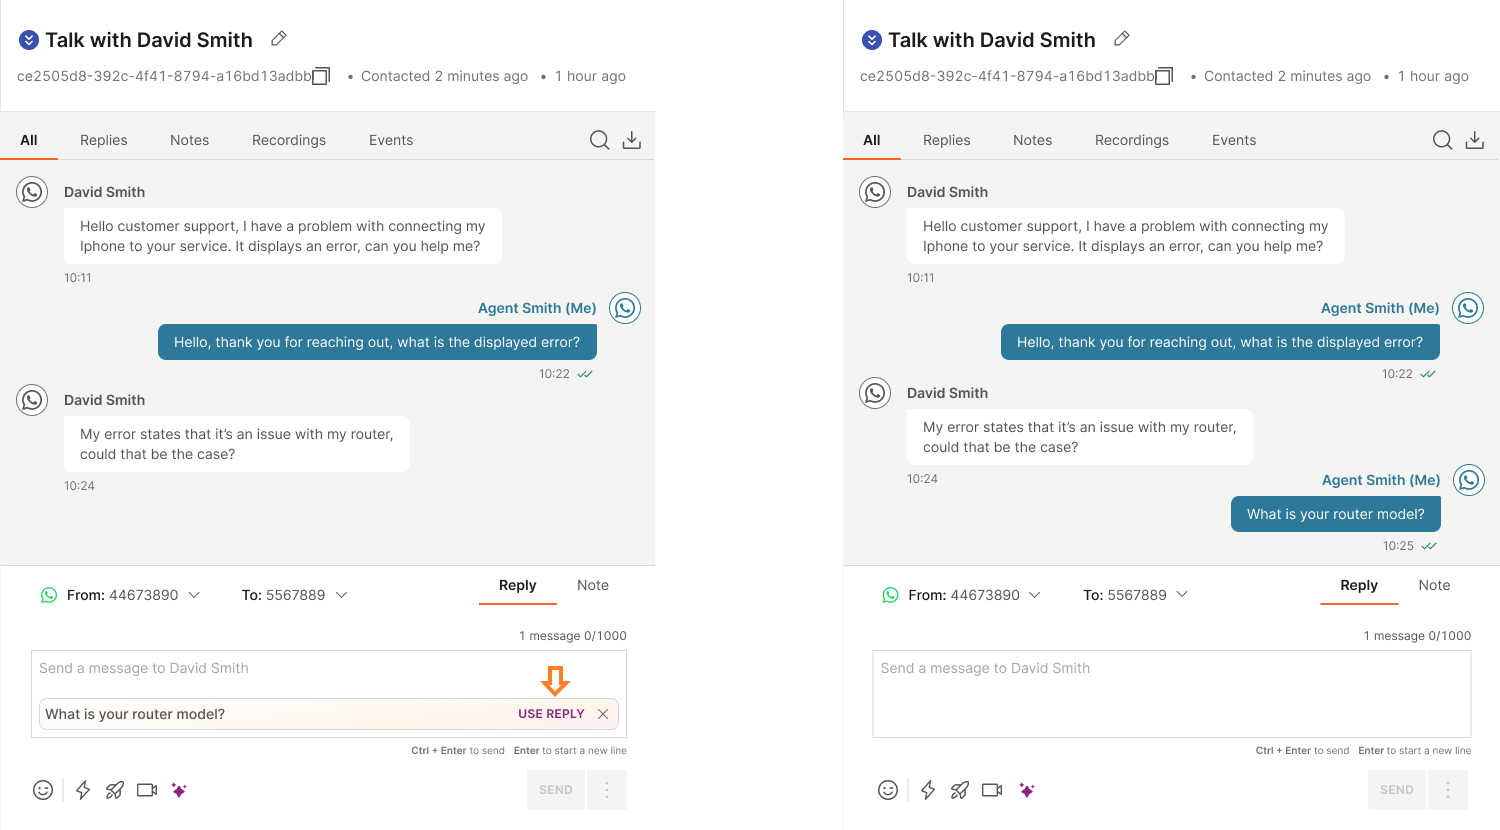
- If none of the three suggestions is relevant, you can Regenerate the replies and receive three new ones.
- Once you select Use option and the reply is populated in the chat field, you can still discard it if you change your mind.
- If you are satisfied with the content, send your message.
Enhance writing [#enhance-writing-ai-assistant]
The Enhance writing option provides several features powered by AI that will help you communicate with customers in an improved tone and without grammar mistakes.
The available options are:
- Fix grammar - the AI assistant analyzes the message, detects if there are any grammatical or spelling errors, and corrects them.
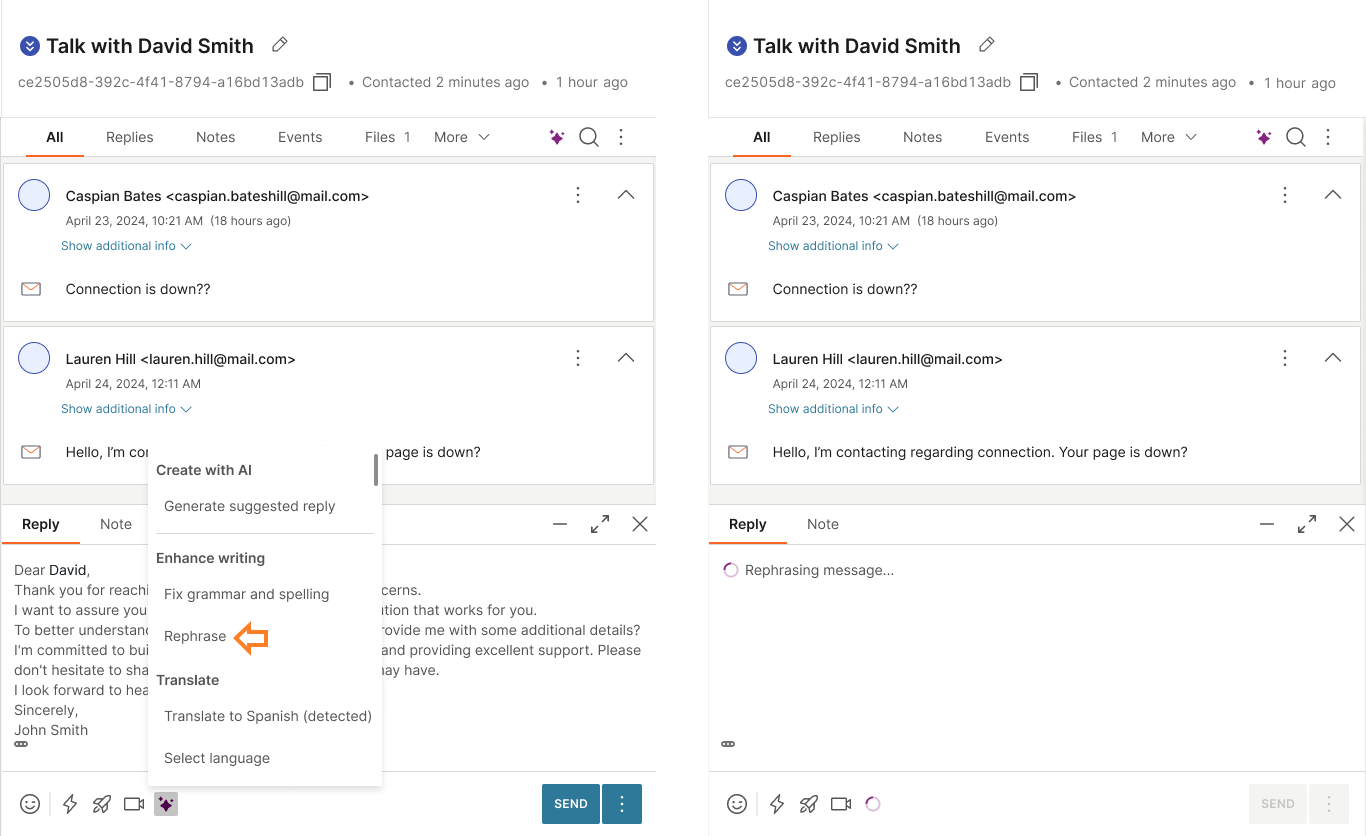
- Rephrase - the AI assistant rephrases your text using different words or sentences that have the same meaning as the original ones.
To enhance writing:
- Write your message in the message input field.
- Select your message, select the AI assistant icon in the bottom right corner of the chat, and choose the Fix grammar and spelling or Rephrase option.
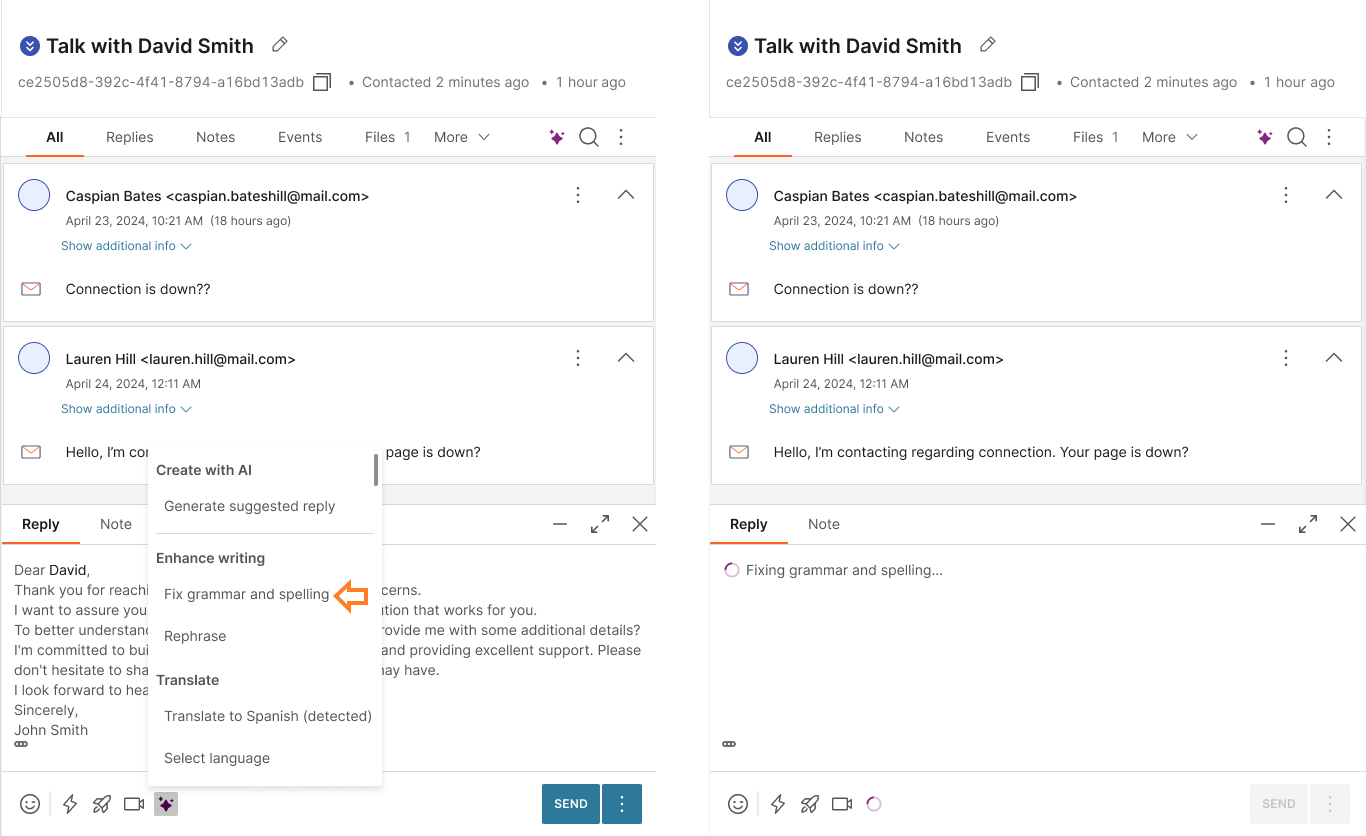
- The AI assistant starts analyzing your text and suggests changes accordingly.
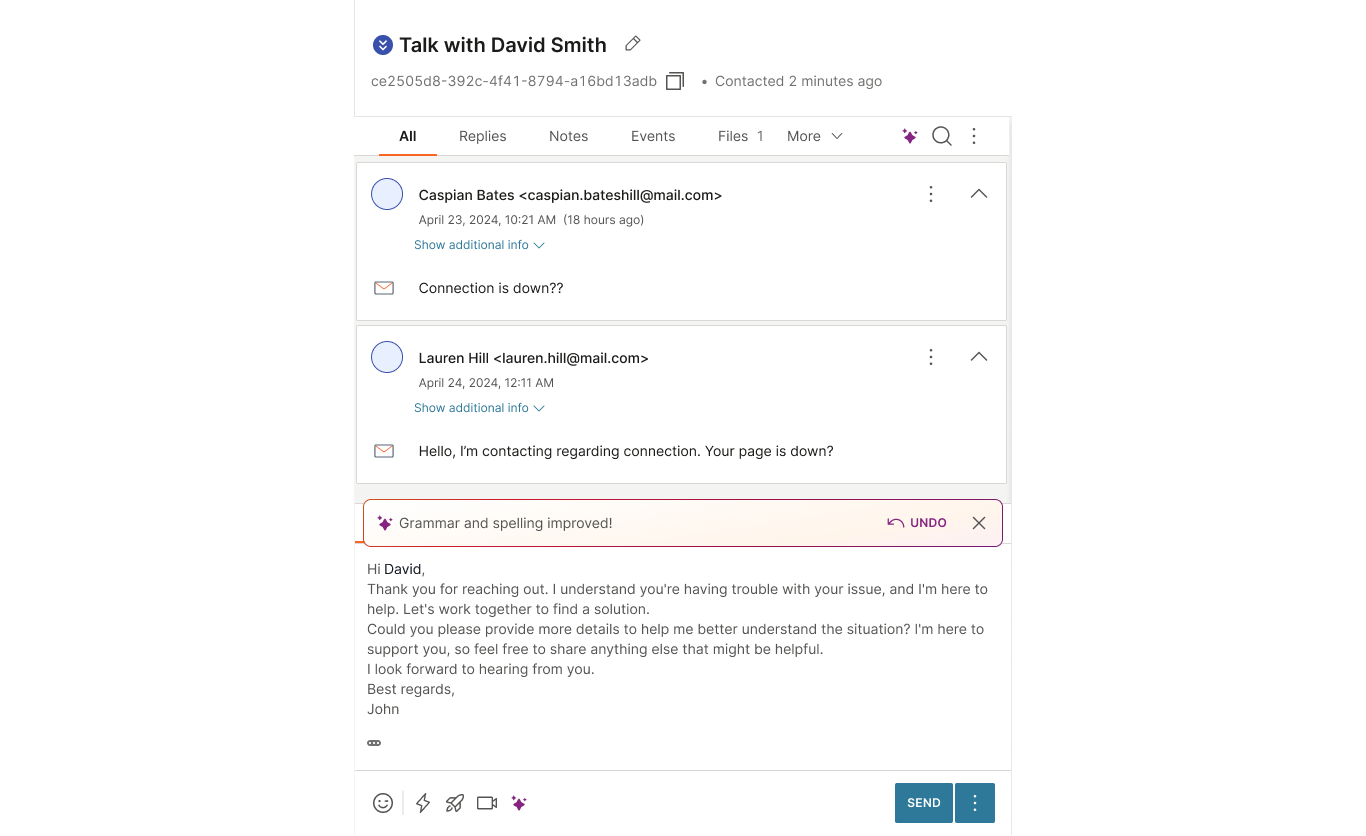
- Review the suggestion and select Use if you accept them. You can also Regenerate changes if you want the AI assistant to suggest different changes.
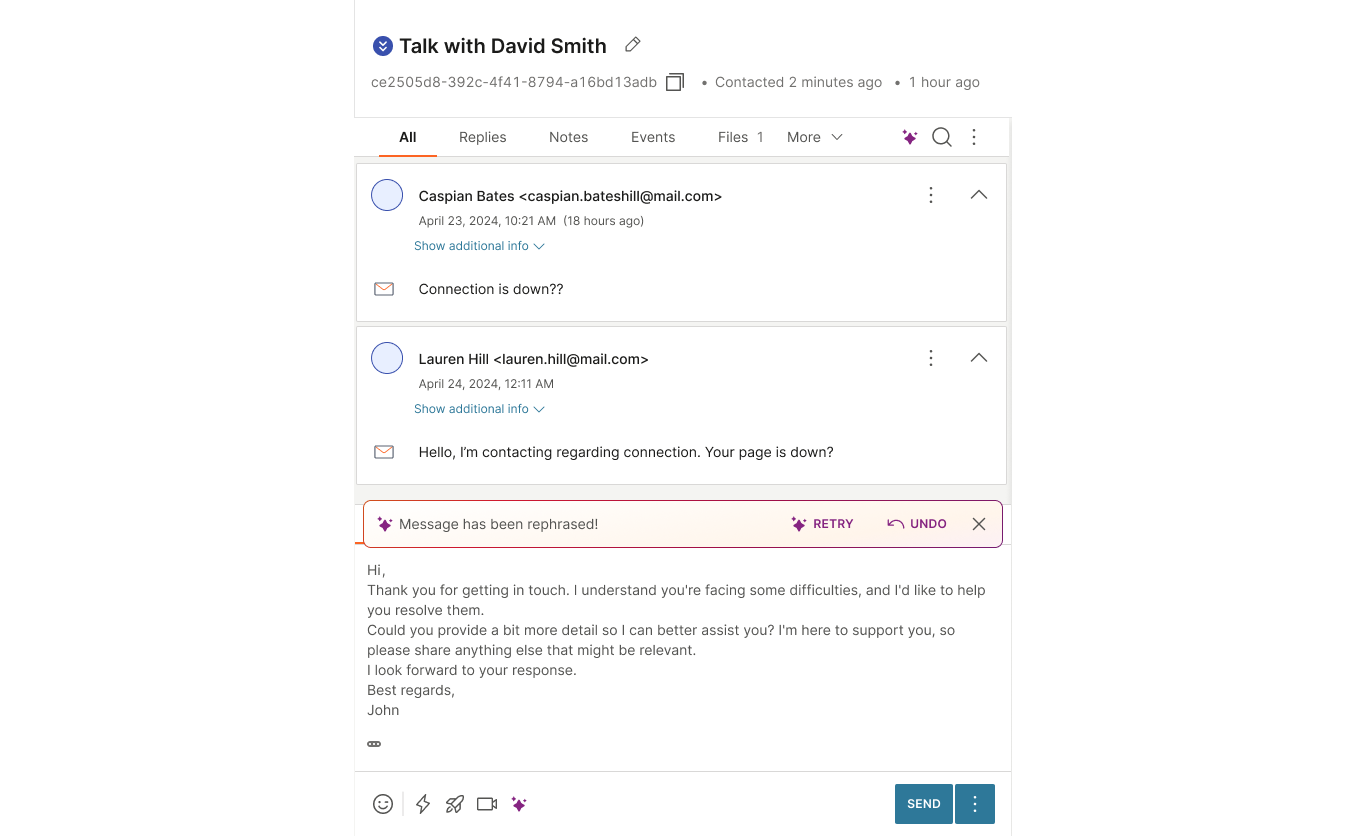
- Once you apply the suggestion, you can Discard the changes if you change your mind, or send your message.
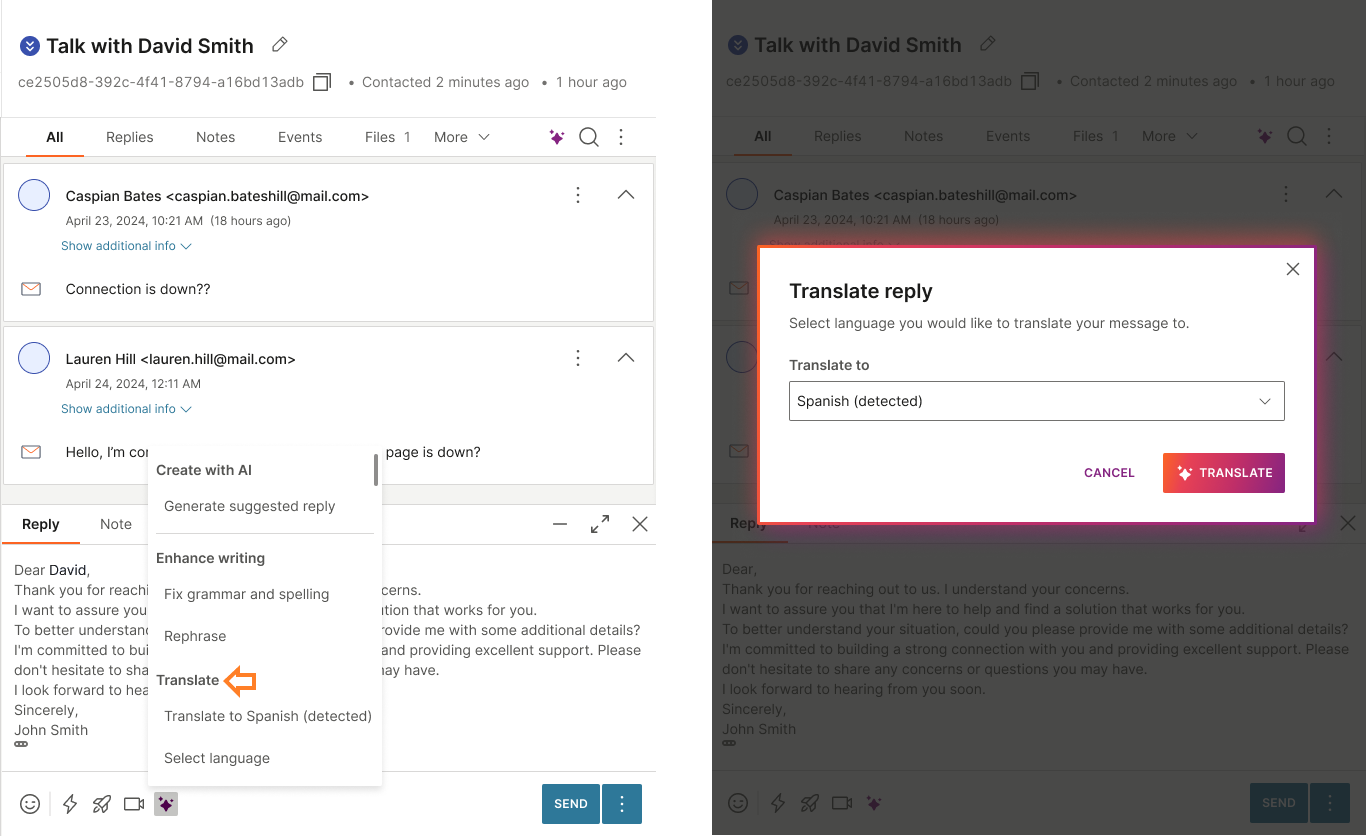
Translate [#translate-ai-assistant]
The Translate feature helps you communicate with customers in different languages by translating messages to and from multiple languages.
You can use it to compose replies in the customer's preferred language.
Supported languages for translation:
| Language | Code |
|---|---|
| Arabic | ar |
| Chinese | zh |
| Croatian | hr |
| Danish | da |
| English | en |
| Finnish | fi |
| French | fr |
| German | de |
| Greek | el |
| Hungarian | hu |
| Indonesian | id |
| Italian | it |
| Korean | ko |
| Norwegian | no |
| Persian | fa |
| Polish | pl |
| Portuguese | pt |
| Russian | ru |
| Spanish | es |
| Swedish | sv |
| Thai | th |
| Turkish | tr |
| Ukrainian | uk |
| Vietnamese | vi |
To translate a message:
- Type your reply.
- Select the AI assistant icon.
- Select Translate.
- Choose one of the following:
- Translate to [language] (detected) to automatically translate to the suggested language.
- Select language to choose a different language from the drop-down menu.
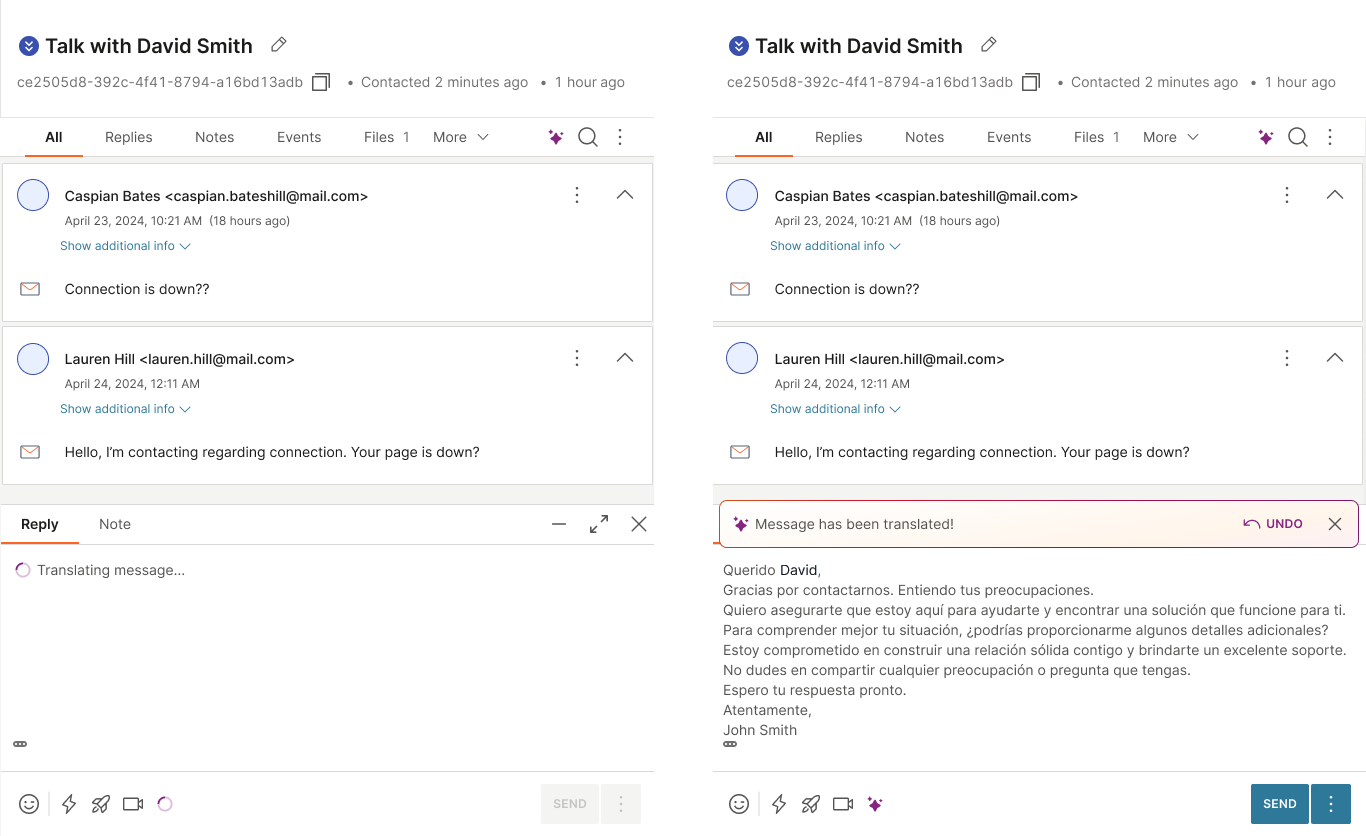
- The AI assistant translates the message and displays the result.
Auto-fill forms with AI [#auto-fill-forms-with-ai-ai-assistant]
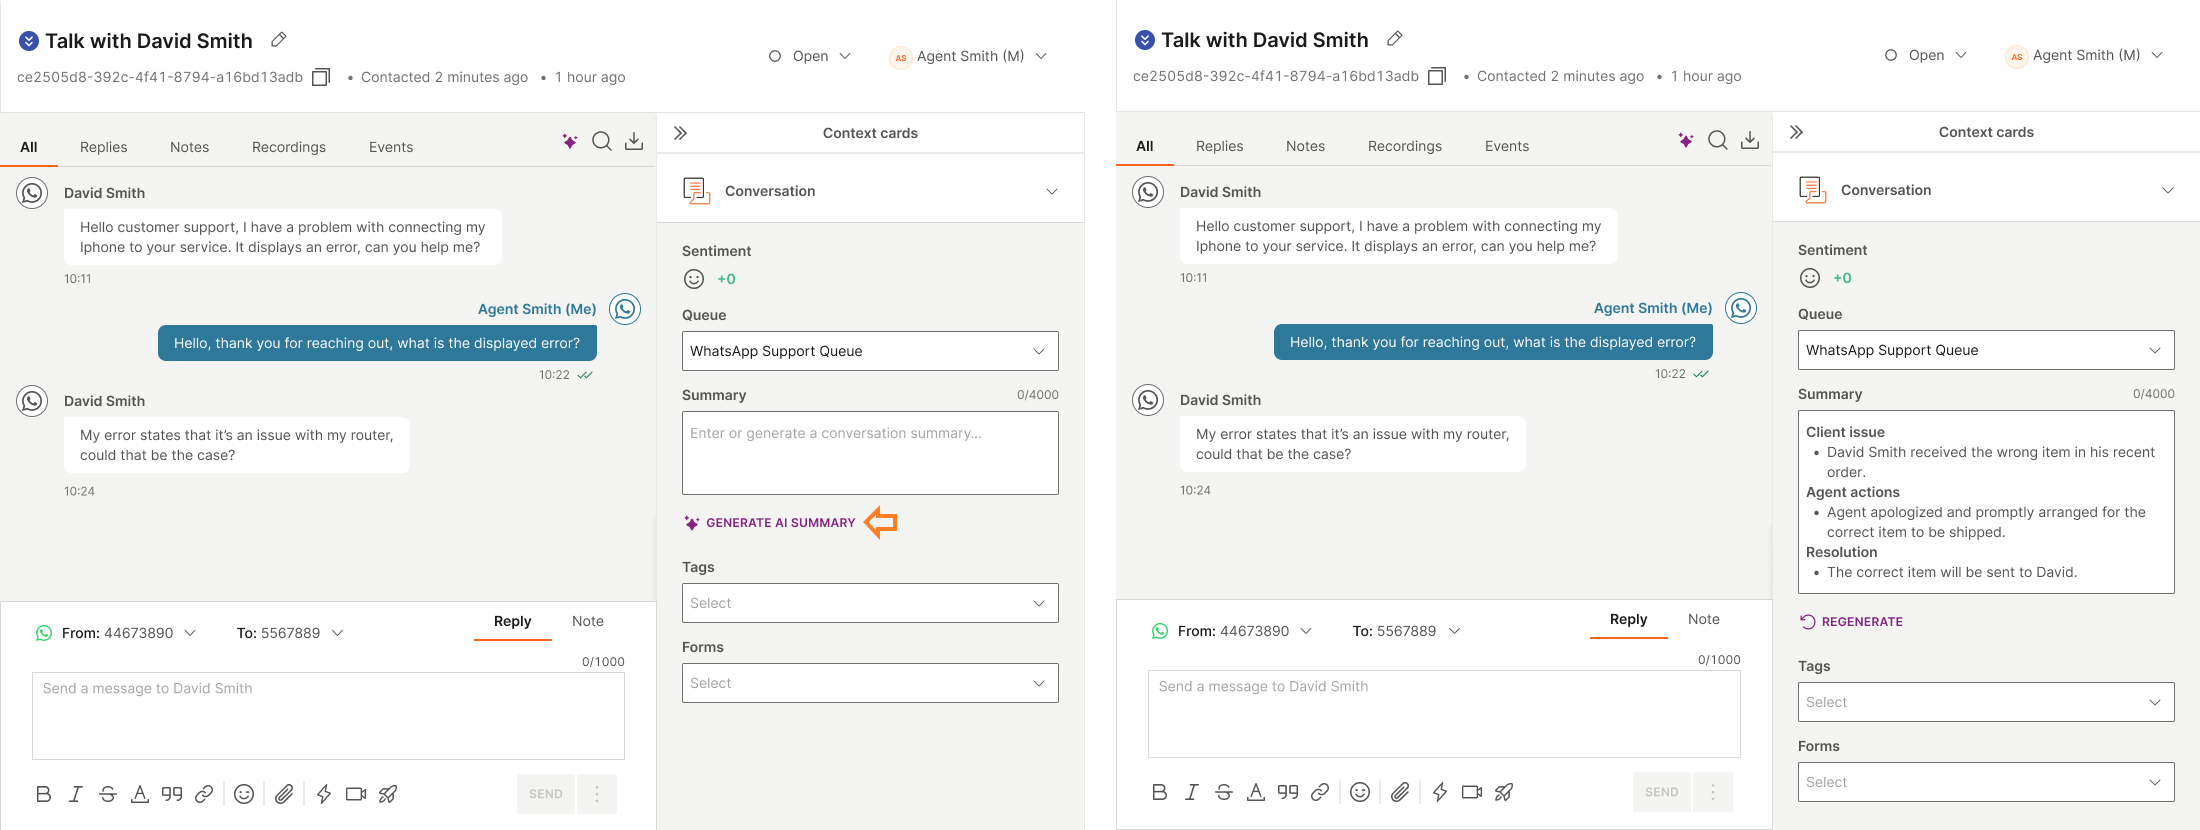
Auto-fill forms with AI is a feature that automatically populates form fields based on conversation history. The AI assistant analyzes the conversation context and extracts relevant information to fill in form fields, saving time and reducing manual data entry.
When this feature is enabled and a form is associated with the conversation, the AI assistant icon appears at the form level.
To use this feature:
- Select the AI assistant icon next to the form.
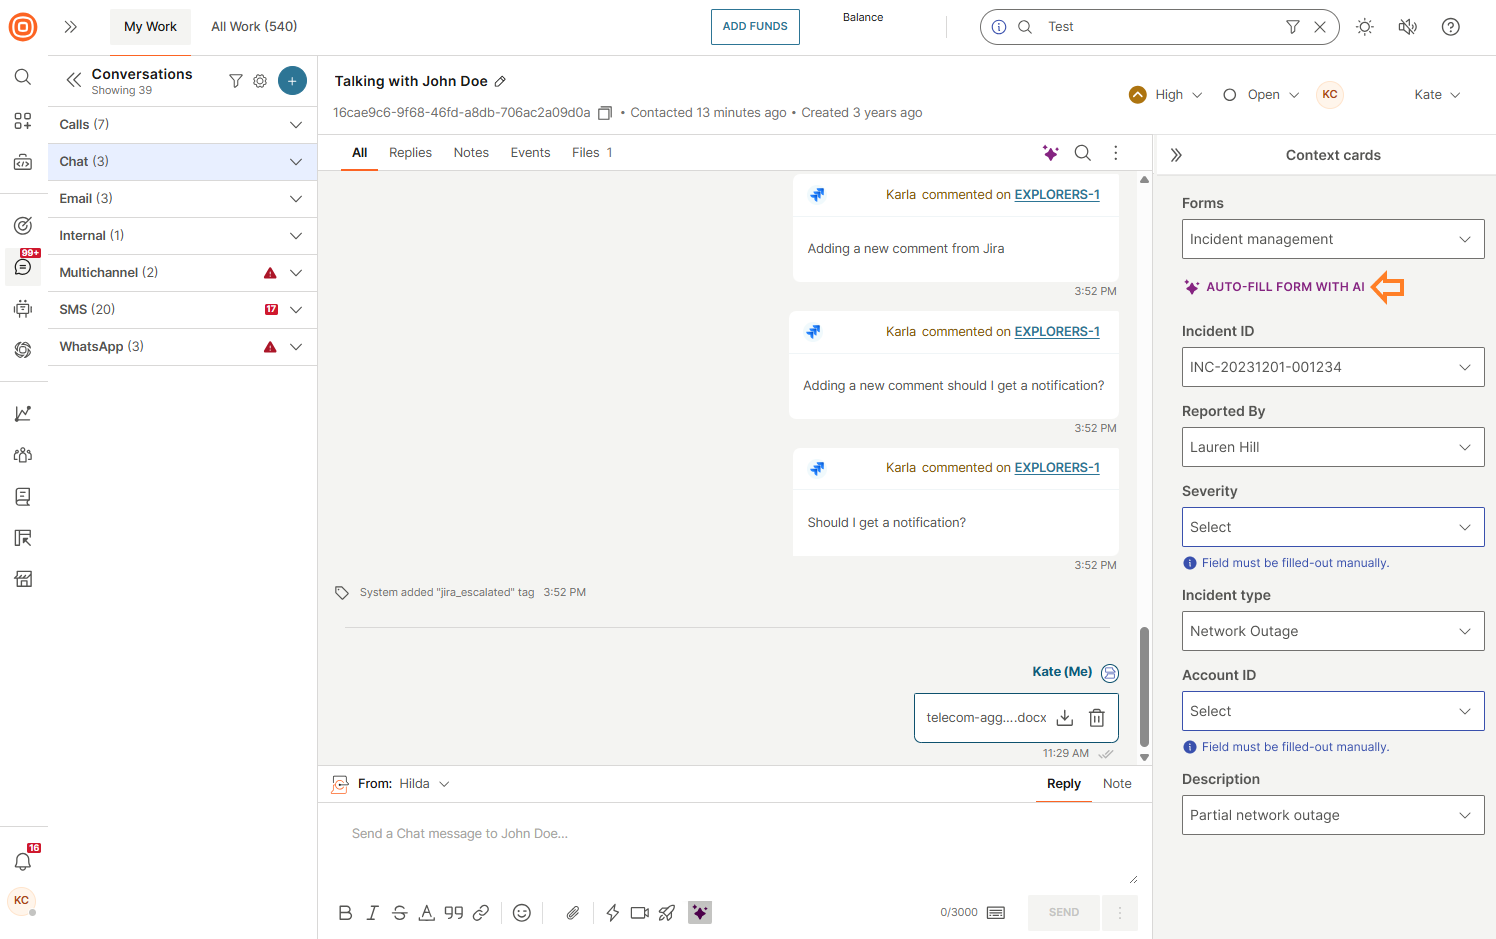
- The AI assistant analyzes the conversation and fills in the form fields automatically.
- Review the populated fields and make any necessary adjustments.
- Save the form when you are satisfied with the content.
Macros
To simplify your work and enable automation of the necessary steps for the same use cases, you can utilize macros for conversations that are already open or for starting new conversations in which all steps are performed automatically and the data is pre-populated.
Macros in open conversations [#macros-in-open-conversations-macros]
You can select the template/macro and based on it, the following fields are auto-populated:
- Subject
- Body
- Sender (Brand)
- Form
- Form fields
- Queue / Assignee
- Status
- Priority
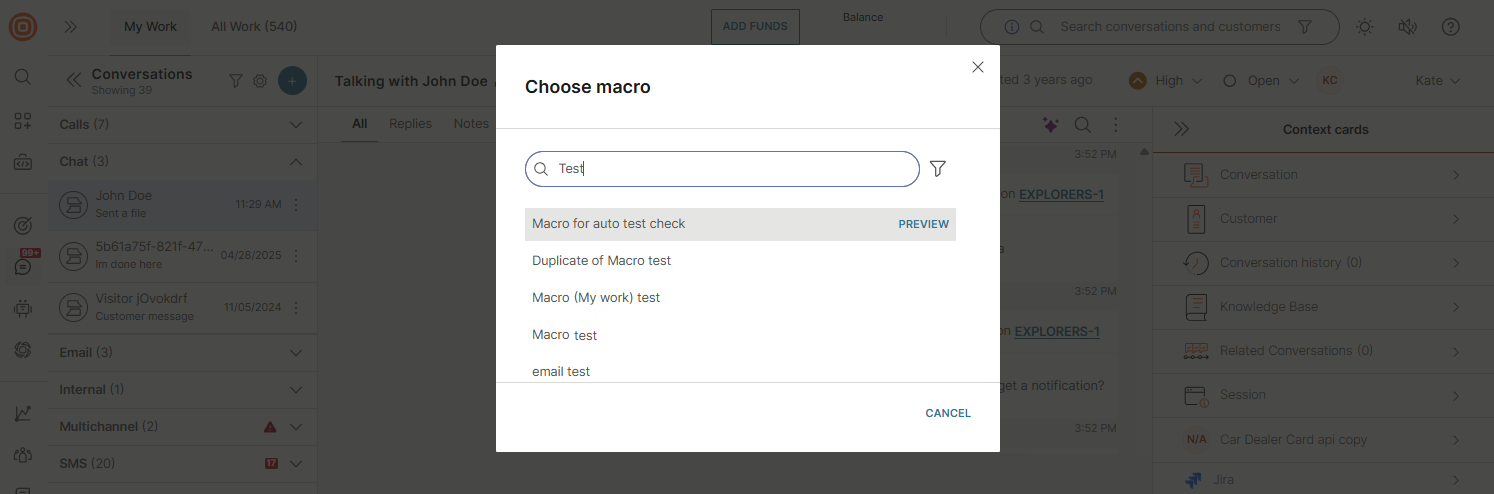
- In My Work, you can list all available macros by clicking the icon and applying the wanted macro for the currently opened conversation.

- Once the Choose macro window opens, you can search for a specific macro and filter them by tags.
- If you hover over a macro in the list, the Preview button appears, and by clicking it, you can see the macro details.
- Once you find the wanted macro, you can select it by clicking the macro directly without previewing it.
- Once you apply the macro, an event is shown in the conversation indicating that you applied it and the steps are automatically completed according to the macro setup.
- When an agent uses a Macro that sets the conversation status to Solved, the agent can edit it as needed and solve the conversation.
Macros in new conversations [#macros-in-new-conversations-macros]
Macros are available to be used in the creation of new conversations to automate repetitive tasks, simplify complex workflows, and increase productivity.
After you click the + button, the following fields will display:
- From which channel and sender message will be sent
- To whom the message will be sent (name of the customer who must exist in People or contact address like MSISDN)
- Channel and contact address in case the recipient has more than contact one associated with their profile
- Option to add CC and BCC. You can add up to 1000 recipients in total across the To, CC, and BCC fields.
- Form for the conversation
- Tags
- Priority of the conversation
- Status of the conversation
- Queue
- Agent assigned to the conversation
- Subject
- Content of the message
The following macro actions are visible and editable when creating new conversations:
- Agent
- Queue
- Tags
- Subject/Topic (for the email channel, the topic will not be displayed, only the subject)
When starting a new conversation:
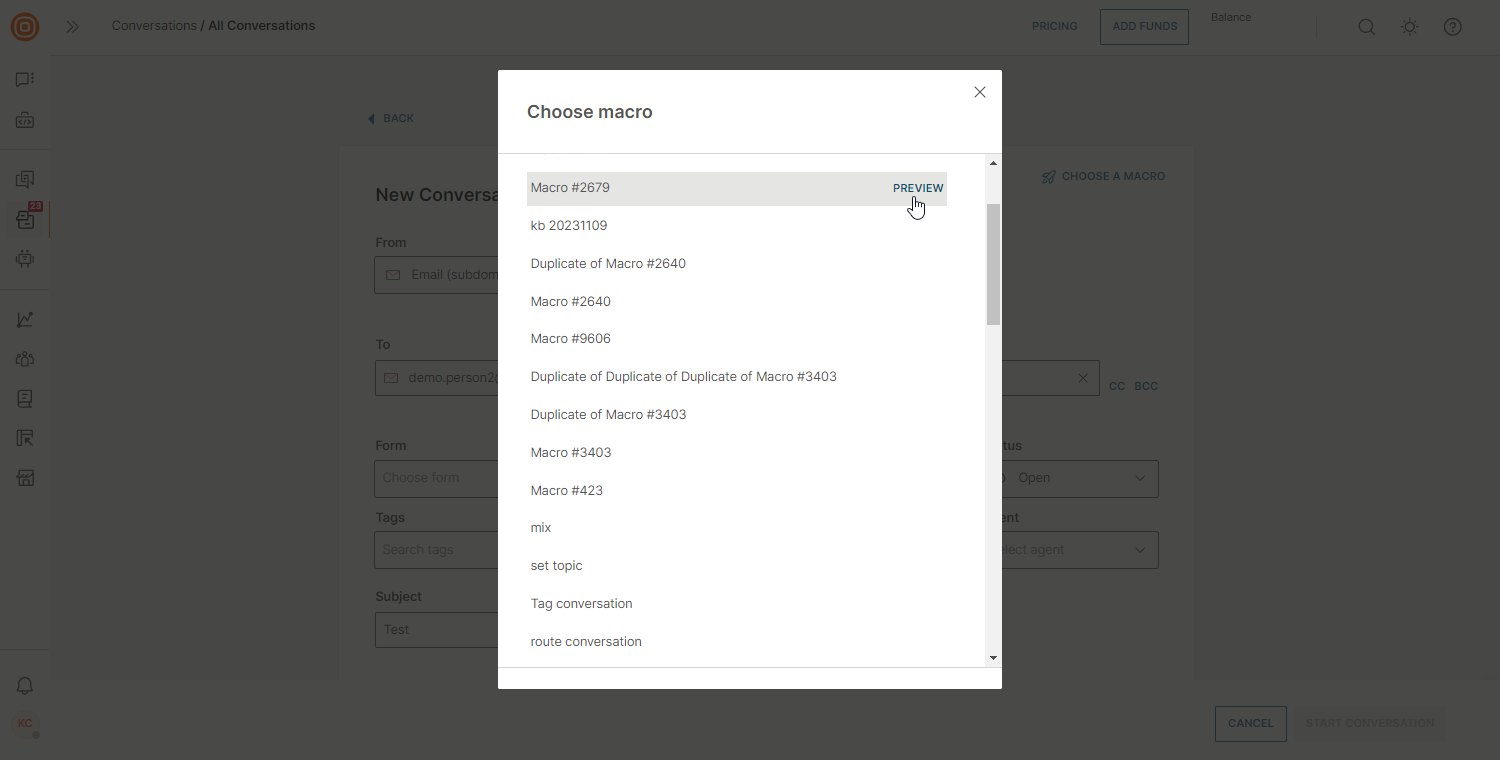
- Click the Choose a macro button to open a list of actions.

- Once the Choose macro modal appears, a list of all available macros appears. You can search for a specific macro, filter and preview it before applying. Once you choose the macro you want, click it and apply it in your new conversation.
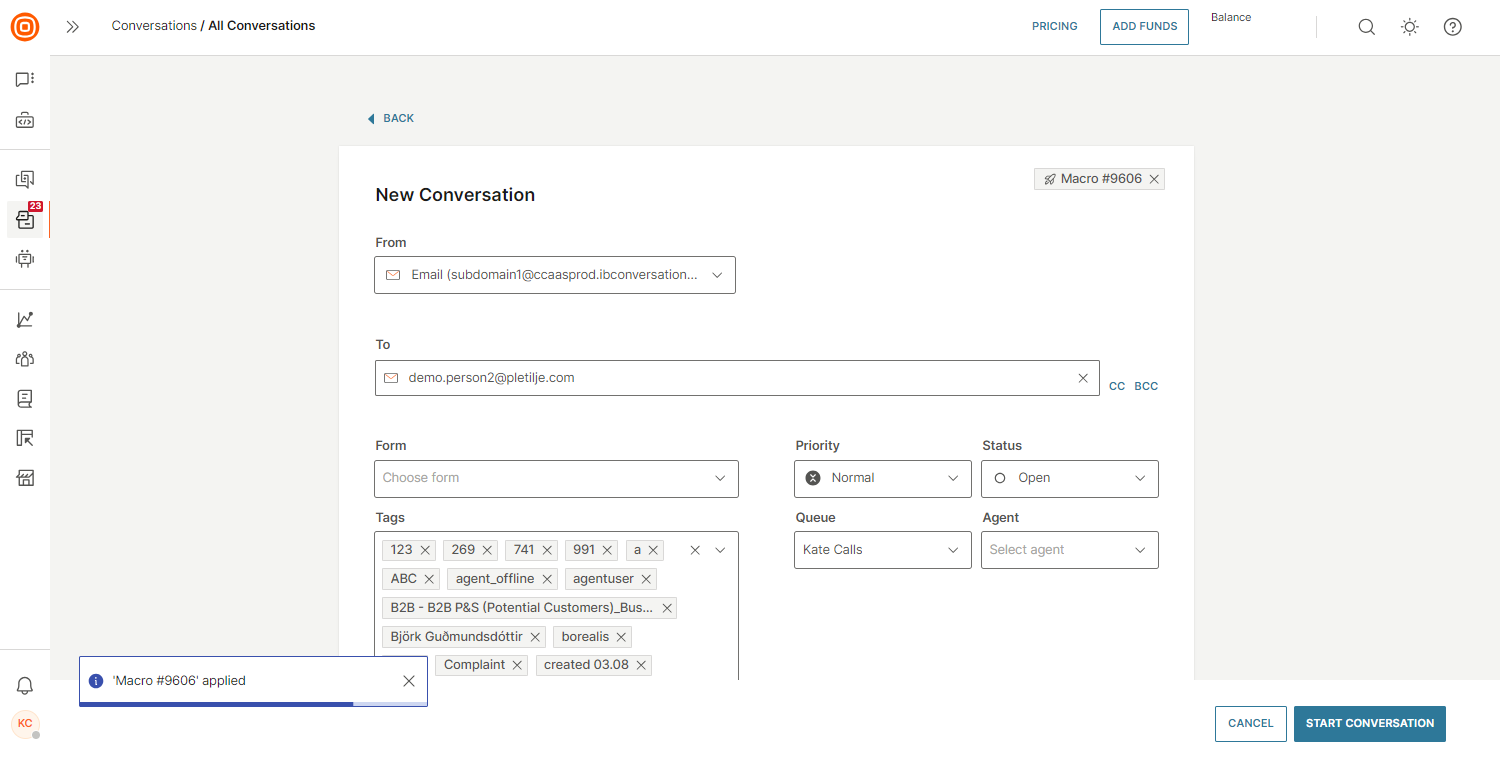
- When you successfully apply the wanted macro, you will see a notification that the macro is applied, its name, and the pre-populated data applied to the conversation. You have the option to choose a form and add or remove tags, and adjust other settings as needed.
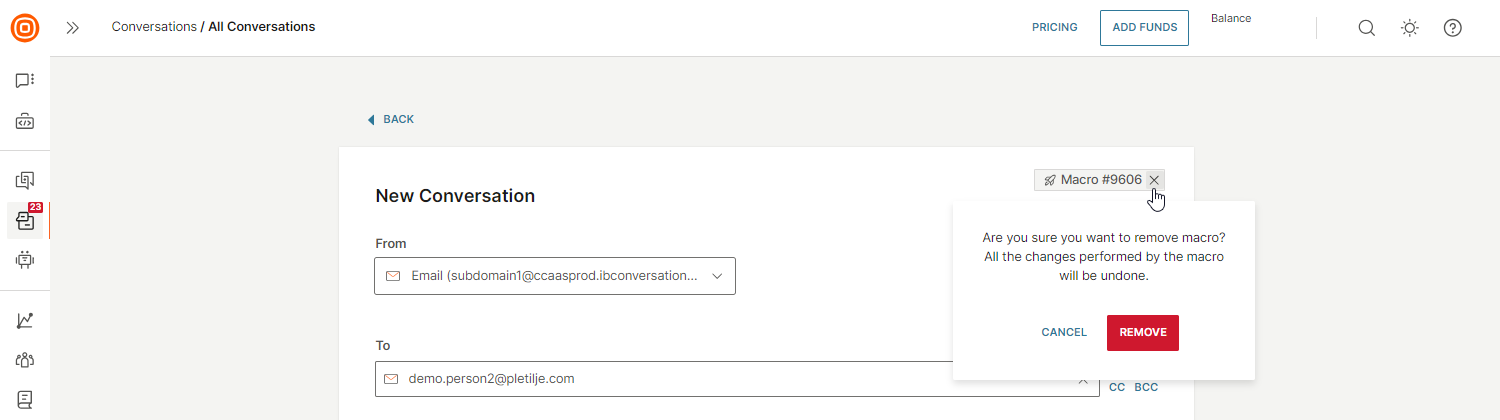
- If you want to remove the applied macro, click the X button next to the macro name and confirm your action.
For WhatsApp, if more than 24 hours have passed from the last communication, you will first need to choose a WhatsApp-specific template and then apply a macro.
Macro logic for creating new conversations
The macro logic for the creation of new conversations is based on the following:
- If the 'To' field has not been filled yet, the agent will only be able to choose macros that have the recipient field (To) configured for the chosen channel selected in the 'From' field.
- If the 'To' field is populated, the agent can select any macro. However, the action to fill in the recipient field (To) will only execute if the channel matches the specified criteria.
- If a session has expired (requiring a registered template), a yellow box will appear. However, if an agent selects a macro, it will be applied silently. When the agent later selects a template, the other fields will populate based on the actions specified in the macro (except from the "Set Template" action - even though it is available, it will not execute in the event of a WhatsApp session expiration as it requires WhatsApp-approved templates).
Notes
Use notes to notify your team about important matters regarding a conversation with a customer.
You can store any supporting documentation, screenshots, and other file types in the notes, which can help you or your colleagues get the full scope of the conversation and see what has been done to resolve a customer's issue.
Supported file formats in notes [#supported-file-formats-in-notes-notes]
Internal notes support the following file formats with the maximum file size of 25 MB:
| File Type | Supported Formats |
|---|---|
| Documents | .pdf, .doc, .docx, .txt, .ppt, .pptx, .xls, .xlsx, .ods, .odp, .odt, .odm |
| Images | .jpg, .jpeg, .png, .gif, .bmp, .webp, .heic, .heif, .ico |
| Video | .mp4, .mpeg, .webm, .avi, .moov, .mov |
| Audio | .wav, .mp3, .ogg |
| Archives | .zip, .rar, .gzip, .gz |
| Data | .csv, .xml, .json |
Knowledge Base
Agents can use the Infobip Knowledge Base, which is a shared component, to share knowledge either within their organization or when talking to customers.
It allows them to access any manuals or important pieces of content that the supervisors/managers have created and shared across the organization and thus help out customers with any frequently asked questions.
To use the Knowledge Base, you need to contact your dedicated account manager to enable it.
While in a conversation with a customer, the agents can access the Knowledge Base articles by searching for a particular piece in the customer context card. To search for an article, simply start typing and it will appear in the results list.
Also, agents will see suggested knowledge base articles. These will appear in the context card based on five previous active conversations between the agent and the end user.
If the agent manually searches for something in the knowledge base, these automatic suggestions will disappear for a moment.
Senders configuration
This feature is only available for the Grow and Scale package.
The Senders configuration feature simplifies the creation of new or existing conversations. If the feature is enabled, the following is applied:
- New conversation:
- Agent only has the default sender available from the queue they are assigned to
- Every queue has only one set default sender
- Existing conversation:
- Only senders from the queue the conversation is assigned to are available
- Agent can only reply to senders in the queue they are assigned to and to senders available in a certain queue, e.g., if the agent receives a conversation from a queue they are not assigned to, they cannot reply to the sender and will receive a warning message
- If a conversation is assigned to a queue that does not have senders by default, the default sender of the queue is chosen for the channel; however, if the default sender in the queue is not available, the From option will stay empty and all other senders will be available for the agent to choose based on the queue configuration
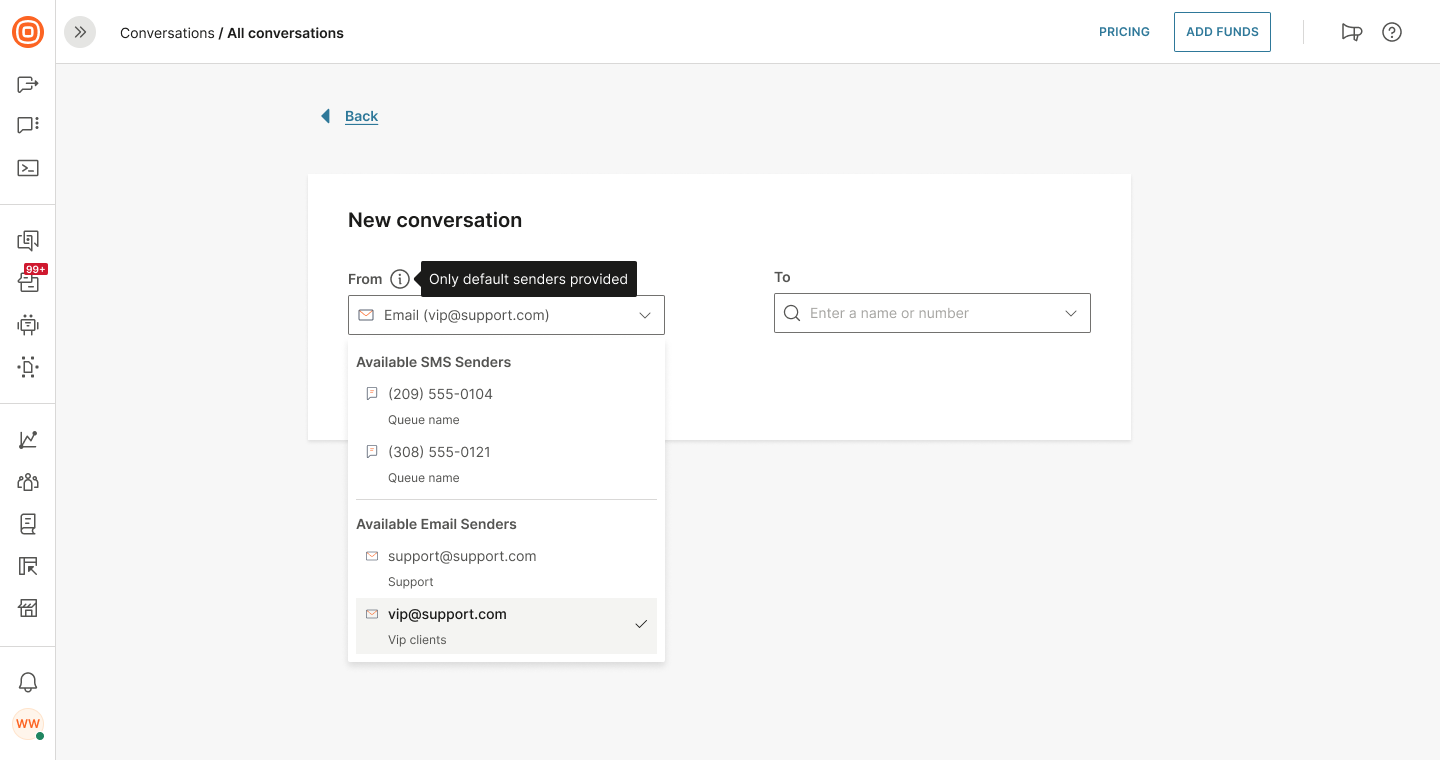
When creating a new conversation, only the default senders are listed where they are grouped based on the queue setup, and senders set under a particular senders group are automatically used for sending.
In the From field, the following is available:
- Search option
- Information about the sender (in which queue the sender is set as default)