Basic settings
Basic settings define how Conversations operates in your contact center. These are the core options that ensure the proper tool functioning and are applicable to most use cases and users, regardless of business size, user type, or communication channel.
In Basic settings, you can configure options such as queues, routing rules, working hours, default behaviors, and other core preferences.
To access them, log in to your Infobip account and go to Conversations → Settings → Basic settings.
See the sections below for details on each basic setting.
Agents
To manage agents in Conversations, go to Conversations → Settings → Basic settings → Agents. This section shows all users along with key details such as their name, assigned queues, current status, and recording settings.
Selecting a specific agent opens a detailed view with information about their profile, queue assignments, capacity, performance metrics, and other insights.
Add agents [#add-agents-agents]
To add a new agent:
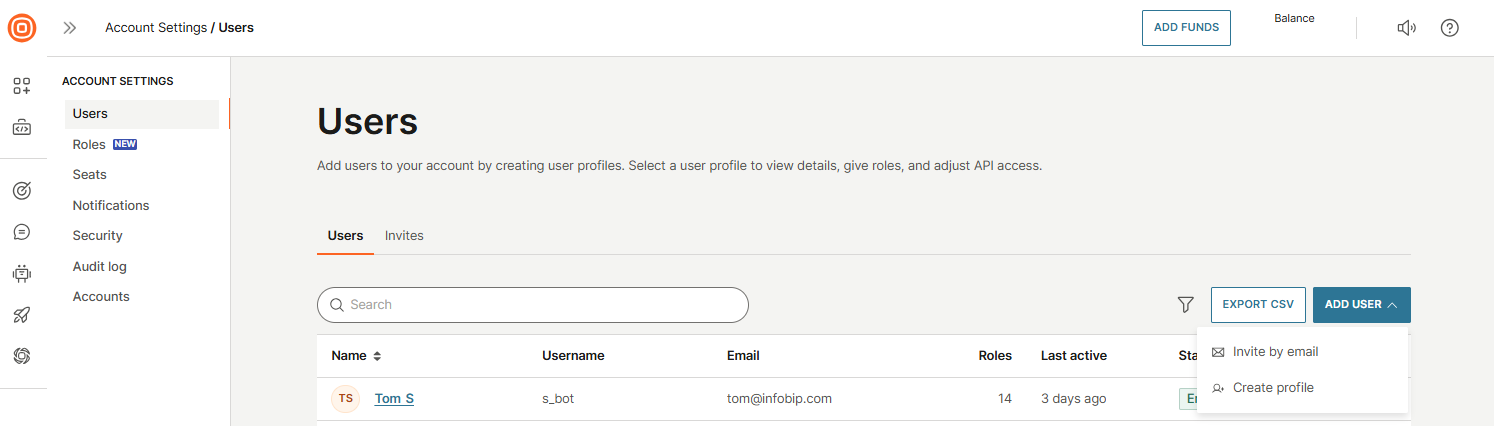
- To add a new user, you can start in two ways:
- Open the profile icon → Account settings → Users, then select Add user.
- Or, while in Conversations → Settings → Agents, select Add users. You will be redirected to the Users page.
- On the Users page, choose how you want to add the user:
- Invite by email - send an invitation for the user to create their own profile.
- Create profile - manually enter the user’s details and set up their profile.
Manage agents [#manage-agents-agents]
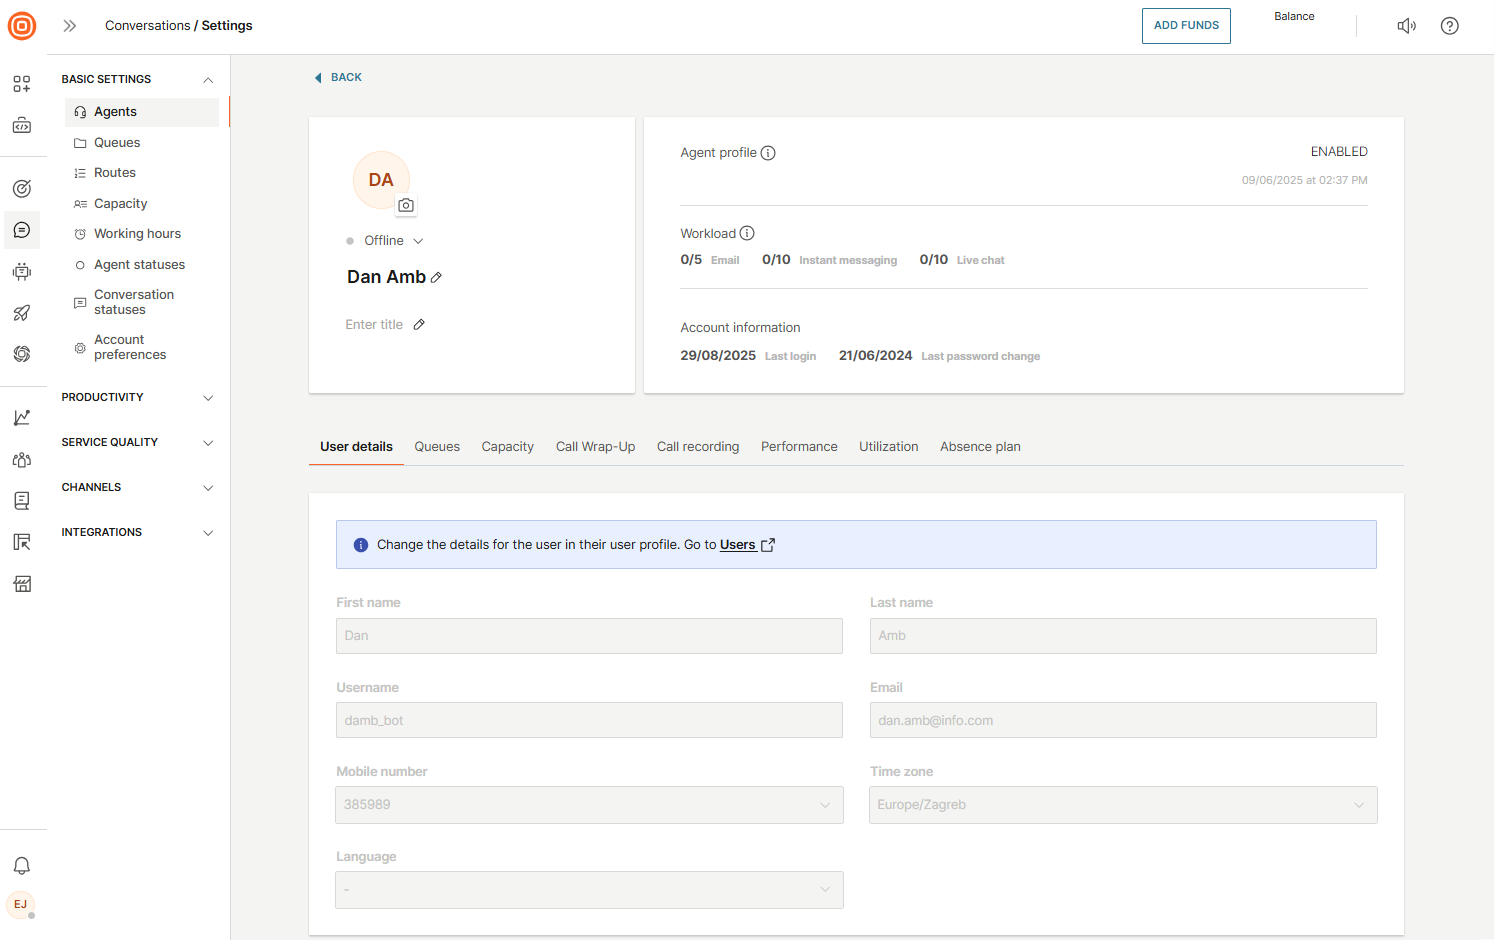
From the list of all agents, you can click on an agent’s name to open their details page.
Here, you can update basic information such as name, title, phone number, or status (Active, Busy, Offline, Away).
You can also enable or disable the user, manage queues, adjust capacity, set wrap-up or call recording options, and review performance and utilization data.
Manage seats [#manage-seats-agents]
The Seats section lets you manage seat allocation across your business units. If you are working with a main account and sub-accounts, this section gives you full control over seat usage and resource distribution.
With this option, you can assign seats to users so they can interact with customers in Conversations. You can also set seat limits per account to control how many seats can be allocated.
If no limit is set, an account can assign seats freely depending on the total number of seats you have purchased. Setting limits helps you maintain visibility and control over seat usage across accounts. Each account can assign seats only up to its specified limit. Once this limit is reached, no more seats can be allocated to users within that account.
Learn more about managing seats.
Queues
Queues are buckets or folders for conversations. Agents are assigned to pick up work from specific queues. New conversations are handled based on specific rules called routes.
The purpose of queues is to categorize conversations. Supervisors can assign agents to certain queues, so conversations are managed in a timely manner by the most knowledgeable team members.
Queue management inside the web interface is located within Conversations → Settings → Basic settings → Queues.
There, you will see two tabs:
- Queues
- Additional settings
Manage queues [#manage-queues-queues]
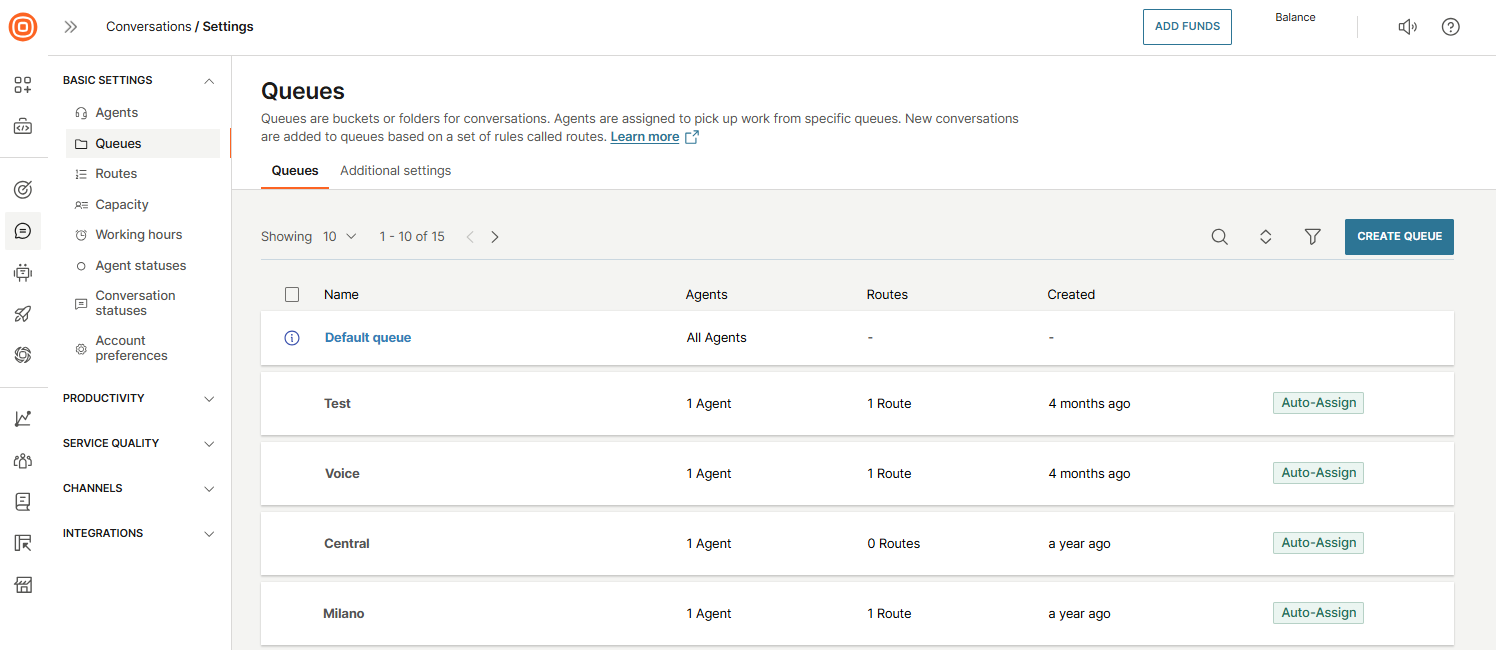
In the Queues tab, you can:
- See the previously created queues
- Sort them to view all, standard, or private queues
- Create a new queue
- Manage existing queues
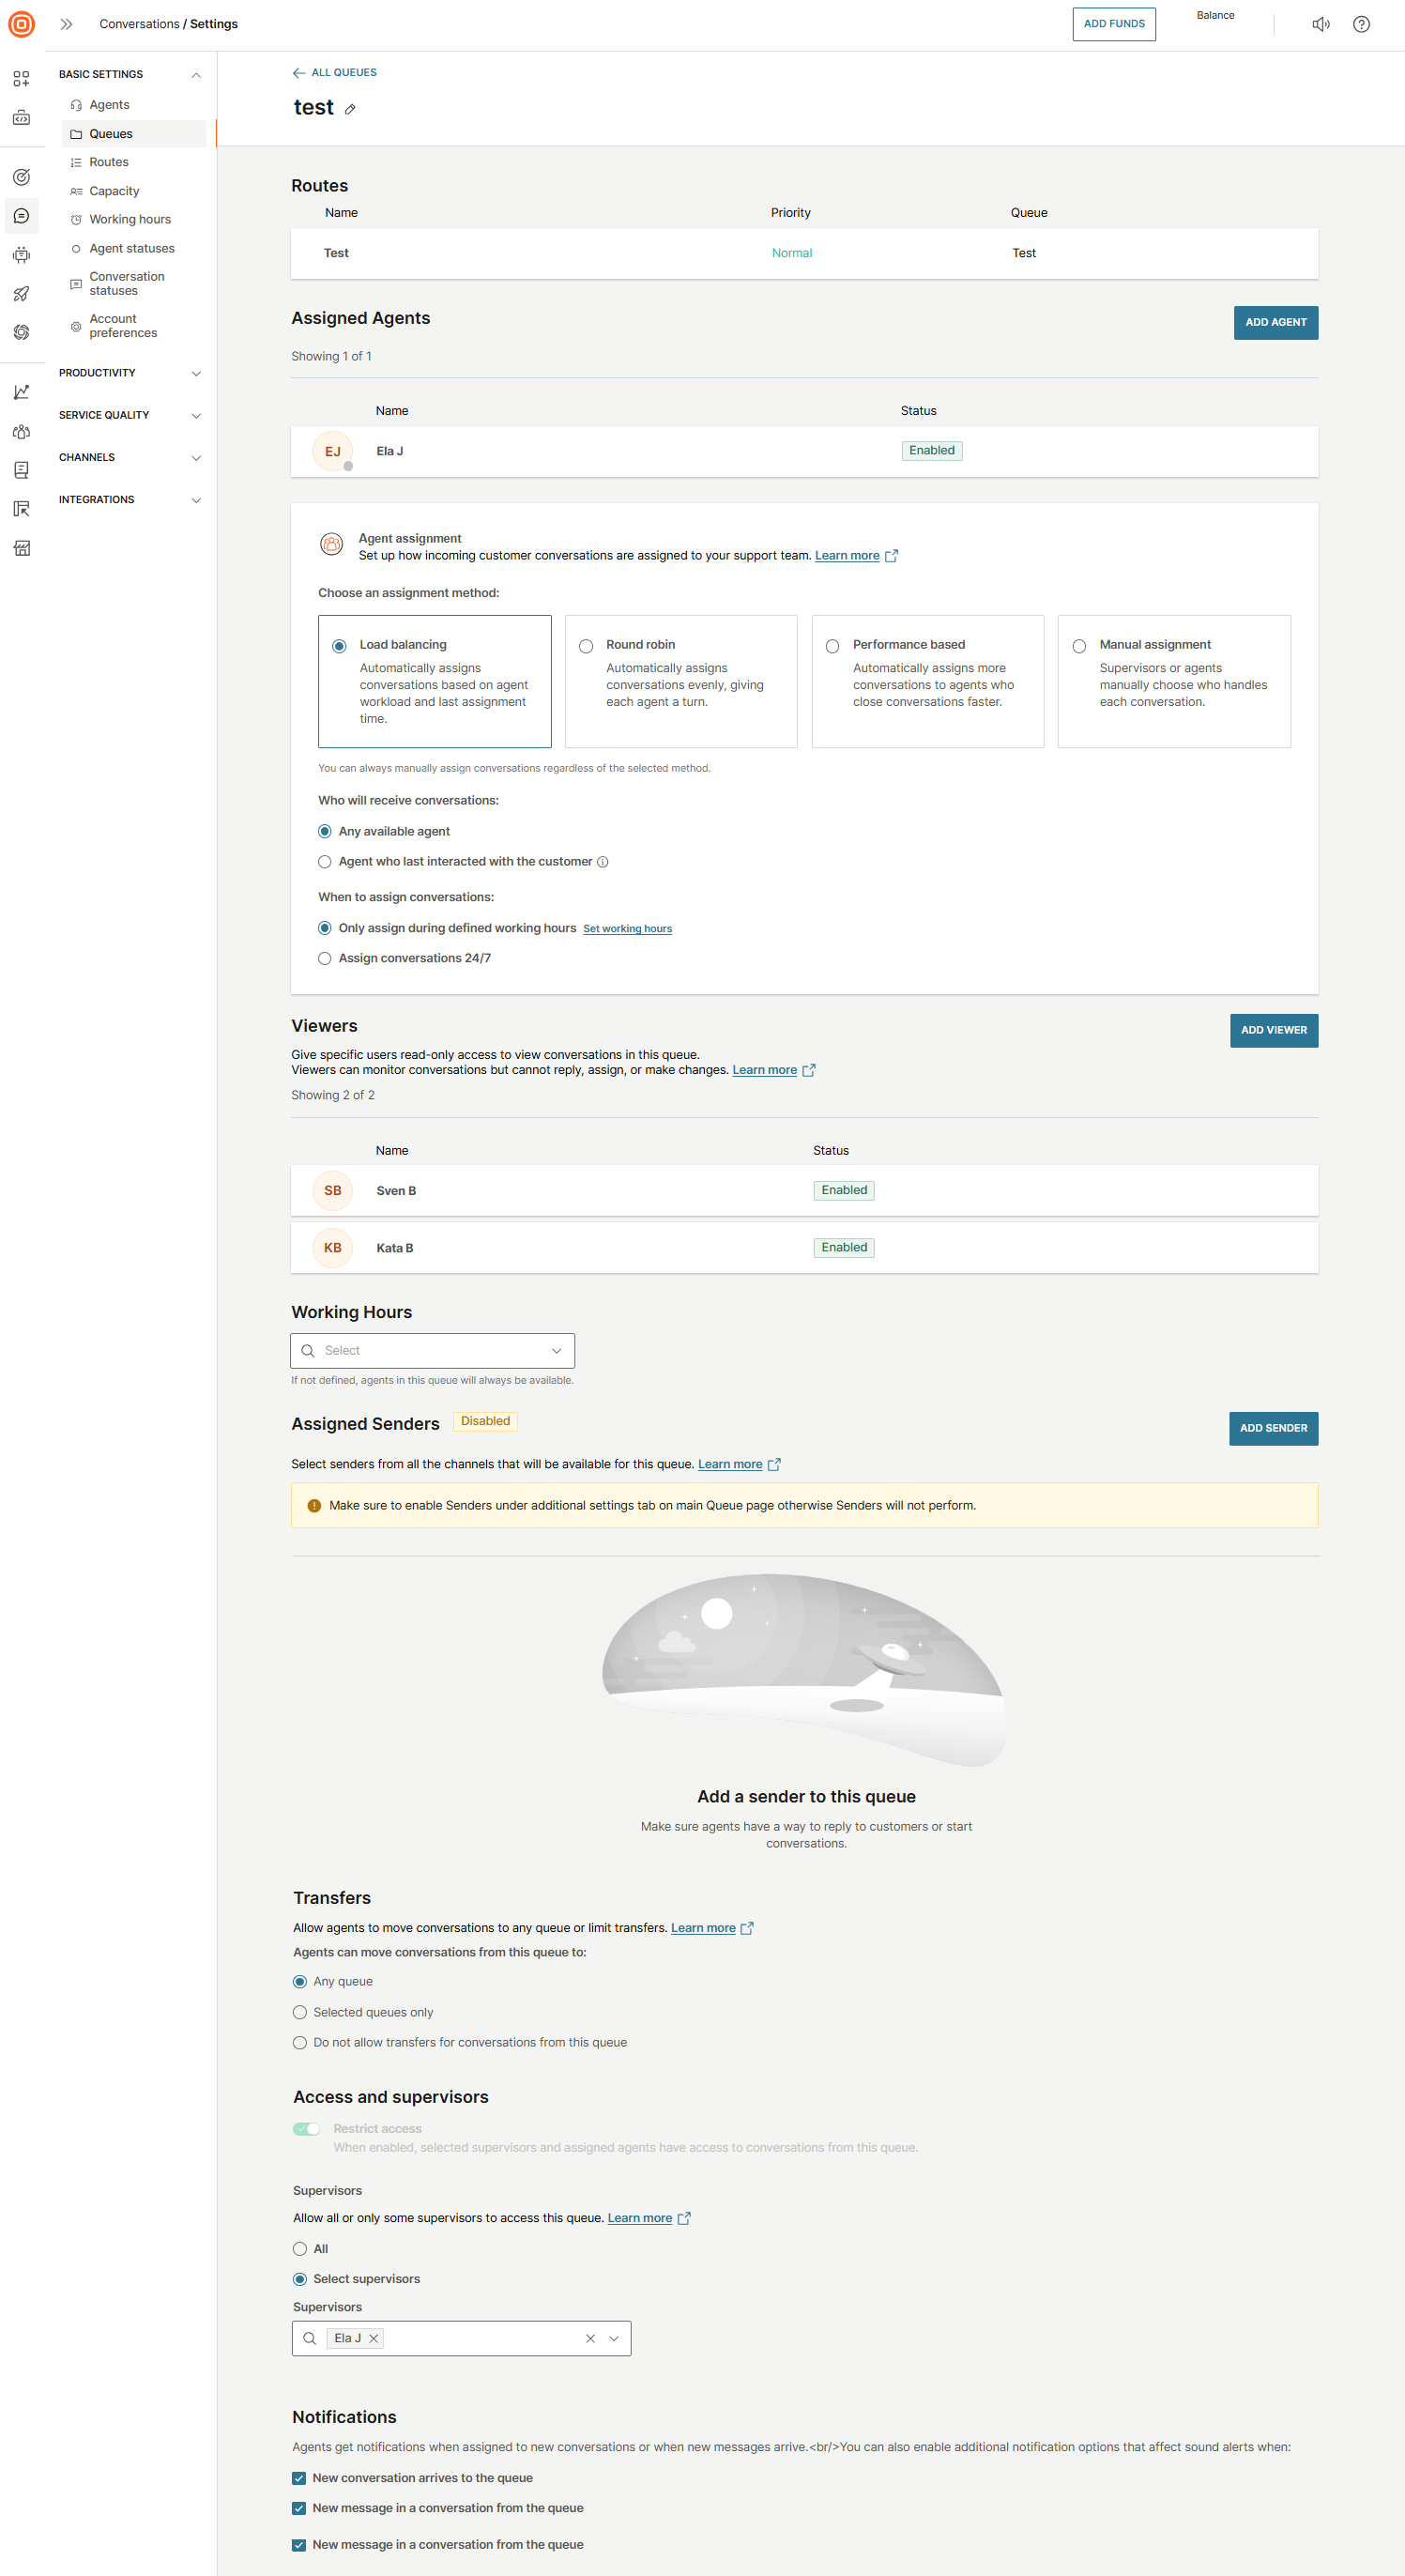
When you click on a queue name, the Queue details page will open. Here, you can find more information about the selected queue such as:
- Name of the queue
- List of routes leading to that queue
- List of agents assigned to the queue
- Agent assignment setup
- Viewers
- Working hours
- Waiting strategy
- Assigned senders
- Transfers
- Access and supervisors
- Notifications
Refer to the sections below to learn more about specific queue settings.
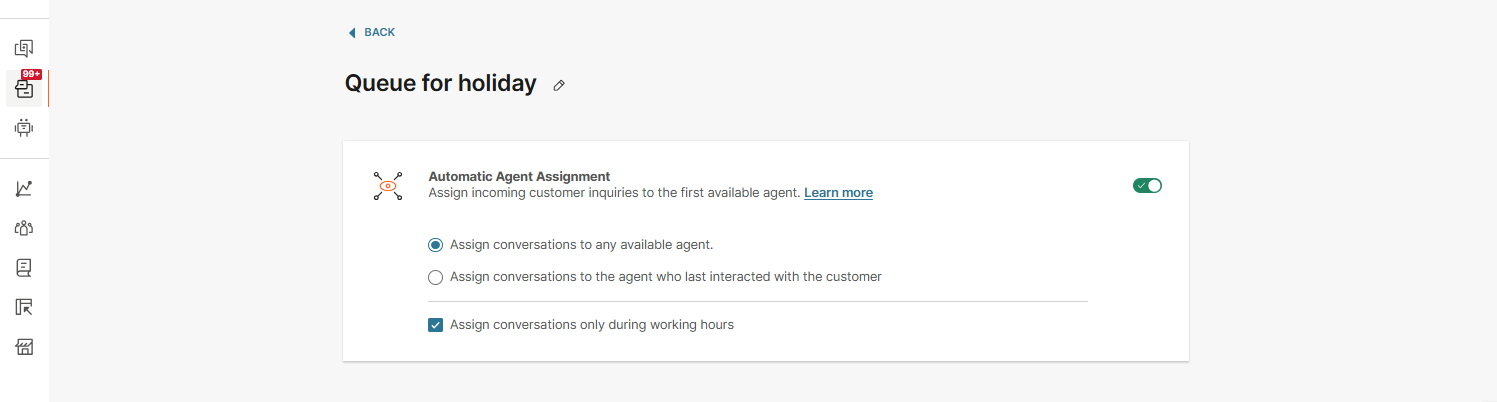
Automatic agent assignment for chats [#automatic-agent-assignment-for-chats-queues]
The automatic agent assignment is a process of distributing conversations between available agents based on their workload, capacity, and idle time. The algorithm ensures an even distribution of workload among agents. New conversations are assigned to the agent handling the fewest active conversations, maintaining balanced utilization across all available agents.
Supervisors can configure this on the queue level in Conversations → Settings → Basic settings → Queues.
When a conversation is routed to a queue with automatic assignment, the system identifies available agents and assigns one to the conversation. Agent selection is based on availability, current workload, and capacity:
- Availability - Determined by the agent’s status and heartbeat. The heartbeat, which tracks an agent’s presence in the app (even if minimized), refreshes every minute. If an agent’s heartbeat exceeds five minutes, they are considered unavailable and excluded from assignment.
- Workload - Represents the number of active conversations assigned to an agent, including all conversation statuses that measure their workload capacity. Refer to the Default capacity section for more info.
- Capacity - The maximum number of concurrent conversations an agent can handle. The default capacity for agents varies based on the communication channel (Live Messaging (10), Email (5), Live Chat (3)). These limits apply either as the default for all agents or as the system-wide capacity setting.
The agent with the fewest active conversations and the longest idle time is prioritized for assignment.
Here are two options you can choose for the automatic agent assignment:
-
Assign conversations to any available agent - agents are picked out of all agents assigned to the queue the conversation is routed to.
-
Assign conversations to the agent who last interacted with the customer - this option, also known as Sticky agent assignment, takes previous interactions with the customer into account, allowing the agent to have some context of the conversation. If the sticky agent is unavailable, the system will assign the conversation based on the standard logic (Option 1). When using this option, you can set an additional parameter - the period within which the agent must have communicated with the customer to be considered for assignment:
- In the last 30 days
- In the last 60 days
- In the last year
- Ever
Assign conversations only during working hours setting
The third optional setting allows conversations to be assigned only during working hours. This option is visible and applicable only for queues with defined working hours. By default, the system assigns conversations automatically to agents only during working hours.
If automatic agent assignment is set to Assign conversations only during working hours, auto-assignment will not be activated outside of working hours in the following cases:
- New inbound conversations → Not assigned to any agent
- Re-assignment of unassigned conversations → Does not occur
- Bot transfers → Not assigned to an agent
- Flow transfers → Not assigned to an agent
- Inbound calls → Not assigned to an agent
- Callbacks → Not assigned to an agent
- Agent changes status or closes or unassigns an ongoing conversation → No automatic assignment
- Agent comes online and there are conversations waiting → No automatic assignment
If the Assign conversations only during working hours setting is disabled, auto-assignment will attempt to assign conversations to available or online agents even outside of working hours, as follows:
- New inbound conversations → Will be automatically assigned if there is an available eligible agent
- Re-assignment of unassigned conversations → A new agent will be assigned if there is an available eligible agent
- Bot transfers → Same as new inbound conversations
- Flow transfers → Same as new inbound conversations
- Agent changes status or closes or unassigns an ongoing conversation → Automatic agent assignment will assign any waiting conversations to this agent if the agent is eligible and available
- Agent comes online and there are conversations waiting → Automatic agent assignment will assign any waiting conversations to this agent if the agent is eligible and available.
This does not apply to calls and callbacks, as they will not be assigned to agents outside of working hours, regardless of the queue settings:
- Inbound calls → Not assigned to an agent
- Callbacks → Not assigned to an agent
-
Finding an agent for a conversation:
- On newly created conversations.
- On active conversations that get unassigned from an agent.
- On unassigned active conversations that are moved from one queue to another. In all these cases, the system checks for all available agents in the conversation queue and assigns the conversation to the agent with the highest capacity and the longest idle time or time without new assignments.
The active conversation status is determined by the settings in the Conversation statuses and capacity section. Based on the configured statuses (for example, Open, Waiting, Solved), all selected statuses are treated as 'active', and auto-assignment applies accordingly. If only the Open status remains (as the default active status), only conversations marked as Open will count toward agent capacity and trigger auto-assignment. For example, if a conversation with the Waiting status is unassigned and Waiting is considered active, auto-assignment will find a new agent. If a sticky agent is set for auto-assignment, the agent who last communicated with the customer will be the first choice, provided they are available. If that agent is unavailable, the standard auto-assignment process is followed. However, if Waiting is not set as an active status, auto-assignment will not reassign the conversation when an agent is unassigned.
Learn more about agent statuses and how capacity is calculated.
-
Assigning conversations to agents who can take on work:
- When an agent's status changes from Offline, Busy, or Away to Available (any status considered as Available).
- When an agent frees up, such as by closing an ongoing conversation or reassigning it to a colleague.
- When an agent's working hours begin.
In all these cases, the system will check for unassigned conversations in the queue(s) the respective agent belongs to and assign them to the available agent, up to their capacity. Conversations with higher priority and longer waiting times will be assigned first.
Learn more about the agent capacity and statuses.
Agent occupancy and auto-algorithms
When the agent occupancy has dropped, AAA is triggered for that specific agent. The following areas can cause a drop in occupancy:
- Conversation unassigned
- Conversation closed
- Conversation merged
- Transition from included to excluded conversation status
When a conversation is routed to a queue and assigned to an agent, and in the meantime, the queue changes, the following happens:
- If the agent is assigned to the new queue, they are left assigned to the conversation after the queue change.
- If the agent is not assigned to the new queue, they are unassigned from the conversation, and the automatic agent assignment starts (if turned on) on the new queue. If the automatic agent assignment is not turned on, the system is waiting for agents in that new queue to take the conversation and handle it.
- Even if the agent was designated as sticky for this customer, once unassigned, the conversation will no longer be assigned to the agent by automatic agent assignment.
| Algorithm | Description |
|---|---|
| Bulk auto-assignment | Triggered at the start of working hours. All conversations received outside business hours are assigned once agents’ shifts begin. When an agent becomes available (free capacity or unassigns some conversations), unassigned conversations are retrieved and ordered. Priority is applied first; if equal, they are ordered by createdAt timestamp. Conversations are then assigned until the agent’s capacity is full. |
| Single auto-assignment | First checks for the sticky agent. If none is found, the system selects the best agent based on workload and availability. This applies when a conversation changes its queue or becomes unassigned. The previously assigned agent is excluded, and a new one is selected. |
| Workload | Defined as occupancy ÷ capacity. For example, Agent A has capacity 4 and occupancy 2 (ratio 0.50). Agent B has capacity 8 and occupancy 3 (ratio 0.38). A new conversation is assigned to Agent B, who has more available capacity. |
| Waiting time | Measured from the last conversation assignment to the agent. The agent who has been waiting longer is more likely to get the next conversation. |
| Assignment formula | Workload and waiting time are combined into a formula to determine which agent gets the conversation. This auto-assignment logic applies to chat conversations only. |
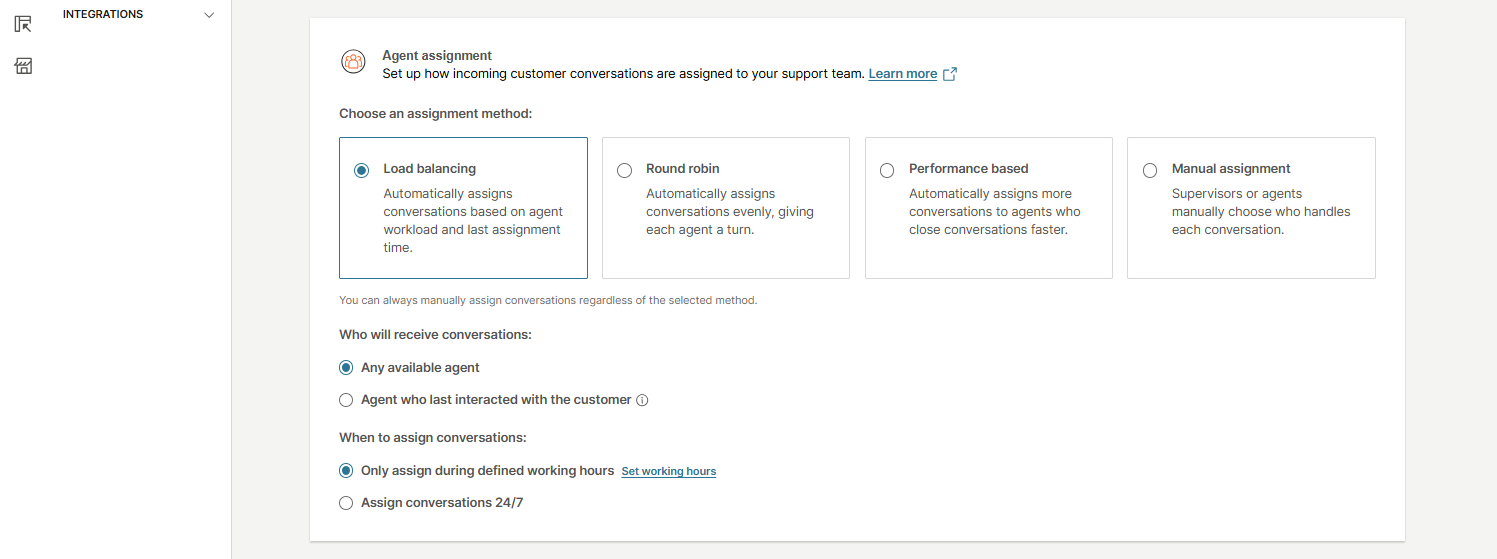
Agent assignment methods
In the Agent assignment section, you can configure how incoming customer conversations are distributed to your support team. You can choose from four assignment methods:
- Load balancing - Automatically assigns conversations based on each agent’s current workload and the time of their last assignment.
- Round robin - Automatically distributes conversations evenly, ensuring each agent takes turns. It assigns conversations based only on the time since each agent’s last assignment. Agents who have waited the longest receive the next conversation. Workload is not considered (unless the agent is at full capacity).
- Performance based - Automatically prioritizes agents who close conversations faster and have more capacity. It assigns conversations based solely on the agent’s available capacity. Agents with lower workloads are prioritized, regardless of when they last received a conversation.
- Manual assignment - Conversations are assigned manually by supervisors or agents.
Automatic vs. manual assignment
The first three methods (Load balancing, Round robin, and Performance based) are considered automatic assignment methods. If you select Manual assignment, automatic assignment is turned off. Regardless of the chosen method, the system always assigns conversations to agents who have available capacity. The differences between the automatic methods only affect how the system prioritizes agents when multiple are available.
For example:
- If only one agent is available and has capacity, all conversations will be assigned to them, regardless of the selected automatic assignment method.
- If there are 10 unassigned conversations and one agent comes online with available capacity, the system will assign all 10 conversations to that agent, regardless of the method.
Additional configuration
After selecting an assignment method, configure the following options:
-
Who will receive conversations:
- Any available agent
- Agent who last interacted with the customer
-
When to assign conversations:
- Only assign during defined working hours
- Assign conversations 24/7
Automatic agent assignment in action
If the sticky agent option is not selected, then the system applies the Weight Sum method. A list of all available agents in the queue is created, and every agent has two attributes assigned.
Weights are applied to agent attributes based on the selected automatic assignment method:
- Load balancing - A weight of 0.5 is assigned to both Workload and Unserved Time, meaning each factor contributes equally to the assignment decision.
- Round robin - Workload is given a weight of 0 (ignored), while Unserved Time is weighted at 1. This method prioritizes agents who have not recently received a new conversation, promoting even distribution by rotating assignments.
- Performance based - Workload is weighted at 1, and Unserved Time is 0 (ignored). The system favors agents with more available capacity, typically those who resolve conversations more efficiently, by assigning them more conversations.
The table below illustrates a simplified example of how these weights influence the assignment calculation.
Workload ranking
| Agent | Live Chat capacity | Live Chat occupancy | Live Messaging capacity | Live Messaging occupancy | Email capacity | Email occupancy | Workload calculation | Workload | Workload rank |
|---|---|---|---|---|---|---|---|---|---|
| Agent 1 | 10 | 2 | 20 | 4 | 5 | 2 | (2/10)×100 + (4/20)×100 + (2/5)×100 = 20 + 20 + 40 = 80 | 80% | 4 |
| Agent 2 | 10 | 2 | 20 | 0 | 10 | 3 | (2/10)×100 + (0/20)×100 + (3/10)×100 = 20 + 0 + 30 = 50 | 50% | 1 |
| Agent 3 | 5 | 1 | 10 | 3 | 5 | 1 | (1/5)×100 + (3/10)×100 + (1/5)×100 = 20 + 30 + 20 = 70 | 70 | 2 |
| Agent 4 | 20 | 9 | 5 | 1 | 10 | 1 | (9/20)×100 + (1/5)×100 + (1/10)×100 = 45 + 20 + 10 = 75 | 75 | 3 |
Last assignment ranking
Agents with longer time since last assignment are ranked higher.
| Agent | Last assignment time | Last assignment rank |
|---|---|---|
| Agent 1 | 20 min ago | 1 |
| Agent 2 | 10 min ago | 4 |
| Agent 3 | 12 min ago | 3 |
| Agent 4 | 15 min ago | 2 |
Each AA method uses a different logic to determine the best agent for a new conversation, based on factors such as workload and time since last assignment.
- Load balancing - The system takes into account both workload and last assignment time. Each agent is ranked based on these two criteria, and the sum of their ranks is calculated. The agent with the lowest combined score is selected to receive the conversation.
- Round robin - Only the time since last assignment (within the relevant queue) is considered. The agent who has gone the longest without receiving a conversation is selected, as long as they are not at full capacity. Workload is ignored unless an agent has no capacity. Once a conversation is assigned, the selected agent moves to the bottom of the queue, making them the least likely to receive the next one.
- Performance based - Only the current workload is considered. The agent with the lowest workload is selected to handle the next conversation. Time since last assignment is not taken into the decision.
The table below illustrates a simplified example of how these AA methods influence the assignment calculation.
| Agent | Workload rank | Last assignment rank | Sum of ranks | Load balancing AA algorithm | Round robin AA algorithm | Performance based AA algorithm |
|---|---|---|---|---|---|---|
| Agent 1 | 4 | 1 | 5 | Agent 1 is the best candidate (longest time since last assignment) | ||
| Agent 2 | 1 | 4 | 5 | Agent 2 is the best candidate (lowest workload) | ||
| Agent 3 | 2 | 3 | 4 | Agent 3 is the best candidate (lowest sum of workload and assignment ranks) | ||
| Agent 4 | 3 | 2 | 6 |
The default queue is a system-defined queue that collects all unmatched conversations during routing. All agents have access to conversations in the default queue and can reply to customers. The default queue can be changed on a conversation but it cannot be deleted.
The auto-assignment is available on the default queue as well. This is the queue where all conversations land in case no match is found in the Routing criteria for specific queues.
Automatic agent assignment for calls [#automatic-agent-assignment-for-calls-queues]
For calls, availability is taken into consideration. An agent is considered available to take on new calls when they set their status to Available, and they have fewer conversations assigned in any status other than Closed.
Workload and waiting times are calculated for every agent who is in the Available status.
- Call assignment process:
- When an incoming call arrives, the system looks for available agents to take the call.
- The eligibility criteria for agents follow the same logic as described for auto-assignment (AA).
- The call rings for the selected agent. If they pick up, both the call and its associated conversation are assigned to them.
- Capacity override for calls:
- Agents who have reached full capacity based on their text channel workload are still considered available/eligible to receive calls.
- If the agent does not pick up:
- The system selects the next available agent and rings them. This process continues until the call is answered.
- If no available agent picks up the call, it will start ringing again from the first agent.
- There is a maximum total ringing time for the call if it remains unanswered, which is defined in the waiting strategy for calls.
- Calls outside working hours:
- When the queue is outside working hours, calls do not ring to agents. Instead, an away message is played.
- Callback auto-assignment:
- The callback assignment logic follows a similar process to how AA assigns waiting conversations to agents who become available.
Viewers [#viewers-queues]
You can give specific users view-only access to a queue by adding them as viewers. Viewers can monitor conversations and write internal notes, but cannot reply, assign, or make any changes.
They cannot be assigned conversations, do not have capacity in the system, and can view only conversations from their assigned queues.
Assigning the Viewer for Conversations role
Before adding a user to a queue as a viewer, you must first assign the Viewer for Conversations role to that user.
When adding users to a queue, the selection list shows only users who already have the Viewer for Conversations role assigned. Users without this role do not appear in the list and cannot be added to the queue as viewers.
Add viewers
To add viewers to a specific queue:
- Select Add viewer.
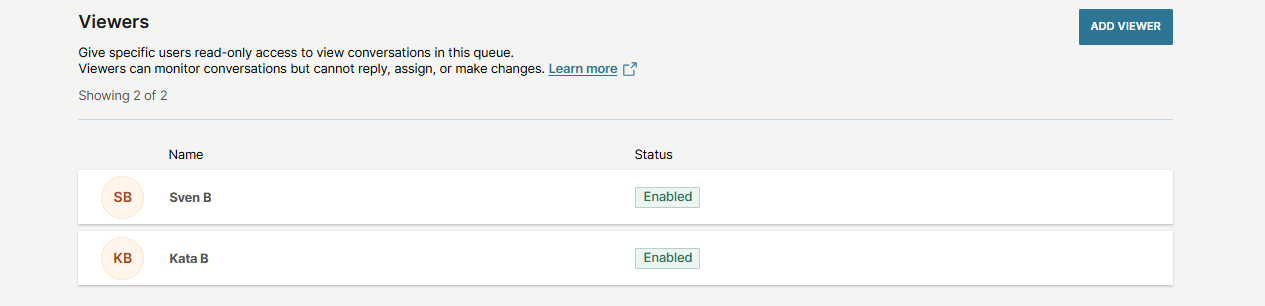
- In the side panel, search for and add the wanted users.
Queue working hours [#queue-working-hours-queues]
Queue working hours define when a specific queue is active and able to receive conversations.
For instructions on how to configure them, see the Working hours section.
Waiting strategy in queues [#waiting-strategy-in-queues-queues]
In the Waiting strategy section, you can see all waiting strategies that are applied to the queue, together with the following details:
- Name
- Max wait time (the maximum time a customer can remain in the queue and the duration of the waiting strategy)
- Channel
- Messages
- Timeout action (defines what happens when a customer waits longer than the maximum allowed time in this queue)
By selecting the linked strategy name, the strategy opens in a new tab, where you can review and edit its settings as needed.

Learn more about Waiting strategies.
Assigned senders [#assigned-senders-queues]
The Assigned senders option lets you add senders from any available channel to a queue.
To add senders:
- Select Add sender.
- In the side menu, find the sender you want to use and select Add.
Learn more about Senders configuration.
Transfers [#transfers-queues]
The Transfers option enables you to determine if a conversation from the queue can be transferred to:
- Any queue
- Selected queues only - if selected, a drop-down menu for queues will appear, allowing you to choose specific queues
- Do not allow transfers for conversations from this queue
These options allow you to specify whether agents can move conversations to any queue or if their transfers should be restricted.

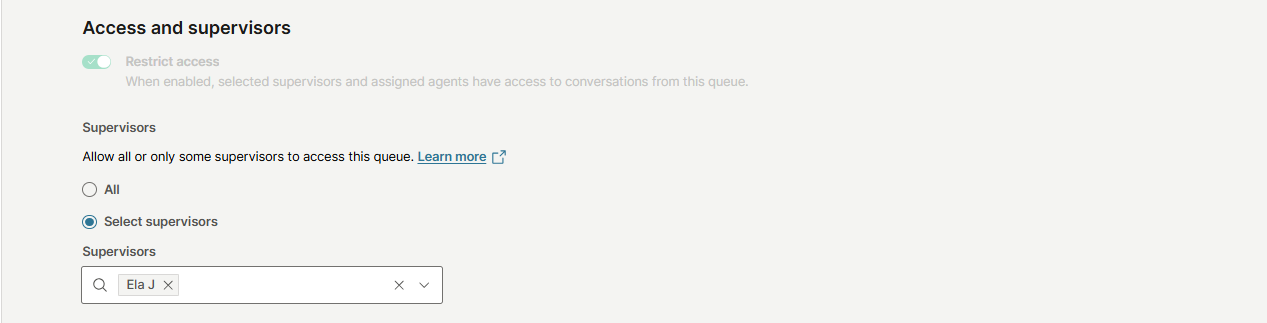
Access and supervisors [#access-and-supervisors-queues]
The Access and supervisors option is a set of configurations that enable users to determine which queues are isolated from others. These settings are defined at the queue level, enabling or preventing transfers from the queue to other queues and restricting access to conversations in the queue to specific users, such as agents and supervisors.
Users often have queues with specific access rules to comply with regulations, such as SCHREMS, which mandate that only users from designated regions can access data for end customers from those regions.
Additionally, VIP queues may contain sensitive conversations that should not be visible to all employees. To address these needs, you can restrict queue access by selectively assigning specific agents and supervisors to manage these queues, while preventing others from accessing them.
To configure the data access for a certain queue, select the wanted queue or create a new one by clicking the Create queue button. From there, scroll down to configure the following items:
- Restrict access
- Supervisors
Restrict access
You can restrict access to the queue and select specific supervisors and assigned agents with access to conversations in this queue by enabling the Restrict access option. If the option stays disabled, all agents can access the conversations from this queue.
Supervisors
In the Supervisors section, you can choose whether to allow all supervisors or only selected supervisors to access this queue by selecting the appropriate option, based on the prior access restriction setting.
To select specific supervisors for queue access, choose the Select supervisors option, which will open a drop-down menu listing all available supervisors.
Notifications [#notifications-queues]
To set up notifications for the agents on a queue level:
- Go to Conversations → Basic setting → Queues.
- Select an existing queue or create a new one → Notifications.
- You can enable additional notification options that affect sound alerts when:
- New conversation arrives to the queue: Notifications are sent to all live agents assigned to the queue only when a conversation is created and remains unassigned. Trigger will not activate if auto-assignment occurs first.
- New message in a conversation from the queue: New message notifications will be sent to all agents assigned to the queue. If the checkbox is not selected, notifications will be sent only to the agent assigned to the specific conversation.

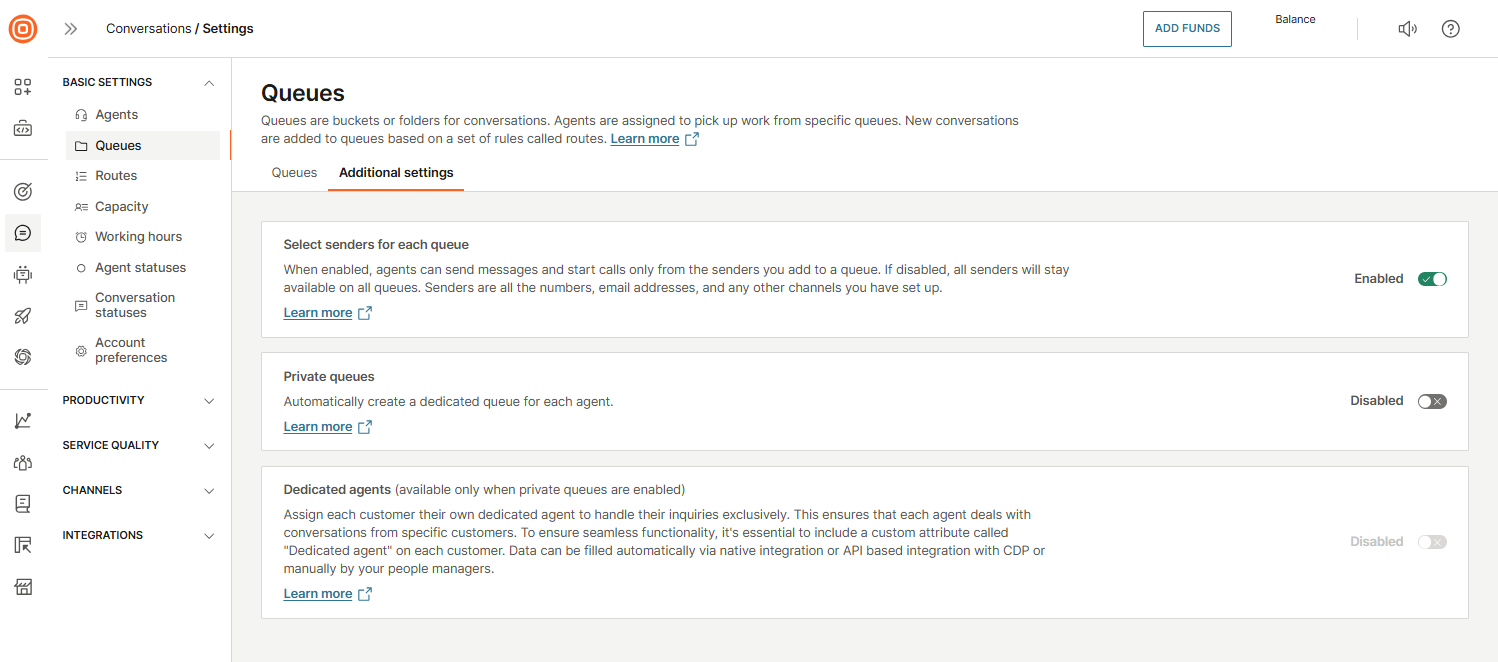
Senders configuration [#senders-configuration-queues]
The Select senders for each queue feature allows you to limit access to specific senders for different departments, helping prevent the misuse of incorrect email addresses or numbers.
This feature is configured at the account level, and once activated, it applies across the entire account.
Its impact can be seen in:
- My Work
- Creating new conversations
To enable it, go to Conversations → Settings → Basic settings → Queues → Additional settings → Select senders for each queue and turn on the toggle to enable the feature.
How it works
When the Select senders for each queue feature is enabled:
- Agents can start conversations only using the default senders assigned to the queues they are part of.
- Messages and calls can only be sent from queues where the agent is assigned, based on the senders added to that queue.
- Senders include all numbers, email addresses, and other channels set up for the account.
This optional setup allows you to define a default sender and a list of available senders for each queue.
If the feature is disabled, all senders remain available for all queues, and agents can access any sender without restrictions.
For queues using the Senders option, each queue can have only one default sender.
Assign senders to a queue
To assign senders to a queue:
- Go to Conversations → Settings → Basic settings → Queues → find the wanted queue or create a new one.
- Find the Assigned senders option.
- Select Add sender.
- In the side menu, find the sender you want to use and select Add.
- Search for the sender by name, number, or channel.
- The first sender you add will automatically become the default sender for that queue.
Manage default and additional senders
To change the default sender, select the currently selected sender in the Assigned senders option. A list of all senders previously added to the queue will appear. Select the one you want to use as the new default.
To add all available senders to a queue at once, click the Add All button. This will add every sender available at that time to the selected queue.
If you want to remove the current default sender, select the Remove button next to it.

Senders in queues and conditions
Once the senders are set up, the queue will appear as a new condition in:
- Routing
- Automation
- Outbound email templates
This condition represents the list of emails assigned to the chosen queue.
For example, in routing, if an email is received by any address specified in Queue 1, the system will match it to the queue and apply the appropriate routing. This allows agents to reference the queue instead of entering multiple individual email addresses.
Any modifications to email addresses, adding or removing, do not require updates to routing, automation, or templates. Changes are applied automatically across all elements where the queue is used.
Private queues [#private-queues-queues]
The Private queues feature automatically creates a dedicated queue for each agent using the default naming format: Agent's full name (username). These queues are private, and only the assigned agent has access, and no other agents can be added.
When enabled, a new private queue is automatically created for every newly added agent. This allows for a consistent and personalized experience for customers, enabling them to interact with the same agent and receive tailored assistance.
How to enable private queues
To enable private queues:
- Go to Conversations → Settings → Basic settings → Queues → Additional settings.
- Turn on the toggle next to Private queues.
After enabling the feature, private queues are grouped in your Infobip account as follows:
- Standard queues
- Private queues
Once a private queue is created, the following settings are applied automatically:
- Auto-assignment is enabled.
- Senders are copied from all queues the assigned agent belongs to.
- Senders configuration can only be edited by supervisors.
- Working hours are not set by default. If configured in general settings, the default working hours apply. Agents or supervisors can edit them manually.
- Notifications are available to both agents and supervisors.
- Agent availability is set to available by default within their private queue.
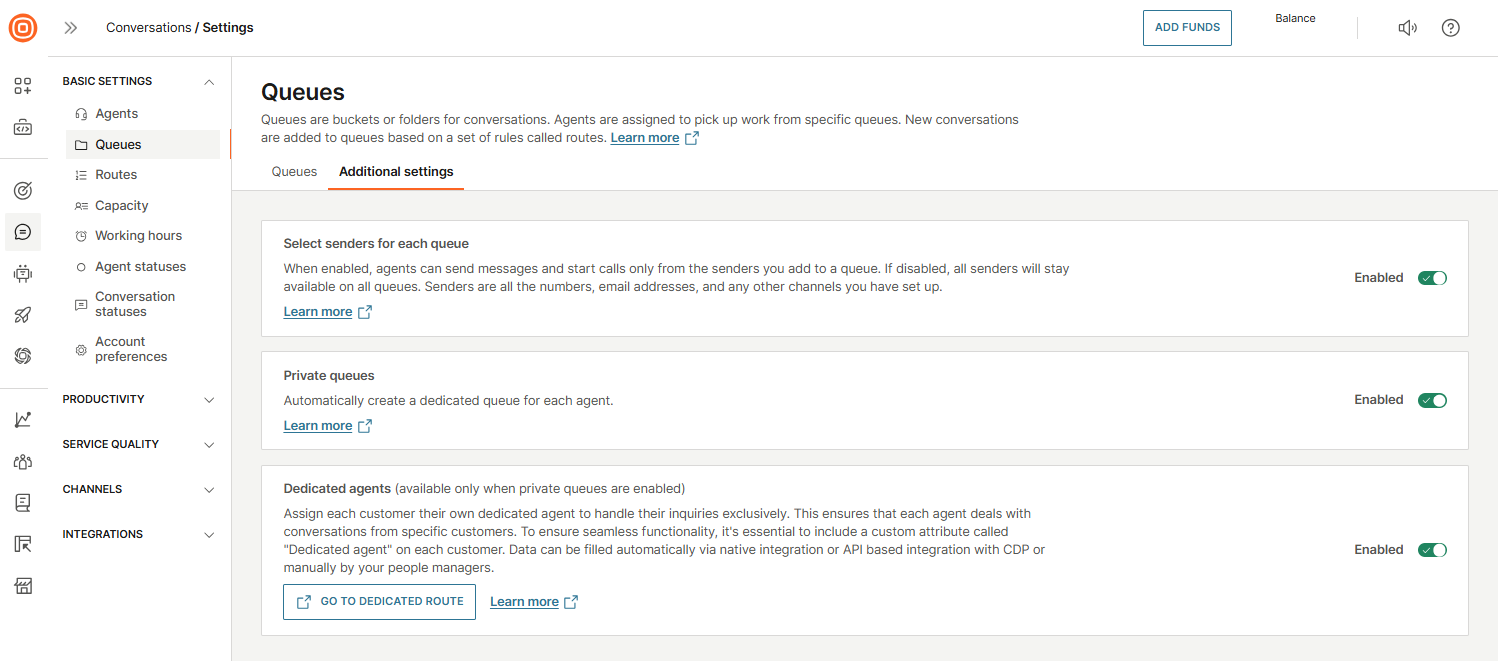
Dedicated agents [#dedicated-agents-queues]
The Dedicated agents feature allows you to assign each customer to a specific agent.
To enable the feature:
- Go to Conversations → Settings → Basic settings → Queues → Additional settings.
- Turn on the toggle next to Dedicated agents.
Once enabled:
- A Dedicated agent custom attribute is automatically created for each customer.
- This attribute must be included for the customer to ensure proper assignment.
- The attribute data can be populated via native integration, API integration with a Customer Data Platform (CDP), or entered manually by supervisors.
- The dedicated agent’s email address must be saved in this attribute and must match the email used for the agent’s account. The correct email can be verified in the agent’s user profile.
The agent associated with the email entered in the attribute will be assigned to that customer.
Private route
Enabling Dedicated agents also creates a private route. The route itself is not editable. You can adjust its position relative to other routes so that other routes can have higher priority.
The route uses the agent’s email address to match customers to their dedicated agent. If the dedicated agent is offline or occupied, auto-assignment will route the customer to the appropriate agent queue and leave the conversation unassigned until the agent becomes available.
Dedicated agent absence management
To maintain service when a dedicated agent is unavailable:
- Go to Conversations → Settings → Basic settings → Agents.
- Find the agent and select Absence plan.
- Use the drop-down menu to select a queue (standard or private) to redirect conversations while the agent is absent.
- All conversations initially routed to the agent’s private queue will be sent to the substitute queue.
- To resume routing to the original private queue, revert the setting to No replacement.
Routes
Routes define how incoming messages are directed to the right queue for agents to handle. They are executed in the order in which they appear on the list. The first route that matches the conditions assigns the message to its queue.
On the Routes page, you can view all existing routes along with key details such as their name, priority, assigned queue, and status.
From here, you can also take actions like editing a route, moving it to the bottom of the list, or sending it to a specific position. You can also rearrange the order of routes by dragging and dropping them according to their priority.

Make sure to order your routes carefully, as their position directly impacts how messages are handled.
Example
Imagine you want to set two routing rules:
- Rule 1: If a message comes to destination number
123and the sender is marked as Spanish-speaking in the Target module, route it to the Spanish queue. - Rule 2: If a message comes to destination number
123and the sender is marked as a premium customer in the Target module, route it to the Premium queue.
Each queue has its own agents:
- Spanish queue - Ten junior agents who can read and write Spanish but do not handle premium customers.
- Premium queue - Three senior agents who speak both Spanish and English and specialize in premium customers.
In this case, you want premium customers to always go to the Premium queue, even if they are Spanish-speaking. To achieve this, set the Premium route as priority 1, and the Spanish route as priority 2.
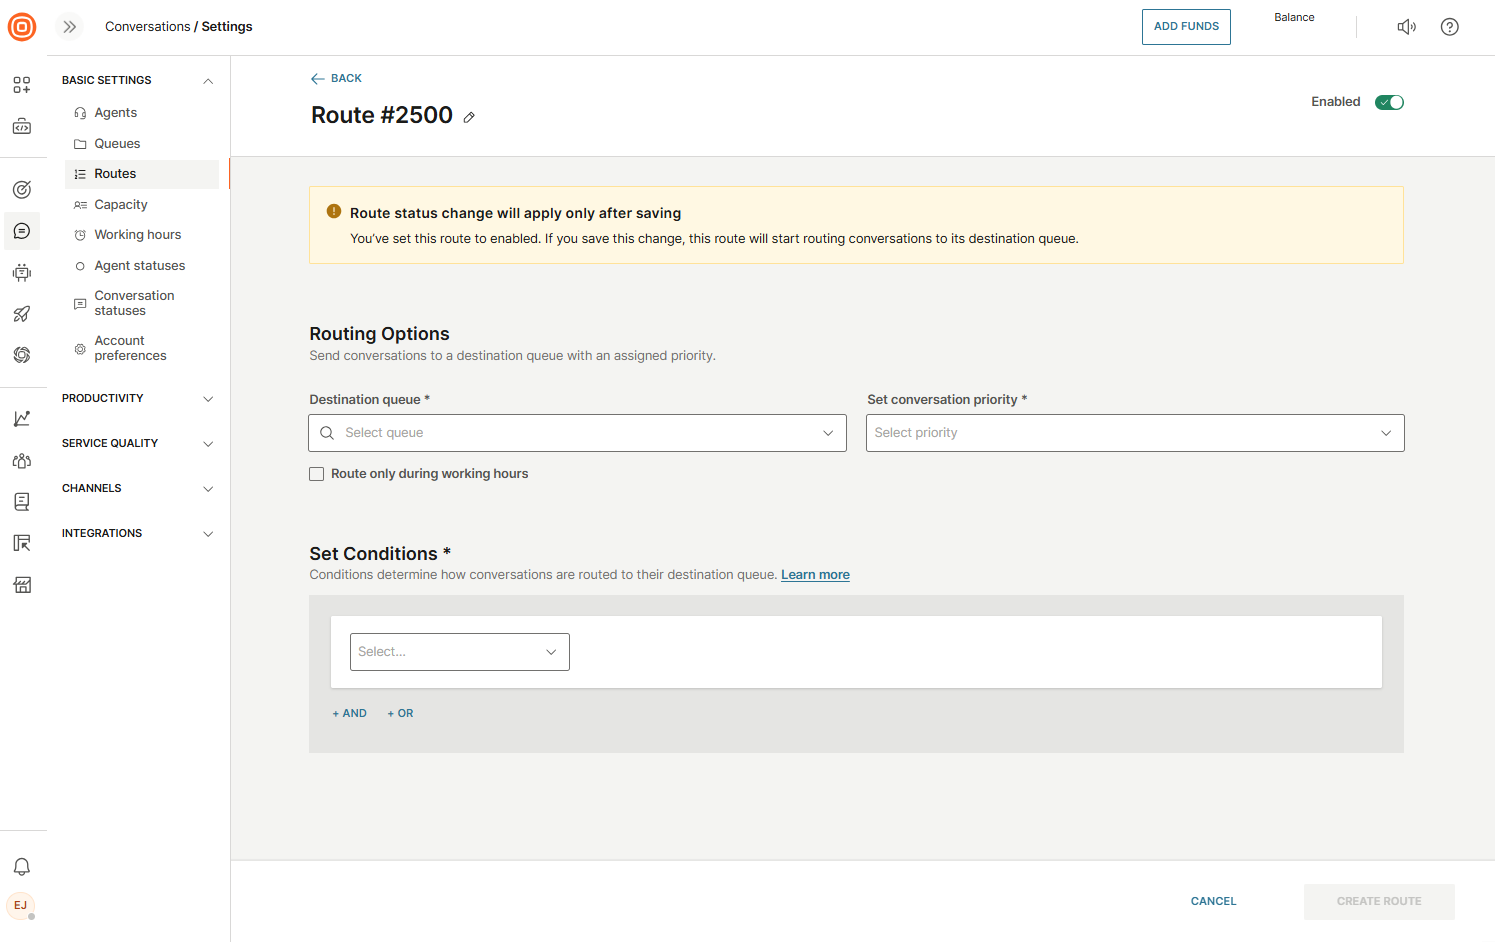
Create a route [#create-a-route-routes]
To create a route over the web interface, log in to your account, and go to Conversations → Basic settings → Routes → Create route.
From there, you can set up the following route details:
- Name
- Destination queue - When a new message arrives, the system checks if the message parameters match any of the rules defined in your routes. If a rule matches, the conversation is assigned to the destination queue specified in that route.
- Conversation priority - Each route can also define a priority. When a conversation matches a route, it receives the priority set in that rule. This determines how it appears in the All Conversations list. You can always change the priority manually from the conversation details page if needed.
- Set conditions - Conditions are the criteria checked for every incoming conversation. Based on these conditions, the system decides which queue the conversation will be assigned to.
- All created routes can be enabled or disabled based on your needs. When a route is disabled, incoming messages are not checked against its conditions, and the route will not be applied.
- Additionally, you need to set up routing rules. The rules are customizable and can refer to, for example:
- Message attributes such as channel, sender, receiver, or message content
- Customer attributes that you specified in People (for example, name, city, purchase power, and more)
- Conversation tags assigned manually or through automated flow
- IVR inputs collected to a variable through automated flow
- Custom data from web and in-app calls and video
- When you provide the necessary details, select Create route.
Route parameters [#route-parameters-routes]
In the table below you can find the parameters you can use to set up routes.
| Category | Existing attributes | Operators | Values |
|---|---|---|---|
| Conversation attributes | channel | is is not | Select channel |
| Content | is is not contains starts with | Free input | |
| Conversation Tags | in list not in list | Tags dropdown (you can select only one) | |
| from | is is not contains starts with | Free input | |
| is visitor | is is not | TrueFalse | |
| to | is is not | Sender dropdown | |
| Standard person attributes | address | is is not contains starts with | Free input |
| birthDate | is is not before after before or on after or on | Date picker | |
| city | is is not contains starts with | Free input | |
| country | is is not contains starts with | Free input | |
| customer tags | contains does not contain | Free input | |
| externalPersonId | is is not contains starts with | Free input | |
| firstName | is is not contains starts with | Free input | |
| gender | is is not | Male Female | |
| integrations | is is not contains starts with | Free input | |
| lastName | is is not contains starts with | Free input | |
| middleName | is is not contains starts with | Free input | |
| modifiedFrom | is is not contains starts with | Free input | |
| nickName | is is not contains starts with | Free input | |
| preferredService | is is not contains starts with | Free input | |
| type | is is not contains starts with | Free input | |
| Custom person attributes | N/A | ||
| Standard company attributes | accountManager | is is not contains starts with | Free input |
| country | is is not contains starts with | Free input | |
| customerStage | is is not contains starts with | Free input | |
| domains | contains does not contain | Free input | |
| externalId | is is not contains starts with | Free input | |
| industry | is is not contains starts with | Free input | |
| name | is is not contains starts with | Free input | |
| notes | is is not contains starts with | Free input | |
| segment | is is not contains starts with | Free input | |
| tags | is is not contains starts with | Free input | |
| vatNumber | is is not contains starts with | Free input | |
| Custom company attributes | N/A | ||
| (Channel specific) Apple Messages for Business attributes | device agent | is is not contains starts with | Free input |
| group | is is not contains starts with | Free input | |
| intent | is is not contains starts with | Free input | |
| locale | is is not contains starts with | Free input | |
| (Channel specific) Email attributes | Email CC | contains does not contain | Free input |
| Email BCC | contains does not contain | Free input | |
| Email To | in list not in list | Sender drop-down | |
| Email From | is is not contains starts with | Free input | |
| Email routed to recipient | is is not | Sender drop-down | |
| Email Subject | is is not contains does not contain starts with | Sender drop-down | |
| Custom attributes | N/A | ||
| Sender Queues | N/A | in list not in list | Queues drop-down |
Routing for Live Chat [#routing-for-live-chat-routes]
This section explains what can be configured for Live Chat in routing to assign specific requests to certain queues.
To configure routing for Live Chat, go to Conversations → Settings → Basic settings → Routes → Create route.
Available fields that you need to set are as follows:
- To - Destination to which inbound conversation messages are sent. This field accepts
widgetIDfor Live Chat routing. Widget ID can be taken from the widget edit page and is unique for each widget configuration. - Channel - Defines if all inbound conversations from the specific channel shall be sent to a certain queue. For Live Chat applicable value is
Live_Chat. - Person attributes - All Person attributes are applicable for Routing, however only if the session is coming from an authenticated (logged in) customer and if we have a Person associated with a key identity (email address, in this case).
- Authenticated customer/anonymous visitor - Can be used to differentiate which customer support queue should take on the on auth. customer or visitors. The parameter
is Visitordefines if the inbound conversation comes from an anonymous visitor. If set tofalse, then it’s treated as inbound conversation from auth. customer.
Language-based routing
To enable language-based routing, you need to configure a custom routing attribute named currentLanguage. Set its value to one of the supported language codes (for example, pt-BR) to ensure the conversation is routed accordingly.
Here’s how to set it up:
- Go to Conversations → Settings → General setup → Routes.
- Either find an existing route or click Create Route.
- Under Set Conditions, choose the
currentLanguageattribute. - Set the condition to
isand enter the desired language code (for example,pt-BR).
Once this is set, the system can route conversations based on the language value you have provided.

Learn more about setting the language in Live Chat.
Capacity
Capacity is the maximum number of defined opened conversations for an agent by channel.
The default capacity for agents varies based on the communication channel:
- Live Messaging: 10 concurrent conversations
- Email: 5 concurrent conversations
- Live Chat: 3 concurrent conversations
These limits apply either as the default for all agents or as the system-wide capacity setting.
For voice calls, the capacity is always one since one agent can talk to only one person at any given time. This default value cannot be changed on the system or agent level.
Calls only occupy capacity during their duration. If a call has ended but an agent still has a conversation assigned to them, it does not count towards the agent's active call capacity.
The default capacity defines the maximum number of concurrent conversations that can be assigned to an agent via automatic assignment.
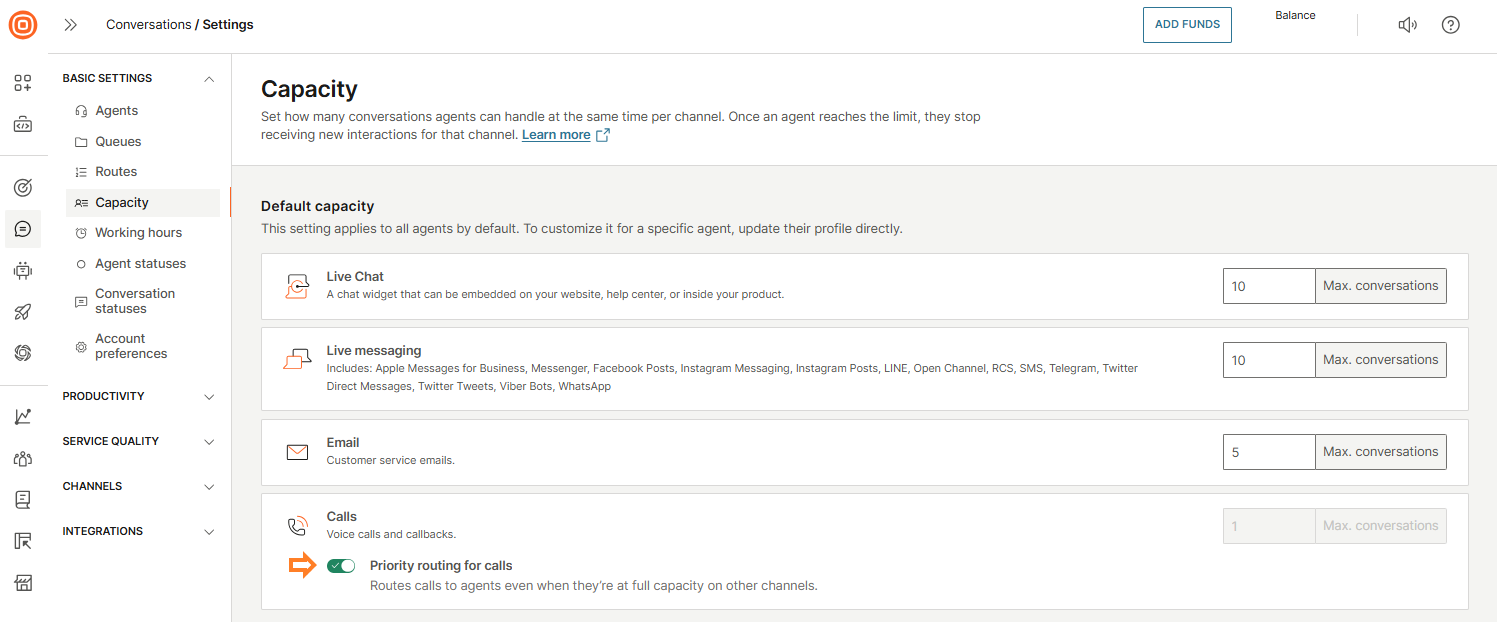
Default capacity [#default-capacity-capacity]
- Go to Conversations → Settings → Basic settings → Capacity.
- Specify the default capacity for all agents.
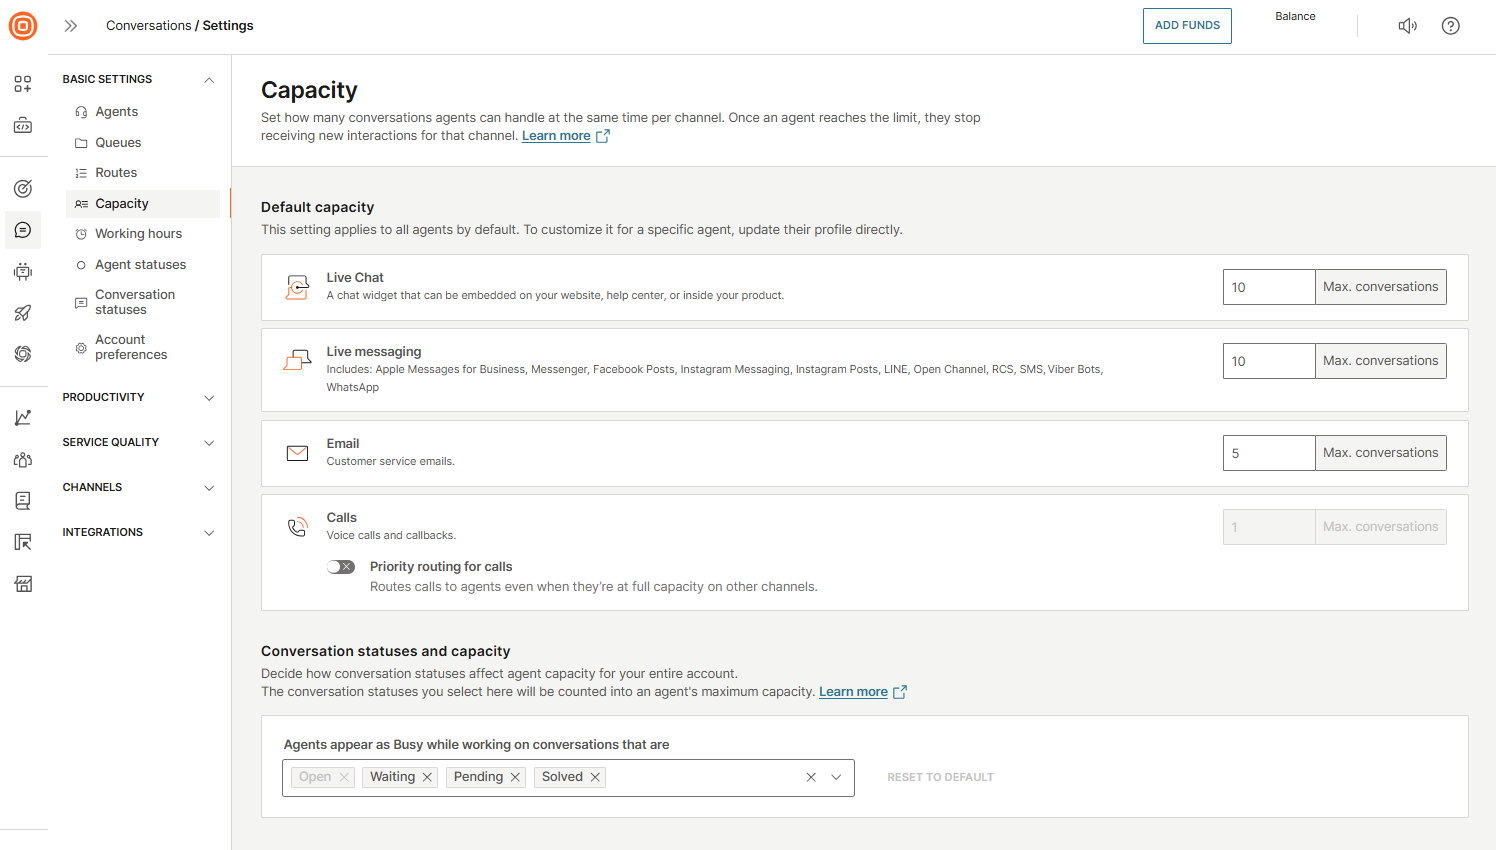
Conversation statuses and capacity [#conversation-statuses-and-capacity-capacity]
In the Conversations statuses and capacity section, you can select which conversation statuses should count toward an agent’s maximum capacity.
- Open status is always counted by default and cannot be removed.
- Solved and Waiting statuses can be excluded. If excluded, conversations in these statuses do not count toward an agent’s capacity or workload.
Example
If an agent has 10 email conversations assigned, 3 in Solved status and 7 in Open status, only the 7 open conversations will count toward the agent’s workload.
You can use the Reset to default button on the far right to restore the default configuration.
These settings ensure that:
- Agent capacity is calculated correctly.
- Agents can continue to receive new conversations without issues caused by excluded or miscounted statuses.
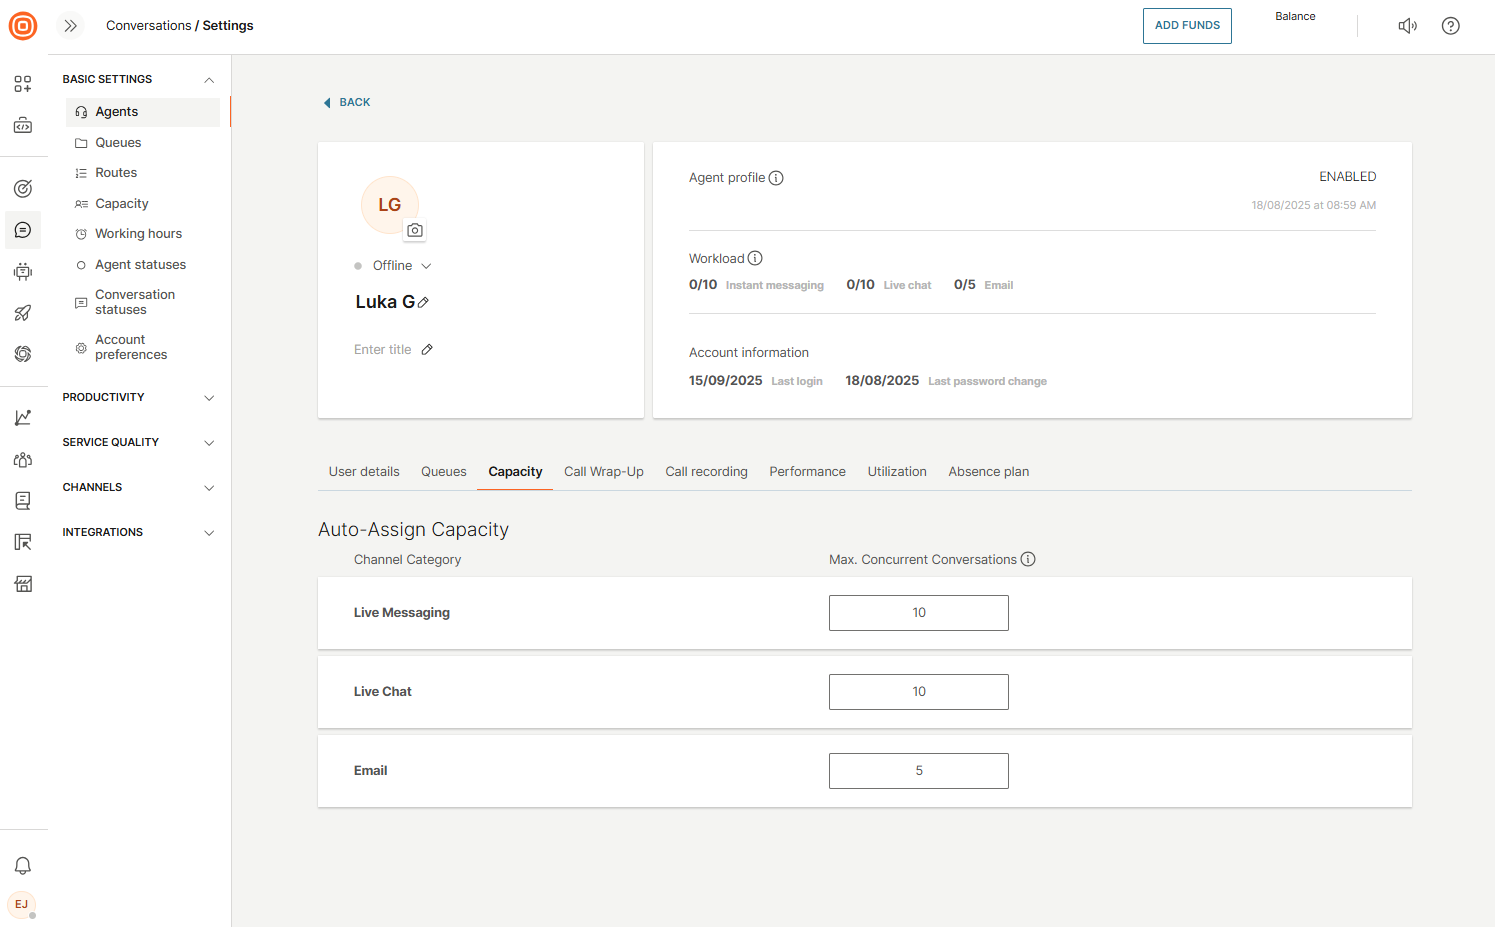
Agent capacity [#agent-capacity-capacity]
To set an individual agent’s capacity:
- Go to Conversations → Settings → Basic settings → Agents.
- Select the agent you want to edit.
- Go to the Capacity section and define the maximum number of concurrent conversations for that agent.
Call capacity override [#call-capacity-override-capacity]
The call capacity override feature allows incoming calls to bypass current capacity limits, ensuring that high-priority calls are always routed to available agents. This prevents calls from being blocked when agents are busy with non-call tasks, improving response times and overall service levels.
To enable this feature:
- Go to Conversations → Settings → Basic settings → Capacity.
- Under Default capacity, locate Calls.
- Enable the Priority routing for calls option.
When enabled, calls will be routed even if all agents are fully occupied, ensuring no important call is missed.
How it works
When you enable this option, this is how it works:
- A new call arrives while all agents are occupied.
- The system searches for an available agent. If none are free, it proceeds to the next step.
- The system identifies an agent using rotation logic, selecting someone at full capacity but not currently on a call.
- The call is assigned to the selected agent.
- The agent answers the call.
Eligible agent statuses
When call capacity override is enabled, an agent is considered available for calls in the following statuses:
- Busy
- Full capacity
- Full capacity (mobile)
- Any custom Busy status
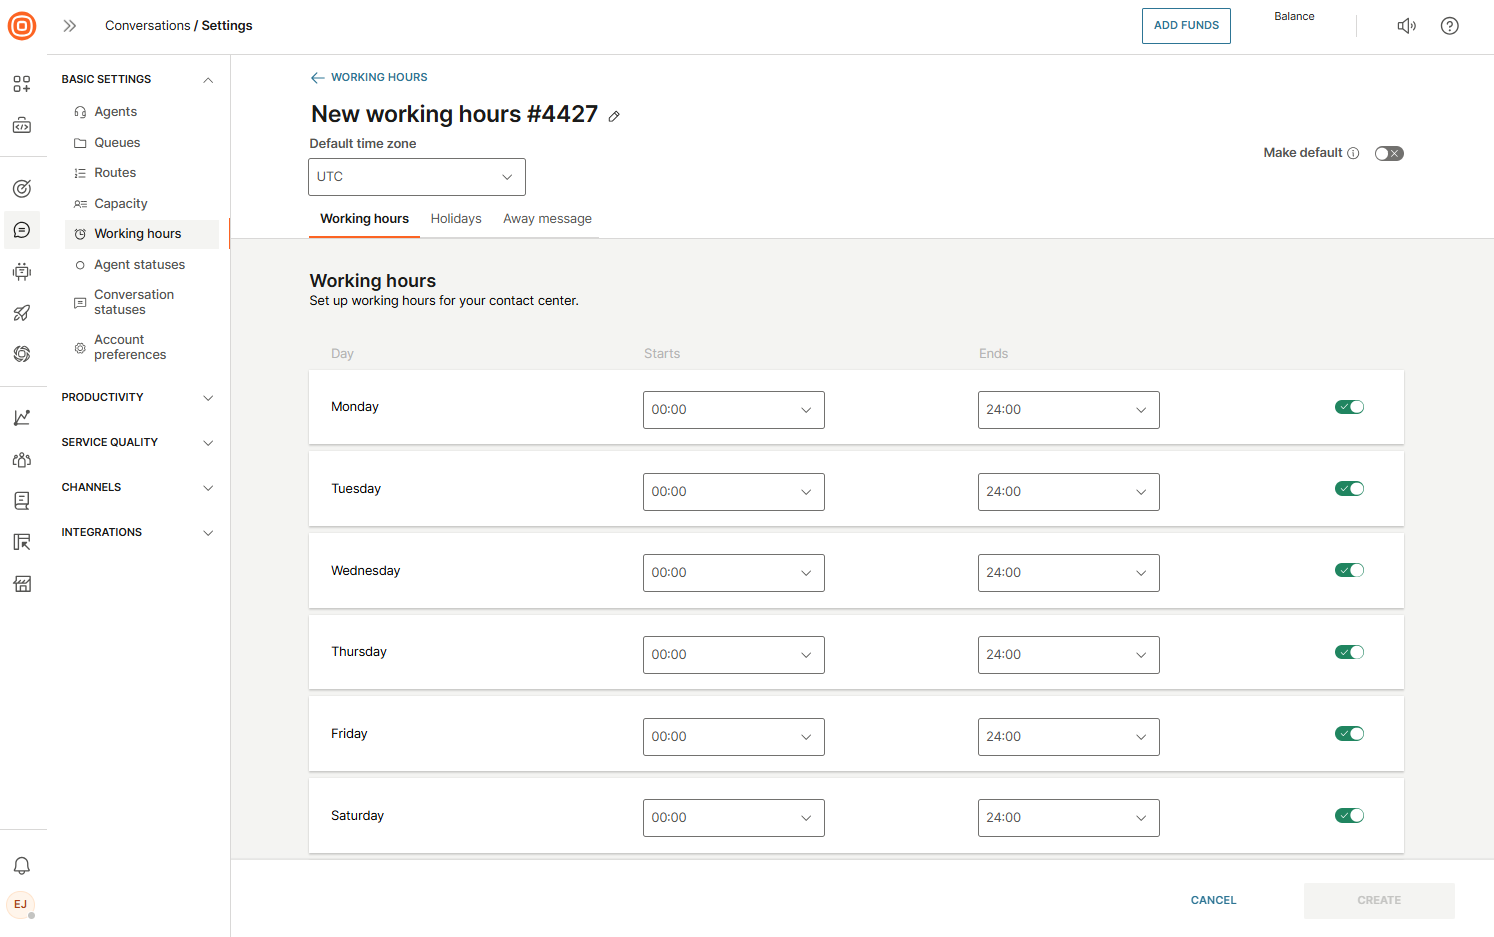
Working hours
You can define working hours for your contact center for each day of the week. Holidays can also be marked as non-working days by specifying exact dates, so you do not need to repeat settings for recurring holidays.
Go to Conversations → Settings → Basic settings → Working hours to configure the following:
- Default time zone - applies to both holidays and regular working hours.
- Working hours - set start and end times for each day.
- Holidays - mark specific dates as non-working days.
- Away message - configure messages that are sent when the contact center is closed or agents are unavailable.
Working hour periods per queue [#working-hour-period-per-queue-working-hours]
You can assign a working hour period to each queue, which is particularly useful for companies operating in different time zones or markets.
- One working hour period can be set as the default, so all newly created queues automatically use this period without additional configuration.
- Changing the default working hour period does not affect previously created queues; they will retain their original settings.
- Agents and supervisors can view all conversations and messages created outside working hours to follow up with customers.
Non-working days
Days that are switched off in the working hours setup are considered non-working days. For example, if Saturday and Sunday are disabled, all conversations started on these days will trigger the Away message.
Auto-reply outside working hours
When a customer sends a message outside working hours, they will automatically receive an auto-reply on the same channel they used to contact you.
You can define holidays for your team - days when they will not be available to interact with customers.
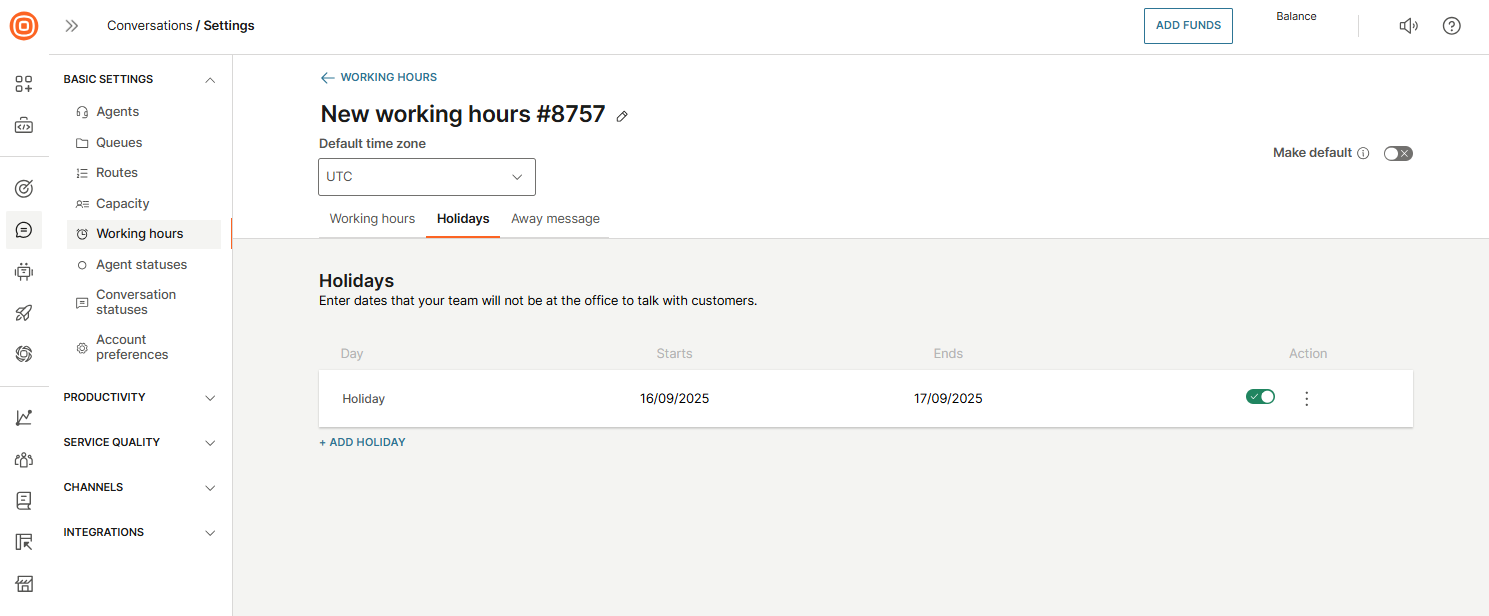
Holidays
In the Holidays tab, you can define holidays when your team will not be available to interact with customers.
A holiday is defined by selecting a start date (00:00 on the start day) and an end date (24:00 on the end day). The end date is inclusive, meaning it is also counted as a holiday.
Example
- One-day holiday: Start and end dates are the same.
- Multiple-day holiday: Start date is the first day of the holiday, and end date is the last day.
This ensures that conversations received during holidays are handled according to your configured Away message or queue rules.
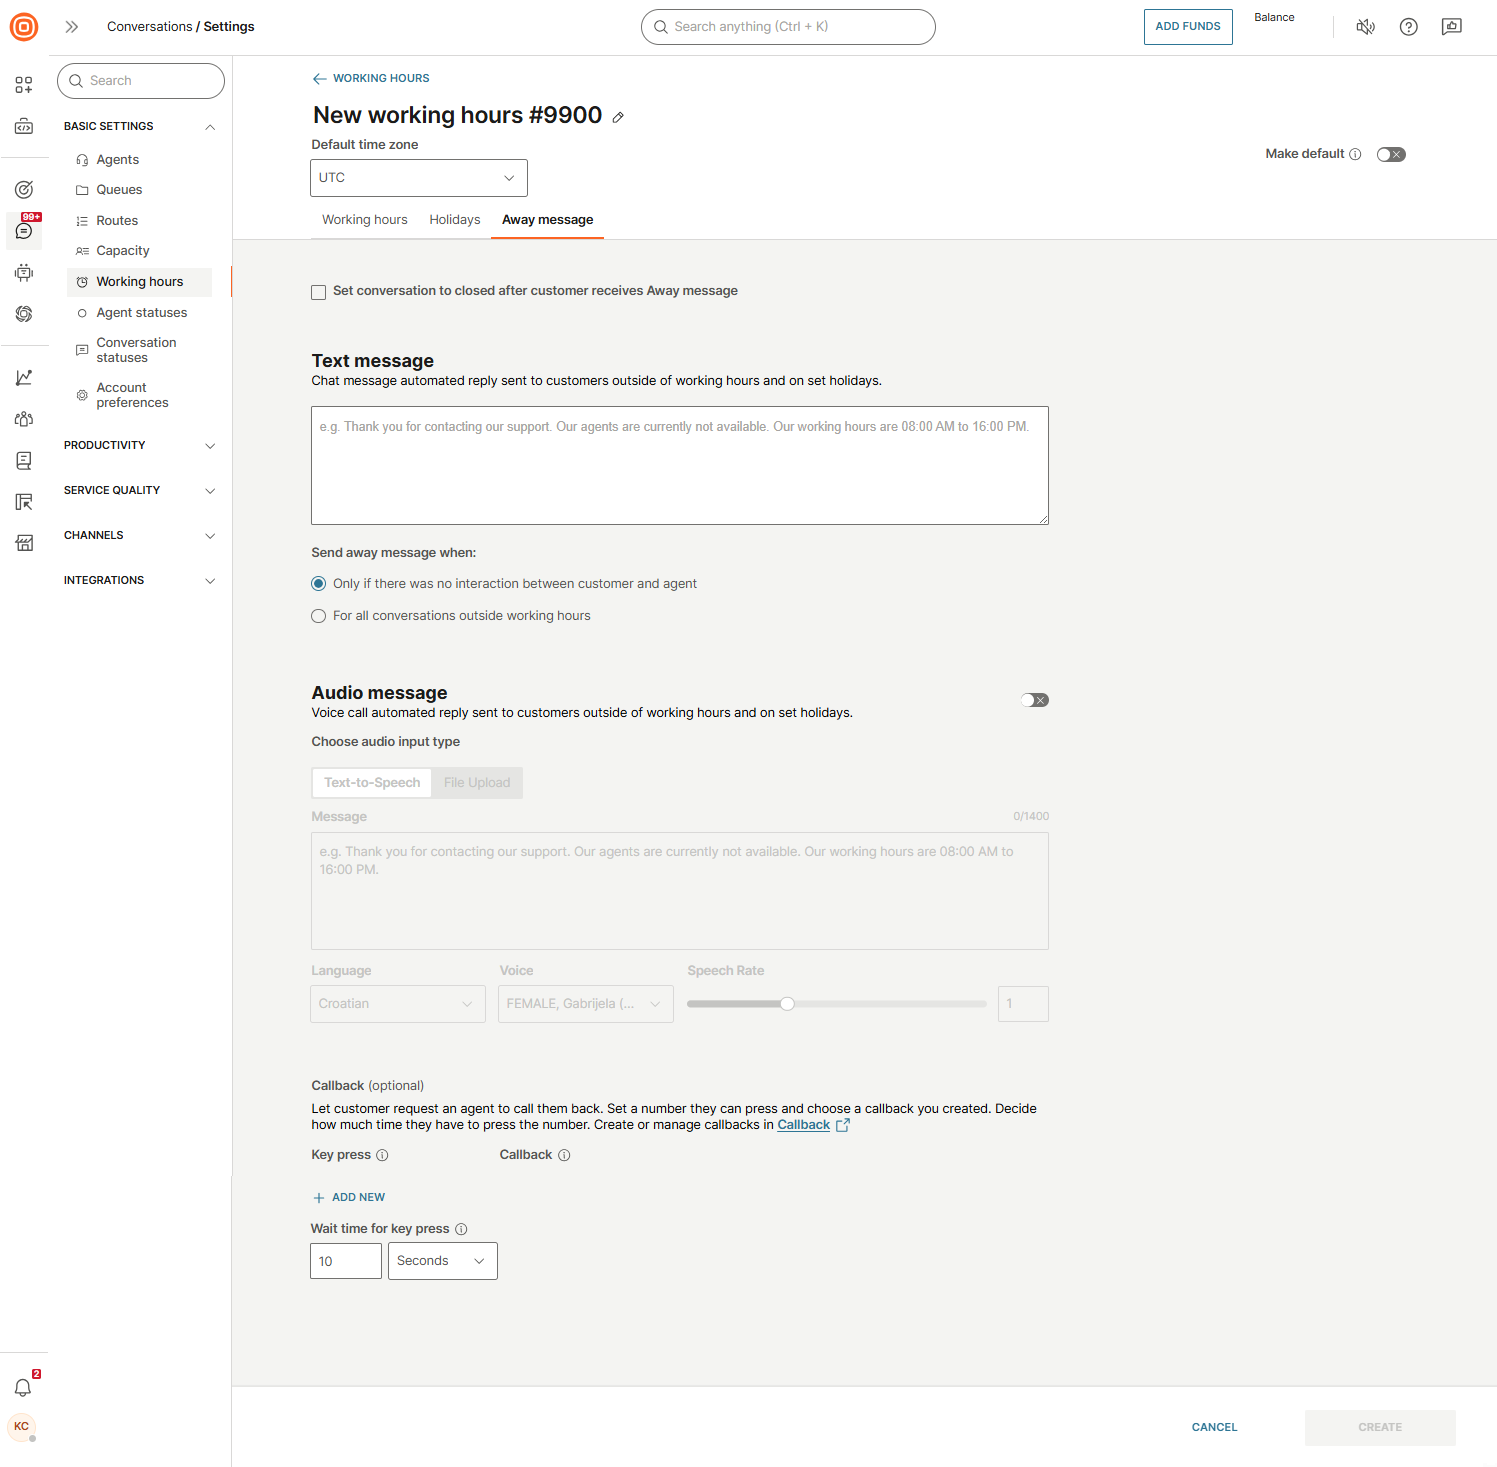
Away message
The Away message option allows you to set up automated messages for each queue to notify customers when they contact your support center outside of working hours or during holidays.
Key features
- Message types: Configure both text and audio messages.
- Single auto-reply: Only one Away message is sent per out-of-hours or holiday period, ensuring customers receive a single notification.
- Automatic conversation closure: If you enable the Set conversation to Closed after customer receives Away message option, the conversation will be automatically closed after sending the message.
Text message
Use the text message box to write the automated reply. You can choose when the Away message should be sent:
- Only if there was no interaction between customer and agent
- For all conversations outside working hours
Audio message
You can also configure an audio message as an automated reply and set up callbacks with their associated details.
Here, you can set up the desired audio messages, choose the language, voice, and speech rate.
This ensures customers are informed promptly when your support center is unavailable, while maintaining consistent communication standards.
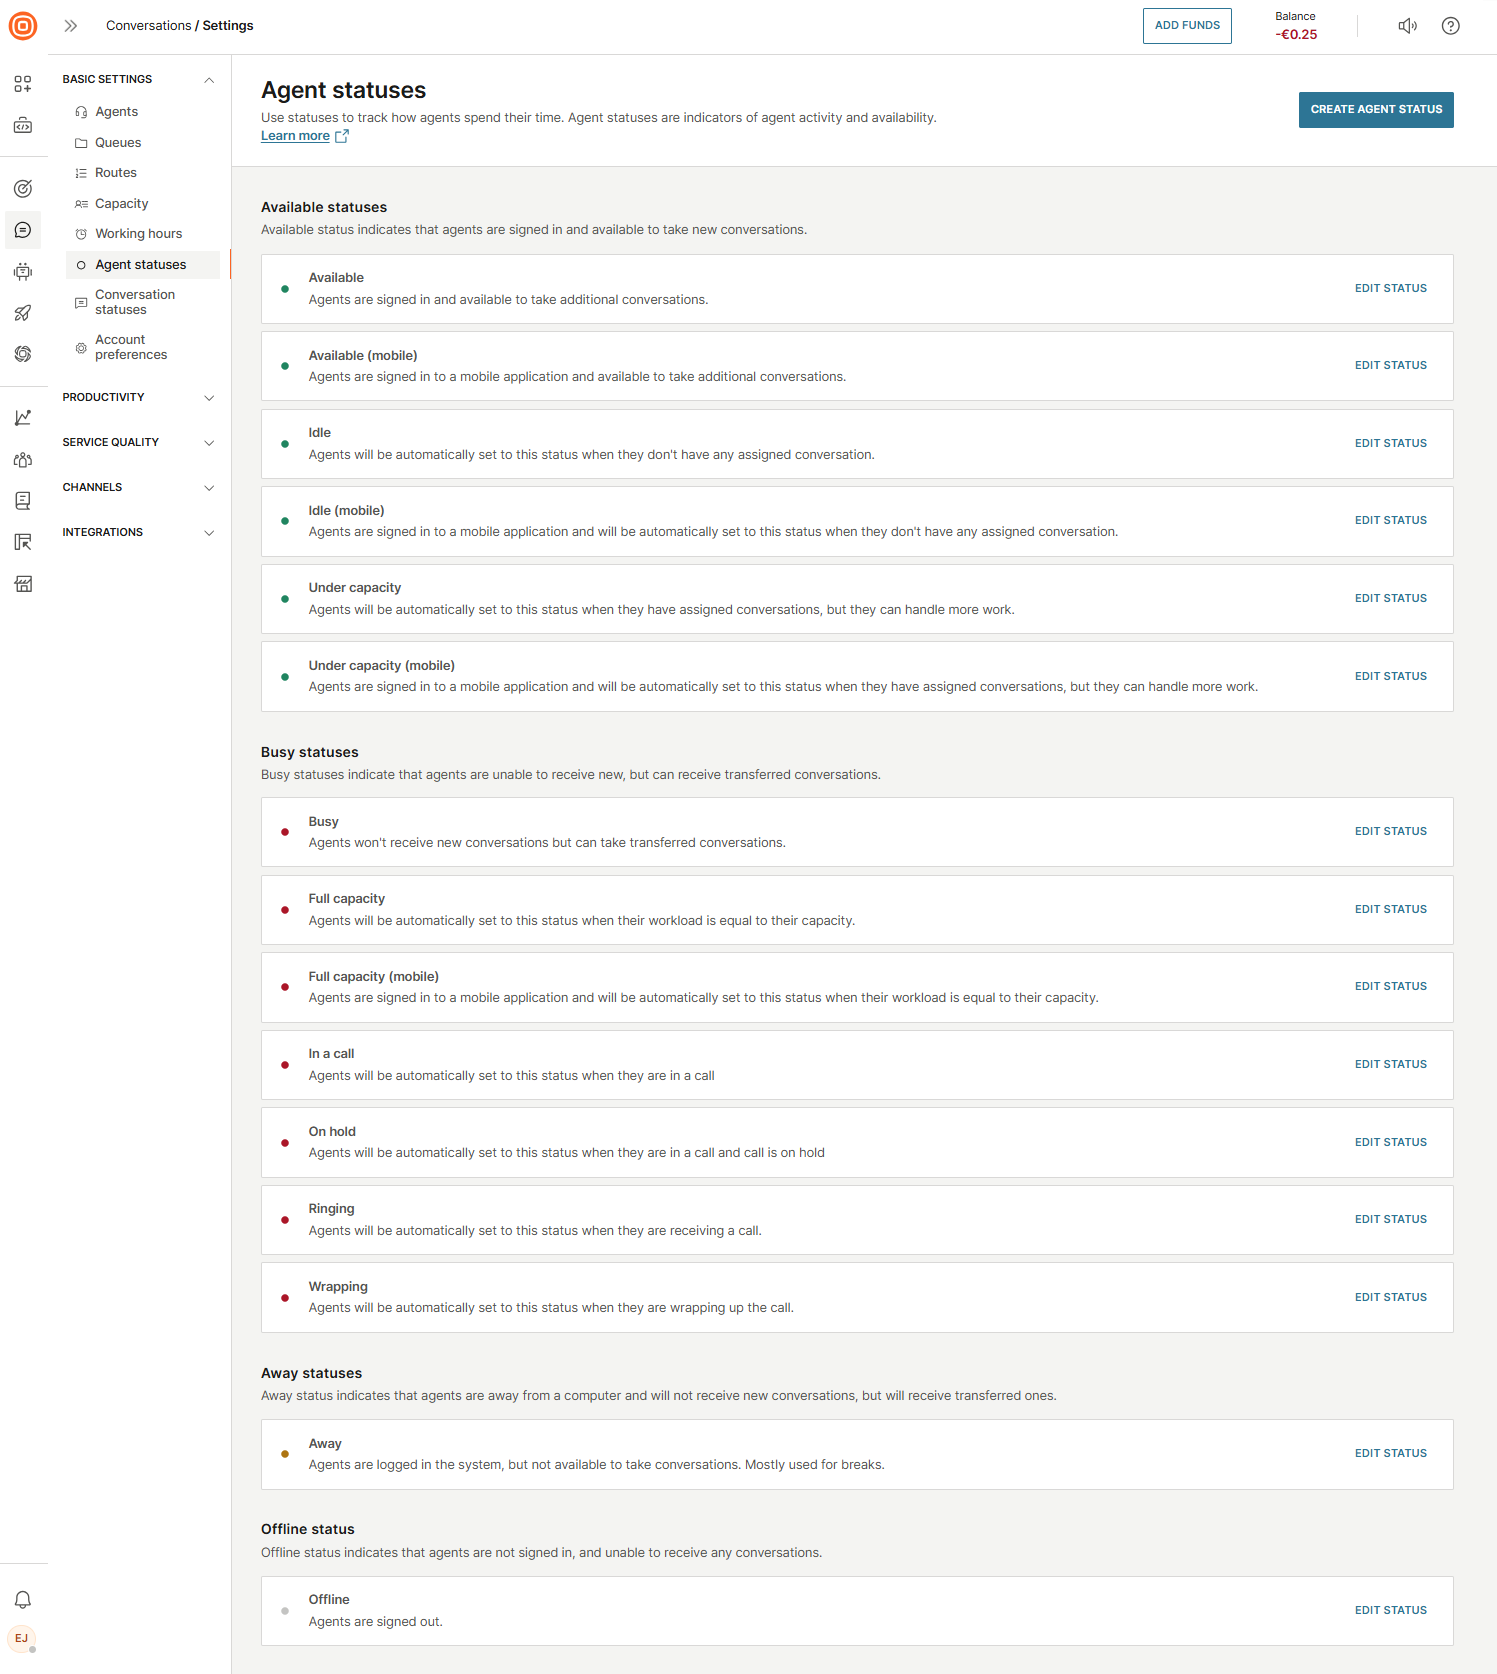
Agent statuses
Agents communicate their availability by setting their status in the system, which can be changed manually or automatically.
There are two types of statuses:
- Standard statuses - Predefined statuses that are available by default.
- Custom statuses - Allow you to create new statuses for your agents to fit your business needs.
Additionally, there are four groups of statuses:
- Available - Agents are ready to receive new conversations.
- Busy - Agents are currently handling conversations and cannot take new ones.
- Away - Agents are not at their computer and will not receive new conversations but can receive transferred ones.
- Offline - Agents are not signed in and cannot receive any conversations.
Configuring and being aware of agents' statuses enables supervisors to better track how agents spend their time and gain insights into how to better utilize their agents.
An agent’s status is also connected to auto-assignment, as only agents in any status from the Available group are eligible for receiving new conversations.
When an agent logs in and sets their status to Available, the system considers their workload and capacity to update their status to one of the automatic options (such as Idle or Under capacity), all of which are treated as available.
Learn more about how statuses impact the agent experience.
To see and edit all available agent statuses, go to Conversations → Settings → Basic settings → Agent statuses.
Full capacity status
If the agent’s current workload is 90% (or higher) of their maximum capacity, they will automatically be transferred to the Full capacity status.
The Full Capacity status considers three categories:
An agent reaches full capacity when the combined percentage across these categories reaches 90 or higher. For example:
Live Messaging 2 Occupancy / 6 Capacity + Live Chat 1 Occupancy / 5 Capacity + Email 3 Occupancy / 10 Capacity = 33% Live Messaging + 20% Live Chat + 30% Email = 83% - the agent has not reached the full capacity yet.
However, if an agent receives, for example, an additional email on top of their current workload, resulting in percentages of 33% Live Messaging, 20% Live Chat, and 40% Email (totaling 93%), the agent will automatically switch to the full capacity status.
When their current workload drops below their maximum capacity, they will be back in the Under capacity status.
Agent's activity
Another important mechanism is the agent’s activity within the system. The system tracks whether agents are really in the status they set themselves in.
Example
If an agent sets themselves as Available but the system notices there is no activity in the browser (or the browser is closed), the system will automatically log them out to prevent further conversations assigned to them and inaccurate time tracking on Agent’s Utilization.
Voice and Video channel statuses
For the Voice and Video channel, there is additional logic involved. To receive, accept, and have a conversation and later wrap it up, agents will undergo several statuses:
- Ringing - Call is not yet connected to the agent but they are prompted with the ringing dialog.
- In a call - When the agent accepts the call.
- Wrapping - After the completed call, the agent has additional time to write important notes or conclude the call if there was a resolution with the customer. In this status, the call does not count the agent's capacity, allowing the agent to receive another call or engage in other conversations. In this status, the agent is considered as still busy and will not receive any new calls or conversations.
- On hold - When an agent puts a call on hold.
In all these statuses, the agent is considered busy and will not receive new calls or conversations automatically.
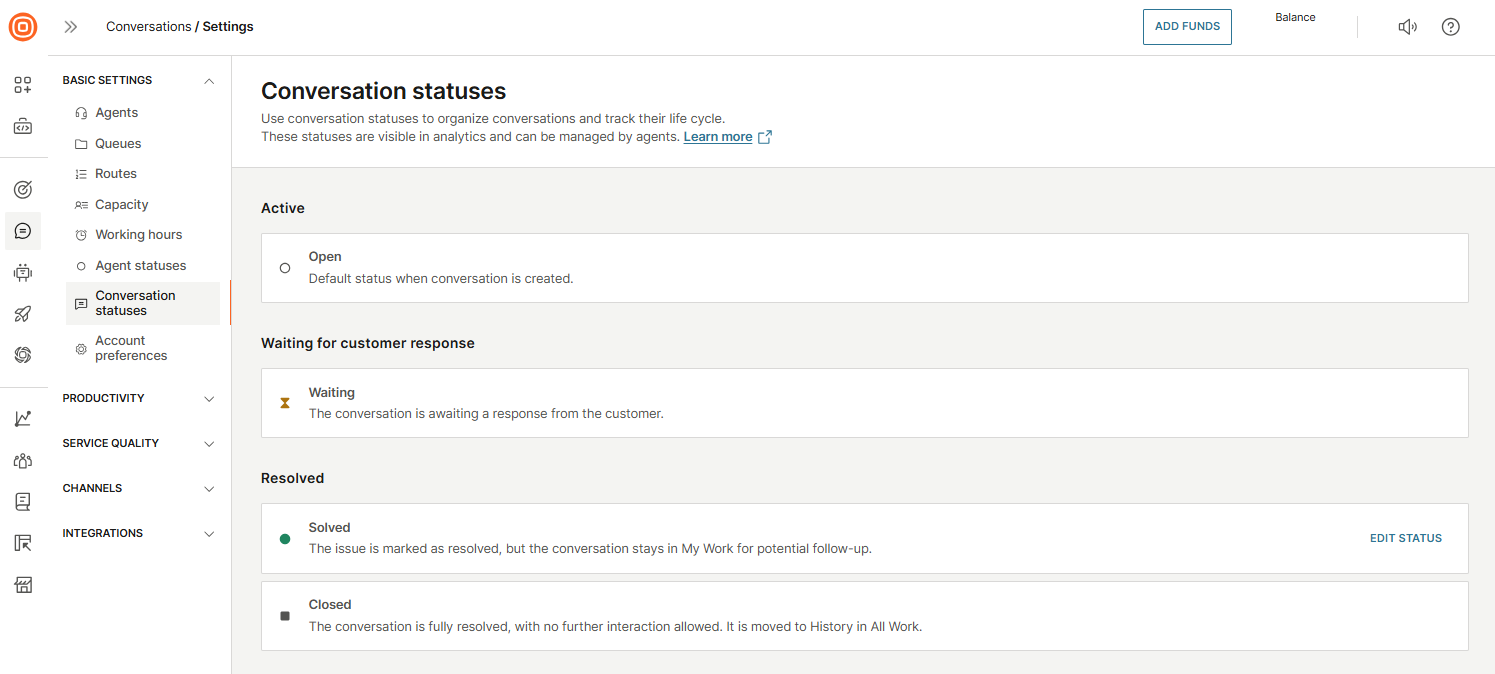
Conversation statuses
Configure conversation statuses by navigating to Conversations → Settings → Basic setup → Conversation statuses.
Statuses can be used to organize conversations and track their life cycle. Agents can manage these conversation statuses, which are also visible in analytics.
There are three status categories:
- Active:
- Open - Default status when a conversation is created.
- Waiting for customer response:
- Waiting - The conversation is awaiting a response from the customer.
- Resolved:
- Solved - The issue is marked as resolved, but the conversation stays in My Work for potential follow-up.
- Closed - The issue is fully resolved, with no further interaction allowed, and moved to History in All Work.
The Open, Waiting, and Closed statuses are present by default and cannot be modified or configured.
However, the Solved status can be configured to suit your needs.
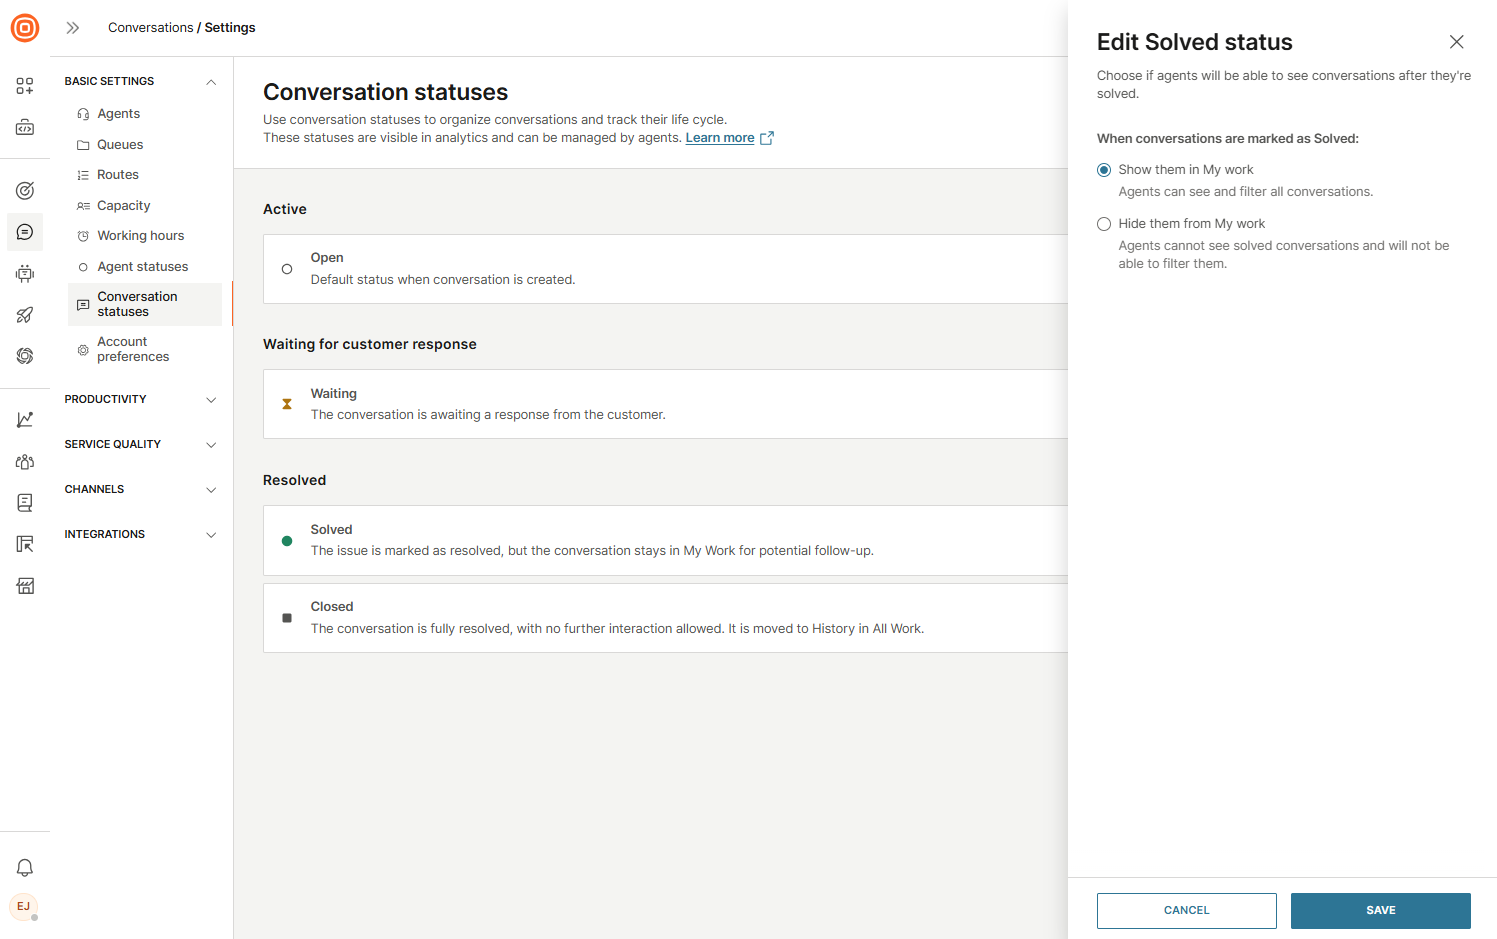
Edit Solved status
To configure the Solved status behavior:
- Select the Edit status button.
- In the side panel, you can set options for handling solved conversations.
- You can configure the following option:
- When conversations are marked as Solved:
- Show them in My Work - Agents can see and filter all conversations.
- Hide them from My Work - Agents cannot see solved conversations and will not be able to filter them.
- When conversations are marked as Solved:
With this option, you can choose whether solved conversations are shown or hidden in My Work.
After configuring the status, a notification will appear in the lower-left corner. If you enable the option to hide conversations marked as solved, the Solved status will be labeled as "Hidden".
Account preferences
In the Account preferences section, you can configure the Short conversation ID.
Refer to the section below to learn more.
Short conversation ID
Short conversation IDs are concise and easy-to-use identifiers that provide a simple way to identify and share conversations with customers. These IDs enable both customers and agents to quickly refer back to specific conversations and issues.
Turn on the toggle next to the Short conversation ID feature to enable it.

Once you turn it on, the Short ID will appear in:
- My Work
- All Work
- Reports
- Outbound email templates (new variable in Conversation attributes)
The Short ID is set as an incrementally growing number and it replaces the Conversation ID in My Work, which is moved to the conversation context card.