Manage conversations
This guide covers how to create new conversations, manage conversation attributes, organize related conversations, and handle internal communications between agents.
Create new conversation
Agents frequently find it necessary to initiate contact with customers rather than waiting for customers to initiate contact with them.
To begin a new conversation within the My Work panel:
- Select the + button to create a new chat.
- After you click the + button and select, for example, the Email channel, you need to specify the following:
- From which channel and sender message will be sent
- To whom the message will be sent (name of the customer who must exist in People or contact address like MSISDN)
- Once you enter a valid customer contact, it will automatically populate the field
- Channel and contact address in case the recipient has more than one contact associated with their profile
- Option to add CC and BCC. You can add up to 1000 recipients in total across the To, CC, and BCC fields.
- Form for the conversation
- Tags
- Priority of the conversation
- Status of the conversation
- Queue
- Agent assigned to the conversation
- Subject
- Content of the message
- The Status, Priority, and Form items are optional, and if you do not specify anything, the default Status is open, and the Priority is normal.
- Besides this, you can choose a macro to automate the steps and pre-populate the data by clicking the respective button.

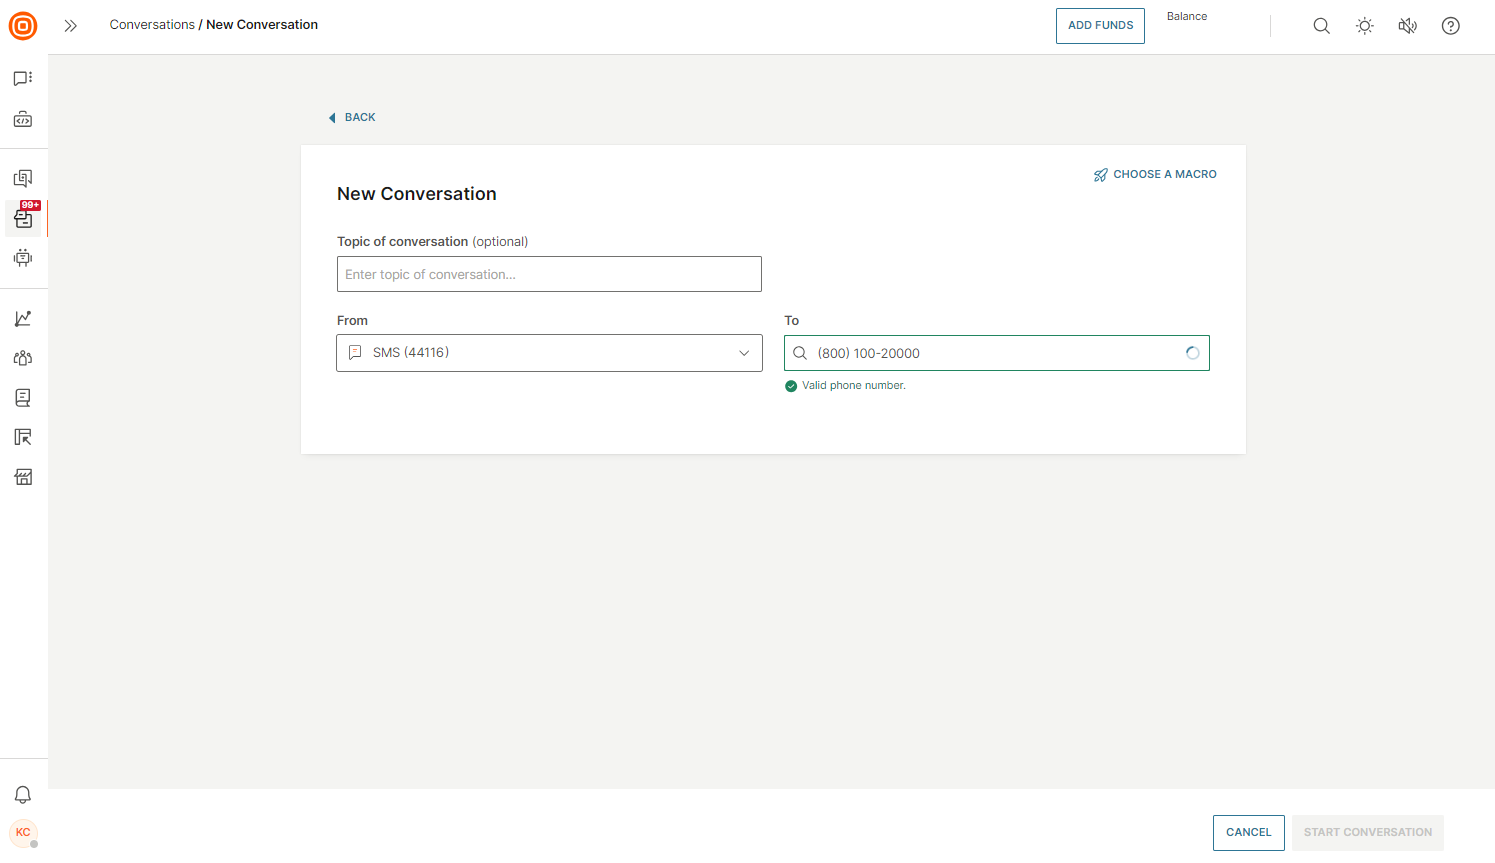
Phone number validation [#phone-number-validation-create-new-conversation]
When opting for a channel that requires manual entry of the customer phone number, the system performs real-time validation to verify the accuracy of the number and prevent any potential errors.
When creating a new conversation:
- You can copy and paste the phone number into the dedicated field, or enter it manually.
- The system will then automatically eliminate any unnecessary characters such as dots, dashes, or brackets.
Example: the following number formats - (800) 100-20000, 800-100-20000, 80010020000, (800)-100-20000 should all resolve to 80010020000 when attempting to search for the number which results in finding the same customer.
- If an error occurs, a notification will appear next to the input field.
- Once done, click the Start a Conversation button to either create a new conversation or continue the thread within an already ongoing conversation.
Threading prevention [#threading-prevention-create-new-conversation]
The system automatically validates if there are any ongoing conversations between the sender and the recipient. If there is, then the system does not allow the agent to create a new conversation and thus prevents multiple parallel conversations and enforces correct threading of messages.
These are the scenarios you can encounter:
- No existing conversations - you can create a new conversation.
- Pre-existing conversations assigned to the logged in agent or unassigned- you are prompted to view the conversation and continue the communication with the customer if it is relevant to the ongoing topic.
- Pre-existing conversations assigned to another agent - You are notified that a new message cannot be sent, nor a conversation can be started with this customer as another agent is already exchanging messages with the same customer. The user can contact the other agent and agree on the next course of action: conversation transfer, another agent sends the new message to the customer, or a new message is sent only after an ongoing conversation is finished depending on the topic and the content to be exchanged.
If the manual conversation assignment is enabled, you cannot take a conversation that is already assigned to another agent.
Example
If one agent assigns a conversation to themselves, and the other agent does the same thing a few milliseconds later than the first agent, this solution prevents the second agent from assigning the conversation to themselves, if the first agent already assigned the same conversation to themselves.
Before the conversation is assigned, a background check is performed to determine whether the conversation has already been assigned to someone else. If it has, the assignment is rejected and the agent receives an error message informing them that another agent has already been assigned to the conversation.
Blocklisted numbers [#blocklisted-numbers-create-new-conversation]
The blocklisted numbers system ensures high levels of customer satisfaction by respecting the preferences of customers who do not wish to be contacted. It upholds customer privacy and prevents unwanted communication across all channels by blocking any attempts to create new conversations with blocklisted numbers.
When you try to initiate a new conversation using a number that is on the blocklist, the system will automatically block its creation.
Regardless of the communication channel - whether it is a call, email, or some other channel - once the blocked contact is entered, it will appear greyed out, preventing the agent from selecting it and continuing the conversation.
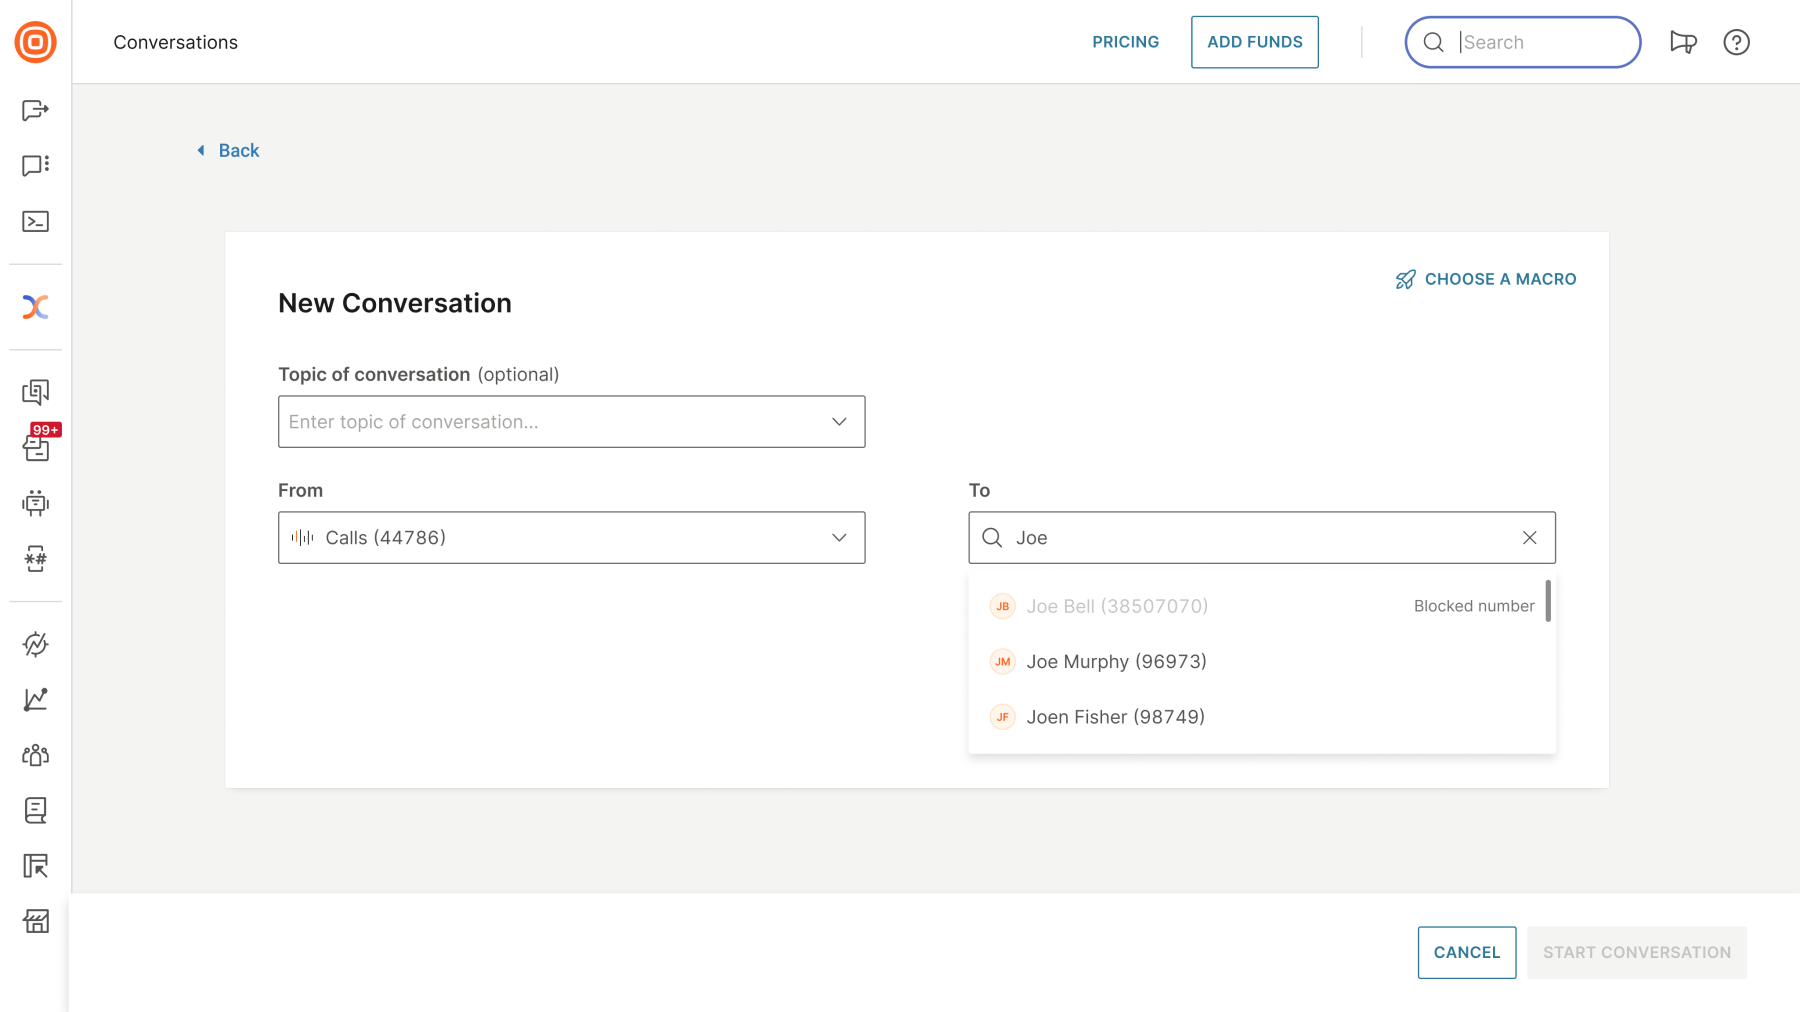
To learn more about the Do Not Contact list, click here.
Manage conversation attributes
This section covers the key attributes and actions for managing conversations in the agent panel.
Topic [#topic-manage-conversation-attributes]
Each conversation gets a default topic name that can be changed anytime - Talking with 'Name of the customer' and a unique conversation ID.
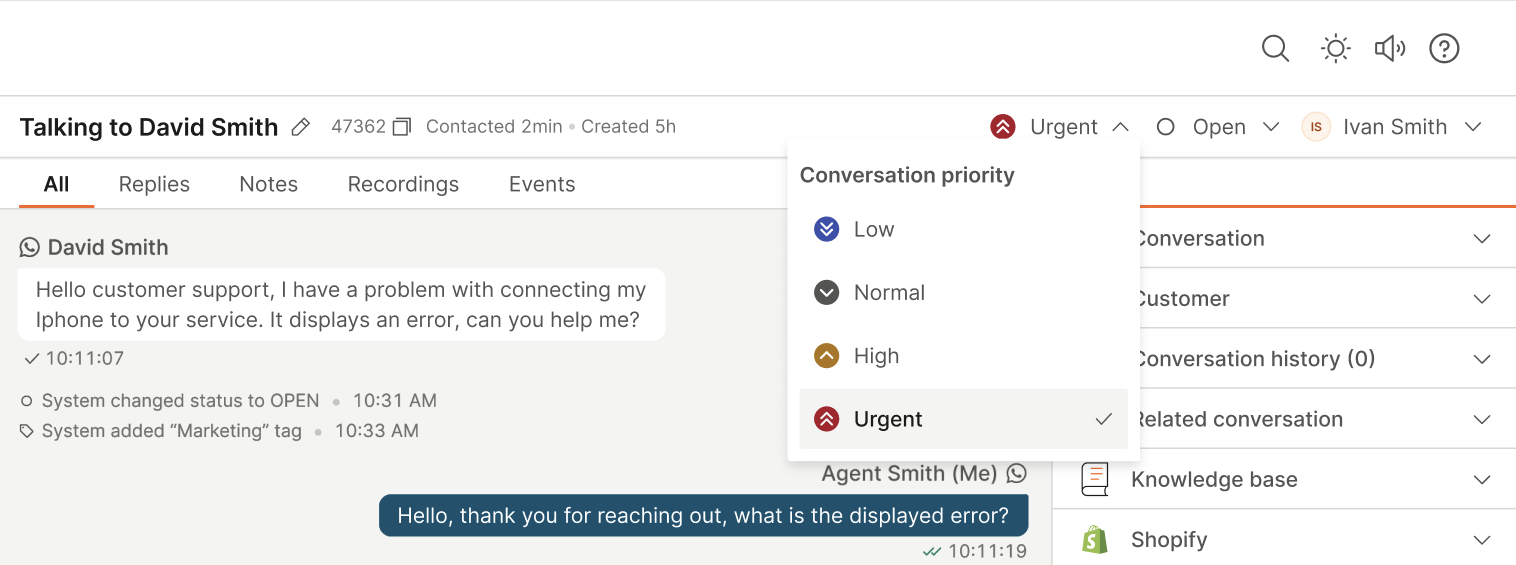
Priority [#priority-manage-conversation-attributes]
Conversation priority is visible in both the header and the message list, making it easier to identify urgent conversations.
Priority is assigned automatically based on routing rules and can be changed manually at any time.
Status [#status-manage-conversation-attributes]
There are four possible conversation statuses:
- Open
- Waiting
- Solved
- Closed
You can manually change the status while interacting with customers. Statuses help transition from an omnichannel continuous conversation to a ticket-based system as follows:
| Status | Description |
|---|---|
| Open | The default status when a conversation is created. |
| Waiting | When the customer is waiting for the agent reply, the agent changes the status from Open to Waiting. This status indicates that the next action is expected from the agent, such as when an issue is escalated and the customer is awaiting feedback or additional information. |
| Pending – Stop SLA | Used when the agent is waiting for a response from the customer, another operator, or an account manager, and wants to pause the SLA timer during this waiting period. |
| Solved | If the agent believes the issue is resolved, they change the status to Solved. No further interaction is expected. If the customer replies, communication continues in the same conversation. |
| Closed | When the agent is certain the issue is resolved, the conversation is marked as Closed and removed from the agent to-do list. |
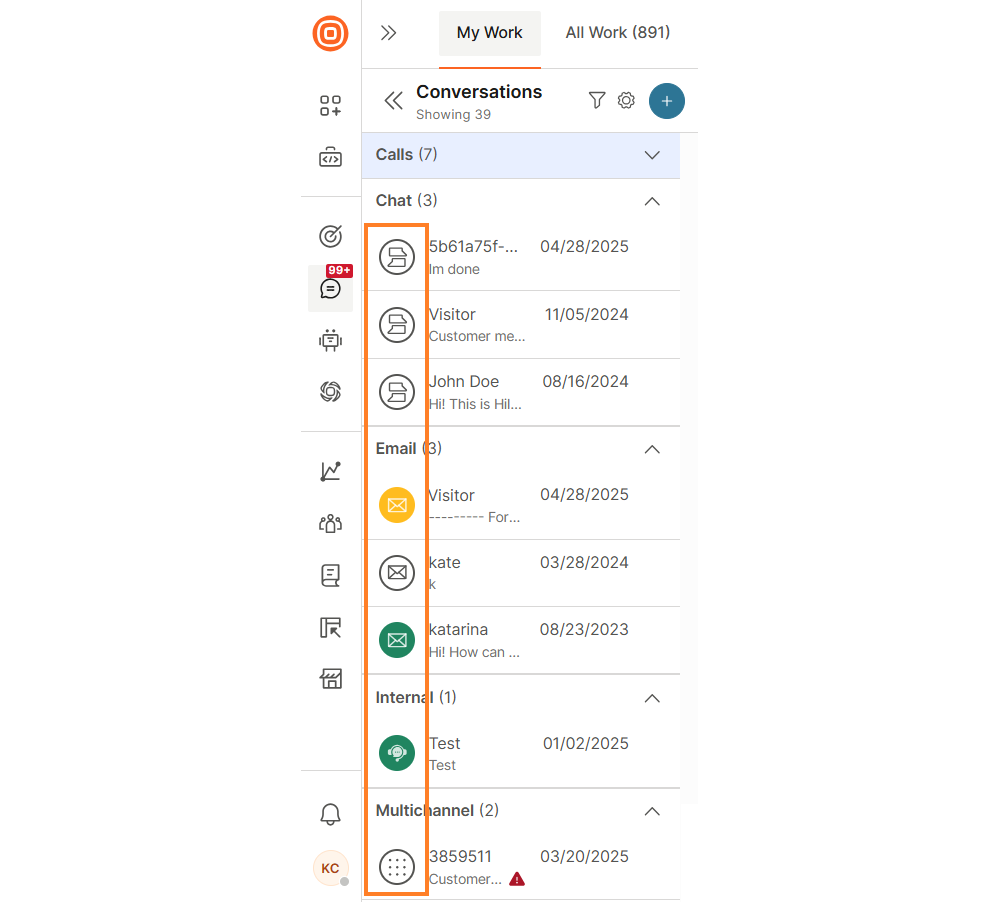
Conversation status colors
Different bubble colors indicate different statuses in the My Work panel:
| Color | Statuses | Meaning |
|---|---|---|
| ⚪ White | Open | Default status. A new conversation is active and in progress. |
| 🟢 Green | Solved | No further interaction is expected. If the customer replies, the same conversation is reopened. |
| 🟡 Yellow | Waiting, Pending - Stop SLA | The conversation is paused while the agent or customer awaits a response. |
Incoming messages automatically change the conversation status from Waiting or Solved back to Open. Conversation statuses also influence the Analytics section, where you can view conversations categorized by their current status.
Assignee [#assignee-manage-conversation-attributes]
Conversation can have two assignee statuses, Assigned (containing information to whom it is assigned) and Unassigned. You can check and change the status in the upper right corner.
Select the drop-down icon to see a list of all agents. The user can then assign or unassign a conversation to any agent. Use the Search agents option if the agent list is too long for scrolling.
If a conversation is closed, you can not change the assignee.
Queue [#queue-manage-conversation-attributes]
On the right-side panel in the Conversations card, check to which queue the selected conversation is assigned to.
Summary [#summary-manage-conversation-attributes]
Summary is a short text input used to write a quick summary about the conversation.
Tags [#tags-manage-conversation-attributes]
Tags can be assigned to conversations to better categorize a conversation topics or customer intent. They are connected to the dashboard where supervisors can analyze the number of conversations per specific tag.
Learn more about Tags.
Customer details [#customer-details-manage-conversation-attributes]
Conversation is built on a combination of participants (customer and agents) and messages exchanged between participants. A customer participating in a conversation can be known or unknown.
Customer is known if their contact number is connected to the People profile.
In case of a known customer, the agent can see on the right-side panel default customer attributes:
- Customer name - Associated with that destination number/ID in People.
- Gender - If associated with person in People.
- City - If associated with person in People.
- Country - If associated with person in People.
More customer details can be found using the View and Edit link in People. Agent can update customer attributes in People (for example, change name, add destination, add tags, and more).
Learn more about Customer details.
Internal conversations
Internal conversations enable agents to communicate with other agents (sort of behind the scenes). Every agent can create a new conversation and assign it to a specific queue. Agents who are part of that queue can be assigned to the conversation.
The recommendation is to enable Email as an internal communication channel within Conversations enables message exchange among registered email addresses, promoting efficient and organized communication.
This functionality ensures conversations are easily accessible, searchable, and organized.
Using email communication within Conversations offers numerous advantages, including:
- Rich text formatting - Unlike traditional internal conversations, email communication supports rich text formatting. Users can emphasize key points, use bullet points, and format text to enhance clarity and expressiveness.
- Templates - Create standardized templates for common responses, ensuring consistency and saving time.
- Macros - Implement macros to automate repetitive tasks, streamlining communication workflows.
- Workflows - Leverage automation to handle routine processes, reducing manual intervention.
- Routes - Efficiently direct messages to the right teams or individuals, ensuring timely responses.
- Auto-assignment - Automatically assign tasks or messages to designated individuals based on predefined rules, optimizing workload distribution.
- Integration - The email communication feature seamlessly integrates with existing functionalities, providing a cohesive and comprehensive solution for internal communication needs.
To create an internal conversation:
- Select the + sign and then Start Internal Conversation.
- After entering the necessary details and composing your message, select the Start Internal Conversation button located in the bottom right corner.

- Another option is to create it from the context card. You need to enter the queue and the subject and body of the internal conversation on that screen.
Conversation ID in internal conversations [#conversation-id-in-internal-conversations-internal-conversations]
Conversation ID is the only optional parameter that you can use to link the internal conversation with an existing one. However, if an internal conversation is created from another conversation, the Conversation ID will be prepopulated.
When you create an internal conversation, the flow is more or less the same as with any other conversation, albeit with minor exceptions. Besides the agent who created the conversation and the agent assigned to actually handle the conversation, other users can also write messages.
Messages from the agent who is working on the conversation are displayed on the agent panel right side. Messages from any other user working on this conversation are shown on the left side.
Related conversations
The Related conversations card enables agents to group multiple conversations that revolve around the same issue, providing better visibility, coordination, and context across customer interactions.
This feature is especially helpful when customers reach out through different channels or reopen discussions on previously resolved topics.
The Related conversations card consists of three main sections:
- Main conversation - Represents the primary thread. You can assign other conversations as related only if the current one is a continuation of a previous interaction. Manual linking of main conversations is currently supported only for Facebook Posts used to route private messages to Messenger.
- Linked conversations - You can manually link conversations using their conversation ID, found in the URL of the respective ticket. Paste the ID into the Related conversations card to establish the link. In addition to manual linking, related conversations are also linked automatically - see the section below for more details. If multiple conversations are linked:
- The one being linked to becomes the main conversation.
- Others are considered related or follow-up threads.
- You can unlink a conversation at any time using the Unlink button.
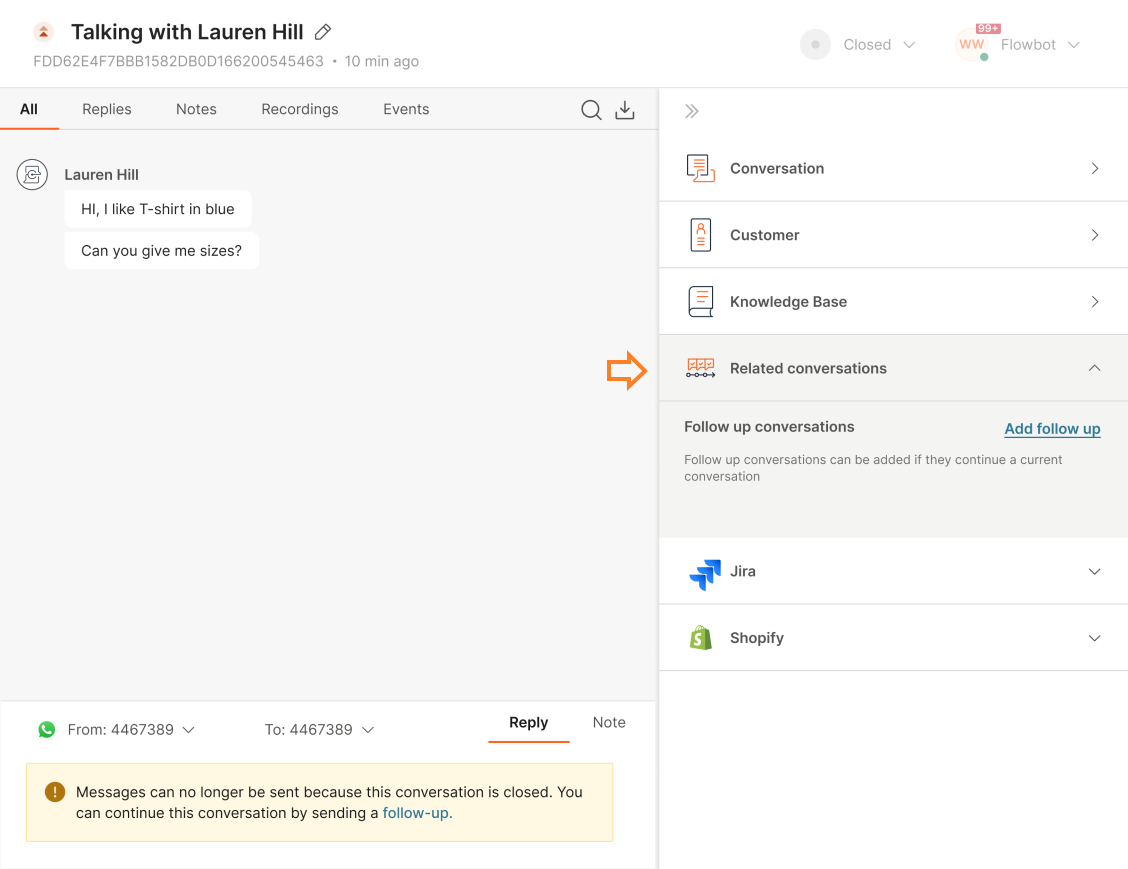
- Follow-up conversations - These can only be created from conversations that have already been closed. This keeps the timeline clear and avoids confusion between ongoing and historical interactions. Read more about Follow-up conversations in the section below.
To view related conversations:
- Go to Context cards → Related conversations, where all linked tickets are displayed.
- For each linked conversation, you can select the three-dots menu to either unlink the conversation or copy its conversation ID for reference or further actions.
Automatic linking of related conversations [#automatic-linking-of-related-conversations-related-conversations]
The automatic linking of related conversations detects and links tickets that originate from the same customer message sent to multiple support addresses within the same account. The system creates a visible relationship between them and ensures agents have full visibility into related interactions.
When a customer sends an inbound email to two registered Infobip senders, two separate inbound messages with the same external email message ID will be received by the system:
- The first inbound message will create Conversation A.
- The second inbound message will create Conversation B, but it will also recognize Conversation A as a potential parent.
As a result, the system will link the two conversations, establishing a connection between them.
Edge case: Ongoing conversation with one sender
If the customer is already engaged in an active conversation (Conversation A) with one Infobip sender and later decides to include a second Infobip sender in the email recipients:
- The system will first save the new message to Conversation A.
- Then, it will create Conversation B for the newly involved sender and recognize Conversation A as a potential parent.
- As with the initial case, the two conversations will be linked.
This linking ensures continuity across multiple senders and helps maintain context across related conversations.
Follow-up conversations [#follow-up-conversations-related-conversations]
Follow-up conversations can only be created from conversations that have been closed. They help agents maintain continuity in customer interactions by tracking the progression of an issue and ensuring timely resolution.
Creating follow-up conversations allows you to document recurring or unresolved issues, monitor their status over time, and maintain a clear communication trail with the customer.
Follow-up conversations can be generated in the following ways:
- When a customer replies to an email tied to a previously closed conversation, the system automatically creates a new follow-up conversation and links it to the original one.
- If a customer uses the reply option through private direct message in Facebook Posts, the system automatically opens a new Messenger conversation as a follow-up.
- You can also manually create a follow-up from any closed conversation using the Related conversations card in the agent interface.
One conversation can have multiple linked and follow-up conversations.
When the Add follow-up button is selected:
- A new window opens, allowing the user to start a new conversation.
- The From and To fields are automatically populated based on the previous conversation and can not be changed.
- The system also copies any existing form and its associated attributes from the original conversation. These details appear in the new conversation screen, where you have the option to discard them if needed.
- If the follow-up conversation is sent using email, it will include a predefined subject line and all necessary technical headers to ensure that the message appears in the same thread on the end customer side.

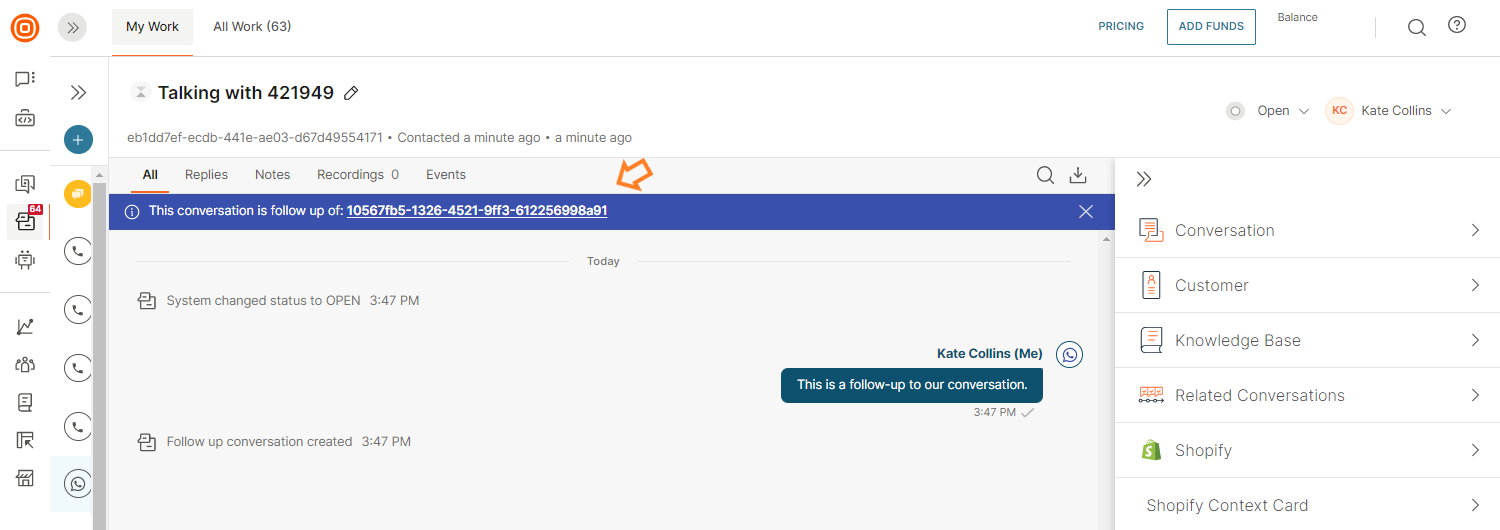
- Once a follow-up conversation is created, a note will appear in the conversation view indicating that it is linked to a previous conversation. This note includes a clickable link that allows you to quickly access the original conversation for context and reference.
The follow-up link is working only for channels that support the creation of new conversations by agents.
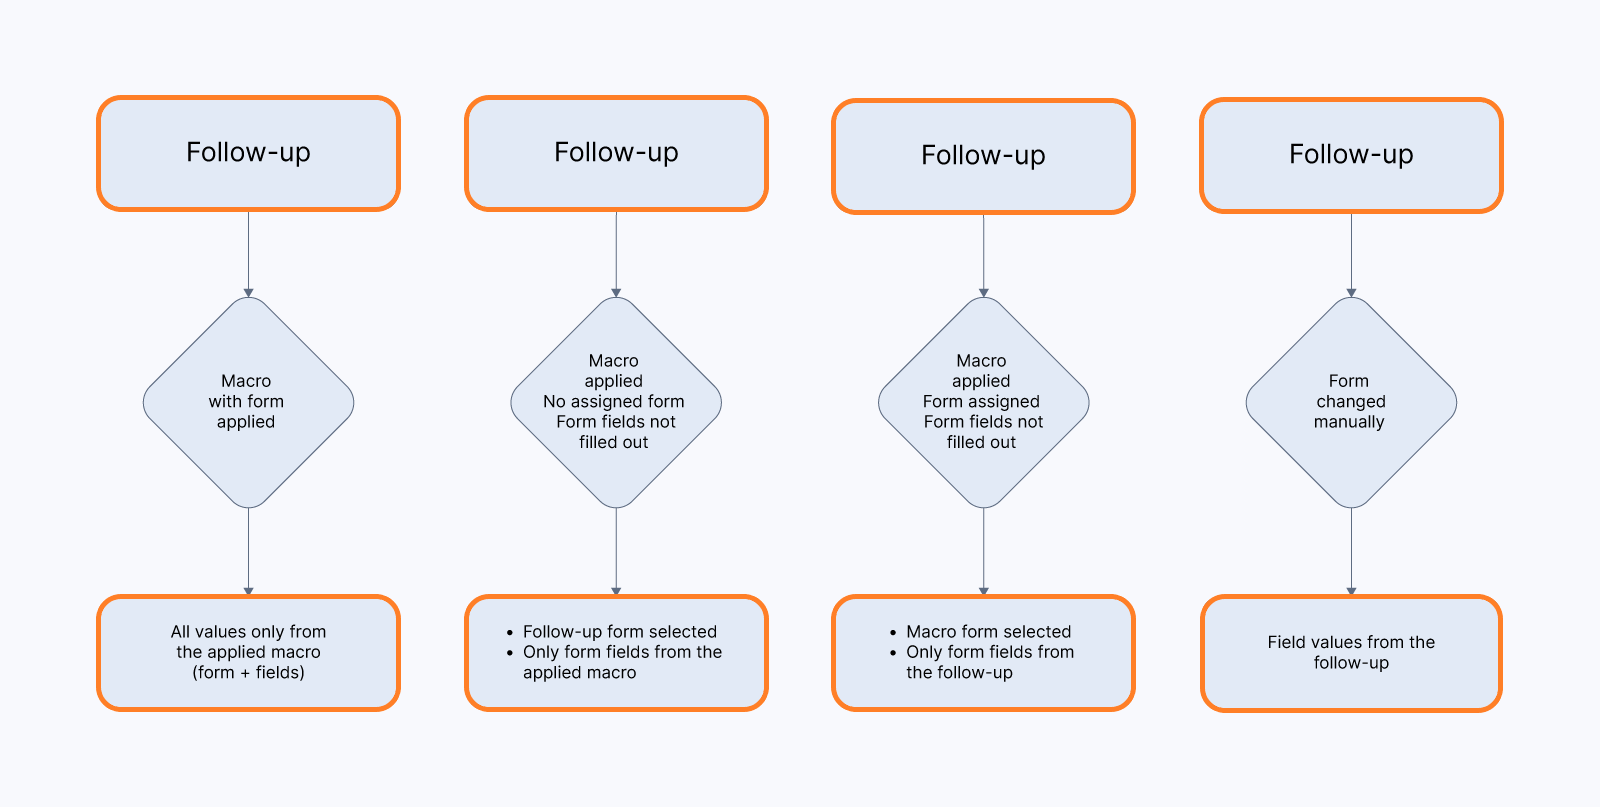
If a macro is applied during the creation of the follow-up conversation, and it contains form-related data, the system will handle form and field values based on the following logic:
- If the macro includes both a form and filled form fields, those values override the follow-up data and are applied to the new conversation.
- If the macro does not include a form or any filled fields, the form and fields from the original (follow-up) conversation are retained.
- If the macro includes a form but no filled fields, the macro form is applied, while the field values are taken from the follow-up conversation.
- If the agent manually changes the form during the creation of the follow-up conversation, the field values from the follow-up are preserved.
Conversation status indicators [#conversation-status-indicators-related-conversations]
The color of the bubbles in linked and follow-up conversations are indicating the status of the conversation:
- In progress ⚪
- Waiting 🟡
- Solved 🟢
- Closed ⚫

Merge conversations
You can merge two conversations with the same customer, in case both conversations address the same topic and are identified as the same customer.
If you decide to merge the conversations, this is what happens:
- Messages from both channels are visible, grouped under same conversation and timestamped.
- Conversation queue, summary, topic, and priority from the current conversation are kept.
- A tag that was in one of the older conversations will be transferred to a new conversation (it will be added on top of the existing tags).
- Any new messages from the customer contact addresses used will be automatically added to the same conversation until the conversation is closed.
If surveys were triggered from both conversations, only the most recent one will be retained.
For more information on how to merge email conversations, click here.
Omnichannel conversations
Conversations are either established over one channel where the channel icon represents a single channel in use or consists of multiple channels within a single conversation.
Omnichannel conversations have a special icon and they can be created in the following cases:
- The customer sends messages over two or more communication channels regarding the same topic and the agent merges the conversations.
- Agents initiate a conversation over a new communication channel within one conversation.
Change channel [#change-channel-omnichannel-conversations]
While having a conversation with a customer, agents can agree to send information through a different communication channel due to several reasons: the customer does not have internet access, the content they wish to send requires rich media support, the customer prefers communication over a specific channel, and more.
To change the communication channel:
- Select the channel drop-down menu above the reply message box.
- Any new messages from the same customer as well as contact addresses will be automatically added to the same conversation until the conversation is marked as closed.
When you select Voice as the channel, the Start a Call button will be shown in the reply message box.
Learn which channels are supported in Conversations.