


GET STARTED GUIDE
Getting started: Email
Infobip’s Email is a cloud-based solution that allows you to send rich, personalized, and responsive emails to your customer database.
Sending your first email (business users)
To send single emails during your trial, you need to set up a valid email address first. This step ensures that your test emails get delivered, and allows you to send to any email address while testing.
For testing you can also send emails to your own address, which is the default option. Alternatively, you can add new addresses in Channels and Numbers.
Be sure to add the sender name and reply-to address, as well as the first line of your company address to comply with the CAN-SPAM act.
If you haven’t verified your address yet, you will be prompted again to do so.
Send test email via Broadcast
Broadcast is the tool used to manage your message broadcasts. It is the first tool in the tool bar on the left side of the screen.
Please see the section on Broadcast.
When sending your test email you can choose between a domain or single sender. Single is recommended for testing purposes.
Fill out the from name (i.e. who the email is from), the from address, the reply-to email.
Next, add your content starting with a subject line and an optional preheader. After this, you can design and preview your email.
You may also opt to send a plain text email, as well, which improves deliverability.
To track your email, select the tracking options you desire. These include:
- Track opens: see how many people opened your email
- Track URL clicks: see which campaign links were clicked on, how many times, and by whom.
You can choose to have these reports via API pull to see how many messages were delivered, and by pushing delivery reports to webhook to subscribe to events on your account with your integration installed.
To personalize emails, select information from the data payload.
Next, scheduling allows you to launch your email campaigns at a specific time and date. Lastly, use Advanced settings to adjust the message speed setting the number of messages per unit of time, and the message validity period. After this time passes, no email deliveries will be retried.
Preview your email before sending – you can still make changes to your broadcast during the preview stage. If there are any errors, these will be highlighted in the Warnings menu.
You can still send a test from the preview and, if everything looks right – feel free to hit Launch.
Once you launch your broadcast you’ll be taken to the reporting page where you can see the real-time status of your broadcasts.
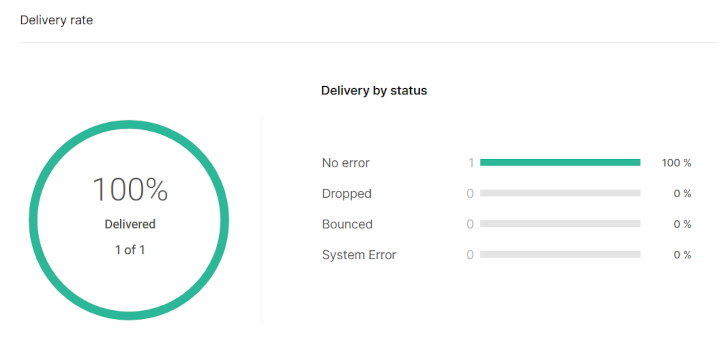
Now that you’ve sent your first email via Broadcast, check your inbox and have a look at your first email. Next, you can check out an overview and summary. If you did everything right, your delivery rate should look like this:
Finally, you have the option to import your contacts via People CDP. And to help you launch your first campaigns quickly, you can browse our predefined email templates.
To make sure your messages land in as many inboxes as possible, check out our deliverability recommendations at the end.
Sending email (developer)
Sending your first email requires you to first set up a sender.
During the free trial you can send to the verified email you signed up with, or add more in Channels and Numbers.
Add a sender name and reply-to email – your sender email field is pre-populated with your verified email address.
Send your first email via API
To send your first email via API, first choose between HTTP and SMTP APIs. Our APIs support scheduling, messaging templates, personalization, and more.
HTTP
You can send your first email using our browser-based IDE and customized code for Java, C#, PHP, and Python.

SMTP
SMTP, which stands for Simple Mail Transfer Protocol, enables safe and reliable email messaging. Infobip provides an SMTP server for fast and secure email delivery.
Our SMTP documentation takes you through the process of sending via SMTP API.
Creating email templates as a developer
You can create custom email templates in Broadcast, customize our email templates, and import your own existing HTML emails.
Build customer relationships over every possible channel
Deliver true omnichannel experiences on the most robust platform.
GET STARTED GUIDE
Getting started: SMS
The most widely available channel worldwide which can be sent to just about any device, SMS is the channel of choice for most businesses.
Sending your first message (business users)
Ready to send your first SMS message?
During the free trial, you will be able to use Infobip’s ServiceSMS test sender to send up to 15 text messages to 5 verified numbers.
To send your first test message, simply click the “Send message” button. And that’s it!
Check delivery report
You can view delivery reports that provide you the status and details of each message.
The details here include the message type, the status and any associated errors, an explanation of the status and any errors, as well as the time the message was sent and its destination.
Check country-specific SMS regulations
Next, you can check for any country-specific restrictions to your intended destination.
You can do this by expanding the “Check country-specific SMS regulations” tab and selecting your intended destination from the drop-down menu.
Explore sender options
Next, depending on your business needs, you should also explore your sender options. You can do this from the “Explore sender options” tab.
You’re encouraged to fill out the brief questionnaire – beginning with “Do you plan to send to the USA and Canada” as well as subsequent questions – to improve your experience.
Specify whether your preferred messaging type is one-way (i.e. your account sends notifications and two-factor authentication codes to your customers), or two-way messaging, which provides customers with a reply path, allowing for conversations with customers.
Next, choose your preferred sender type. You can choose from dedicated or shared senders. Dedicated senders are unique to your account. Shared senders, as the name implies, are shared with other business accounts – often sharing a generic name, like InfoSMS.
Sending your first message (developers)
During your free trial you can send SMS to up to 5 verified numbers.
Getting started is made simple with personalized code ready to run with Java, C#, PHP, Python or Go. We support other languages, as well – see our send SMS API for code examples. You can also find code examples in our developer SDKs.
Build customer relationships over every possible channel
Deliver true omnichannel experiences on the most robust platform.
GET STARTED GUIDE
Getting started: Developers
If you prefer integrating channels and solutions into your existing systems – then you’re a developer. Here’s everything you need to know about getting started with Infobip as a developer.
As a developer, you’re experienced in integrating APIs into your existing systems.
Infobip makes this easy by providing fully personalized code examples that are ready to go. Easily implement Java, C#, PHP, Python, and Go – and for more languages and coding examples, visit our documentation hub.
API key
Your account is assigned an API key at signup. This acts as an access token for clients to use when making API calls.
This is a simple way to secure access, and as such, a popular authentication method used with REST APIs.
You can generate more keys and manage your existing one from your API key management page. Find out more about API keys in our documentation hub.
API base URL
Your base URL serves as your unique identifier which helps our platform identify the originator of each API request at DNS level to find the optimal route for API requests.
This ensures the best user experience, as well as more efficient technical support if you ever run into any issues. You can find out more about your base URL, here.
Developer tools
The Developer tools menu give you quick access to the most important tools for developers. We already mentioned API keys and where to manage them, and these are four more tools for developers:
- API transaction log: Shows a log of all transactions via API. Detailed filters help you refine results.
- API issue monitoring: Helps you detect and resolve any API related issues to keep your integration secure and robust.
- Applications and entities: This is where developers can build solutions to their unique use cases and associate them with resources (like numbers and domains). Learn more about developing applications and entities, here.
- Subscriptions management: Create notifications subscriptions for each channel and define events you want to be notified of. Manage your webhook and authentication settings with notification profiles you create under authentication settings.
These developer tools help you fully manage your developer account, as well as to create applications specifically for your unique use cases.
Build customer relationships over every possible channel
Deliver true omnichannel experiences on the most robust platform.
GET STARTED GUIDE
Getting started: Business users
If you prefer intuitive drag-and-drop interfaces over coding – you may be a business user. Here’s everything you need to know about getting started with Infobip.
Toolbar
As a business user, your experience is a code-free one using web-based tools. Here’s a quick overview of the tools and how to use them.
The toolbar on the left side of the screen contains all the tools you need to get started.
Here, we’ll go through each in the order they appear in.
Broadcast
From SMS to Voice calls and Email, all your individual messaging is managed from Broadcast, the web interface for message deployment management.
Here you can create individual messages or complete campaigns.
It’s as simple as adding recipients, choosing your sender, setting your messaging parameters in terms of start, end, delivery window, duration, retry schemes, etc.
There are more or fewer options reliant on channel capabilities. We’ll review these in more detail when we explore each individual channel.
Channels and Numbers
This menu gives you access to Channels, Numbers, Tools and Compliance, and My requests.
Channels
From Channels you can request new and manage your existing channels, discover how to use, read case studies, learn about requirements etc.
The channels available are:
- SMS: The channel of choice to reach every mobile user on the planet. With open rates of 98%, it remains the highest engagement channel of them all.
- WhatsApp: Reach over 2.7 billion users and engage them with conversations between agents or chatbots.
- Voice and WebRTC: Set up voice numbers, SIP trunks and Call Routing, Recording, Call Link and WebRTC settings. Note that WebRTC is only available for developer users.
- Email: Engage over one of the most widely used, cost effective and furthest reaching channels.
- RCS Business Messages: Provide customers with immersive interactive experiences over the next generation of SMS with images, video – and more. Note: This channel is only available upon request.
- Viber for Business: Integrate your chatbot and create impactful engagement over one of the most popular chat apps in the world.
- Live Chat: Engage with customers in real time via web or app widgets to provide instant support and create guided customer journeys.
- …and more!
Numbers
This is where you can buy and manage numbers for your account.
This is a straightforward process – simply click on Buy Number and choose your destination from the dropdown menu.
Make sure to filter by number capability to match your requirement, i.e. SMS, MMS or Voice.
Note: We may not have numbers available for some destinations.
Tools and Compliance
In Tools and Compliance, users can access these helpful tools:
- URL shortener: Allows you to shorten long URLs in messages. Simply copy in your domain, hit “Shorten URL” and that’s it.
- US sender registration: Messaging the US? Use this tool to register your short code or 10DLC in order to send SMS and MMS. Note that this tool is not available in the free trial.
- SIM swap detection: Detect SIM swap fraud attempts in real time to keep customers protected. This feature isn’t available in the free trial.
Build customer relationships over every possible channel
Deliver true omnichannel experiences on the most robust platform.
GET STARTED GUIDE
Getting started: Signup flow
Here we look at the signup process, what is included in your free trial, and the first steps at getting your account set up.
Infobip Portal signup flow
When you sign up for an Infobip trial, you get up to 100 free messages, 15 SMS messages and access to CPaaS messaging products that help you build engagement with your customers.
Note: No credit card is required to sign up and test the platform.
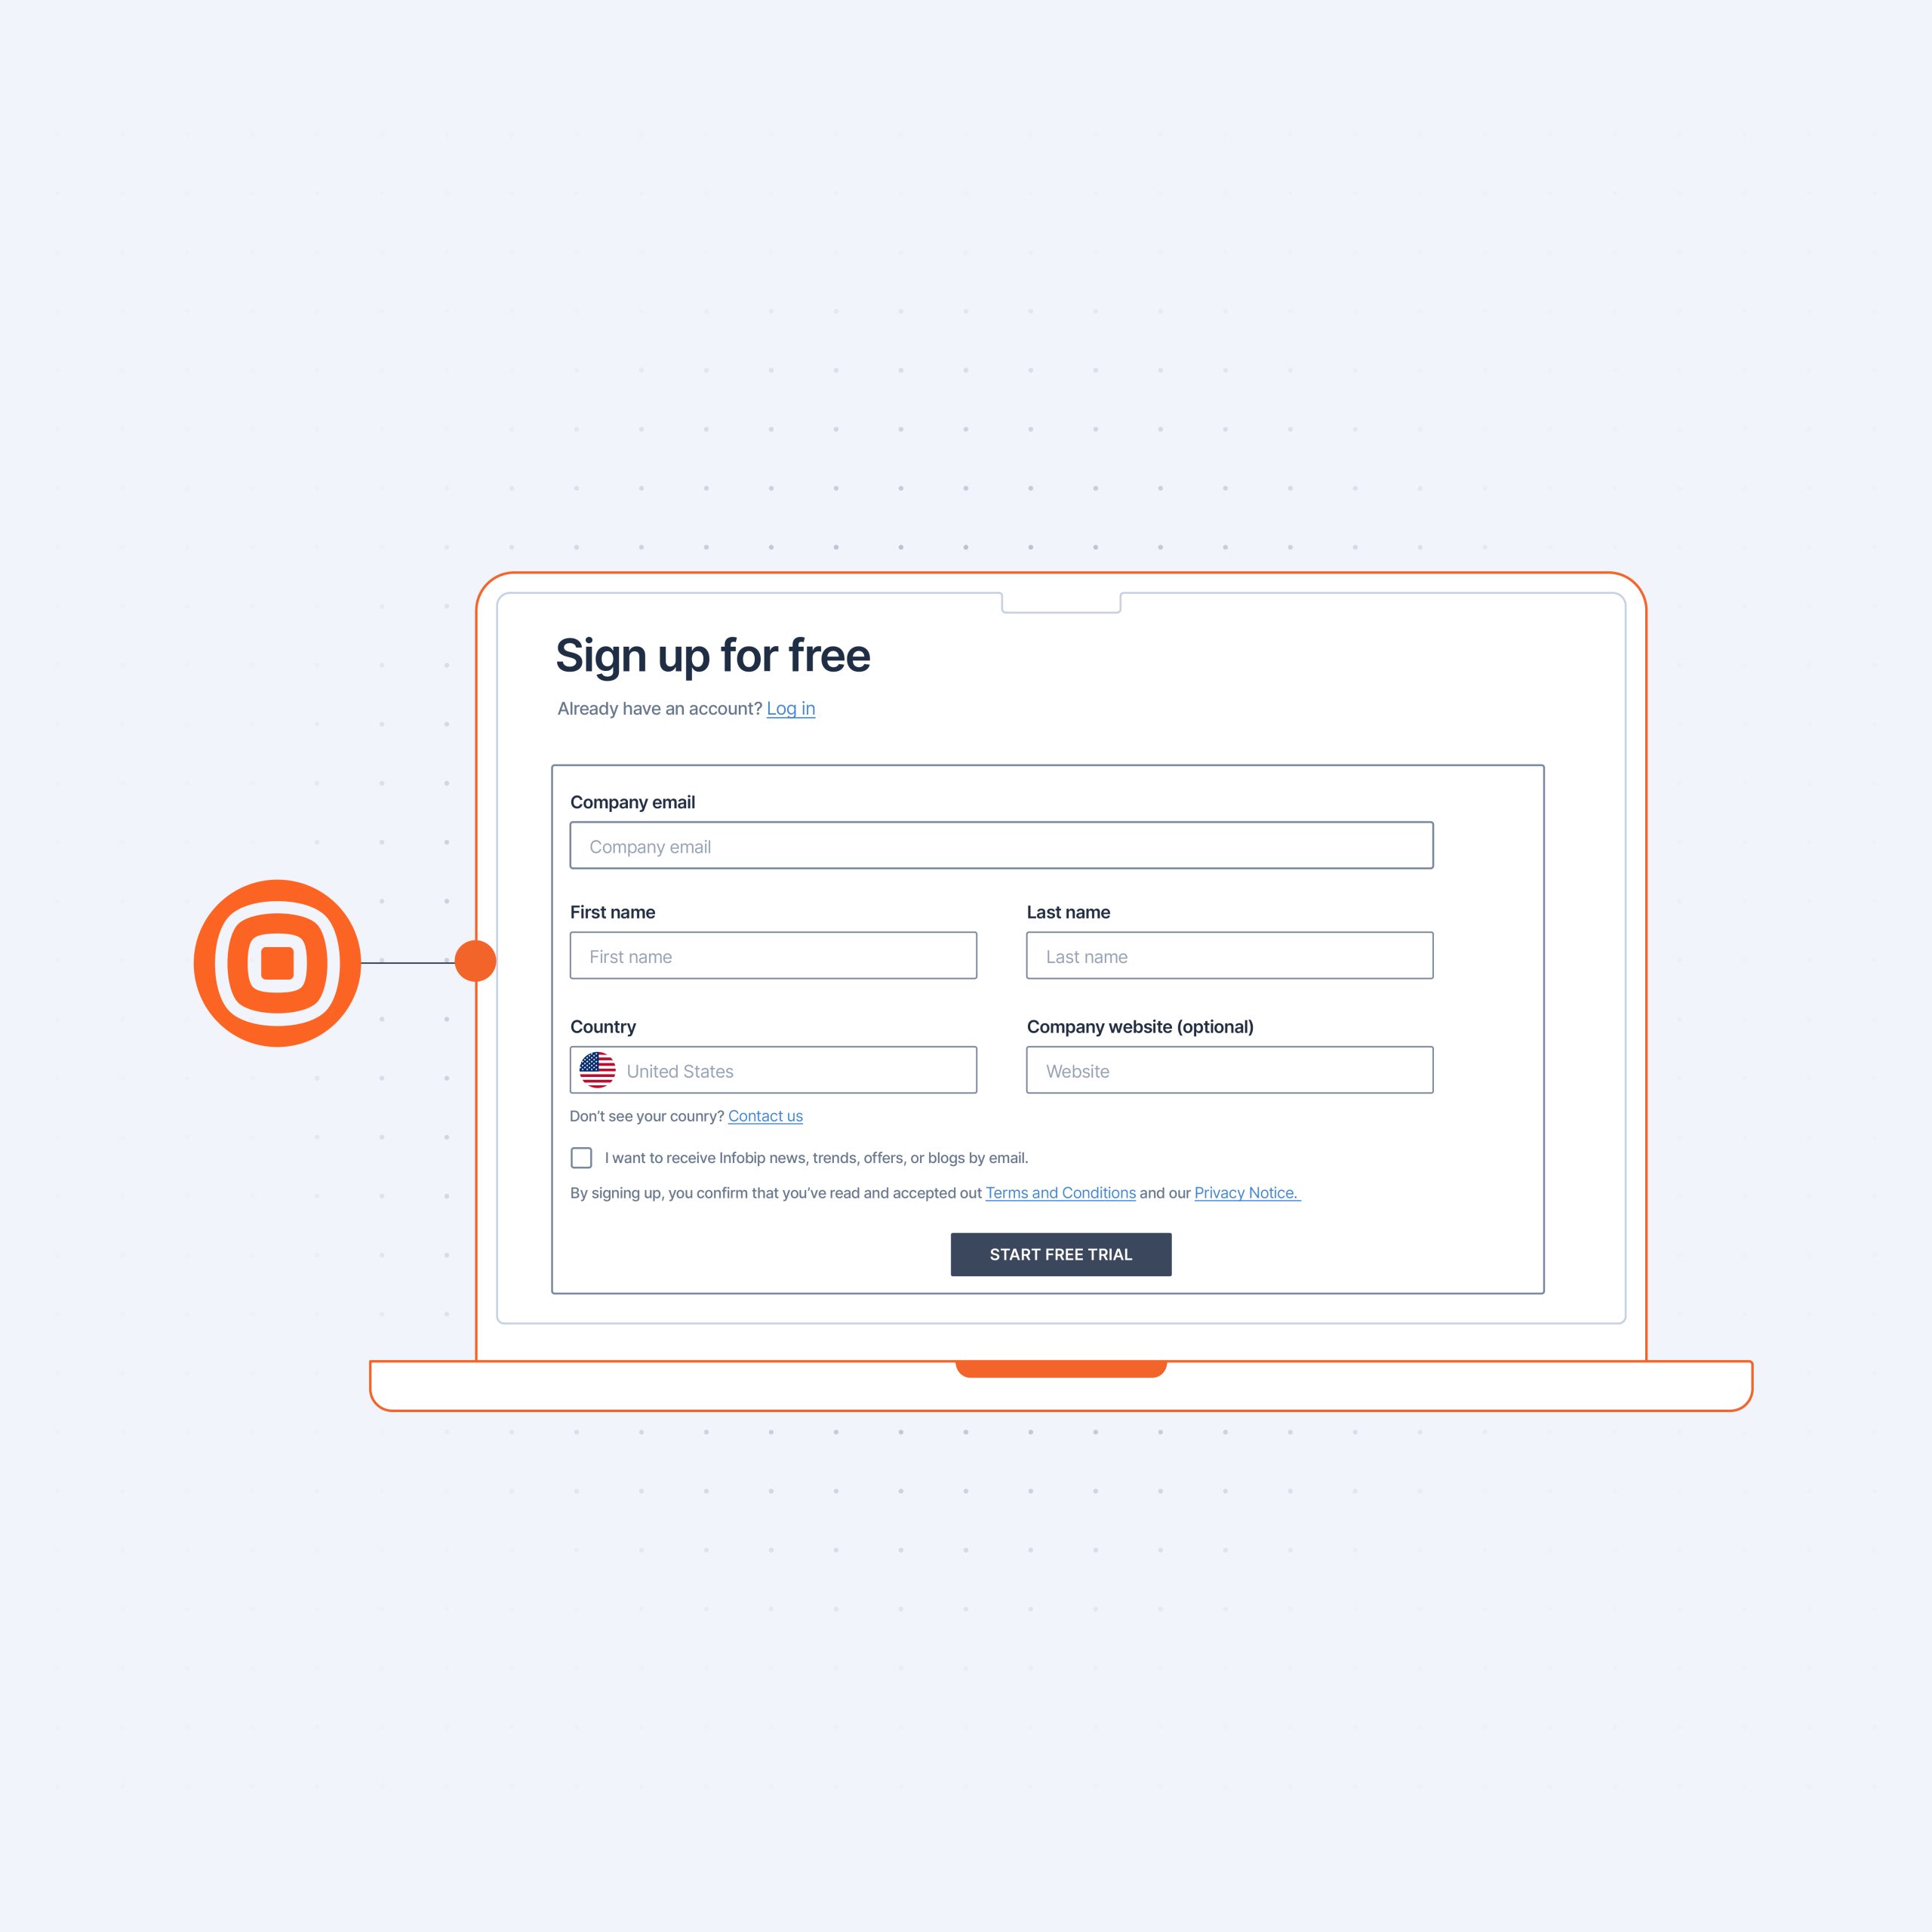
To sign up, simply fill out the sign-up form:

When you fill out the sign-up form, you will be sent an email with a verification link. This email will be associated with your account, and during the trial period will be the only one that you can email.

Once you’ve verified your email, you will be prompted to enter your phone number.
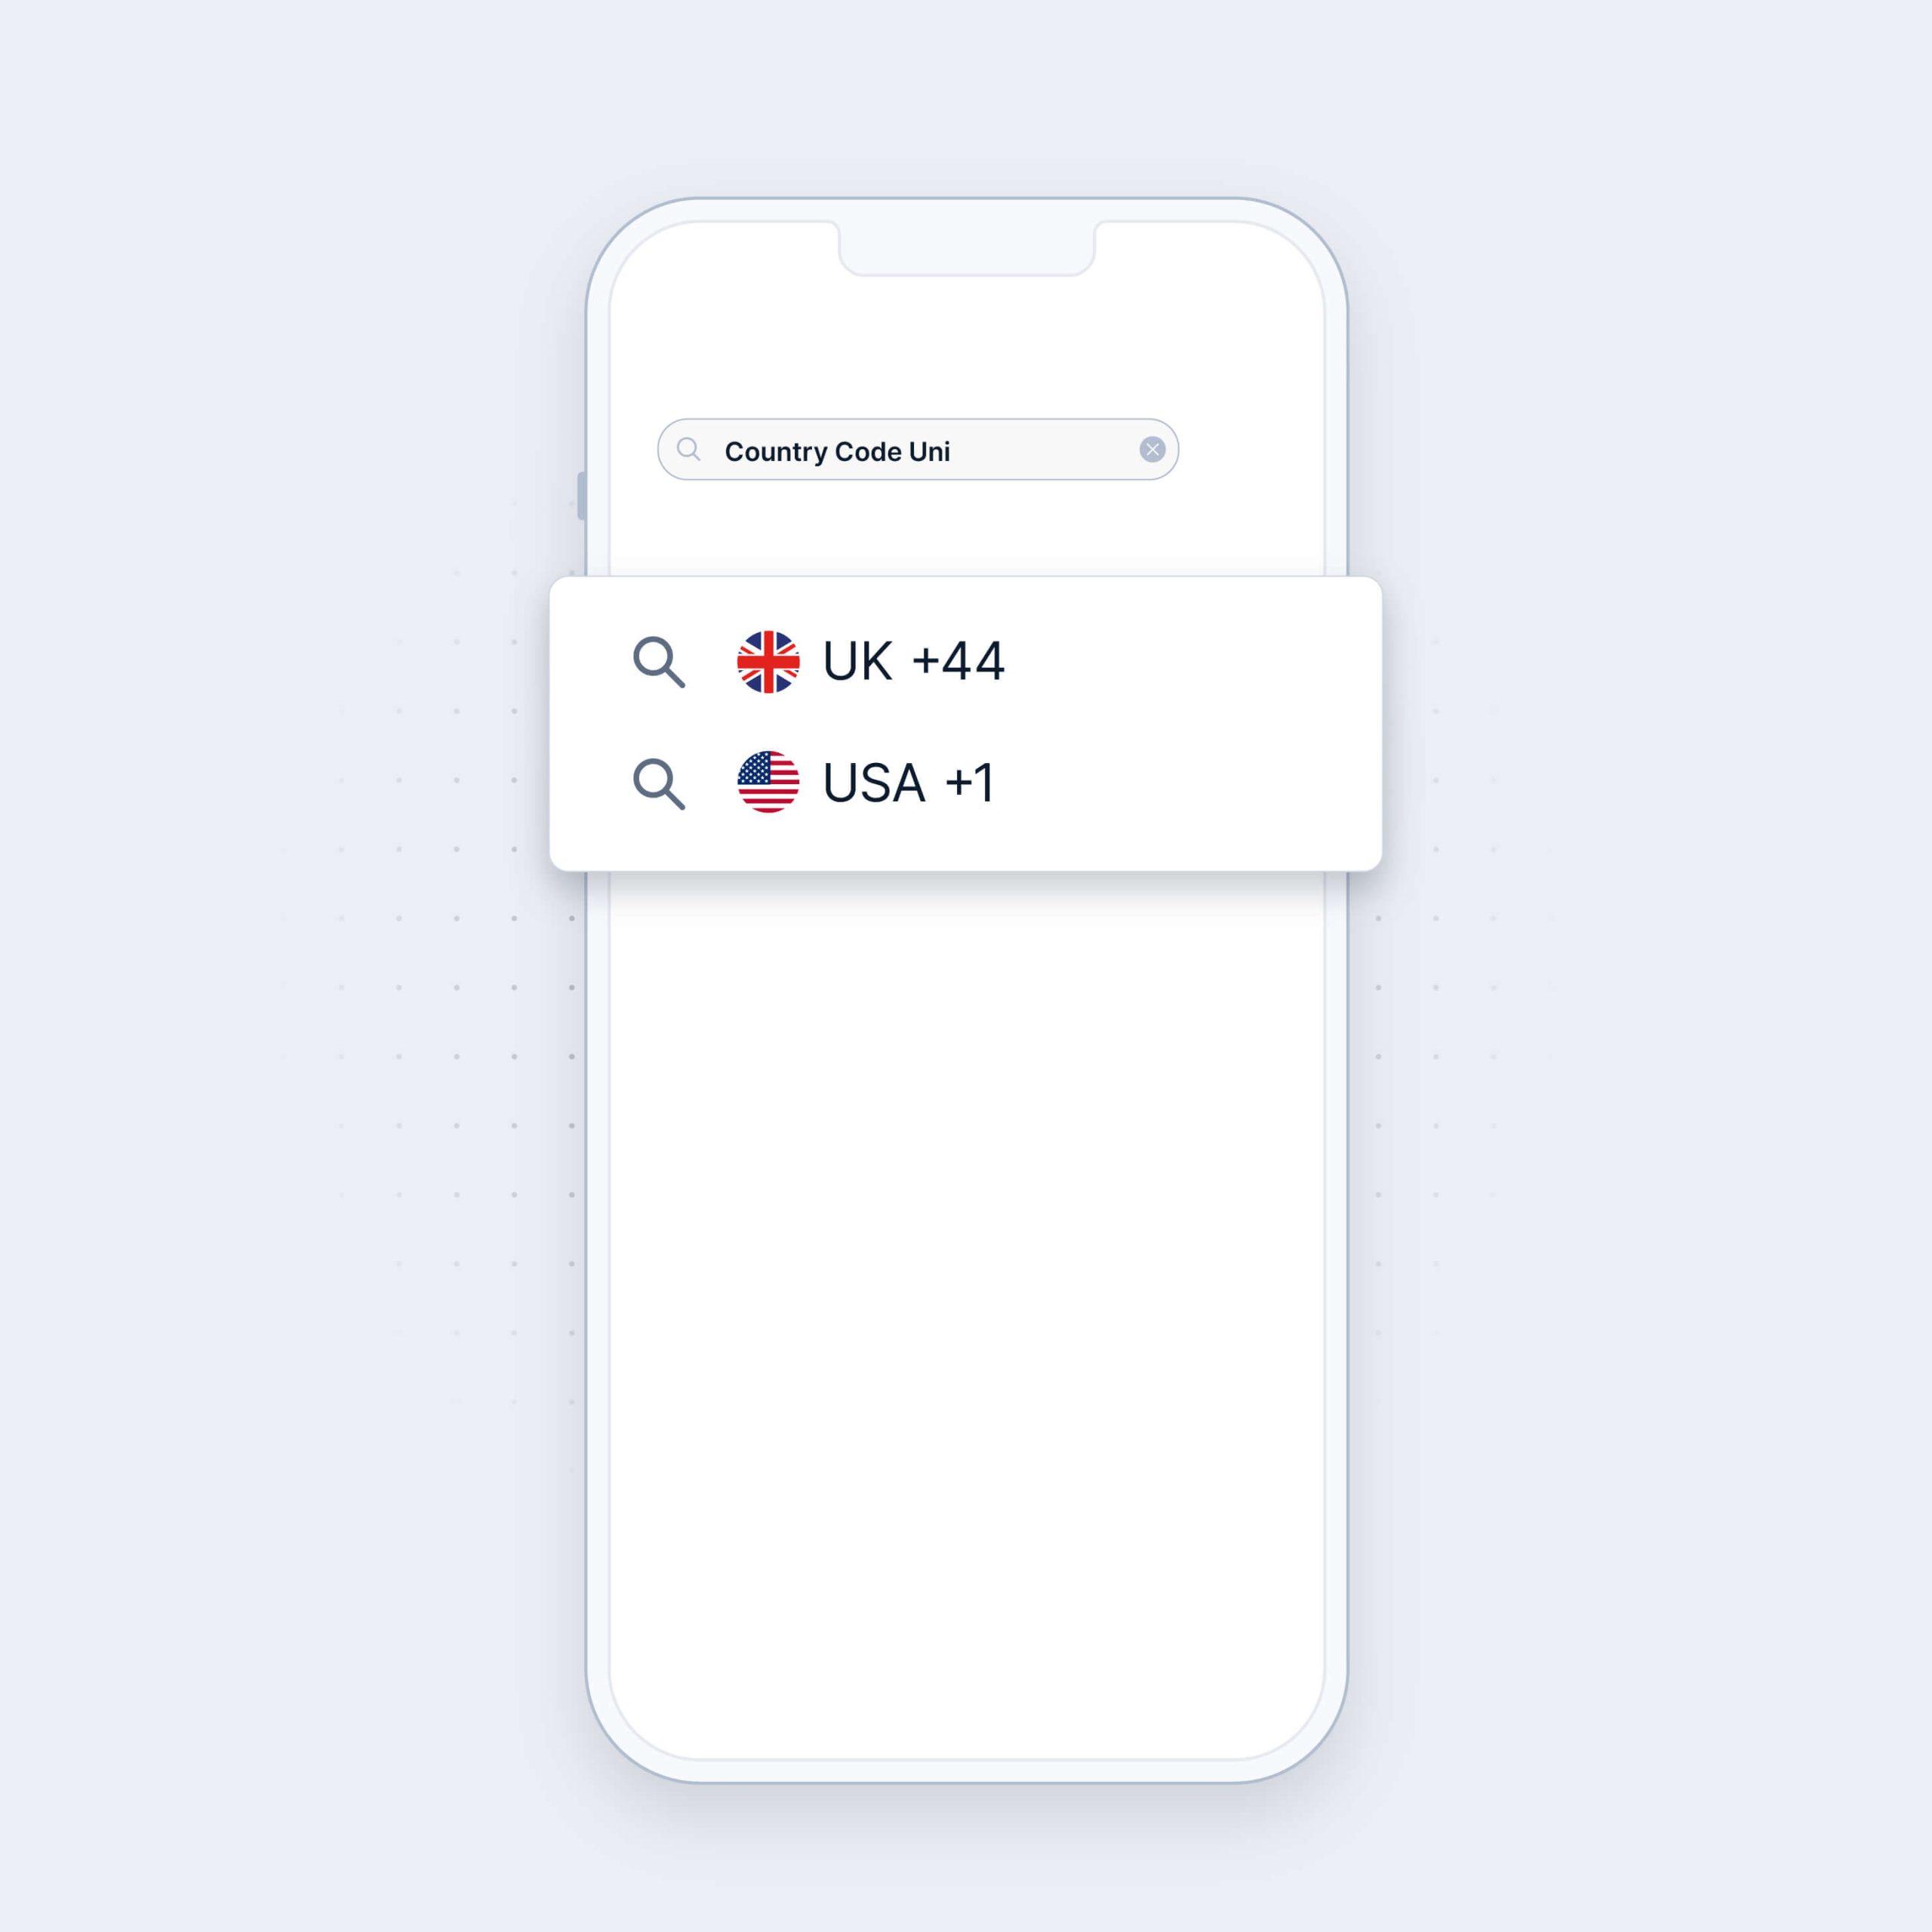
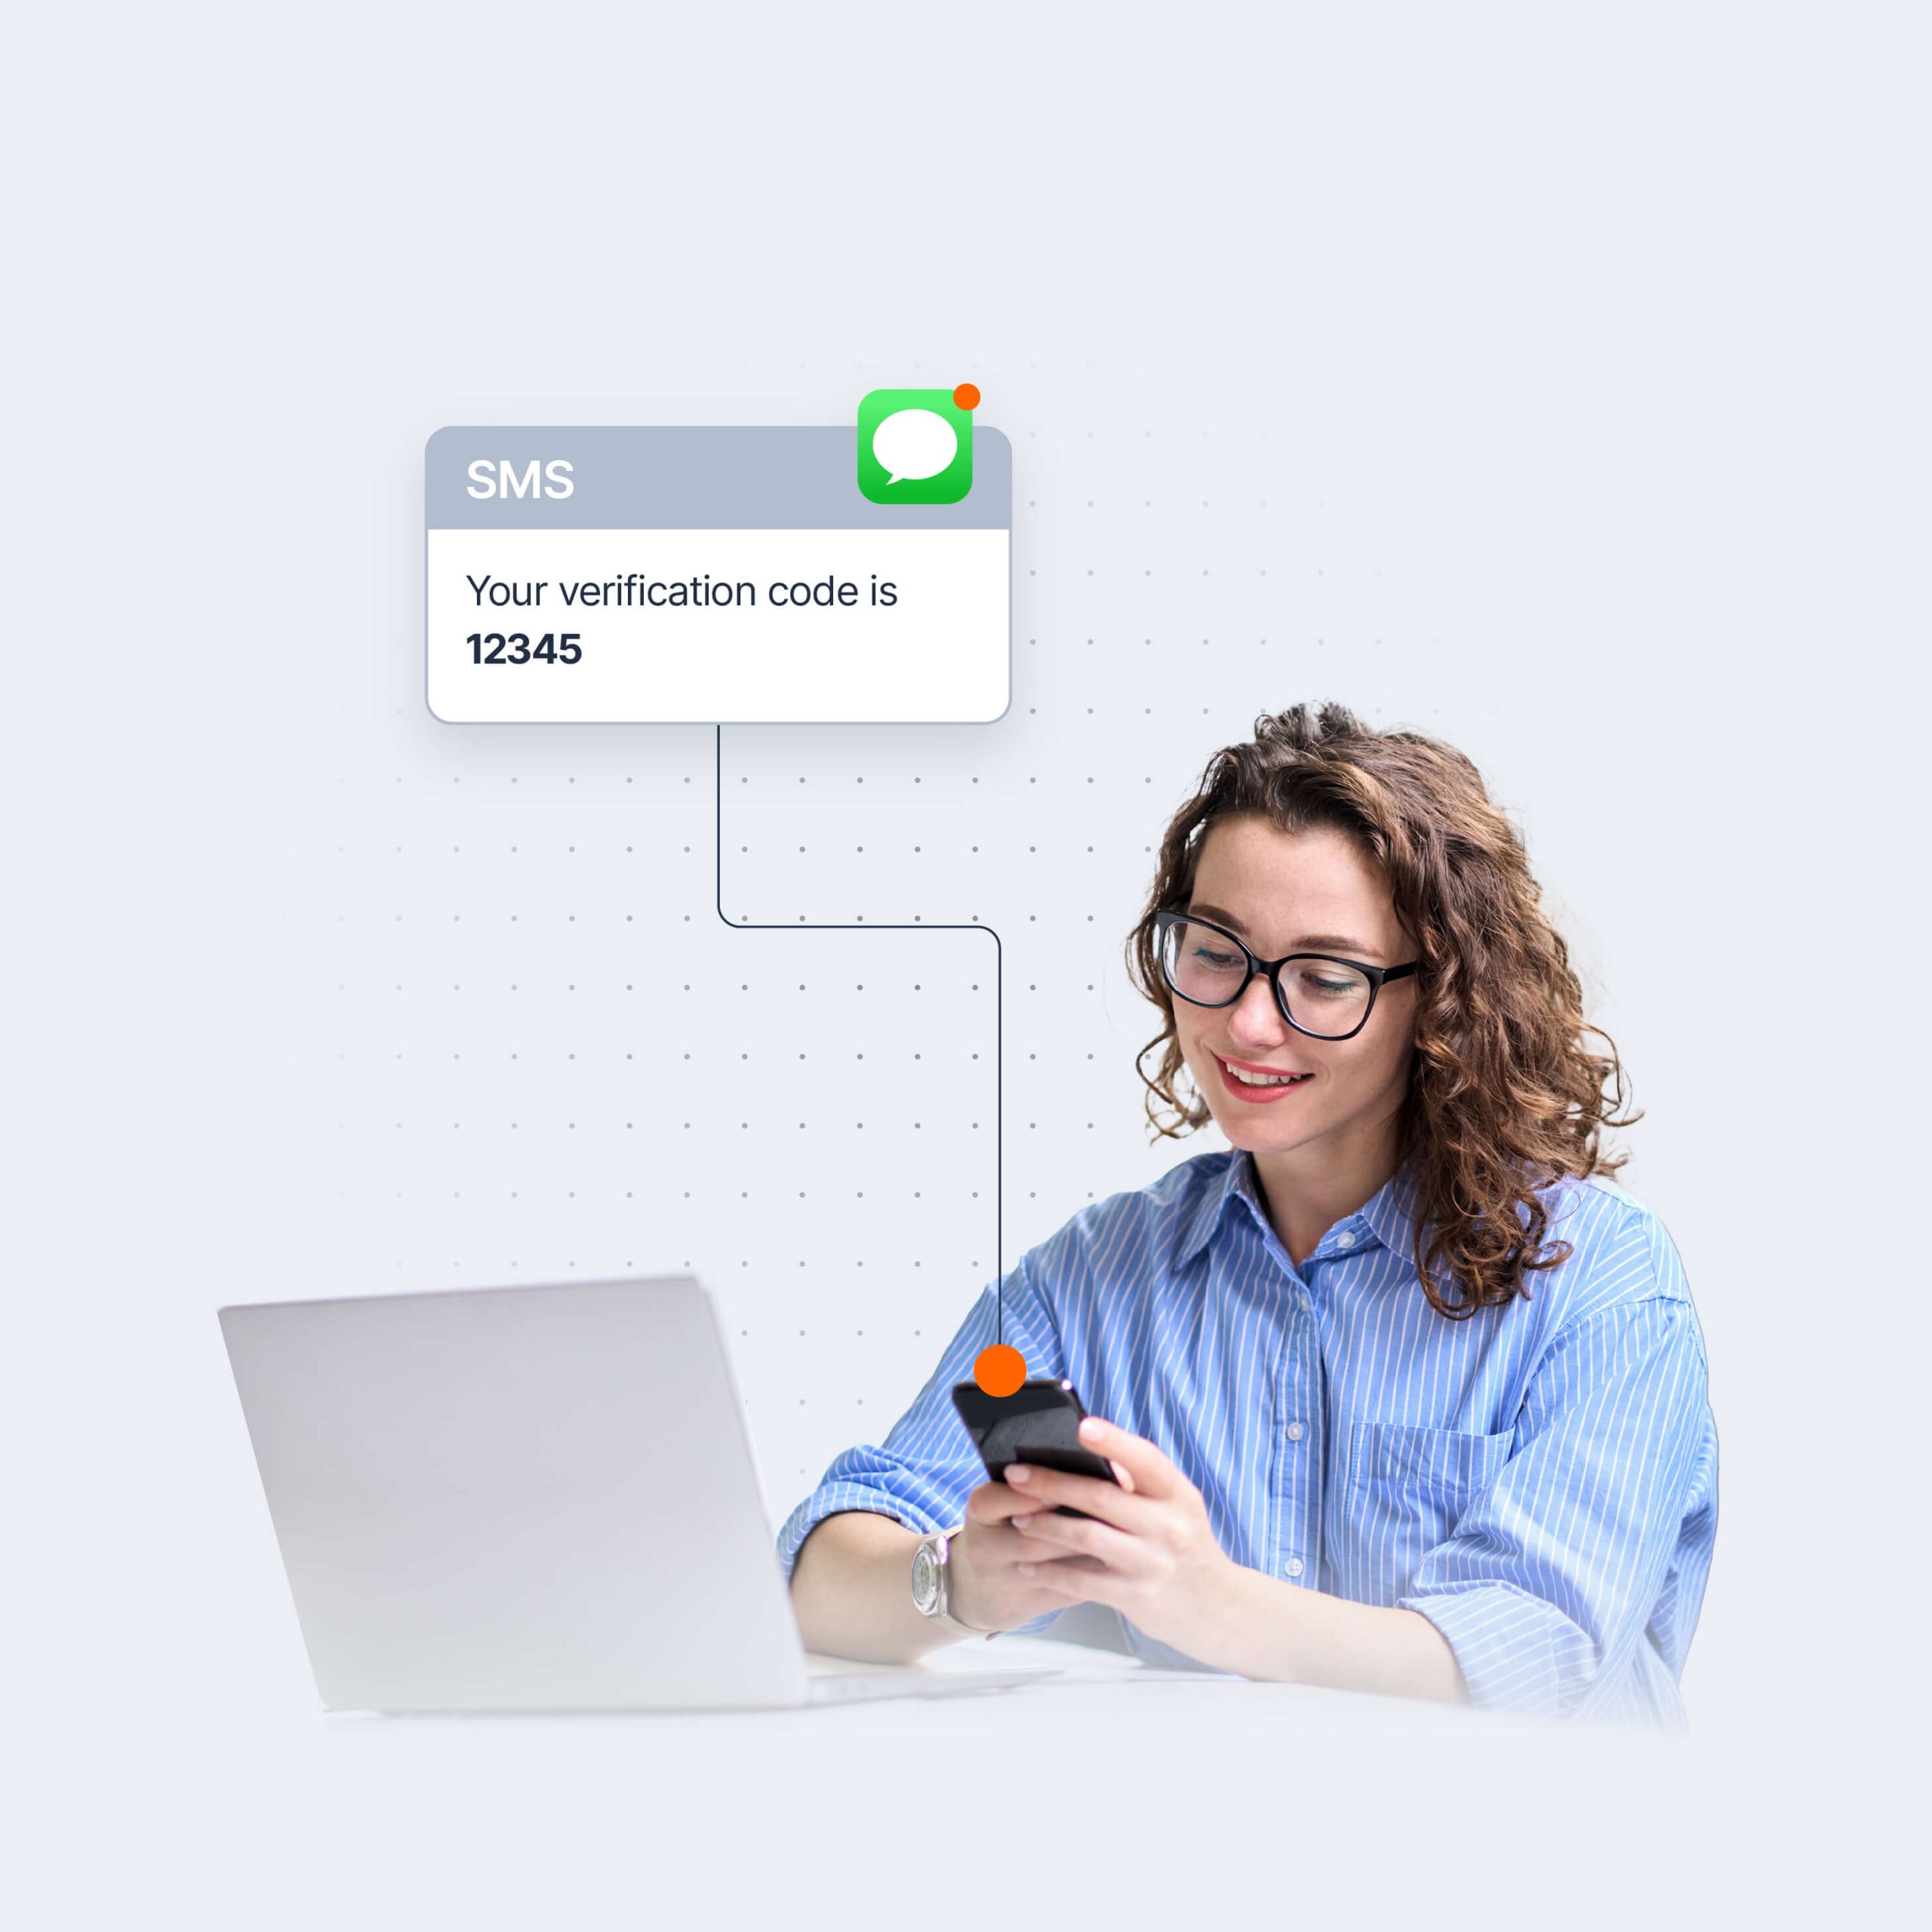
Choose your country code from the drop-down menu and enter your number. You will receive a text message containing your verification code. Enter this 4-digit PIN when prompted to verify your number. This number will be associated with your account during the trial period.
Free messages and solutions
When you create a free account, you are granted test credits in the amount of:
- 15 SMS
- 15 Voice calls
- 100 Email
- 100 WhatsApp messages
- 100 Viber messages
During the trial period, these free messages can be used to test each individual channel independently or as a part of our solutions:
- Conversations: A complete cloud contact center solution.It works on desktop and mobile, you can add as many agents as you need and choose channels that you want to use.
- Answers: The drag-and-drop chatbot building platform. This solution can also be integrated into Conversations to assist human agents in providing contextual customer service.
- Moments: The unified customer engagement solution. Moments is an omnichannel marketing automation tool that can be used to create entire guided customer journeys.
- People: A customer data platform, People CDP can be integrated with all the channels and solutions that we offer to build rich customer profiles used for segmentation, personalization and accurate customer targeting.
Customize your experience
The next step in your account creation is the guided survey aimed at optimizing your experience.
To get the best experience, fill out the quick survey and answer questions about:
- Getting started (on your own, schedule a call, or explore other options if you’re not sure yet)
- How you prefer to use the Infobip platform – either as a business user or developer, i.e. code-free or code)
- Which communication services you’re most interested in (i.e. authenticating users, providing customer support, sending transactional messaging etc.)
Next, we’ll look at the experience for each account type.
Build customer relationships over every possible channel
Deliver true omnichannel experiences on the most robust platform.
GET STARTED GUIDE
The complete guide to getting started with Infobip
From signing up to creating your first engagements with customers – this guide will take you through the entire process of creating, using, and managing your own account.
Introduction
Eager to try out Infobip, but don’t know how or where to start?
It’s easy – especially if you follow this step-by-step guide to getting started with Infobip Portal.
What is Infobip Portal?
Infobip Portal is a digital communication solution that offers various channels for messaging third parties – depending on your needs.
The portal is intended for self use by business users and developers alike to manage messaging, accounts and account users, channels, solutions, and everything else to meet the demands of modern customer communication.
Why use Infobip Portal?
With Infobip Portal, you can quickly set up and manage your account to start sending messages in an instant.
Self-service is intended for clients who want the flexibility of a pre-paid account with no commitments, or who want to start engaging customers, fast.
Infobip offers a free trial to users, with no credit card required, to evaluate our service, channels and products to see if this is the right solution for your business needs.
Build customer relationships over every possible channel
Deliver true omnichannel experiences on the most robust platform.

PHONE AND EMAIL VERIFICATION GUIDE
Summary
Phone and email verification help you to keep costs low, ROI high, as well as you and your customers protected from fraud. Let’s recap some of the other key points of phone and email verification.
Verification vs validation
Two terms that are commonly used interchangeably are “verification and validation.” While the two are related, they are distinct.
Validating emails and numbers will deal more with the formatting, whereas verification deals with ownership.
Specifically, validation is the process of confirming a number or address is valid, whereas verification verifies the number or address is valid and belongs to an individual human recipient who has ownership and access to the number or email address in question.
Importance of verification
Verifying records protects both your business and your customers by standing as a first line of defense guarding against account takeovers and other forms of fraud.
It also ensures elevated CX by guaranteeing customers receive messages and can be kept in the loop throughout their customer journeys.
High ROI is another important part of verification by ensuring a more emails land in the appropriate inbox, get seen, and the desired customer actions taken.
By verifying phone numbers and email addresses, businesses excel at CX, keep ROI high,and fraudsters at bay.
Build customer relationships over every possible channel
Deliver true omnichannel experiences on the most robust platform.
PHONE AND EMAIL VERIFICATION GUIDE
Best practices for phone and email verification
Now that you understand what phone and email verification are, what the benefits are for you business, and how to implement each – it’s time to look at best practices when implementing these solutions.
Best practices for phone number verification
When collecting new customer numbers at signup, you will want to focus on three critical areas:
- Input: Collecting the number from the user
- Number validation: Ensuring the number is genuine
- Number verification: Ensuring that the customer has access to the number
Country code drop-down menu
To avoid any confusion, it’s best to put country codes in a dropdown menu next to the number collection field. This makes it easier to collect numbers in the recommended E.164 format.
Make sure locations match
Cross reference the country code with the IP address the user is signing up from. While mismatches could indicate legitimate practices (i.e. use of a VPN), it could also be indicative of fraudulent action.
(Re)format to E.164
We strongly recommend all phone numbers be formatted to the industry standard E.164 format.
Confirm numbers are valid
Users will sometimes intentionally enter incorrect data. Avoid this by checking number validity at signup with Number Lookup.
Detect line type
Avoid sending confirmation codes to numbers that are unable to receive them like landlines or SIPs.
OTP for user verification
Send a one-time PIN to users in order to verify they have access to the number they’re signing up with.
This prevents actors from signing up with someone else’s number and helps your business ensure that you are collecting a unique, authentic sign-up.
Use failover channels
If users are in an area with poor reception, they may not be able to receive your SMS or voice OTP.
Define rules and failover channels to ensure delivery of critical authentication codes – or use a solution that takes care of that for you.
Keep numbers editable throughout the customer journey
Sometimes customers enter the wrong number by mistake – maybe they missed a digit or entered their number neighbor.
Display the number they entered and give them the option of correcting any mistakes instead of waiting for an OTP they’ll never receive.
Customer channel preferences
Keep customers verified throughout their customer lifetime with you and store their preferred 2FA channels for quick and easy authentication.
Silent mobile verification
And keep customers protected with silent mobile verification always on in the background to seamlessly authenticate them and keep their account secure.
Best practices for email validation
These are some of the most common best practices to prevent email list contamination and maintaining proper email list hygiene.
Use real-time API
Verify emails for validity at signup using a real-time API email validation tool to minimize the risk of invalid emails entering your database.
This tool should check for mailbox and syntax validity, as well as whether the email is a catchall, temporary or role-based address.
Email double opt-in
Confirm that the person signing up to your service has access to the email address by sending them a single use code, or even a simple link.
Performing either action can ensure that the customer has access to the email address.
Keep code under the fold
When sending any code, take care to ensure that the code will not be visible in the email notification on a mobile device.
Potentially malicious users in possession of someone’s device may be able to see codes above the fold and use them for their nefarious purposes.
Periodically maintain email list hygiene
Keeping email subscriber lists clean by periodically performing bulk checks helps keep your costs down and, more importantly, your email sender reputation up.
We recommend cleaning lists at least twice yearly, or ahead of every big campaign. Remove any invalid, high bounce addresses from your lists.
Build customer relationships over every possible channel
Deliver true omnichannel experiences on the most robust platform.

PHONE AND EMAIL VERIFICATION GUIDE
Email verification
Email verification often gets confused with email validation – but validation is a component of the more complex process of verification. Read on to learn more!
What is email verification?
Email verification is the process of ensuring that email addresses you are given are authentic and connected to a real person are genuine, up to date, and reachable.
You can check emails at signup or at any point throughout the customer journey – ideally, before they’re committed to an email list.
But even when you have lists – you should periodically clean them.
This is because, on average, email lists decline by 22.5% each year due to natural subscriber attrition, when people leave companies or change their personal email addresses. Email experts suggest that your lists need to be maintained regularly.
Without regular email list verification, invalid and abandoned accounts will begin to accumulate in your database, resulting in bounce backs and your content not being read.
Why is email verification important?
There are a number of reasons why email verification is important. The first is fraud prevention.
A customer’s email address can serve as a piece of personally identifiable information, which can play a role in identity verification – and fraud prevention. Because of this, it’s important to verify that the user associated with the email address is in possession of and has access to the address. This can be achieved by sending the user a single-use code to help verify the person has access to the address being used at signup.
Next, you want to make sure that people are giving you their correct email address the first time. Unfortunately, this isn’t always the case. In older survey (from 2015), more than 60% of respondents said they will intentionally provide a fake email address.
This can be avoided by implementing email verification at signup to immediately spot incorrect email types.
Email verification at signup will also help to avoid pesky spam traps. These are email addresses used by mailbox providers and blocklist operators to identify senders who aren’t following best email practices. Getting caught in one of these traps can have critical, negative effects on your email sender authority.
Negative email sender authority could result in emails you send to customers landing in the dreaded spam box instead of the intended inbox. Customers will miss important emails, notifications, updates, offers, etc. resulting in lost opportunities, unhappy customers, and poor customer experience.
And last but not least important, verifying email addresses will help keep marketing ROI up. Since email is a cost-effective marketing channel, the cleaner your email lists are, the greater your marketing ROI will be. It should go without saying that emails sent to invalid addresses won’t result in conversions.
Benefits of email verification
There are a few key ways in which email verification benefits businesses. Let’s take a look at the main ones.
Database cleaning
Using email validation tools as a component of verification gives business a way to bulk clean invalid email records, or validate entries in real time.
Whether older email records naturally attritted or were incorrectly entered, email validation can help with both invalid record types.
Cost optimization
By verifying emails and cleaning databases of invalid or unreachable email addresses, businesses avoid the cost of sending to invalid addresses – and with yearly list degradation rates nearly one quarter, your savings are easy to calculate.
Fraud prevention
Email verficiation helps protect against sign-ups by bad actors by identifying patterns in naming, address age, and domain validity. Through timely identification of potential fraudulent actors, businesses can protect themselves and their customers.
How to verify emails
Email verification can be conducted in bulk by cleaning entire email lists – which experts recommend doing periodically due to natural email attrition – or live, one at a time.
Either way, email verification looks at email addresses for:
- Invalid and non-existent mailboxes
- Syntax errors
- Temporary email addresses
- Role-based emails
- Catch-all domains
Invalid and non-existent mailboxes
This method verifies email addresses before deploying messages by looking at the domain. Performing this check helps you to avoid hard bounces, preserve your sender reputation, and save money.
An example of an invalid or non-existent mailbox would be an incorrect domain, like @inbofip.com instead of @infobip.com.
Syntax errors
This step looks for errors in the email structure or format made by recipients. Here you can get suggestions for possible corrections.
An example would be “did you mean @infobip.com?”
Temporary email address
These are disposable, single use addresses set up for one-time events or for a limited time period. Identify these and remove them from your database to avoid triggering high bounce rates once they’re no longer in use.
Role-based domains
These are emails associated with a company, department or group of recipients instead of an individual.
Anyone signing up to your service with a [email protected] probably won’t be a single recipient. Remove these from your database to ensure data cleanliness.
Catch-all domains
These are email domains that accept all emails sent to them, regardless of whether the recipient’s address exists. It can lead to a higher risk of sending emails to non-existent or invalid addresses, harming your sender reputation.
Following these steps is a best practice for collecting emails at signup, checkout, or any other point of the customer journey – as well as for purging existing email lists of invalid contacts.
In the next chapter, we’ll look at some more best practices.
Build customer relationships over every possible channel
Deliver true omnichannel experiences on the most robust platform.
PHONE AND EMAIL VERIFICATION GUIDE
Phone verification
Phone verification is the process of verifying whether a specific phone number belongs to the person associated with a customer or user account. The process consists of a few different components and sub-processes. Read on to find out more!
What is phone verification?
Phone verification is defined as any of the processes involved in verifying the validity and availability of a number, or the identity of the phone number user.
Numbers can be verified in real-time by checking records in operator home location registries (HLR). These checks can provide detailed number status information – but the most important is whether the number is a valid one. Armed with this information, businesses can decide whether to engage in more in-depth verification.
In-depth verification methods involve user interaction. An example of verification requiring user interaction is common 2-factor authentication.
When signing up for a service, users will be sent a one-time PIN code to their number which they enter when prompted. This can serve as evidence to the service provider that the number is valid and that the device associated with the number is in the user’s possession.
OTP codes are most commonly associated with SMS messages. But there are various channels that businesses can use to ensure prompt delivery of verification codes, including:
- Voice – this is often the channel of choice for accessibility
- RCS
- Chat apps – WhatsApp, Viber, Zalo, KakaoTalk
Another method, and one that doesn’t require user interaction, is silent mobile verification, which works by cross referencing the number with mobile operator data.
This process doesn’t require any effort from the user other than consent – which is great for user experience. In addition to verifying the number, silent mobile verification can be used throughout the customer journey to authenticate actions. Additionally, silent mobile verification can be used as an added layer of security to check whether the SIM card is still in the device. A missing SIM card could be indicative of SIM swap fraud.
This brings us to SIM swap check, which further enhances number verification security. SIM swap check looks at operator records to see when the last MSISDN was paired with the IMEI. This is a step that helps ensure the user phone number and device are paired.
Why is number verification important?
Number verification is important since collecting and maintaining accurate customer contact databases is a basic requirement for any business looking to build and nurture lasting customer relationships.
If providing positive customer experiences is important to your company – then number validation should be, too.
Because your outreach is only as good as the information in your databases. By checking numbers in real-time at common customer entry points, you can be sure that every message you send customers will hit the mark – and save yourself the costly embarrassment of providing poor customer experience.
Ensuring a valid and verified number is attached to a customer record also helps properly identify customers throughout the customer journey. This helps businesses provide personalized, contextual customer service.
But verifying numbers is important for more than just providing smooth customer experience and personalized interactions.
Number verification can be used to boost security and keep you and your customers safe.
Businesses can protect their customers and themselves by requesting customers to authenticate actions in real-time for important transactions, i.e., cash withdrawals from ATMs abroad or account sign-ins from different geographic locations.
And of course – there’s cost. When businesses target large databases of numbers, they can reduce their overall costs by using number verification to target only numbers that are available. This helps to avoid the costs associated with messaging any invalid or inaccessible numbers.
From providing contextual customer experiences to cost optimization and boosting security for you and your customers, number verification is a must-have. But how do you get started?
How to do number verification
There are several ways to perform number verification. The fastest way to perform number verification in real time is using Number Lookup. This is an HLR-based check that verifies number validity against live operator records.
Number Lookup
When a customer enters their number, your system sends a request through a service provider and checks the number status against operator records. The results can indicate whether a number is correctly formatted, active, reachable – or simply invalid.
These checks can also be performed throughout the customer journey. For example, when making a withdrawal from an overseas ATM, it’s prudent to perform a check on the customer’s number to ensure their device is attached to a mobile network in that country.
OTP
Next is number verification via OTP. Once you’ve performed a check and found the number valid, you want to verify that it belongs to the customer.
Depending on the customer’s preferences, you can send them an OTP via SMS or RCS, as well as over chat apps like WhatsApp, Viber etc.
Silent mobile verification
When the customer receives the one-time pin code, they verify ownership and possession of the number by entering it when prompted.
You can continue performing number verification checks throughout the customer journey in an unobtrusive way with silent mobile verification. Silent mobile verification checks the number in the background, ensuring the user’s identity.
By verifying customers in the background, you keep them secure while also providing uninterrupted customer experiences.
Build customer relationships over every possible channel
Deliver true omnichannel experiences on the most robust platform.